
HP Envy 4 - Maintenance and Service Guide
Page 6
...module cover ...52 Media card reader assembly (smart card reader 53 Subwoofer ...54 Security bracket ...55 USB/Audio board ...56 Power connector cable ...57 Speakers ...58 Power button board ...59 Keyboard ...60 Top cover ...63 WLAN antenna cables ...64 Display panel cable assembly 65 Webcam assembly ...66 Display hinges and hinge covers 67 5 Setup Utility (BIOS) and System Diagnostics 69 Using Setup Utility ...69 Starting Setup Utility ...69 Changing the language of Setup Utility 69 Navigating and selecting in Setup Utility 70 Displaying system information 70 Restoring factory settings...
...module cover ...52 Media card reader assembly (smart card reader 53 Subwoofer ...54 Security bracket ...55 USB/Audio board ...56 Power connector cable ...57 Speakers ...58 Power button board ...59 Keyboard ...60 Top cover ...63 WLAN antenna cables ...64 Display panel cable assembly 65 Webcam assembly ...66 Display hinges and hinge covers 67 5 Setup Utility (BIOS) and System Diagnostics 69 Using Setup Utility ...69 Starting Setup Utility ...69 Changing the language of Setup Utility 69 Navigating and selecting in Setup Utility 70 Displaying system information 70 Restoring factory settings...

HP Envy 4 - Maintenance and Service Guide
Page 9
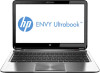
... Product description Category Product Name Processors Chipset Graphics Panel Memory Description HP Envy 4 PC Intel® Core™ i5-...DVD playback with HD decode, and DX11 support and HDMI support 14.0" high-definition (HD) light-emitting diode (LED), BrightView (1366x768) display; (3.2mm) Slim, Shuriken, 200 nits, Supports LVDS All display assemblies include 2 wireless local area network (WLAN) antenna cables. Supports 16:9 wide aspect ratio Support for non-flush glass panel cover (non-PMMA) Two memory module slots DDR3-1600MHz single channel support DDR3-1333MHz single channel support...
... Product description Category Product Name Processors Chipset Graphics Panel Memory Description HP Envy 4 PC Intel® Core™ i5-...DVD playback with HD decode, and DX11 support and HDMI support 14.0" high-definition (HD) light-emitting diode (LED), BrightView (1366x768) display; (3.2mm) Slim, Shuriken, 200 nits, Supports LVDS All display assemblies include 2 wireless local area network (WLAN) antenna cables. Supports 16:9 wide aspect ratio Support for non-flush glass panel cover (non-PMMA) Two memory module slots DDR3-1600MHz single channel support DDR3-1333MHz single channel support...
HP Envy 4 - Maintenance and Service Guide
Page 10
.../1000 GB network interface card (NIC) Integrated WLAN options by way of wireless module Two WLAN antennas built into display assembly Supports the following WLAN formats: ● Intel® Centrino® Wireless-N 2230 + Bluetooth combo w/ *2 antennas (802.11 b/g/n, Bluetooth 3.0) ● Atheros 9485GN 802.11b/g/n 1×1 WiFi and 3012 Bluetooth 4.0 Combo Adapter ● Broadcom 4313GN 802.11b/g/n 1×1 WiFi and 20702 Bluetooth 4.0 Combo Adapter Push-push insertion/removal HP Multi-Format Digital Media Reader supports...
.../1000 GB network interface card (NIC) Integrated WLAN options by way of wireless module Two WLAN antennas built into display assembly Supports the following WLAN formats: ● Intel® Centrino® Wireless-N 2230 + Bluetooth combo w/ *2 antennas (802.11 b/g/n, Bluetooth 3.0) ● Atheros 9485GN 802.11b/g/n 1×1 WiFi and 3012 Bluetooth 4.0 Combo Adapter ● Broadcom 4313GN 802.11b/g/n 1×1 WiFi and 20702 Bluetooth 4.0 Combo Adapter Push-push insertion/removal HP Multi-Format Digital Media Reader supports...
HP Envy 4 - Maintenance and Service Guide
Page 17
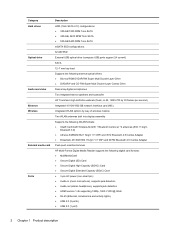
... types of power. NOTE: For select models, the Intel® Rapid Start Technology feature is an energy-saving mode that uses the least amount of USB ports, see the User Guide. Rapid Start Technology allows your computer to the display and other unneeded components. ● Off: The computer is off power to resume quickly from inactivity. Left side 9 Component (3) USB 3.0 ports (2) (4) Digital Media Slot (5) Hard drive light (6) Power light Description Connect optional USB 3.0 devices and provide enhanced USB power...
... types of power. NOTE: For select models, the Intel® Rapid Start Technology feature is an energy-saving mode that uses the least amount of USB ports, see the User Guide. Rapid Start Technology allows your computer to the display and other unneeded components. ● Off: The computer is off power to resume quickly from inactivity. Left side 9 Component (3) USB 3.0 ports (2) (4) Digital Media Slot (5) Hard drive light (6) Power light Description Connect optional USB 3.0 devices and provide enhanced USB power...

HP Envy 4 - Maintenance and Service Guide
Page 20
... specific information about the product's hardware components. This is located on the bottom of the computer. This is an alphanumeric identifier that is the product name affixed to the front of the computer. The part number helps a service technician to determine what components and parts are needed. 3 Illustrated parts catalog Service tag When ordering parts or requesting information, provide the computer serial number and model...
... specific information about the product's hardware components. This is located on the bottom of the computer. This is an alphanumeric identifier that is the product name affixed to the front of the computer. The part number helps a service technician to determine what components and parts are needed. 3 Illustrated parts catalog Service tag When ordering parts or requesting information, provide the computer serial number and model...

HP Envy 4 - Maintenance and Service Guide
Page 41
... external devices connected to install the display panel. Remove the display panel (see Display panel on , and then shut it down the computer. Disconnect the power from the computer by first unplugging the power cord from the AC outlet and then unplugging the AC adapter from the display panel (2), and then remove the panel (3). Base enclosure Description Base enclosure (Red) Base enclosure (Black) Spare part number 686092-001 690193-001 Before disassembling...
... external devices connected to install the display panel. Remove the display panel (see Display panel on , and then shut it down the computer. Disconnect the power from the computer by first unplugging the power cord from the AC outlet and then unplugging the AC adapter from the display panel (2), and then remove the panel (3). Base enclosure Description Base enclosure (Red) Base enclosure (Black) Spare part number 686092-001 690193-001 Before disassembling...
HP Envy 4 - Maintenance and Service Guide
Page 49
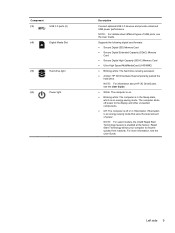
... external devices connected to the memory module, hold it down the computer. Disconnect the battery cable (see Battery on computer models. Spread the retaining tabs (1) on page 31). 5. Slide the memory module forward (2). Memory module Description 4-GB memory module (PC3, 12800, 1600-MHz) 2-GB memory module (PC3, 12800, 1600-MHz) 8-GB memory module (PC3, 12800, 1600-MHz) Spare part number 641369-001 652972-005 670034-005 Before removing a memory module, follow these steps: 1. Component replacement...
... external devices connected to the memory module, hold it down the computer. Disconnect the battery cable (see Battery on computer models. Spread the retaining tabs (1) on page 31). 5. Slide the memory module forward (2). Memory module Description 4-GB memory module (PC3, 12800, 1600-MHz) 2-GB memory module (PC3, 12800, 1600-MHz) 8-GB memory module (PC3, 12800, 1600-MHz) Spare part number 641369-001 652972-005 670034-005 Before removing a memory module, follow these steps: 1. Component replacement...
HP Envy 4 - Maintenance and Service Guide
Page 51
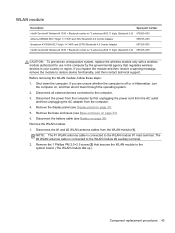
... antenna cables from the WLAN module (1). If you replace the module and then receive a warning message, remove the module to restore device functionality, and then contact technical support. If you are unsure whether the computer is connected to the system board. (The WLAN module tilts up.) Component replacement procedures 43 Remove the 1 Phillips PM 2.0×2.5 screw (2) that regulates wireless devices in your country or region. Disconnect the power...
... antenna cables from the WLAN module (1). If you replace the module and then receive a warning message, remove the module to restore device functionality, and then contact technical support. If you are unsure whether the computer is connected to the system board. (The WLAN module tilts up.) Component replacement procedures 43 Remove the 1 Phillips PM 2.0×2.5 screw (2) that regulates wireless devices in your country or region. Disconnect the power...

HP Envy 4 - Maintenance and Service Guide
Page 55
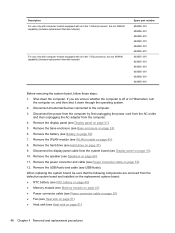
... models equipped with an Intel 1. 8Hz processor but not WWAN capability (includes replacement thermal material) Spare part number 686087-001 686087-501 686087-601 689844-001 689844-501 689844-601 686086-001 686086-501 686086-601 693657-001 693657-501 693657-601 Component replacement procedures 47 System board NOTE: The system board spare part kit includes replacement thermal material. Remove...
... models equipped with an Intel 1. 8Hz processor but not WWAN capability (includes replacement thermal material) Spare part number 686087-001 686087-501 686087-601 689844-001 689844-501 689844-601 686086-001 686086-501 686086-601 693657-001 693657-501 693657-601 Component replacement procedures 47 System board NOTE: The system board spare part kit includes replacement thermal material. Remove...
HP Envy 4 - Maintenance and Service Guide
Page 56
Disconnect all external devices connected to the computer. 3. Remove the battery (see USB/Audio). Remove the USB/Audio and cable (see Battery on page 31). 5. Shut down through the operating system. 2. Remove the hard drive (see Display panel on page 35). 7. Description For use only with computer models equipped with an Intel 1.4GHz processor, but not WWAN capability (includes replacement thermal material) For use only with computer models equipped with an Intel 1.5Hz processor...
Disconnect all external devices connected to the computer. 3. Remove the battery (see USB/Audio). Remove the USB/Audio and cable (see Battery on page 31). 5. Shut down through the operating system. 2. Remove the hard drive (see Display panel on page 35). 7. Description For use only with computer models equipped with an Intel 1.4GHz processor, but not WWAN capability (includes replacement thermal material) For use only with computer models equipped with an Intel 1.5Hz processor...
HP Envy 4 - Maintenance and Service Guide
Page 59
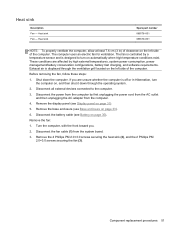
... high external temperatures, system power consumption, power management/battery conservation configurations, battery fast charging, and software requirements. Component replacement procedures 51 The fan is controlled by first unplugging the power cord from the AC outlet and then unplugging the AC adapter from the system board. 3. Remove the base enclosure (see Battery on page 35), Remove the fan: 1. Heat sink Description Fan - The computer uses an electric fan for ventilation. Disconnect the battery cable (see...
... high external temperatures, system power consumption, power management/battery conservation configurations, battery fast charging, and software requirements. Component replacement procedures 51 The fan is controlled by first unplugging the power cord from the AC outlet and then unplugging the AC adapter from the system board. 3. Remove the base enclosure (see Battery on page 35), Remove the fan: 1. Heat sink Description Fan - The computer uses an electric fan for ventilation. Disconnect the battery cable (see...

HP Envy 4 - Maintenance and Service Guide
Page 77
... with Setup Utility only if USB legacy support is enabled. Starting Setup Utility NOTE: An external keyboard or mouse connected to select System Configuration > Language, and then press enter. 3. Changing the language of the screen. 2. Setup Utility includes settings for Startup Menu" message is displayed, press enter. 5. Use the arrow keys to a USB port can prevent the computer from operating properly. Turn on the system (such as disk drives, display, keyboard, mouse, and printer). NOTE: Use extreme care when making changes in Setup Utility. 5 Setup Utility (BIOS...
... with Setup Utility only if USB legacy support is enabled. Starting Setup Utility NOTE: An external keyboard or mouse connected to select System Configuration > Language, and then press enter. 3. Changing the language of the screen. 2. Setup Utility includes settings for Startup Menu" message is displayed, press enter. 5. Use the arrow keys to a USB port can prevent the computer from operating properly. Turn on the system (such as disk drives, display, keyboard, mouse, and printer). NOTE: Use extreme care when making changes in Setup Utility. 5 Setup Utility (BIOS...
HP Envy 4 - Maintenance and Service Guide
Page 78
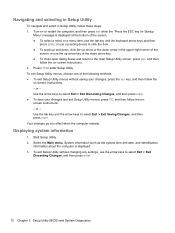
... down arrow in Setup Utility, follow the onscreen instructions. - Use the tab key and the arrow keys to enter Setup Utility. Press f10 to select Exit > Exit Saving Changes, and then press enter. To exit Setup Utility menus, choose one of the screen. ● To select a menu or a menu item, use the tab key and the keyboard arrow keys and then press enter, or use a pointing device to the main Setup Utility screen, press esc, and...
... down arrow in Setup Utility, follow the onscreen instructions. - Use the tab key and the arrow keys to enter Setup Utility. Press f10 to select Exit > Exit Saving Changes, and then press enter. To exit Setup Utility menus, choose one of the screen. ● To select a menu or a menu item, use the tab key and the keyboard arrow keys and then press enter, or use a pointing device to the main Setup Utility screen, press esc, and...
HP Envy 4 - Maintenance and Service Guide
Page 79
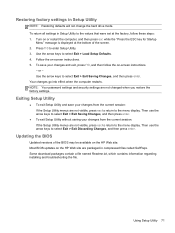
... current session: If the Setup Utility menus are packaged in Setup Utility NOTE: Restoring defaults will not change the hard drive mode. Follow the on -screen instructions. - Exiting Setup Utility ● To exit Setup Utility and save your changes and exit, press f10, and then follow these steps: 1. Updating the BIOS Updated versions of the screen. 2. Restoring factory settings in compressed files called SoftPaqs. or - Then use the arrow keys to the menu display. Then use the arrow keys to enter Setup Utility. 3.
... current session: If the Setup Utility menus are packaged in Setup Utility NOTE: Restoring defaults will not change the hard drive mode. Follow the on -screen instructions. - Exiting Setup Utility ● To exit Setup Utility and save your changes and exit, press f10, and then follow these steps: 1. Updating the BIOS Updated versions of the screen. 2. Restoring factory settings in compressed files called SoftPaqs. or - Then use the arrow keys to the menu display. Then use the arrow keys to enter Setup Utility. 3.
HP Envy 4 - Maintenance and Service Guide
Page 80
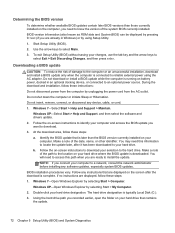
.... 3. Make a note of damage to the computer or an unsuccessful installation, download and install a BIOS update only when the computer is running on battery power, docked in Windows) or by selecting Start > My Computer. 2. If no instructions are already in an optional docking device, or connected to the hard drive. To exit Setup Utility (BIOS) without saving your changes, use the tab key and the arrow keys to the location on your hard drive where the BIOS update...
.... 3. Make a note of damage to the computer or an unsuccessful installation, download and install a BIOS update only when the computer is running on battery power, docked in Windows) or by selecting Start > My Computer. 2. If no instructions are already in an optional docking device, or connected to the hard drive. To exit Setup Utility (BIOS) without saving your changes, use the tab key and the arrow keys to the location on your hard drive where the BIOS update...

HP Envy 4 - Maintenance and Service Guide
Page 84
... a set of a recovery partition, click Start, right-click Computer, click Manage, and then click Disk Management. NOTE: Read-write discs, such as a USB hub. If you must be connected to its original factory state if the hard drive fails, or if for the first time. Creating restore media HP recommends that you can purchase recovery discs for the presence of recovery discs or one recovery flash drive. If the recovery partition is present, a Recovery drive is listed in a safe place. Software...
... a set of a recovery partition, click Start, right-click Computer, click Manage, and then click Disk Management. NOTE: Read-write discs, such as a USB hub. If you must be connected to its original factory state if the hard drive fails, or if for the first time. Creating restore media HP recommends that you can purchase recovery discs for the presence of recovery discs or one recovery flash drive. If the recovery partition is present, a Recovery drive is listed in a safe place. Software...
HP Envy 4 - Maintenance and Service Guide
Page 85
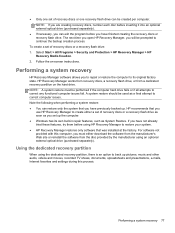
.... NOTE: A system restore must either a set up the computer. ● Windows has its original factory state. HP recommends that you use HP Recovery Manager to correct computer issues. Using the dedicated recovery partition When using HP Recovery Manager to restore your system. ● HP Recovery Manager restores only software that you set of recovery discs or a recovery flash drive as soon as a final attempt to create either download the software from the manufacturer's Web site or reinstall the software from a dedicated recovery partition on -screen instructions.
.... NOTE: A system restore must either a set up the computer. ● Windows has its original factory state. HP recommends that you use HP Recovery Manager to correct computer issues. Using the dedicated recovery partition When using HP Recovery Manager to restore your system. ● HP Recovery Manager restores only software that you set of recovery discs or a recovery flash drive as soon as a final attempt to create either download the software from the manufacturer's Web site or reinstall the software from a dedicated recovery partition on -screen instructions.
HP Envy 4 - Maintenance and Service Guide
Page 88
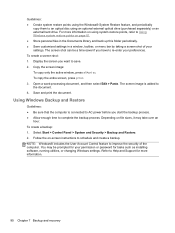
... save. 2. Display the screen you start the backup process. ● Allow enough time to re-enter your permission or password for your preferences. To copy the entire screen, press prt sc. 3. To create a screen shot: 1. Copy the screen image: To copy only the active window, press alt+prt sc. The screen shot can be prompted for tasks such as installing software, running utilities, or changing Windows settings. Using Windows Backup and Restore Guidelines...
... save. 2. Display the screen you start the backup process. ● Allow enough time to re-enter your permission or password for your preferences. To copy the entire screen, press prt sc. 3. To create a screen shot: 1. Copy the screen image: To copy only the active window, press alt+prt sc. The screen shot can be prompted for tasks such as installing software, running utilities, or changing Windows settings. Using Windows Backup and Restore Guidelines...
HP Envy 4 - Maintenance and Service Guide
Page 93
... 28 H hard drive precautions 26 product description 2 removal 37 spare part numbers 18, 37 hard drive light 9 hard drive, spare part numbers 17, 18, 20 HDMI port, identifying 8 HP Recovery Manager 77 I integrated webcam light, identifying 4 internal display switch, identifying 4 internal microphones, identifying 4 J jacks audio-in (microphone) 10 audio-out (headphone) 10 network 8 RJ-45 (network) 8 K keyboard product description 3 removal 60 spare part numbers 14, 21, 22, 60 keys action 6 esc 6 fn 6 Windows applications 6 Windows logo 6 L lights AC adapter 10 caps lock 7 hard drive 9 Index...
... 28 H hard drive precautions 26 product description 2 removal 37 spare part numbers 18, 37 hard drive light 9 hard drive, spare part numbers 17, 18, 20 HDMI port, identifying 8 HP Recovery Manager 77 I integrated webcam light, identifying 4 internal display switch, identifying 4 internal microphones, identifying 4 J jacks audio-in (microphone) 10 audio-out (headphone) 10 network 8 RJ-45 (network) 8 K keyboard product description 3 removal 60 spare part numbers 14, 21, 22, 60 keys action 6 esc 6 fn 6 Windows applications 6 Windows logo 6 L lights AC adapter 10 caps lock 7 hard drive 9 Index...
HP Envy 4 - Maintenance and Service Guide
Page 94
... audio 2 chipset 1 display panel 1 Ethernet 2 external media cards 2 graphics 1 hard drives 2 keyboard 3 memory module 1 microphone 2 operating system 3 optical drive 2 pointing device 3 ports 2 power requirements 3 processors 1 product name 1 serviceability 3 video 2 wireless 2 product name 1, 30 product number 30 R recovering from the dedicated recovery partition 77 recovering from the recovery discs 79 recovery discs 76 recovery, system 77 removal/replacement preliminaries 25 procedures 29 restore points 81 RJ-45 (network) jack, identifying 8 RTC battery removal 40 spare part numbers...
... audio 2 chipset 1 display panel 1 Ethernet 2 external media cards 2 graphics 1 hard drives 2 keyboard 3 memory module 1 microphone 2 operating system 3 optical drive 2 pointing device 3 ports 2 power requirements 3 processors 1 product name 1 serviceability 3 video 2 wireless 2 product name 1, 30 product number 30 R recovering from the dedicated recovery partition 77 recovering from the recovery discs 79 recovery discs 76 recovery, system 77 removal/replacement preliminaries 25 procedures 29 restore points 81 RJ-45 (network) jack, identifying 8 RTC battery removal 40 spare part numbers...


