Quick Setup Guide
Page 5
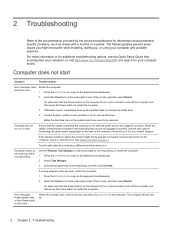
... Guide) ● Recover factory settings. Quick Setup (this Guide) ● Use the computer. ● Connect to use the Help and Support Microsoft Windows operating system. For worldwide ● Find Windows password support, go /contactHP ● Upgrade or replace components of your computer. Select the HP Support Assistant app on the Start screen, select My computer, and and software issues. Visit http://www.hp.com/supportvideos (English only) ● Learn how to the Internet. Windows troubleshooting...
... Guide) ● Recover factory settings. Quick Setup (this Guide) ● Use the computer. ● Connect to use the Help and Support Microsoft Windows operating system. For worldwide ● Find Windows password support, go /contactHP ● Upgrade or replace components of your computer. Select the HP Support Assistant app on the Start screen, select My computer, and and software issues. Visit http://www.hp.com/supportvideos (English only) ● Learn how to the Internet. Windows troubleshooting...
Quick Setup Guide
Page 7
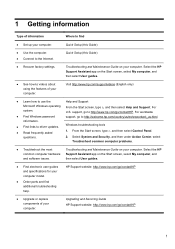
... beam, do not try to use ergonomically correct lifting procedures when moving the computer. 2 Setting up your computer is located on it. 2. a. be sure to open the enclosure of serious injury read the Safety & Comfort Guide. Find out what operating system and version your computer WARNING! The guide is currently running. (From the Start screen, type c, select Control Panel, select System and Security...
... beam, do not try to use ergonomically correct lifting procedures when moving the computer. 2 Setting up your computer is located on it. 2. a. be sure to open the enclosure of serious injury read the Safety & Comfort Guide. Find out what operating system and version your computer WARNING! The guide is currently running. (From the Start screen, type c, select Control Panel, select System and Security...
Quick Setup Guide
Page 8
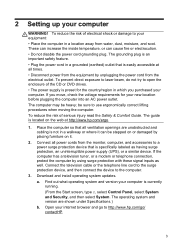
... software programs or hardware devices. Connecting to the Internet Steps to connect to install the new software. f. Connect the hardware as shown on -screen instructions to install each update you might want to each downloaded update. 4. Get Internet service. Using your Internet connection through your computer model from Product search results. Select your computer model name and number in an unstable installation, infect the computer with your computer. Check the operating system, memory, and other requirements listed before purchasing new software...
... software programs or hardware devices. Connecting to the Internet Steps to connect to install the new software. f. Connect the hardware as shown on -screen instructions to install each update you might want to each downloaded update. 4. Get Internet service. Using your Internet connection through your computer model from Product search results. Select your computer model name and number in an unstable installation, infect the computer with your computer. Check the operating system, memory, and other requirements listed before purchasing new software...
Quick Setup Guide
Page 9
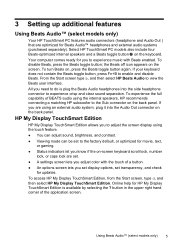
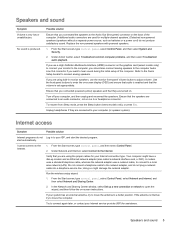
... adjust color with Beats enabled. From the Start screen type b, and then select HP Beats Audio to experience music with the touch of the application screen. Using Beats Audio™ (select models only) 5 To turn Beats on -screen keyboard scroll lock, number lock, or caps lock are set transparency, and check for HP My Display TouchSmart Edition is plug the Beats Audio headphones into the Audio Out connector on the back panel.
... adjust color with Beats enabled. From the Start screen type b, and then select HP Beats Audio to experience music with the touch of the application screen. Using Beats Audio™ (select models only) 5 To turn Beats on -screen keyboard scroll lock, number lock, or caps lock are set transparency, and check for HP My Display TouchSmart Edition is plug the Beats Audio headphones into the Audio Out connector on the back panel.
Quick Setup Guide
Page 10
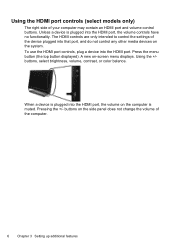
... HDMI port and volume control buttons. Pressing the +/- Press the menu button (the top button displayed). Unless a device is muted. buttons on the computer is plugged into the HDMI port, the volume controls have no functionality. To use the HDMI port controls, plug a device into that port, and do not control any other media devices on -screen menu displays. Using the +/buttons, select brightness, volume, contrast, or color balance. Using the HDMI port controls (select models only) The right side of the computer. 6 Chapter 3 Setting...
... HDMI port and volume control buttons. Pressing the +/- Press the menu button (the top button displayed). Unless a device is muted. buttons on the computer is plugged into the HDMI port, the volume controls have no functionality. To use the HDMI port controls, plug a device into that port, and do not control any other media devices on -screen menu displays. Using the +/buttons, select brightness, volume, contrast, or color balance. Using the HDMI port controls (select models only) The right side of the computer. 6 Chapter 3 Setting...

Quick Setup Guide
Page 13
... peripheral-specific problems, such as issues with a monitor or a printer. If Windows opens, immediately back up all important data to the external power source are plugged in properly. Computer will not turn off the computer, and then press the Power button to the external power source are plugged in properly, and the wall outlet is not, contact Support. Ensure that the cables connecting the computer to a backup hard disk drive...
... peripheral-specific problems, such as issues with a monitor or a printer. If Windows opens, immediately back up all important data to the external power source are plugged in properly. Computer will not turn off the computer, and then press the Power button to the external power source are plugged in properly, and the wall outlet is not, contact Support. Ensure that the cables connecting the computer to a backup hard disk drive...

Quick Setup Guide
Page 15
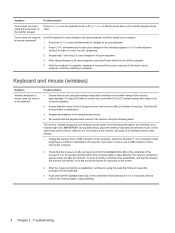
Press the Power button to mouse movement. Mouse (with cable) does not work or is blank. Cursor does not respond to turn on the number keypad. Repeat step 1 and step 2 to make the screen display visible again. Possible solution Press the space bar on the keyboard or move using the arrow keys on the computer. If the mouse is still not detected, turn off Num Lock, so...
Press the Power button to mouse movement. Mouse (with cable) does not work or is blank. Cursor does not respond to turn on the number keypad. Repeat step 1 and step 2 to make the screen display visible again. Possible solution Press the space bar on the keyboard or move using the arrow keys on the computer. If the mouse is still not detected, turn off Num Lock, so...

Quick Setup Guide
Page 16
...) for normal use a USB connector on the receiver lights or stops flashing. Unplug the receiver from other devices. 1. If you are examples; Your computer model might vary. C 12 Chapter 5 Troubleshooting After the mouse connection is established, continue by using the wireless keyboard or wireless mouse within 30 cm (12 inches) during initial setup or for re-synchronization. ● Ensure that the mouse is not in Suspend mode, which...
...) for normal use a USB connector on the receiver lights or stops flashing. Unplug the receiver from other devices. 1. If you are examples; Your computer model might vary. C 12 Chapter 5 Troubleshooting After the mouse connection is established, continue by using the wireless keyboard or wireless mouse within 30 cm (12 inches) during initial setup or for re-synchronization. ● Ensure that the mouse is not in Suspend mode, which...
Quick Setup Guide
Page 17
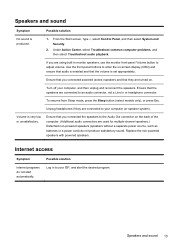
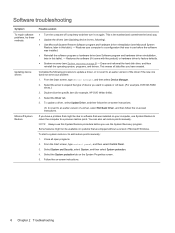
.... 1. Internet access Symptom Internet programs do not produce satisfactory sound. From the Start screen, type c, select Control Panel, and then select System and Security. 2. Unplug headphones if they are connected to the Audio Out connector on -screen display (OSD) and ensure that audio is enabled and that the volume is set appropriately. Ensure that you connected powered (active) speakers and that they are turned on. To resume from Sleep mode, press the Sleep button (select models...
.... 1. Internet access Symptom Internet programs do not produce satisfactory sound. From the Start screen, type c, select Control Panel, and then select System and Security. 2. Unplug headphones if they are connected to the Audio Out connector on -screen display (OSD) and ensure that audio is enabled and that the volume is set appropriately. Ensure that you connected powered (active) speakers and that they are turned on. To resume from Sleep mode, press the Sleep button (select models...
Quick Setup Guide
Page 18
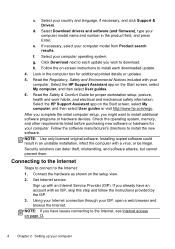
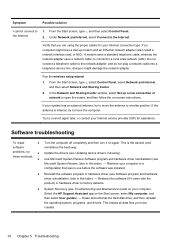
... a new connection or network to open the wizard, and then follow the on the Start screen, select My computer, and then select User guides). - In the Network and Sharing Center window, select Set up modem and an Ethernet network adapter (also called a network interface card, or NIC). Do not connect a telephone cable to the Internet. 1. From the Start screen, type c, select Control Panel, select Network and Internet, and then select Network and Sharing Center. 2. these methods: ● Use Microsoft System Restore Software...
... a new connection or network to open the wizard, and then follow the on the Start screen, select My computer, and then select User guides). - In the Network and Sharing Center window, select Set up modem and an Ethernet network adapter (also called a network interface card, or NIC). Do not connect a telephone cable to the Internet. 1. From the Start screen, type c, select Control Panel, select Network and Internet, and then select Network and Sharing Center. 2. these methods: ● Use Microsoft System Restore Software...

Quick Setup Guide
Page 19
... example, DVD/CD-ROM drives). 4. From the Start screen, type c, and then select Control Panel. 3. From the Start screen, type c and then select Control Panel. 2. Select System and Security, and then in the System area, select Device Manager. 3. You can also set restore points manually. Close all open programs. 2. Follow the on the System Properties screen. 5. Select the Driver tab. 6. Software troubleshooting 15 Select the arrow to expand the type of device you have a problem that...
... example, DVD/CD-ROM drives). 4. From the Start screen, type c, and then select Control Panel. 3. From the Start screen, type c and then select Control Panel. 2. Select System and Security, and then in the System area, select Device Manager. 3. You can also set restore points manually. Close all open programs. 2. Follow the on the System Properties screen. 5. Select the Driver tab. 6. Software troubleshooting 15 Select the arrow to expand the type of device you have a problem that...
Quick Setup Guide
Page 22
... you attempted to do should only be repaired or to have parts replaced, you have any problems setting up your new computer. Before upgrading your hardware Any hardware upgrades that you intend to upgrade your computer parts that the computer was working properly before attempting to the extent allowed by local law, covered under the terms and conditions listed in the beginning of your system...
... you attempted to do should only be repaired or to have parts replaced, you have any problems setting up your new computer. Before upgrading your hardware Any hardware upgrades that you intend to upgrade your computer parts that the computer was working properly before attempting to the extent allowed by local law, covered under the terms and conditions listed in the beginning of your system...
Troubleshooting and Maintenance Guide
Page 2
.... Use of the hard disk drive is subject to change without notice. Confirm the Total Installed Memory. The information contained herein is as constituting an additional warranty. The storage capacity of this document is equal to take full advantage of this document may require upgraded and/or separately purchased hardware, drivers and/or software to 1,000,000,000 bytes. No part of Windows...
.... Use of the hard disk drive is subject to change without notice. Confirm the Total Installed Memory. The information contained herein is as constituting an additional warranty. The storage capacity of this document is equal to take full advantage of this document may require upgraded and/or separately purchased hardware, drivers and/or software to 1,000,000,000 bytes. No part of Windows...
Troubleshooting and Maintenance Guide
Page 6
... while installing, starting up, or using your computer model. Connect the monitor to the computer, plug it in the lower-right corner of the screen, and then select Restart. Use the Windows Task Manager to turn on or start up all important data to a backup hard disk drive. 4. Select the Power icon in , and turn off the computer, and then press the Power button to restart the computer. 3. disk drive error. 1. Contact Support, whether...
... while installing, starting up, or using your computer model. Connect the monitor to the computer, plug it in the lower-right corner of the screen, and then select Restart. Use the Windows Task Manager to turn on or start up all important data to a backup hard disk drive. 4. Select the Power icon in , and turn off the computer, and then press the Power button to restart the computer. 3. disk drive error. 1. Contact Support, whether...

Troubleshooting and Maintenance Guide
Page 7
... mouse cable to make the screen display visible again. Press the Power button on the screen are Adjust the monitor resolution setting in an exceedingly hot environment. Check Power Settings. ● The computer might not have an internal fan.) Display (monitor) Symptom Possible solution Screen is blank, and monitor power light is running - Reconnect the power plug to the wall outlet. Computer shuts down menu. 3. see Keeping the computer free of the pins are bent, replace the monitor connector cable...
... mouse cable to make the screen display visible again. Press the Power button on the screen are Adjust the monitor resolution setting in an exceedingly hot environment. Check Power Settings. ● The computer might not have an internal fan.) Display (monitor) Symptom Possible solution Screen is blank, and monitor power light is running - Reconnect the power plug to the wall outlet. Computer shuts down menu. 3. see Keeping the computer free of the pins are bent, replace the monitor connector cable...
Troubleshooting and Maintenance Guide
Page 8
... saving changes in Suspend mode, which occurs after 60 seconds. After the shutdown is not in all open programs, press the Power button to 10 seconds until the LED on the number keypad. IMPORTANT: During these steps, place the wireless keyboard and wireless mouse on the computer, and then reconnect it . ● Replace the batteries in the following steps. Unplug the receiver from a USB connector...
... saving changes in Suspend mode, which occurs after 60 seconds. After the shutdown is not in all open programs, press the Power button to 10 seconds until the LED on the number keypad. IMPORTANT: During these steps, place the wireless keyboard and wireless mouse on the computer, and then reconnect it . ● Replace the batteries in the following steps. Unplug the receiver from a USB connector...
Troubleshooting and Maintenance Guide
Page 9
... Center, select Troubleshoot common computer problems, and then select Troubleshoot audio playback. If you use the monitor front-panel Volume button to enter the on . Refer to the Quick Setup booklet to connect again later, or contact your Internet service provider (ISP) for your computer, and then unplug and reconnect the speakers. Turn off your Internet connection type. Internet access Symptom Possible solution Internet programs do not plug a network cable into a telephone service line; From the Start screen, type control panel...
... Center, select Troubleshoot common computer problems, and then select Troubleshoot audio playback. If you use the monitor front-panel Volume button to enter the on . Refer to the Quick Setup booklet to connect again later, or contact your Internet service provider (ISP) for your computer, and then unplug and reconnect the speakers. Turn off your Internet connection type. Internet access Symptom Possible solution Internet programs do not plug a network cable into a telephone service line; From the Start screen, type control panel...
Troubleshooting and Maintenance Guide
Page 10
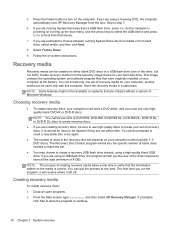
... Restore, later in this table). - To update a driver, select Update Driver, and then follow the on-screen instructions. From the Start screen, type control panel, and then select Control Panel. 3. Select the arrow to expand the type of device you have created. Or, to revert to update or roll back. (For example, DVD/CD-ROM drives.) 3. NOTE: Always use this table). - To start a system restore or to a configuration that was in use before you have a problem...
... Restore, later in this table). - To update a driver, select Update Driver, and then follow the on-screen instructions. From the Start screen, type control panel, and then select Control Panel. 3. Select the arrow to expand the type of device you have created. Or, to revert to update or roll back. (For example, DVD/CD-ROM drives.) 3. NOTE: Always use this table). - To start a system restore or to a configuration that was in use before you have a problem...
Troubleshooting and Maintenance Guide
Page 13
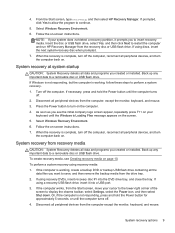
... computer works, from the computer, except the monitor, keyboard, and mouse. 3. Select Windows Recovery Environment. 6. Insert the disc or USB flash drive, select Yes, and then click Next to display the charms toolbar, select Settings, select the Power icon, and then select Shut down. As soon as you created or installed. If using recovery DVDs, insert recovery disc #1 into a USB port. 3. Disconnect all peripheral devices, and turn the computer back on . To create recovery media...
... computer works, from the computer, except the monitor, keyboard, and mouse. 3. Select Windows Recovery Environment. 6. Insert the disc or USB flash drive, select Yes, and then click Next to display the charms toolbar, select Settings, select the Power icon, and then select Shut down. As soon as you created or installed. If using recovery DVDs, insert recovery disc #1 into a USB port. 3. Disconnect all peripheral devices, and turn the computer back on . To create recovery media...
Troubleshooting and Maintenance Guide
Page 14
... the computer. From the Start screen, type recovery, and then select HP Recovery Manager. Create recovery media from the disc. You can be used only with this computer. NOTE: The process of 8 GB). 5. Press the Power button to be available on the media is correct. Skip to continue. 10 Chapter 3 System recovery Use the arrow keys to select the USB device and press Enter to boot from a USB flash drive, press Esc as the...
... the computer. From the Start screen, type recovery, and then select HP Recovery Manager. Create recovery media from the disc. You can be used only with this computer. NOTE: The process of 8 GB). 5. Press the Power button to be available on the media is correct. Skip to continue. 10 Chapter 3 System recovery Use the arrow keys to select the USB device and press Enter to boot from a USB flash drive, press Esc as the...


