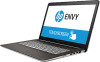
Maintenance and Service Guide 1
Page 2
... editions or versions of USB Implementers Forum. If you switch out of Windows functionality. Windows is automatically updated, which is a trademark owned by HP Inc. See http://www.microsoft.com. Software terms By installing, copying, downloading, or otherwise using any further information or to S Mode. and/or other countries. Certain default settings, features, and apps cannot be liable for HP products and services are common to...
... editions or versions of USB Implementers Forum. If you switch out of Windows functionality. Windows is automatically updated, which is a trademark owned by HP Inc. See http://www.microsoft.com. Software terms By installing, copying, downloading, or otherwise using any further information or to S Mode. and/or other countries. Certain default settings, features, and apps cannot be liable for HP products and services are common to...
Maintenance and Service Guide 1
Page 4
... ...4 Locating software...4 Right side ...4 Left side ...5 Display ...6 Low blue light mode (select products only) ...6 Keyboard area...7 Touchpad settings and components ...8 Touchpad settings ...8 Adjusting touchpad settings ...8 Turning on the touchpad ...8 Touchpad components ...8 Lights ...9 Button and speakers...10 Special keys ...11 Action keys...13 HP Hubs Launcher (select products only) ...14 Bottom ...14 Labels...15 3 Illustrated parts catalog ...18 Computer major components...18 Display assembly subcomponents...20 Cables...21 Miscellaneous parts...22 4 Removal and replacement...
... ...4 Locating software...4 Right side ...4 Left side ...5 Display ...6 Low blue light mode (select products only) ...6 Keyboard area...7 Touchpad settings and components ...8 Touchpad settings ...8 Adjusting touchpad settings ...8 Turning on the touchpad ...8 Touchpad components ...8 Lights ...9 Button and speakers...10 Special keys ...11 Action keys...13 HP Hubs Launcher (select products only) ...14 Bottom ...14 Labels...15 3 Illustrated parts catalog ...18 Computer major components...18 Display assembly subcomponents...20 Cables...21 Miscellaneous parts...22 4 Removal and replacement...

Maintenance and Service Guide 1
Page 5
... Battery ...34 Memory modules...35 WLAN module ...37 Solid-state drive ...39 Heat sink ...40 Fan assembly ...41 Display assembly panel ...43 Power connector cable ...44 System board...44 IR board...47 Speakers ...48 Hall sensor board...50 Touchpad ...51 RJ-45 door ...52 Display assembly...53 Keyboard with top cover...57 6 Using Setup Utility (BIOS) ...59 Starting Setup Utility (BIOS) ...59 Updating Setup Utility (BIOS) ...59 Determining the BIOS version ...59 Preparing for a BIOS update ...60 Downloading a BIOS update ...60 Installing a BIOS update ...60 7 Computer Setup (BIOS), TPM, and HP...
... Battery ...34 Memory modules...35 WLAN module ...37 Solid-state drive ...39 Heat sink ...40 Fan assembly ...41 Display assembly panel ...43 Power connector cable ...44 System board...44 IR board...47 Speakers ...48 Hall sensor board...50 Touchpad ...51 RJ-45 door ...52 Display assembly...53 Keyboard with top cover...57 6 Using Setup Utility (BIOS) ...59 Starting Setup Utility (BIOS) ...59 Updating Setup Utility (BIOS) ...59 Determining the BIOS version ...59 Preparing for a BIOS update ...60 Downloading a BIOS update ...60 Installing a BIOS update ...60 7 Computer Setup (BIOS), TPM, and HP...
Maintenance and Service Guide 1
Page 6
... Installing HP PC Hardware Diagnostics Windows 71 Using HP PC Hardware Diagnostics UEFI ...71 Using an HP PC Hardware Diagnostics UEFI hardware failure ID code 71 Starting HP PC Hardware Diagnostics UEFI...71 Downloading HP PC Hardware Diagnostics UEFI to a USB flash drive 72 Downloading the latest HP PC Hardware Diagnostics UEFI version 72 Downloading HP PC Hardware Diagnostics UEFI by product name or number (select products only)..........72 Using Remote HP PC Hardware Diagnostics UEFI settings (select products only 73 Downloading Remote HP...
... Installing HP PC Hardware Diagnostics Windows 71 Using HP PC Hardware Diagnostics UEFI ...71 Using an HP PC Hardware Diagnostics UEFI hardware failure ID code 71 Starting HP PC Hardware Diagnostics UEFI...71 Downloading HP PC Hardware Diagnostics UEFI to a USB flash drive 72 Downloading the latest HP PC Hardware Diagnostics UEFI version 72 Downloading HP PC Hardware Diagnostics UEFI by product name or number (select products only)..........72 Using Remote HP PC Hardware Diagnostics UEFI settings (select products only 73 Downloading Remote HP...
Maintenance and Service Guide 1
Page 13
... the card into the memory card reader, and then press in on headphones, earbuds, or a headset. To reduce the risk of personal injury, adjust the volume before putting on the card, and then remove it is connected to know your computer This jack does not support optional standalone microphones. NOTE: Use a standard USB Type-A charging cable or cable adapter (purchased separately) when charging a small external device. (3) Audio-out (headphone)/Audio-in Sleep mode. To insert a card: 1. NOTE: When a device...
... the card into the memory card reader, and then press in on headphones, earbuds, or a headset. To reduce the risk of personal injury, adjust the volume before putting on the card, and then remove it is connected to know your computer This jack does not support optional standalone microphones. NOTE: Use a standard USB Type-A charging cable or cable adapter (purchased separately) when charging a small external device. (3) Audio-out (headphone)/Audio-in Sleep mode. To insert a card: 1. NOTE: When a device...
Maintenance and Service Guide 1
Page 40
...: Details about supported parts for disassembly To remove and replace computer components, use in Hibernation, turn the computer on -screen instructions. NOTE: HP continually improves and changes product parts. Disconnect all external devices from the computer. 3. 5 Removal and replacement procedures for authorized service provider parts This chapter provides removal and replacement procedures for authorized service provider parts 33 IMPORTANT: Only an authorized service provider should access the components described in this chapter. Make special note...
...: Details about supported parts for disassembly To remove and replace computer components, use in Hibernation, turn the computer on -screen instructions. NOTE: HP continually improves and changes product parts. Disconnect all external devices from the computer. 3. 5 Removal and replacement procedures for authorized service provider parts This chapter provides removal and replacement procedures for authorized service provider parts 33 IMPORTANT: Only an authorized service provider should access the components described in this chapter. Make special note...
Maintenance and Service Guide 1
Page 45
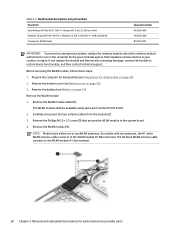
... secures the WLAN module to restore device functionality, and then contact technical support. The #2 black WLAN antenna cable connects to the WLAN module #1 Aux terminal. 38 Chapter 5 Removal and replacement procedures for disassembly on page 34). Prepare the computer for disassembly (see Preparation for authorized service provider parts The WLAN module shield is available using spare part number N10779-001. 2. Remove the WLAN module (4). On models with a wireless module authorized for use in your country...
... secures the WLAN module to restore device functionality, and then contact technical support. The #2 black WLAN antenna cable connects to the WLAN module #1 Aux terminal. 38 Chapter 5 Removal and replacement procedures for disassembly on page 34). Prepare the computer for disassembly (see Preparation for authorized service provider parts The WLAN module shield is available using spare part number N10779-001. 2. Remove the WLAN module (4). On models with a wireless module authorized for use in your country...
Maintenance and Service Guide 1
Page 52
...). 4. Remove the battery (see Heat sink on page 41). Remove the fans (see Preparation for disassembly (see Fan assembly on page 40). 5. Prepare the computer for disassembly on page 43). Remove the bottom cover (see Display assembly panel on page 33). 2. Identify the following components (as applicable) from the system board: ● Webcam cable (1) ● Power connector cable (2) ● IR board cable (ZIF) (3) System board 45 IMPORTANT: After replacing the...
...). 4. Remove the battery (see Heat sink on page 41). Remove the fans (see Preparation for disassembly (see Fan assembly on page 40). 5. Prepare the computer for disassembly on page 43). Remove the bottom cover (see Display assembly panel on page 33). 2. Identify the following components (as applicable) from the system board: ● Webcam cable (1) ● Power connector cable (2) ● IR board cable (ZIF) (3) System board 45 IMPORTANT: After replacing the...
Maintenance and Service Guide 1
Page 61
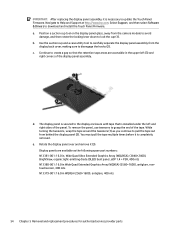
... cover, making sure to disengage the hooks (2). The display panel is secured to the display enclosure with tape that the retention tape areas are available as you continue to lock the cup (1). Navigate to update the Touch Panel Firmware. e. Display panels are accessible in WQXGA (2560×1600), antiglare, 400 nits 54 Chapter 5 Removal and replacement procedures for authorized service provider parts Use the suction cup and a case utility...
... cover, making sure to disengage the hooks (2). The display panel is secured to the display enclosure with tape that the retention tape areas are available as you continue to lock the cup (1). Navigate to update the Touch Panel Firmware. e. Display panels are accessible in WQXGA (2560×1600), antiglare, 400 nits 54 Chapter 5 Removal and replacement procedures for authorized service provider parts Use the suction cup and a case utility...
Maintenance and Service Guide 1
Page 66
... then select the HP Support Assistant app. - Setup Utility (BIOS) includes settings for the types of devices installed, the startup sequence of the computer, and the amount of Setup Utility (BIOS) might be in notebook mode and you need to update Setup Utility (BIOS), first determine the BIOS version on your notebook. Updating Setup Utility (BIOS) Updated versions of system and extended memory. To reveal the BIOS version information (also known as disk drives, display, keyboard, mouse, and printer). or - or - Turn on or restart...
... then select the HP Support Assistant app. - Setup Utility (BIOS) includes settings for the types of devices installed, the startup sequence of the computer, and the amount of Setup Utility (BIOS) might be in notebook mode and you need to update Setup Utility (BIOS), first determine the BIOS version on your notebook. Updating Setup Utility (BIOS) Updated versions of system and extended memory. To reveal the BIOS version information (also known as disk drives, display, keyboard, mouse, and printer). or - or - Turn on or restart...
Maintenance and Service Guide 1
Page 67
... insert, remove, connect, or disconnect any device, cable, or cord. Downloading a BIOS update After you review the prerequisites, you are ready to a network, consult the network administrator before downloading and installing a BIOS update. Select the Search icon in the taskbar, type support in the search box, and then select File Explorer. 2. If the update is typically Local Disk (C:). 60 Chapter 6 Using Setup Utility (BIOS) Follow any software updates, especially system BIOS updates. Preparing for a BIOS update on -screen instructions. 4. b. Select...
... insert, remove, connect, or disconnect any device, cable, or cord. Downloading a BIOS update After you review the prerequisites, you are ready to a network, consult the network administrator before downloading and installing a BIOS update. Select the Search icon in the taskbar, type support in the search box, and then select File Explorer. 2. If the update is typically Local Disk (C:). 60 Chapter 6 Using Setup Utility (BIOS) Follow any software updates, especially system BIOS updates. Preparing for a BIOS update on -screen instructions. 4. b. Select...
Maintenance and Service Guide 1
Page 69
... select Yes. To start Computer Setup, turn on the system (such as hard drives, display, keyboard, mouse, and printer). NOTE: If you are using arrow keys to highlight your computer. NOTE: If you are using arrow keys to highlight your choice, you must then press enter. Your changes go into effect when the computer restarts. Computer Setup includes settings for types of devices installed, the startup sequence of the computer...
... select Yes. To start Computer Setup, turn on the system (such as hard drives, display, keyboard, mouse, and printer). NOTE: If you are using arrow keys to highlight your computer. NOTE: If you are using arrow keys to highlight your choice, you must then press enter. Your changes go into effect when the computer restarts. Computer Setup includes settings for types of devices installed, the startup sequence of the computer...
Maintenance and Service Guide 1
Page 70
... Setup menus without saving your choice, you must then press enter. Do not download or install a BIOS update while the computer is connected to reliable external power using arrow keys to follow these instructions: Do not disconnect power on battery power, docked in compressed files called SoftPaqs. Updating the BIOS 63 NOTE: Restoring defaults will not change the hard drive mode. 1. Some download packages contain a file named Readme.txt, which contains information regarding installing and troubleshooting...
... Setup menus without saving your choice, you must then press enter. Do not download or install a BIOS update while the computer is connected to reliable external power using arrow keys to follow these instructions: Do not disconnect power on battery power, docked in compressed files called SoftPaqs. Updating the BIOS 63 NOTE: Restoring defaults will not change the hard drive mode. 1. Some download packages contain a file named Readme.txt, which contains information regarding installing and troubleshooting...
Maintenance and Service Guide 1
Page 71
... on -screen instructions. 4. NOTE: After a message on or restart the computer, and when the HP logo appears, press f9 to install the update. You might need to access this information to locate the update later, after the download is complete. Complete the installation by following the on your hard drive designation. Changing the boot order using the f9 prompt To dynamically choose a boot device for and download BIOS updates. 1. b. Using the hard drive path you...
... on -screen instructions. 4. NOTE: After a message on or restart the computer, and when the HP logo appears, press f9 to install the update. You might need to access this information to locate the update later, after the download is complete. Complete the installation by following the on your hard drive designation. Changing the boot order using the f9 prompt To dynamically choose a boot device for and download BIOS updates. 1. b. Using the hard drive path you...

Maintenance and Service Guide 1
Page 73
... the type of creating recovery media and backups are available on a tablet, the tablet battery must be a lengthy process. You can be at least 70% charged before you follow the on a bootable USB flash drive. For details: ▲ Go to create HP Recovery media on -screen instructions. Schedule regular backups to the keyboard base before you will be performing recovery procedures on select products only. Using a recent backup can use the HP Cloud Recovery Download...
... the type of creating recovery media and backups are available on a tablet, the tablet battery must be a lengthy process. You can be at least 70% charged before you follow the on a bootable USB flash drive. For details: ▲ Go to create HP Recovery media on -screen instructions. Schedule regular backups to the keyboard base before you will be performing recovery procedures on select products only. Using a recent backup can use the HP Cloud Recovery Download...

Maintenance and Service Guide 1
Page 74
... safest way to reset your computer before you obtain and use the HP recovery discs. For more information, see Using the HP Cloud Recovery Download Tool to obtain recovery discs. On select products, it can return your machine to a working state sooner than using the HP Cloud Recovery Download Tool. Using a recent backup can be created on a bootable USB flash drive using the HP recovery discs. Creating a system restore System Restore is restored, reinstalling all the operating system software released since your...
... safest way to reset your computer before you obtain and use the HP recovery discs. For more information, see Using the HP Cloud Recovery Download Tool to obtain recovery discs. On select products, it can return your machine to a working state sooner than using the HP Cloud Recovery Download Tool. Using a recent backup can be created on a bootable USB flash drive using the HP recovery discs. Creating a system restore System Restore is restored, reinstalling all the operating system software released since your...
Maintenance and Service Guide 1
Page 75
... drive or USB flash drive from which you can fully restore the HP OS image without keyboards, turn on the location of your computer does not restart using the HP Recovery media, you want to boot, and then follow the on -screen instructions to http://www.hp.com/support. Follow the on -screen instructions. IMPORTANT: For a tablet with HP Sure Recover, a PC operating system (OS) recovery solution built into the hardware and software. HP Sure Recover can change the boot order...
... drive or USB flash drive from which you can fully restore the HP OS image without keyboards, turn on the location of your computer does not restart using the HP Recovery media, you want to boot, and then follow the on -screen instructions to http://www.hp.com/support. Follow the on -screen instructions. IMPORTANT: For a tablet with HP Sure Recover, a PC operating system (OS) recovery solution built into the hardware and software. HP Sure Recover can change the boot order...
Maintenance and Service Guide 1
Page 88
...light sensor, identifying 7 audio adjusting volume 13 audio-out (headphone)/audio-in (microphone) combo jack, identifying 6 audio, product description 1 B backup, creating 66 backups 66 battery illustrated 19 spare part number 19 BIOS determining version 59, 63 downloading an update 60, 63, 64 starting the Setup Utility 59 updating 59, 63 Bluetooth label 15 boot order changing using the f9 prompt 64 boot order, changing 68 bottom components 14 bottom cover illustrated 19 removal 33 spare part number 19, 33 buttons left touchpad 8, 9 power 11, 12 right touchpad 8, 9 C cables spare part numbers...
...light sensor, identifying 7 audio adjusting volume 13 audio-out (headphone)/audio-in (microphone) combo jack, identifying 6 audio, product description 1 B backup, creating 66 backups 66 battery illustrated 19 spare part number 19 BIOS determining version 59, 63 downloading an update 60, 63, 64 starting the Setup Utility 59 updating 59, 63 Bluetooth label 15 boot order changing using the f9 prompt 64 boot order, changing 68 bottom components 14 bottom cover illustrated 19 removal 33 spare part number 19, 33 buttons left touchpad 8, 9 power 11, 12 right touchpad 8, 9 C cables spare part numbers...
Maintenance and Service Guide 1
Page 89
... light mode 6 M media card reader, product description 2 memory module product description 1 memory modules removal 35 spare part numbers 35 microphone product description 1 microphone mute light, identifying 10 model name 1 mute light, identifying 10 mute microphone action key 13 mute volume action key 13 N next track action key 14 O operating system, product description 2 P packaging guidelines 24, 30 pause action key 14 play action key 13, 14 pointing device, product description 2 ports HDMI 5 product description 2 USB SuperSpeed 6 USB SuperSpeed port with HP Sleep and Charge 5 USB Type...
... light mode 6 M media card reader, product description 2 memory module product description 1 memory modules removal 35 spare part numbers 35 microphone product description 1 microphone mute light, identifying 10 model name 1 mute light, identifying 10 mute microphone action key 13 mute volume action key 13 N next track action key 14 O operating system, product description 2 P packaging guidelines 24, 30 pause action key 14 play action key 13, 14 pointing device, product description 2 ports HDMI 5 product description 2 USB SuperSpeed 6 USB SuperSpeed port with HP Sleep and Charge 5 USB Type...
Maintenance and Service Guide 1
Page 90
... 3 setup utility navigating and selecting 62 restoring factory settings 62 SIM slot, identifying 6 slots SIM card 6 software locating 4 software installed locating 4 solid-state drive product description 1 removal and replacement 39 specifications 76, 77 spare part country codes 57 speaker removal 48 spare part number 48 speaker volume action keys 13 speakers 11, 15 special keys identifying 11 using 11 specifications computer 75 display 75, 76 hard drive 75 solid-state drive 76, 77 static electricity 24, 25 support information 30 Sure Start using 65...
... 3 setup utility navigating and selecting 62 restoring factory settings 62 SIM slot, identifying 6 slots SIM card 6 software locating 4 software installed locating 4 solid-state drive product description 1 removal and replacement 39 specifications 76, 77 spare part country codes 57 speaker removal 48 spare part number 48 speaker volume action keys 13 speakers 11, 15 special keys identifying 11 using 11 specifications computer 75 display 75, 76 hard drive 75 solid-state drive 76, 77 static electricity 24, 25 support information 30 Sure Start using 65...


