
Start Here
Page 5
1 Introducing Windows 10 This guide describes new Windows® 10 features, which may update some of the information provided with your computer hardware and software, see the User Guide. These new features include the following: ● Enhanced Start menu ● Shut down from the Start menu ● Improved search options ● Enhanced backup and recovery information For details about your computer. Go to http://www.hp.com/ support, and select your country. Select Drivers & Downloads, and then follow the on-screen instructions. 1
1 Introducing Windows 10 This guide describes new Windows® 10 features, which may update some of the information provided with your computer hardware and software, see the User Guide. These new features include the following: ● Enhanced Start menu ● Shut down from the Start menu ● Improved search options ● Enhanced backup and recovery information For details about your computer. Go to http://www.hp.com/ support, and select your country. Select Drivers & Downloads, and then follow the on-screen instructions. 1
Start Here
Page 9
... the Start button, and then select the Get started app. ● If you need to know before you get started ● HP Recovery Manager recovers only software that you to recover the computer to its original state. Restore and recovery There are available on all methods are several options for restoring from backup, refreshing the computer, and resetting the computer to its original factory state by using the HP Recovery partition (select...
... the Start button, and then select the Get started app. ● If you need to know before you get started ● HP Recovery Manager recovers only software that you to recover the computer to its original state. Restore and recovery There are available on all methods are several options for restoring from backup, refreshing the computer, and resetting the computer to its original factory state by using the HP Recovery partition (select...
Start Here
Page 11
... for startup information. Access BIOS: For computers or tablets with a detachable keyboard, connect the keyboard to an optical drive or a USB flash drive. then select f9. 3. Follow the on or restart the tablet, and then quickly hold down button; For tablets without keyboards: ▲ Turn on -screen instructions. So before beginning these steps to perform System Recovery or create HP recovery media from which is only available on products that support this function...
... for startup information. Access BIOS: For computers or tablets with a detachable keyboard, connect the keyboard to an optical drive or a USB flash drive. then select f9. 3. Follow the on or restart the tablet, and then quickly hold down button; For tablets without keyboards: ▲ Turn on -screen instructions. So before beginning these steps to perform System Recovery or create HP recovery media from which is only available on products that support this function...
User Guide
Page 7
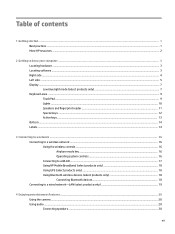
... 1 Getting started ...1 Best practices ...1 More HP resources ...2 2 Getting to know your computer ...3 Locating hardware ...3 Locating software ...3 Right side ...4 Left side ...5 Display ...7 Low blue light mode (select products only 7 Keyboard area ...9 TouchPad ...9 Lights ...10 Speakers and fingerprint reader ...11 Special keys ...12 Action keys ...13 Bottom ...14 Labels ...14 3 Connecting to a network ...16 Connecting to a wireless network ...16 Using the wireless controls ...16 Airplane mode key ...16 Operating system controls 16 Connecting to a WLAN ...17 Using HP Mobile Broadband...
... 1 Getting started ...1 Best practices ...1 More HP resources ...2 2 Getting to know your computer ...3 Locating hardware ...3 Locating software ...3 Right side ...4 Left side ...5 Display ...7 Low blue light mode (select products only 7 Keyboard area ...9 TouchPad ...9 Lights ...10 Speakers and fingerprint reader ...11 Special keys ...12 Action keys ...13 Bottom ...14 Labels ...14 3 Connecting to a network ...16 Connecting to a wireless network ...16 Using the wireless controls ...16 Airplane mode key ...16 Operating system controls 16 Connecting to a WLAN ...17 Using HP Mobile Broadband...
User Guide
Page 9
...39 Setting Setup Utility (BIOS) passwords 40 Using Windows Hello (select products only) ...41 Using Internet security software ...41 Using antivirus software ...41 Using firewall software ...41 Installing software updates ...42 Using HP Device as a Service (select products only 42 Securing your wireless network ...42 Backing up your software applications and information 42 Using an optional security cable (select products only 42 9 Using Setup Utility (BIOS) ...43 Starting Setup Utility (BIOS) ...43 Updating Setup Utility (BIOS) ...43 Determining the BIOS version ...43 Downloading a BIOS...
...39 Setting Setup Utility (BIOS) passwords 40 Using Windows Hello (select products only) ...41 Using Internet security software ...41 Using antivirus software ...41 Using firewall software ...41 Installing software updates ...42 Using HP Device as a Service (select products only 42 Securing your wireless network ...42 Backing up your software applications and information 42 Using an optional security cable (select products only 42 9 Using Setup Utility (BIOS) ...43 Starting Setup Utility (BIOS) ...43 Updating Setup Utility (BIOS) ...43 Determining the BIOS version ...43 Downloading a BIOS...
User Guide
Page 28
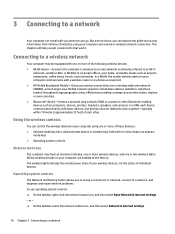
.... ● Bluetooth® device-Creates a personal area network (PAN) to connect to as airports, restaurants, coffee shops, hotels, and universities. The wireless light indicates the overall power state of your computer communicates with a wireless router or a wireless access point. ● HP Mobile Broadband Module-Gives you can explore the globe and access information from millions of websites using one or two wireless lights. But even at the factory. In...
.... ● Bluetooth® device-Creates a personal area network (PAN) to connect to as airports, restaurants, coffee shops, hotels, and universities. The wireless light indicates the overall power state of your computer communicates with a wireless router or a wireless access point. ● HP Mobile Broadband Module-Gives you can explore the globe and access information from millions of websites using one or two wireless lights. But even at the factory. In...

User Guide
Page 33
... Control Panel, select Hardware and Sound, and then select Sound. Use the audio control panel to your product. Headphones combined with a microphone are not connected to the HDMI port on headphones, earbuds, or a headset. Follow the device manufacturer's instructions. To access this document: ▲ Select the Start button, select HP Help and Support, and then select HP Documentation. To connect wireless headsets to your viewing enjoyment, use one end of personal injury, lower the volume setting...
... Control Panel, select Hardware and Sound, and then select Sound. Use the audio control panel to your product. Headphones combined with a microphone are not connected to the HDMI port on headphones, earbuds, or a headset. Follow the device manufacturer's instructions. To access this document: ▲ Select the Start button, select HP Help and Support, and then select HP Documentation. To connect wireless headsets to your viewing enjoyment, use one end of personal injury, lower the volume setting...
User Guide
Page 44
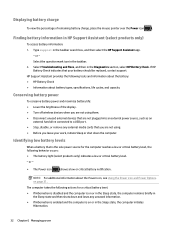
... of the display. ● Turn off wireless devices when you are not using them. ● Disconnect unused external devices that are not plugged into an external power source, such as an external hard drive connected to a USB port. ● Stop, disable, or remove any external media cards that you are not using. ● Before you leave your battery should be replaced, contact support. or - ● The Power icon shows a low or critical battery notification. Type support in the...
... of the display. ● Turn off wireless devices when you are not using them. ● Disconnect unused external devices that are not plugged into an external power source, such as an external hard drive connected to a USB port. ● Stop, disable, or remove any external media cards that you are not using. ● Before you leave your battery should be replaced, contact support. or - ● The Power icon shows a low or critical battery notification. Type support in the...
User Guide
Page 45
... HP Battery Check in this product cannot be replaced, contact support. Resolving a low battery level Resolving a low battery level when external power is available Connect one of the following conditions: ● When charging or calibrating a battery ● When installing or updating system software ● When updating the system BIOS ● When writing information to a disc (select products only) Running on external power For information about connecting to external power, refer to the Setup Instructions...
... HP Battery Check in this product cannot be replaced, contact support. Resolving a low battery level Resolving a low battery level when external power is available Connect one of the following conditions: ● When charging or calibrating a battery ● When installing or updating system software ● When updating the system BIOS ● When writing information to a disc (select products only) Running on external power For information about connecting to external power, refer to the Setup Instructions...

User Guide
Page 47
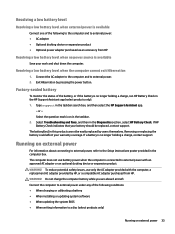
... hard drive to normal operation. Using Disk Cleanup Use Disk Cleanup to free up disk space and help the computer run Disk Defragmenter on battery power. NOTE: It is not protected by performing regular maintenance tasks with tools such as Disk Defragmenter and Disk Cleanup. To run Disk Cleanup: 1. Improving performance 35 This chapter explains how to run more efficiently. Type defragment in an optional docking device or connected to a USB port...
... hard drive to normal operation. Using Disk Cleanup Use Disk Cleanup to free up disk space and help the computer run Disk Defragmenter on battery power. NOTE: It is not protected by performing regular maintenance tasks with tools such as Disk Defragmenter and Disk Cleanup. To run Disk Cleanup: 1. Improving performance 35 This chapter explains how to run more efficiently. Type defragment in an optional docking device or connected to a USB port...
User Guide
Page 52
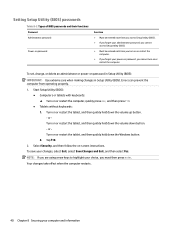
... the Windows button. 2. Start Setup Utility (BIOS): ● Computers or tablets with keyboards: ▲ Turn on -screen instructions. NOTE: If you must then press enter. Your changes take effect when the computer restarts. 40 Chapter 8 Securing your choice, you are using arrow keys to highlight your computer and information or Turn on password in Setup Utility (BIOS): IMPORTANT: Use extreme care when making changes in Setup Utility (BIOS). Errors can prevent the computer from operating properly. 1. To set, change...
... the Windows button. 2. Start Setup Utility (BIOS): ● Computers or tablets with keyboards: ▲ Turn on -screen instructions. NOTE: If you must then press enter. Your changes take effect when the computer restarts. 40 Chapter 8 Securing your choice, you are using arrow keys to highlight your computer and information or Turn on password in Setup Utility (BIOS): IMPORTANT: Use extreme care when making changes in Setup Utility (BIOS). Errors can prevent the computer from operating properly. 1. To set, change...
User Guide
Page 54
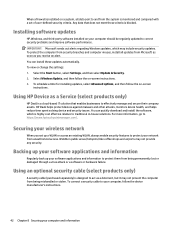
... alerts regarding Windows updates, which is highly cost effective relative to protect them from being permanently lost or damaged through a virus attack or a software or hardware failure. Select the Start button, select Settings, and then select Update & Security. 2. Securing your wireless network When you receive an alert. WLANs in -house solutions. To connect a security cable to your computer, follow the device manufacturer's instructions. 42...
... alerts regarding Windows updates, which is highly cost effective relative to protect them from being permanently lost or damaged through a virus attack or a software or hardware failure. Select the Start button, select Settings, and then select Update & Security. 2. Securing your wireless network When you receive an alert. WLANs in -house solutions. To connect a security cable to your computer, follow the device manufacturer's instructions. 42...
User Guide
Page 56
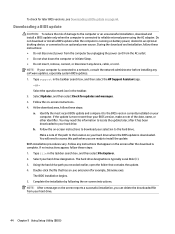
.... 3. Select your hard drive. 44 Chapter 9 Using Setup Utility (BIOS) At the download area, follow these steps: a. The BIOS installation begins. 5. Follow any instructions that appear on -screen instructions. 4. Using the hard drive path you are ready to install the update. Follow the on the screen after it to the BIOS version currently installed on your hard drive. The hard drive designation is connected to a network, consult the network administrator before installing any device, cable, or cord. Make a note of the...
.... 3. Select your hard drive. 44 Chapter 9 Using Setup Utility (BIOS) At the download area, follow these steps: a. The BIOS installation begins. 5. Follow any instructions that appear on -screen instructions. 4. Using the hard drive path you are ready to install the update. Follow the on the screen after it to the BIOS version currently installed on your hard drive. The hard drive designation is connected to a network, consult the network administrator before installing any device, cable, or cord. Make a note of the...
User Guide
Page 58
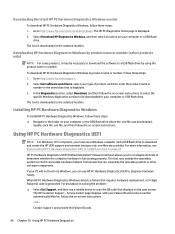
... the operating system so that it may be downloaded to your computer or USB flash drive. Select Download HP Diagnostics Windows, and then select a location on your Failure ID and product number automatically filled in. Go to diagnose hardware issues. Select Get software and drivers, select your type of product, and then enter the product name or number in solving the problem: ▲ Select Get Support, and then use a Windows...
... the operating system so that it may be downloaded to your computer or USB flash drive. Select Download HP Diagnostics Windows, and then select a location on your Failure ID and product number automatically filled in. Go to diagnose hardware issues. Select Get software and drivers, select your type of product, and then enter the product name or number in solving the problem: ▲ Select Get Support, and then use a Windows...

User Guide
Page 74
... 21 sound settings 21 speakers 20 audio-out (headphone)/audio-in (microphone) combo jack, identifying 6 B backing up software and information 42 backup, creating 50 backups 50 battery conserving power 32 discharging 32 factory-sealed 33 finding information 32 low battery levels 32 resolving low battery level 33 battery charge 32 battery information, finding 32 battery power 31 best practices 1 BIOS determining version 43 downloading an update 44 starting the Setup Utility 43 updating 43 Bluetooth device 16, 18 Bluetooth label 15 boot order, changing...
... 21 sound settings 21 speakers 20 audio-out (headphone)/audio-in (microphone) combo jack, identifying 6 B backing up software and information 42 backup, creating 50 backups 50 battery conserving power 32 discharging 32 factory-sealed 33 finding information 32 low battery levels 32 resolving low battery level 33 battery charge 32 battery information, finding 32 battery power 31 best practices 1 BIOS determining version 43 downloading an update 44 starting the Setup Utility 43 updating 43 Bluetooth device 16, 18 Bluetooth label 15 boot order, changing...

User Guide
Page 75
... J jacks audio-out (headphone)/audio-in (microphone) 6 K keyboard and optional mouse using 28 keyboard backlight action key 13 keypad, integrated numeric 12 keys action 12 airplane mode 14 esc 12 fn 12 N next track action key 13 O one-finger slide touch screen gesture 28 operating environment 53 operating system controls 16 P passwords Setup Utility (BIOS) 40 Windows 39 pause action key 13 play action key 13 ports HDMI 4, 21 USB SuperSpeed 5 USB SuperSpeed port with HP Sleep and Charge 4 USB Type-C 23 USB Type-C with HP Sleep and Charge 4 power battery 31 external...
... J jacks audio-out (headphone)/audio-in (microphone) 6 K keyboard and optional mouse using 28 keyboard backlight action key 13 keypad, integrated numeric 12 keys action 12 airplane mode 14 esc 12 fn 12 N next track action key 13 O one-finger slide touch screen gesture 28 operating environment 53 operating system controls 16 P passwords Setup Utility (BIOS) 40 Windows 39 pause action key 13 play action key 13 ports HDMI 4, 21 USB SuperSpeed 5 USB SuperSpeed port with HP Sleep and Charge 4 USB Type-C 23 USB Type-C with HP Sleep and Charge 4 power battery 31 external...
User Guide
Page 76
... device 18 V vents, identifying 4, 6, 14 video HDMI port 21 USB Type-C 23 wireless displays 23 video, using 21 volume adjusting 13 mute 14 W Windows backup 50 recovery media 50 system restore point 50 64 Index restoring 50 right side components 4 S screen brightness action keys 13 Section 508 accessibility standards 57, 58 security cable, installing 42 serial number, computer 14 service labels, locating 14 Setup Utility (BIOS) passwords 40 shipping the computer 37 shutdown 30 Sleep exiting 29 initiating 29 Sleep and Hibernation, initiating 29 slots memory card reader 6 software Disk...
... device 18 V vents, identifying 4, 6, 14 video HDMI port 21 USB Type-C 23 wireless displays 23 video, using 21 volume adjusting 13 mute 14 W Windows backup 50 recovery media 50 system restore point 50 64 Index restoring 50 right side components 4 S screen brightness action keys 13 Section 508 accessibility standards 57, 58 security cable, installing 42 serial number, computer 14 service labels, locating 14 Setup Utility (BIOS) passwords 40 shipping the computer 37 shutdown 30 Sleep exiting 29 initiating 29 Sleep and Hibernation, initiating 29 slots memory card reader 6 software Disk...
Maintenance and Service Guide
Page 64
... then select the HP Support Assistant app. - or - The BIOS installation begins. 5. Type support in the taskbar. 2. You may need to access this information to locate the update later, after the download is connected to a network, consult the network administrator before installing any device, cable, or cord. Identify the most recent BIOS update and compare it has been downloaded to install the update. Using the hard drive path you are ready to your hard drive. 56 Chapter 6 Using Setup Utility (BIOS)
... then select the HP Support Assistant app. - or - The BIOS installation begins. 5. Type support in the taskbar. 2. You may need to access this information to locate the update later, after the download is connected to a network, consult the network administrator before installing any device, cable, or cord. Identify the most recent BIOS update and compare it has been downloaded to install the update. Using the hard drive path you are ready to your hard drive. 56 Chapter 6 Using Setup Utility (BIOS)
Maintenance and Service Guide
Page 78
... 21 USB Type-C-to-USB 3.0 21 USB-to-Gigabit RJ45 21 antenna 7 audio, product description 3 audio-in jack 12, 13 audio-out jack 12, 13 B back cover, spare part number 21 backups 61 battery removal 29 spare part number 19, 29 battery light 14 BIOS determining version 55 downloading an update 56 starting the Setup Utility 55 updating 55 boot order changing 65 bottom components 15 bottom cover removal 27 spare part number 19, 27 buttons power 12 TouchPad 11 volume 13 C caps lock light 9 chipset, product description 1 components bottom 15 display 7 keys...
... 21 USB Type-C-to-USB 3.0 21 USB-to-Gigabit RJ45 21 antenna 7 audio, product description 3 audio-in jack 12, 13 audio-out jack 12, 13 B back cover, spare part number 21 backups 61 battery removal 29 spare part number 19, 29 battery light 14 BIOS determining version 55 downloading an update 56 starting the Setup Utility 55 updating 55 boot order changing 65 bottom components 15 bottom cover removal 27 spare part number 19, 27 buttons power 12 TouchPad 11 volume 13 C caps lock light 9 chipset, product description 1 components bottom 15 display 7 keys...

Maintenance and Service Guide
Page 79
... 1 display panel 2 Ethernet 3 external media cards 4 graphics 1, 2 hard drive 2, 3 keyboard 4 memory module 2 microphone 3 operating system 4, 5 optical drive 3 pointing device 4 ports 4 power requirements 4 processors 1 product name 1 security 4 sensors 3 serviceability 5 video 3 wireless 3 product name 1 R recover options 63 recovery discs 62, 64 HP Recovery Manager 63 media 64 starting 64 supported discs 62 system 63 USB flash drive 64 using HP Recovery media 62 recovery media creating 61 creating using HP Recovery Manager 62 recovery partition removing 66 removal/replacement procedures...
... 1 display panel 2 Ethernet 3 external media cards 4 graphics 1, 2 hard drive 2, 3 keyboard 4 memory module 2 microphone 3 operating system 4, 5 optical drive 3 pointing device 4 ports 4 power requirements 4 processors 1 product name 1 security 4 sensors 3 serviceability 5 video 3 wireless 3 product name 1 R recover options 63 recovery discs 62, 64 HP Recovery Manager 63 media 64 starting 64 supported discs 62 system 63 USB flash drive 64 using HP Recovery media 62 recovery media creating 61 creating using HP Recovery Manager 62 recovery partition removing 66 removal/replacement procedures...


