
User Guide
Page 5
... monitor stand and base 5 Mounting the monitor head (select products only 7 Removing the monitor stand 7 Attaching the monitor head to a mounting device 8 Connecting the cables ...9 Connecting USB devices ...12 Adjusting the monitor ...13 Installing a security cable ...15 Turning on the monitor ...16 HP watermark and image retention policy 16 2 Using the monitor ...17 Downloading software and utilities ...17 The Information file ...17 The Image Color Matching file ...17 Using the OSD menu ...18 Using the function buttons ...19 Reassigning the function buttons ...19 Changing the power mode...
... monitor stand and base 5 Mounting the monitor head (select products only 7 Removing the monitor stand 7 Attaching the monitor head to a mounting device 8 Connecting the cables ...9 Connecting USB devices ...12 Adjusting the monitor ...13 Installing a security cable ...15 Turning on the monitor ...16 HP watermark and image retention policy 16 2 Using the monitor ...17 Downloading software and utilities ...17 The Information file ...17 The Image Color Matching file ...17 Using the OSD menu ...18 Using the function buttons ...19 Reassigning the function buttons ...19 Changing the power mode...
User Guide
Page 6
... serial number and product number 24 4 Maintaining the monitor ...25 Maintenance guidelines ...25 Cleaning the monitor ...25 Shipping the monitor ...26 Appendix A Technical specifications ...27 68.6 cm (27.0 in) FHD model specifications ...27 68.6 cm (27.0 in) QHD model specifications ...28 61.0 cm (24.0 in) model specifications ...28 60.5 cm (23.8 in) model specifications ...29 58.4 cm (23.0 in) model specifications ...30 54.6 cm (21.5 in) model specifications ...31 Preset display resolutions...
... serial number and product number 24 4 Maintaining the monitor ...25 Maintenance guidelines ...25 Cleaning the monitor ...25 Shipping the monitor ...26 Appendix A Technical specifications ...27 68.6 cm (27.0 in) FHD model specifications ...27 68.6 cm (27.0 in) QHD model specifications ...28 61.0 cm (24.0 in) model specifications ...28 60.5 cm (23.8 in) model specifications ...29 58.4 cm (23.0 in) model specifications ...30 54.6 cm (21.5 in) model specifications ...31 Preset display resolutions...
User Guide
Page 7
... power from the computer by the plug. WARNING! It describes proper workstation setup and proper posture, health, and work habits for maximum image size while preserving original aspect ratio: Important safety information 1 Use a power strip whose manufacturer offers a damage replacement policy so that they cannot be taken to route all cords and cables connected to the monitor so that you use another cord, use with the monitor...
... power from the computer by the plug. WARNING! It describes proper workstation setup and proper posture, health, and work habits for maximum image size while preserving original aspect ratio: Important safety information 1 Use a power strip whose manufacturer offers a damage replacement policy so that they cannot be taken to route all cords and cables connected to the monitor so that you use another cord, use with the monitor...
User Guide
Page 8
...; (HDMI) video input (cable included) ● VGA video input (cable included in select regions) ● USB hub with one USB Type-B port (cable included) that connects to the computer (upstream) and four USB ports that connect to USB devices (downstream) ● Four on-screen display (OSD) buttons, three that you can reconfigure to quickly allow selection of the most commonly used operations ● Plug and Play capability if supported by your operating system ● VESA® mounting...
...; (HDMI) video input (cable included) ● VGA video input (cable included in select regions) ● USB hub with one USB Type-B port (cable included) that connects to the computer (upstream) and four USB ports that connect to USB devices (downstream) ● Four on-screen display (OSD) buttons, three that you can reconfigure to quickly allow selection of the most commonly used operations ● Plug and Play capability if supported by your operating system ● VESA® mounting...

User Guide
Page 10
... their descriptions Component Description (1) Security cable slot Connects an optional security cable. (2) Power connector Connects the power cord. (3) VESA release button Releases the stand from the source device to the monitor to enable USB Type-A ports on the monitor. (8) USB ports (2) (downstream) Connect a USB cable to a peripheral device, such as a keyboard, mouse, or USB hard drive. (9) USB ports (2) (downstream) Connect a USB cable to a source device such as a keyboard, mouse, or USB hard drive, and charge peripheral devices. 4 Chapter 1 Getting started
... their descriptions Component Description (1) Security cable slot Connects an optional security cable. (2) Power connector Connects the power cord. (3) VESA release button Releases the stand from the source device to the monitor to enable USB Type-A ports on the monitor. (8) USB ports (2) (downstream) Connect a USB cable to a peripheral device, such as a keyboard, mouse, or USB hard drive. (9) USB ports (2) (downstream) Connect a USB cable to a source device such as a keyboard, mouse, or USB hard drive, and charge peripheral devices. 4 Chapter 1 Getting started

User Guide
Page 13
... the monitor head, use the power and video cables provided with the VESA standard and is turned off and all cables from the monitor. 2. Position the monitor facedown on a flat surface covered by a UL-listed or CSA-listed wall-mount bracket. Push up the monitor 7 Setting up the latch near the bottom center of the stand's mounting plate (1). 4. For best performance, use four 4 mm, 0.7 pitch, and 10 mm long screws. Longer screws might...
... the monitor head, use the power and video cables provided with the VESA standard and is turned off and all cables from the monitor. 2. Position the monitor facedown on a flat surface covered by a UL-listed or CSA-listed wall-mount bracket. Push up the monitor 7 Setting up the latch near the bottom center of the stand's mounting plate (1). 4. For best performance, use four 4 mm, 0.7 pitch, and 10 mm long screws. Longer screws might...

User Guide
Page 21
... an optional speaker bar to the monitor. NOTE: Use the operating system's display settings to landscape. To rotate the OSD from landscape to landscape, open the OSD menu and select Image Adjustment, select On-Screen Menu Rotation, and then select Portrait. Setting up the monitor 15 IMPORTANT: If the monitor is not in full height and full tilt position when pivoting, the bottom right corner of the monitor panel will come...
... an optional speaker bar to the monitor. NOTE: Use the operating system's display settings to landscape. To rotate the OSD from landscape to landscape, open the OSD menu and select Image Adjustment, select On-Screen Menu Rotation, and then select Portrait. Setting up the monitor 15 IMPORTANT: If the monitor is not in full height and full tilt position when pivoting, the bottom right corner of the monitor panel will come...
User Guide
Page 22
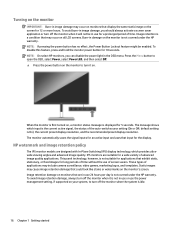
... image quality applications. This panel technology, however, is not covered under the HP warranty. To avoid burn-in use for a prolonged period of time without the use the power management setting, if supported on monitors that could look like stains or watermarks on the monitor to open the OSD, select Power, select Power LED, and then select Off. ▲ Press the power button on the monitor's screen. Press the Menu button to turn...
... image quality applications. This panel technology, however, is not covered under the HP warranty. To avoid burn-in use for a prolonged period of time without the use the power management setting, if supported on monitors that could look like stains or watermarks on the monitor to open the OSD, select Power, select Power LED, and then select Off. ▲ Press the power button on the monitor's screen. Press the Menu button to turn...
User Guide
Page 23
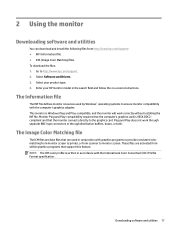
... the on-screen instructions. Select Software and Drivers. 3. Monitor Plug and Play-compatibility requires that the computer's graphics card is Windows Plug and Play-compatible, and the monitor will work through separate BNC-type connectors or through distribution buffers, boxes, or both. Enter your product type. 4. These files are used by Windows® operating systems to ensure monitor compatibility with the International Color Consortium (ICC) Profile Format specification. 2 Using the monitor Downloading software and...
... the on-screen instructions. Select Software and Drivers. 3. Monitor Plug and Play-compatibility requires that the computer's graphics card is Windows Plug and Play-compatible, and the monitor will work through separate BNC-type connectors or through distribution buffers, boxes, or both. Enter your product type. 4. These files are used by Windows® operating systems to ensure monitor compatibility with the International Color Consortium (ICC) Profile Format specification. 2 Using the monitor Downloading software and...

User Guide
Page 24
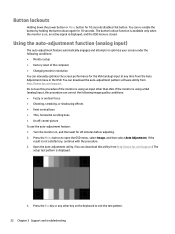
... image based on -screen display (OSD) menu and function button controls. The following table lists possible menu selections in the OSD: ● Use the buttons at the bottom of the screen. Adjusts the power settings. Table 2-1 OSD menu options and descriptions for using a button Main menu Description Brightness+ Color Image Input Power Menu Management Information Exit Adjusts the brightness, contrast, and black stretch levels of the monitor's front bezel. Using the OSD menu Use the OSD menu to navigate, select, and adjust the menu choices. Selects the video input signal...
... image based on -screen display (OSD) menu and function button controls. The following table lists possible menu selections in the OSD: ● Use the buttons at the bottom of the screen. Adjusts the power settings. Table 2-1 OSD menu options and descriptions for using a button Main menu Description Brightness+ Color Image Input Power Menu Management Information Exit Adjusts the brightness, contrast, and black stretch levels of the monitor's front bezel. Using the OSD menu Use the OSD menu to navigate, select, and adjust the menu choices. Selects the video input signal...

User Guide
Page 25
...Button Description (1) Menu button Opens the OSD main menu and selects a menu item from their default values so that when the buttons are activated, you can adjust the monitor screen to a comfortable viewing light or select a preset view mode. (4) Next Active Input button Assignable function button Switches the monitor's input source to the next active input. If your monitor supports Performance mode, then to keep the USB ports enabled when the monitor is in Sleep Mode, the monitor's default setting is in Sleep mode, change the power mode setting: 1. Select Power, select Power...
...Button Description (1) Menu button Opens the OSD main menu and selects a menu item from their default values so that when the buttons are activated, you can adjust the monitor screen to a comfortable viewing light or select a preset view mode. (4) Next Active Input button Assignable function button Switches the monitor's input source to the next active input. If your monitor supports Performance mode, then to keep the USB ports enabled when the monitor is in Sleep Mode, the monitor's default setting is in Sleep mode, change the power mode setting: 1. Select Power, select Power...
User Guide
Page 26
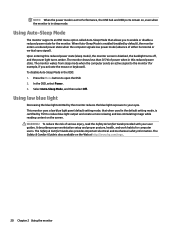
... and USB ports remain on the Web at http://www.hp.com/ergo. 20 Chapter 2 Using the monitor Upon entering this reduced power state. The monitor draws less than 0.5 W of power when in the default setting mode, is blanked, the backlight turns off, and the power light turns amber. Select Auto-Sleep Mode, and then select Off. This monitor uses a low blue light panel default setting mode, that allows you activate the mouse or keyboard). Using Auto-Sleep Mode The monitor supports an OSD menu...
... and USB ports remain on the Web at http://www.hp.com/ergo. 20 Chapter 2 Using the monitor Upon entering this reduced power state. The monitor draws less than 0.5 W of power when in the default setting mode, is blanked, the backlight turns off, and the power light turns amber. Select Auto-Sleep Mode, and then select Off. This monitor uses a low blue light panel default setting mode, that allows you activate the mouse or keyboard). Using Auto-Sleep Mode The monitor supports an OSD menu...
User Guide
Page 27
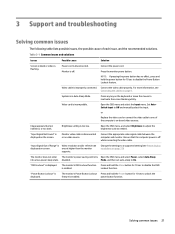
...-power sleep state. The monitor does not enter The monitor's power saving control is off . Connect the power cord. Connect the video cable properly. System is improperly connected. Press any key on -board video sources. power button function. Video cable is in Auto-Sleep Mode. 3 Support and troubleshooting Solving common issues The following table lists possible issues, the possible cause of Range" is Video resolution and/or refresh rate displayed on screen. "Input Signal Not Found" is disconnected. or Replace the video card or connect the video cable to...
...-power sleep state. The monitor does not enter The monitor's power saving control is off . Connect the power cord. Connect the video cable properly. System is improperly connected. Press any key on -board video sources. power button function. Video cable is in Auto-Sleep Mode. 3 Support and troubleshooting Solving common issues The following table lists possible issues, the possible cause of Range" is Video resolution and/or refresh rate displayed on screen. "Input Signal Not Found" is disconnected. or Replace the video card or connect the video cable to...
User Guide
Page 28
... use this procedure can correct the following conditions: ● Monitor setup ● Factory reset of the computer ● Changing monitor resolution You can re-enable the button by holding the button down the power button or Menu button for 10 seconds disables that button. You can manually optimize the screen performance for the VGA (analog) input at any other than VGA. Press the Esc key or any time from http://www.hp.com/support. Turn the monitor...
... use this procedure can correct the following conditions: ● Monitor setup ● Factory reset of the computer ● Changing monitor resolution You can re-enable the button by holding the button down the power button or Menu button for 10 seconds disables that button. You can manually optimize the screen performance for the VGA (analog) input at any other than VGA. Press the Esc key or any time from http://www.hp.com/support. Turn the monitor...
User Guide
Page 29
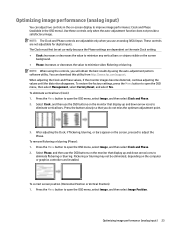
... controller card installed. NOTE: The Clock and Phase controls are not adjustable for digital inputs. NOTE: When using the controls, you do not miss the optimum adjustment point. 3. To correct screen position (Horizontal Position or Vertical Position): 1. Optimizing image performance (analog input) 23 When adjusting the Clock and Phase values, if the monitor images become distorted, continue adjusting the values until the distortion disappears. Press the Menu button to open the OSD menu, select Image, and then select Image Position. Press the Menu button...
... controller card installed. NOTE: The Clock and Phase controls are not adjustable for digital inputs. NOTE: When using the controls, you do not miss the optimum adjustment point. 3. To correct screen position (Horizontal Position or Vertical Position): 1. Optimizing image performance (analog input) 23 When adjusting the Clock and Phase values, if the monitor images become distorted, continue adjusting the values until the distortion disappears. Press the Menu button to open the OSD menu, select Image, and then select Image Position. Press the Menu button...

User Guide
Page 30
... 3 Support and troubleshooting 2. Contacting support To resolve a hardware or software problem, go to contact HP and open a support case. NOTE: Contact customer support to replace the power cord or any other cables that display up or down arrow icons to discussion forums and instructions on a label under which the problem occurred ● Error messages received ● Hardware configuration ● Name and version of the monitor head. Press the OSD buttons...
... 3 Support and troubleshooting 2. Contacting support To resolve a hardware or software problem, go to contact HP and open a support case. NOTE: Contact customer support to replace the power cord or any other cables that display up or down arrow icons to discussion forums and instructions on a label under which the problem occurred ● Error messages received ● Hardware configuration ● Name and version of the monitor head. Press the OSD buttons...

User Guide
Page 31
... or damaged, contact an authorized HP dealer, reseller, or service provider. ● Use only a power source and connection appropriate for each device. ● Install the monitor near an outlet that the total ampere rating of the products connected to clean the monitor screen or cabinet. NOTE: A burned-in the operating instructions. These openings provide ventilation. ● Do not drop the monitor or place it from the...
... or damaged, contact an authorized HP dealer, reseller, or service provider. ● Use only a power source and connection appropriate for each device. ● Install the monitor near an outlet that the total ampere rating of the products connected to clean the monitor screen or cabinet. NOTE: A burned-in the operating instructions. These openings provide ventilation. ● Do not drop the monitor or place it from the...

User Guide
Page 37
... Input terminal One HDMI port, one DisplayPort connector, and one VGA port Preset display resolutions The following display resolutions are the most commonly used modes and are set as factory defaults. 54.6 cm (21.5 in) model specifications Table A-6 54.6 cm (21.5 in) model specifications Specification Measurement Display, wide-screen Type 54.6 cm IPS 21.5 in Viewable image size 54.6 cm diagonal 21.5 in diagonal Maximum weight (unpacked, with stand) 5.30 kg 11.68 lbs Dimensions (include base) Height...
... Input terminal One HDMI port, one DisplayPort connector, and one VGA port Preset display resolutions The following display resolutions are the most commonly used modes and are set as factory defaults. 54.6 cm (21.5 in) model specifications Table A-6 54.6 cm (21.5 in) model specifications Specification Measurement Display, wide-screen Type 54.6 cm IPS 21.5 in Viewable image size 54.6 cm diagonal 21.5 in diagonal Maximum weight (unpacked, with stand) 5.30 kg 11.68 lbs Dimensions (include base) Height...
User Guide
Page 40
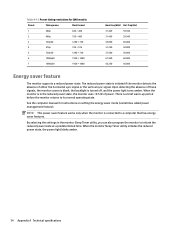
Table A-12 Preset timing resolutions for QHD models Preset Timing name Pixel format 1 480p 640 × 480 2 480p 720 × 480 3 720p60 1280 × 720 4 576p 720 × 576 5 720p50 1280 ...The monitor supports a reduced power state. When the monitor is turned off, and the power light turns amber. The reduced power state is initiated if the monitor detects the absence of these signals, the monitor screen is blank, the backlight is in the reduced power state, the monitor uses Upon detecting the absence of either the horizontal sync signal or the vertical sync signal.
Table A-12 Preset timing resolutions for QHD models Preset Timing name Pixel format 1 480p 640 × 480 2 480p 720 × 480 3 720p60 1280 × 720 4 576p 720 × 576 5 720p50 1280 ...The monitor supports a reduced power state. When the monitor is turned off, and the power light turns amber. The reduced power state is initiated if the monitor detects the absence of these signals, the monitor screen is blank, the backlight is in the reduced power state, the monitor uses Upon detecting the absence of either the horizontal sync signal or the vertical sync signal.
Quick Setup Guide 1
Page 1
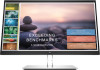
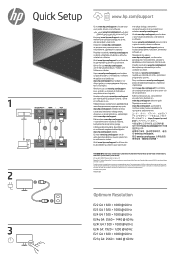
... products and services. www.hp.com/support Přejděte na stránku www.hp.com/support, na které vyhledejte uživatelskou příručku, ovladače a software. Ga naar www.hp.com/support om de gebruikershandleiding, stuurprogramma's en software te vinden. 1 2 3 Quick Setup DisplayPort™ HDMI VGA OR OR 2 1 i www.hp.com/support Go to www.hp.com/support to change without...
... products and services. www.hp.com/support Přejděte na stránku www.hp.com/support, na které vyhledejte uživatelskou příručku, ovladače a software. Ga naar www.hp.com/support om de gebruikershandleiding, stuurprogramma's en software te vinden. 1 2 3 Quick Setup DisplayPort™ HDMI VGA OR OR 2 1 i www.hp.com/support Go to www.hp.com/support to change without...


