
User Guide
Page 6
... the TouchPad and keyboard 32 5 Multimedia Multimedia features ...33 Identifying your multimedia components 34 Adjusting the volume ...35 Using the media activity keys 36 Multimedia software ...37 Using HP MediaSmart or TouchSmart (select models only) software 37 Using other preinstalled multimedia software 37 Installing multimedia software from a disc 37 Audio ...39 Connecting external audio devices 39 Checking your audio functions 39 Video ...40 Connecting an external monitor or projector 40 Connecting an HDMI device 41 Configuring audio for HDMI 41 Webcam ...42 6 Power management...
... the TouchPad and keyboard 32 5 Multimedia Multimedia features ...33 Identifying your multimedia components 34 Adjusting the volume ...35 Using the media activity keys 36 Multimedia software ...37 Using HP MediaSmart or TouchSmart (select models only) software 37 Using other preinstalled multimedia software 37 Installing multimedia software from a disc 37 Audio ...39 Connecting external audio devices 39 Checking your audio functions 39 Video ...40 Connecting an external monitor or projector 40 Connecting an HDMI device 41 Configuring audio for HDMI 41 Webcam ...42 6 Power management...

User Guide
Page 8
... 67 Managing power with a parked hard drive 67 Using HP ProtectSmart Hard Drive Protection software 68 Replacing a drive in the hard drive bay 69 8 External devices Using a USB device ...72 Connecting a USB device 72 Removing a USB device ...73 Using an eSATA device ...73 Connecting an eSATA device 74 Removing an eSATA device 75 9 External media cards Using Digital Media Slot cards ...76 Inserting a digital card ...76 Removing a digital card ...77 10 Memory modules 11 Security Protecting the computer ...82 Using passwords ...83 Setting passwords in Windows 83 Setting passwords in Setup...
... 67 Managing power with a parked hard drive 67 Using HP ProtectSmart Hard Drive Protection software 68 Replacing a drive in the hard drive bay 69 8 External devices Using a USB device ...72 Connecting a USB device 72 Removing a USB device ...73 Using an eSATA device ...73 Connecting an eSATA device 74 Removing an eSATA device 75 9 External media cards Using Digital Media Slot cards ...76 Inserting a digital card ...76 Removing a digital card ...77 10 Memory modules 11 Security Protecting the computer ...82 Using passwords ...83 Setting passwords in Windows 83 Setting passwords in Setup...

User Guide
Page 15
TouchPad buttons Item 1 2 3 Description TouchPad off indicator Left TouchPad button Right TouchPad button Function To switch the TouchPad on an external mouse. Functions like the right button on an external mouse. Right-click the device representing your computer. 3. Functions like the left button on and off, quickly double-tap the TouchPad off indicator. Select Mouse settings. Select Start > Devices and Printers. 2. Components 5 To view or change pointing device preferences: 1.
TouchPad buttons Item 1 2 3 Description TouchPad off indicator Left TouchPad button Right TouchPad button Function To switch the TouchPad on an external mouse. Functions like the right button on an external mouse. Right-click the device representing your computer. 3. Functions like the left button on and off, quickly double-tap the TouchPad off indicator. Select Mouse settings. Select Start > Devices and Printers. 2. Components 5 To view or change pointing device preferences: 1.

User Guide
Page 20
...; Memory Stick (MS) ● Memory Stick Pro (MSP) ● xD-Picture Card (XD) 10 Chapter 2 Features NOTE: The computer fan starts up automatically to optional powered stereo speakers, headphones, ear buds, a headset, or television audio. NOTE: Depending on and off during routine operation. Connects an external VGA monitor or projector. Connects an optional USB device. Connects an optional video or audio device, such as an eSATA external hard drive, or connects an optional USB device. Produces sound when connected to cool internal...
...; Memory Stick (MS) ● Memory Stick Pro (MSP) ● xD-Picture Card (XD) 10 Chapter 2 Features NOTE: The computer fan starts up automatically to optional powered stereo speakers, headphones, ear buds, a headset, or television audio. NOTE: Depending on and off during routine operation. Connects an external VGA monitor or projector. Connects an optional USB device. Connects an optional video or audio device, such as an eSATA external hard drive, or connects an optional USB device. Produces sound when connected to cool internal...

User Guide
Page 34
... customize settings for pointing devices, such as button configuration, click speed, and pointer options. Select Mouse settings. To access Mouse Properties: 1. Select Start > Devices and Printers. 2. Use the left and right TouchPad buttons like the corresponding buttons on an external mouse. Turning the TouchPad on an external mouse. Use the left and right TouchPad buttons like the corresponding buttons on and off The TouchPad is off. When the TouchPad is on, the light is turned on and off, quickly double...
... customize settings for pointing devices, such as button configuration, click speed, and pointer options. Select Mouse settings. To access Mouse Properties: 1. Select Start > Devices and Printers. 2. Use the left and right TouchPad buttons like the corresponding buttons on an external mouse. Turning the TouchPad on an external mouse. Use the left and right TouchPad buttons like the corresponding buttons on and off The TouchPad is off. When the TouchPad is on, the light is turned on and off, quickly double...

User Guide
Page 39
... are specific to specific keys at the factory. Connecting an external mouse Connect an external USB mouse to the computer using one of the action keys opens a specific shortcut menu within that are assigned to the touch screen and the computer. ● For left-handed or right-handed users, select Start > Control Panel > Hardware and Sound > Tablet PC Settings > General tab. NOTE: The action key feature is connected to activate the assigned function. You can disable this feature is disabled in Setup Utility...
... are specific to specific keys at the factory. Connecting an external mouse Connect an external USB mouse to the computer using one of the action keys opens a specific shortcut menu within that are assigned to the touch screen and the computer. ● For left-handed or right-handed users, select Start > Control Panel > Hardware and Sound > Tablet PC Settings > General tab. NOTE: The action key feature is connected to activate the assigned function. You can disable this feature is disabled in Setup Utility...

User Guide
Page 51
... HDMI device The computer includes an HDMI (High Definition Multimedia Interface) port. The HDMI port connects the computer to an optional video or audio device, such as a high-definition TV, to the device manufacturer's instructions. 3. Configure the default audio playback device: a. b. Click Set Default. Connect an audio or video device, such as a high-definition television, or any other end of the taskbar. Press the f4 key (switch screen image key) to switch the image between the display devices connected to the HDMI port...
... HDMI device The computer includes an HDMI (High Definition Multimedia Interface) port. The HDMI port connects the computer to an optional video or audio device, such as a high-definition TV, to the device manufacturer's instructions. 3. Configure the default audio playback device: a. b. Click Set Default. Connect an audio or video device, such as a high-definition television, or any other end of the taskbar. Press the f4 key (switch screen image key) to switch the image between the display devices connected to the HDMI port...

User Guide
Page 53
... Sleep: ● Press the Power button. ● If the display is initiated, the power lights blink and the screen clears. CAUTION: To prevent possible audio and video degradation, loss of audio or video playback functionality, or loss of information, do not initiate Sleep or Hibernation while reading from or writing to a disc or an external media card. Power settings and timeouts are changed using Power Options in Windows Control Panel. 6 Power management Setting power options Using power-saving states The computer has two power-saving states enabled...
... Sleep: ● Press the Power button. ● If the display is initiated, the power lights blink and the screen clears. CAUTION: To prevent possible audio and video degradation, loss of audio or video playback functionality, or loss of information, do not initiate Sleep or Hibernation while reading from or writing to a disc or an external media card. Power settings and timeouts are changed using Power Options in Windows Control Panel. 6 Power management Setting power options Using power-saving states The computer has two power-saving states enabled...

User Guide
Page 60
... plugged into external power through an AC adapter, an optional power adapter, an optional expansion product, or an optional docking device. To maximize battery discharge time: ● Lower the brightness on battery power. The battery charges whenever the computer is not being used while on the display. ● Check the Power saver setting in a cool, dry location. 50 Chapter 6 Power management Maximizing battery discharge time Battery discharge time varies depending on board an aircraft. Charging a battery WARNING!
... plugged into external power through an AC adapter, an optional power adapter, an optional expansion product, or an optional docking device. To maximize battery discharge time: ● Lower the brightness on battery power. The battery charges whenever the computer is not being used while on the display. ● Check the Power saver setting in a cool, dry location. 50 Chapter 6 Power management Maximizing battery discharge time Battery discharge time varies depending on board an aircraft. Charging a battery WARNING!

User Guide
Page 62
... AC adapter, optional power adapter, optional expansion product, or optional docking device, and then connect the adapter or device to Never. To disable Hibernation and Sleep: a. Under the current power plan, click Change plan settings. d. g. i. Click Save changes. 3. WARNING! Insert the battery into the computer. c. Disable Hibernation and Sleep. Select Start > Control Panel > System and Security > Power Options. Record the Turn off the display settings listed in use, but do not shut down the computer. Record the On battery setting under...
... AC adapter, optional power adapter, optional expansion product, or optional docking device, and then connect the adapter or device to Never. To disable Hibernation and Sleep: a. Under the current power plan, click Change plan settings. d. g. i. Click Save changes. 3. WARNING! Insert the battery into the computer. c. Disable Hibernation and Sleep. Select Start > Control Panel > System and Security > Power Options. Record the Turn off the display settings listed in use, but do not shut down the computer. Record the On battery setting under...

User Guide
Page 65
... not allow switching modes, or prompt you are reset when switching between graphics modes (select models only) 55 NOTE: HDMI only works in Power-saving mode. NOTE: When select computer models are in the notification area, and the screen image reappears. Save your work, and close all open programs, including the operating system, and then turns off the display and computer. When switching between AC and battery power, you to...
... not allow switching modes, or prompt you are reset when switching between graphics modes (select models only) 55 NOTE: HDMI only works in Power-saving mode. NOTE: When select computer models are in the notification area, and the screen image reappears. Save your work, and close all open programs, including the operating system, and then turns off the display and computer. When switching between AC and battery power, you to...

User Guide
Page 77
... drive light on the computer turns amber to normal operation. NOTE: The icon in an optional docking device, or are connected to a USB port, are currently protected or whether a drive is parked. Select Start > Control Panel > Hardware and Sound > HP ProtectSmart Hard Drive Protection. For more information, refer to -date status for the drive. If: ● The software is enabled, a green check mark is superimposed over the hard drive icon. ● The software is disabled...
... drive light on the computer turns amber to normal operation. NOTE: The icon in an optional docking device, or are connected to a USB port, are currently protected or whether a drive is parked. Select Start > Control Panel > Hardware and Sound > HP ProtectSmart Hard Drive Protection. For more information, refer to -date status for the drive. If: ● The software is enabled, a green check mark is superimposed over the hard drive icon. ● The software is disabled...

User Guide
Page 95
... screen, press the f10 key. - Open Setup Utility by turning on or restarting the computer. When the Startup Menu appears, press the f10 key. 2. A power-on or restart the computer, or exit Hibernation. When the Press the ESC key for Startup Menu message appears in the lower left corner of the screen, press the esc key. Entering an administrator password At the Enter Password prompt, type your current password in the Enter Password...
... screen, press the f10 key. - Open Setup Utility by turning on or restarting the computer. When the Startup Menu appears, press the f10 key. 2. A power-on or restart the computer, or exit Hibernation. When the Press the ESC key for Startup Menu message appears in the lower left corner of the screen, press the esc key. Entering an administrator password At the Enter Password prompt, type your current password in the Enter Password...

User Guide
Page 109
... latest Windows device drivers Obtain the latest Windows device drivers by using Windows Update. To use Windows Update: 1. Click Check for updates. 2. Follow the on the hard drive. When prompted, click Save and then select a storage location on -screen instructions. NOTE: If you have not previously set up Windows Update, a prompt appears asking you to enter settings before checking for Updates. 3. When the list of drivers is complete, and then verify the operation of the device. Click Install now...
... latest Windows device drivers Obtain the latest Windows device drivers by using Windows Update. To use Windows Update: 1. Click Check for updates. 2. Follow the on the hard drive. When prompted, click Save and then select a storage location on -screen instructions. NOTE: If you have not previously set up Windows Update, a prompt appears asking you to enter settings before checking for Updates. 3. When the list of drivers is complete, and then verify the operation of the device. Click Install now...
User Guide
Page 117
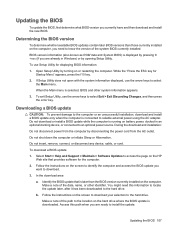
... need this path when you are ready to install the update. Updating the BIOS 107 To use Setup Utility for Startup Menu" appears, press the f10 key. 2. Follow the instructions on the screen to download your selection to access the page on or restarting the computer. Do not download or install a BIOS update while the computer is downloaded. Select Start > Help and Support > Maintain > Software Updates to the hard drive. Updating the BIOS To update the BIOS, first determine what BIOS...
... need this path when you are ready to install the update. Updating the BIOS 107 To use Setup Utility for Startup Menu" appears, press the f10 key. 2. Follow the instructions on the screen to download your selection to access the page on or restarting the computer. Do not download or install a BIOS update while the computer is downloaded. Select Start > Help and Support > Maintain > Software Updates to the hard drive. Updating the BIOS To update the BIOS, first determine what BIOS...
User Guide
Page 118
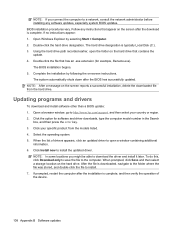
... hard drive designation is complete. Using the hard drive path recorded earlier, open a window containing additional information. 6. Click your country or region. 2. Follow any software updates, especially system BIOS updates. Updating programs and drivers To download and install software other than a BIOS update: 1. Open a browser window, go to install the updated driver. Double-click the file that has an .exe extension (for software and driver downloads, type the computer model number in the Search box, and then press the enter key...
... hard drive designation is complete. Using the hard drive path recorded earlier, open a window containing additional information. 6. Click your country or region. 2. Follow any software updates, especially system BIOS updates. Updating programs and drivers To download and install software other than a BIOS update: 1. Open a browser window, go to install the updated driver. Double-click the file that has an .exe extension (for software and driver downloads, type the computer model number in the Search box, and then press the enter key...

User Guide
Page 125
Index A AC adapter connecting 47 identifying 14 action keys adjusting volume 30 audio CD, DVD, or BD controls 30 decrease screen brightness 29 Help and Support 29 increase screen brightness 29 muting speaker sound 30 switching screen image 29 using 29 volume 35 wireless 30 administrator password creating 85 entering 85 managing 85 airport security devices 57 antennas 13 antivirus software 87 Applications key, Windows 8 audio devices, connecting external 39 audio features 39 audio functions, checking 39 audio-in (microphone) jack 34 audio-out (headphone) jacks 34 AutoPlay 61 B backing...
Index A AC adapter connecting 47 identifying 14 action keys adjusting volume 30 audio CD, DVD, or BD controls 30 decrease screen brightness 29 Help and Support 29 increase screen brightness 29 muting speaker sound 30 switching screen image 29 using 29 volume 35 wireless 30 administrator password creating 85 entering 85 managing 85 airport security devices 57 antennas 13 antivirus software 87 Applications key, Windows 8 audio devices, connecting external 39 audio features 39 audio functions, checking 39 audio-in (microphone) jack 34 audio-out (headphone) jacks 34 AutoPlay 61 B backing...

User Guide
Page 126
... and Support key 29 Hibernation exiting 44 initiated during critical battery level 51 initiating 44 high-definition devices, connecting 41 hotkeys description 31 using 31 HP MediaSmart, starting 37 HP Mobile Broadband Module serial number label 15 HP ProtectSmart Hard Drive Protection 67 HP QuickWeb disabling 100 enabling 100 introducing 1 Setup Utility 104 HP TouchSmart, starting 37 hubs 72 I icons Connection Manager 17 network 17, 93 wired network 17 wireless 17 integrated webcam light, identifying 12 interference, minimizing 94 internal digital...
... and Support key 29 Hibernation exiting 44 initiated during critical battery level 51 initiating 44 high-definition devices, connecting 41 hotkeys description 31 using 31 HP MediaSmart, starting 37 HP Mobile Broadband Module serial number label 15 HP ProtectSmart Hard Drive Protection 67 HP QuickWeb disabling 100 enabling 100 introducing 1 Setup Utility 104 HP TouchSmart, starting 37 hubs 72 I icons Connection Manager 17 network 17, 93 wired network 17 wireless 17 integrated webcam light, identifying 12 interference, minimizing 94 internal digital...
User Guide
Page 127
...lock 6 mute 6 power 6 TouchPad 6 volume mute 6 webcam 12 wireless 6 local area network (LAN) cable required 23 connecting cable 23 low battery level 51 M Main menu 103 maintenance Disk Cleanup 66 Disk Defragmenter 66 managing a power-on password 86 managing an administrator password 85 media activity keys 36 media controls, keys 30 memory module inserting 79 removing 79 memory module compartment cover removing 79 replacing 80 memory module compartment, identifying 11 memory test 105 microphones, internal 34 Microsoft Certificate of Authenticity label 15 minimizing interference 94 monitor port...
...lock 6 mute 6 power 6 TouchPad 6 volume mute 6 webcam 12 wireless 6 local area network (LAN) cable required 23 connecting cable 23 low battery level 51 M Main menu 103 maintenance Disk Cleanup 66 Disk Defragmenter 66 managing a power-on password 86 managing an administrator password 85 media activity keys 36 media controls, keys 30 memory module inserting 79 removing 79 memory module compartment cover removing 79 replacing 80 memory module compartment, identifying 11 memory test 105 microphones, internal 34 Microsoft Certificate of Authenticity label 15 minimizing interference 94 monitor port...
User Guide
Page 128
..., 97 DVD movie play 97 external display 97 HP device drivers 98 optical disc tray 94 optical drive detection 95 Windows drivers 99 turning off the computer 55 U unresponsive system 55 USB cable, connecting 72 USB devices connecting 72 description 72 removing 73 USB hubs 72 USB ports, identifying 9, 10, 72 using Setup Utility 101 using system restore 112 V vents, identifying 11 video, using 40 Virtualization Technology 104 volume adjust 35 keys 35 mute 35 volume keys, identifying 30 volume mute light, identifying 6 W webcam 34 webcam light 34 webcam...
..., 97 DVD movie play 97 external display 97 HP device drivers 98 optical disc tray 94 optical drive detection 95 Windows drivers 99 turning off the computer 55 U unresponsive system 55 USB cable, connecting 72 USB devices connecting 72 description 72 removing 73 USB hubs 72 USB ports, identifying 9, 10, 72 using Setup Utility 101 using system restore 112 V vents, identifying 11 video, using 40 Virtualization Technology 104 volume adjust 35 keys 35 mute 35 volume keys, identifying 30 volume mute light, identifying 6 W webcam 34 webcam light 34 webcam...


