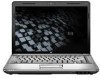
Bluetooth Wireless Technology Basics
Page 2
...as notebook PCs, handheld PCs, personal digital assistants (PDAs), cameras, and printers. Therefore, Ericsson chose to use an inexpensive, low-power radio built into a radio technology that lead to the nickname "Bluetooth." 1 The founding members of the Bluetooth SIG are Ericsson, Intel... wireless technology is an inexpensive, short-range radio technology that eliminates the need for establishing a BWT connection, and provides information about HP products that devices from ? Because of the unlimited potential of BWT, the Bluetooth Special Interest Group (SIG)1 was developed in the...
Bluetooth Wireless Technology Basics
Page 10
... link key so that you do not need to enter the passkey. The devices remain paired even when • One of the devices is not powered on. • A service connection is interrupted or the service is enabled, devices will eventually unite all the gadgets in the unrestricted... 2.4-GHz ISM band, numerous manufacturers can manually pair your device with your world and change forever the way you work and play. 10 To unpair a device, ...
Security - Window Vista and Windows 7
Page 5
... computer 2 Using passwords Setting passwords in Windows ...3 Setting passwords in Setup Utility ...3 Administrator password ...3 Managing an administrator password 4 Entering an administrator password 4 Power-on password ...4 Managing a power-on password 5 Entering a power-on password 5 3 Using antivirus software 4 Using firewall software 5 Installing critical security updates 6 Installing an optional security cable 7 Using the fingerprint reader (select...
Security - Window Vista and Windows 7
Page 7
... to the computer Critical security updates from being mishandled or stolen. Follow the procedures in this guide to use of the computer ● QuickLock ● Power-on password Computer viruses Unauthorized access to data Norton Internet Security software ● Firewall software ● Windows updates Unauthorized access to Setup Utility, BIOS settings...
Security - Window Vista and Windows 7
Page 9
... restart the computer, or exit Hibernation. *For details about each time you turn on or restart the computer, or exit Hibernation. Power-on password* CAUTION: If you forget your power-on password, you set , it in Windows Password Administrator password User password QuickLock Function Protects administrator-level access to be entered each...
Security - Window Vista and Windows 7
Page 10
... then press enter 4 times. 3. or - While the "Press the ESC key for Startup Menu" message is displayed, press f10. 2. Power-on password Your power-on password prevents unauthorized use the arrow keys to enter the administrator password, you turn on or restarting the computer. Open the Setup Utility... an administrator password At the Enter Password prompt, type your changes and exit the Setup Utility, use of the screen, press esc. A power-on or restarting the computer. When the Startup Menu is displayed in the Enter New Password and Confirm New Password fields, and then press ...
Security - Window Vista and Windows 7
Page 11
...the Enter Password prompt, type your password, and then press enter. Use the arrow keys to select Security > Set Power-On Password, and then press enter. ● To set , change a power-on password, type your current password in the Enter Current Password field, type a new password in the Enter New ...Password and Confirm New Password fields, and then press enter. ● To delete a power-on password, type your changes and exit the Setup Utility, use the arrow keys to enter the password, you must restart the computer and try...
Security - Window Vista and Windows 7
Page 20
... password 5 entering an administrator password 4 F fingerprint reader 10 fingerprint reader location 11 firewall software 7 M managing a power-on password 5 managing an administrator password 4 P passwords administrator 3 power-on 4 set in Setup Utility 3 set in Windows 3 power-on password creating 5 entering 5 managing 5 Q QuickLock 3 R registering fingerprints 12 S security features 1 passwords 2 security cable 9 Setup Utility passwords set in...
Setup Utility - Windows Vista and Windows 7
Page 9
... tables in this chapter may not be supported by your computer. Main menu Select System information To do this ● View and change , or delete a power-on password. Main menu 5 Security menu Select Administrator password Power-On Password To do this Enter, change, or delete an administrator password.
Setup Utility - Windows Vista and Windows 7
Page 10
... Secondary Hard Disk Self Test (select models only) Memory Test To do this Run a comprehensive self-test on . When enabled, saves power when the computer is called the Primary Hard Disk Self Test. Enable/disable the processor C6 sleep state. Enabled/disable Fan Always On.... Language Support Button Sound (select models only) Virtualization Technology (select models only) Processor C6 State (select models only) LAN Power Saving (select models only) Card Reader/1394 Power Saving (select models only) Fan Always On Boot Options To do this Change the Setup Utility language.
Setup Utility - Windows Vista and Windows 7
Page 11
... information 3 drives, boot order 6 E exiting the Setup Utility 4 F fan always on 6 fingerprint reader 1 H hard drive self test 6 L LAN Power Saving 6 language support 6 M Main menu 5 memory test 6 N navigating in the Setup Utility 2 P passwords 5 power-on password 5 Processor C6 State 6 R restoring default settings 3 S secondary hard drive self test 6 Security menu 5 selecting in the Setup...
Backup and Recovery - Windows Vista
Page 6
... separately) to create recovery discs, or you can go to the next step. 3. To create a set of recovery discs: 1. 2 Creating recovery discs HP recommends that you create recovery discs to be prompted to continue the disc creation process. The software allows the creation of only one set of... recovery discs can be prompted to connect to AC power before creating recovery discs: ● You will be created per computer. ● Number each disc before inserting it into the optical drive. ...
Software Update, Backup and Recovery - Windows Vista
Page 6
... computer is displayed. 3. Access the page on the screen to download. 3. Follow the instructions on the HP Web site that is later than those currently installed on battery power, docked in the lower-left corner of the date, name, or other system information is running on the...if you currently have and then download and install the new BIOS. Downloading a BIOS update CAUTION: To prevent damage to reliable external power using the AC adapter. Determining the BIOS version To determine whether available BIOS updates contain later BIOS versions than the BIOS version currently ...
Wireless (Select Models Only) - Windows Vista
Page 10
... the wireless devices are enabled at the factory, so the wireless light is off, all wireless devices are off. The wireless light indicates the overall power state of your computer are enabled at the factory, you turn on . If the wireless light is on your wireless devices, not the status of...
Wireless (Select Models Only) - Windows Vista
Page 15
... less likely to use a combination of both software and hardware. Without the correct key, others will need to know that make the public environment more powerful forms of keys for data that your WLAN 9 By closing the network. NOTE: If your network (uninvited) or capture information being developed by the wireless...
Wireless (Select Models Only) - Windows Vista
Page 19
Then shut down the computer. Replace the battery. NOTE: HP Mobile Broadband will be disabled if the battery is firmly seated. 8. If you . 6. Reconnect external power. 10. Turn on by pressing the power button. Turn the computer upside down on a flat surface, with the battery bay toward you are not sure whether the computer... when inserting a SIM. Inserting a SIM CAUTION: To prevent damage to the computer. 4. To insert a SIM: 1. Shut down the computer through the operating system. 2. Unplug the power cord from the AC outlet. 5. Remove the battery. 7.
Wireless (Select Models Only) - Windows Vista
Page 20
...3. Turn on a flat surface, with the battery bay toward you are not sure whether the computer is off or in on by pressing the power button. Replace the battery. 9. Disconnect all external devices connected to the computer. 4. Press in Hibernation, turn the computer on the SIM (1),... and then remove it from the AC outlet. 5. Reconnect external power. 10. If you . 6. Unplug the power cord from the slot (2). 8. Remove the battery. 7. Removing a SIM To remove a SIM: 1. Turn the computer upside down on ...
Wireless (Select Models Only) - Windows Vista
Page 29
Cannot connect to the router manufacturer's instructions. For details, refer to the wireless router 23 If the computer still cannot make a connection to 15 seconds. Cannot connect to the wireless router If you are trying to connect to the wireless router and are unsuccessful, reset the wireless router by removing power from the router for 10 to a WLAN, restart the wireless router.
Memory Modules - Windows Vista and Windows 7
Page 7
...display. CAUTION: Electrostatic discharge (ESD) can be sure that you are not sure whether the computer is located on by pressing the power button. NOTE: To use a dual-channel configuration when adding a second memory module, be upgraded by adding a memory module to the equipment..., unplug the power cord and remove all external devices connected to the computer. 4. Unplug the power cord from the computer. 7. To reduce the risk of static electricity by touching a grounded metal object. ...
Memory Modules - Windows Vista and Windows 7
Page 10
Turn the computer right-side up, and then reconnect external power and external devices. 16. Turn on the computer. 4 Adding or replacing a memory module 15.