
Service Manual
Page 6
... 3Ć14 PowerĆOn SelfĆTests 3Ć14 Demonstration Plot 3Ć14 Example of Setup Sheet (DesignJet 250C 3Ć15 Example of Setup Sheet (DesignJet 350C 3Ć16 4 Preventive Maintenance Moisture on Plotter 4Ć2 Level of Plotter Usage 4Ć2 Friction on Slider... Rod 4Ć2 Noisy Carriage Wheel 4Ć2 Ink Spilling 4Ć3 Belt Swelling 4Ć3 Cleaning the RollĆfeed Assembly 4Ć3 Cleaning ...
... 3Ć14 PowerĆOn SelfĆTests 3Ć14 Demonstration Plot 3Ć14 Example of Setup Sheet (DesignJet 250C 3Ć15 Example of Setup Sheet (DesignJet 350C 3Ć16 4 Preventive Maintenance Moisture on Plotter 4Ć2 Level of Plotter Usage 4Ć2 Friction on Slider... Rod 4Ć2 Noisy Carriage Wheel 4Ć2 Ink Spilling 4Ć3 Belt Swelling 4Ć3 Cleaning the RollĆfeed Assembly 4Ć3 Cleaning ...
Service Manual
Page 7
5 Functional Overview (more ' HP DesignJet 200/220 Service Manual) Introduction 5Ć2 Loading Sheet Media 5Ć2 Loading Roll Media on the DesignJet 330 and 350C 5Ć4 Roll Media 5Ć5 Removing Static Charge from the Media 5Ć5 Gripping ...the Media 5Ć5 PinchĆArm Sensor 5Ć5 Providing a Force on Top of the Media 5Ć6 Bail 5Ć6 BailĆLift Mechanism 5Ć6 Moving the Carriage 5Ć6 CarriageĆDrive Mechanics 5Ć6 Motor, Belt...
5 Functional Overview (more ' HP DesignJet 200/220 Service Manual) Introduction 5Ć2 Loading Sheet Media 5Ć2 Loading Roll Media on the DesignJet 330 and 350C 5Ć4 Roll Media 5Ć5 Removing Static Charge from the Media 5Ć5 Gripping ...the Media 5Ć5 PinchĆArm Sensor 5Ć5 Providing a Force on Top of the Media 5Ć6 Bail 5Ć6 BailĆLift Mechanism 5Ć6 Moving the Carriage 5Ć6 CarriageĆDrive Mechanics 5Ć6 Motor, Belt...
Service Manual
Page 8
... the Trailing Cable 6Ć35 Removing the TrailingĆCable Guide 6Ć36 Removing the Cartridge Carriage 6Ć37 Removing the Drive Belt 6Ć39 Removing the DriveĆBelt Pulley 6Ć40 Removing the Drive Roller 6Ć41 Reinstalling the Drive Roller 6Ć42 Removing the PinchĆArm Lift Mechanism...
... the Trailing Cable 6Ć35 Removing the TrailingĆCable Guide 6Ć36 Removing the Cartridge Carriage 6Ć37 Removing the Drive Belt 6Ć39 Removing the DriveĆBelt Pulley 6Ć40 Removing the Drive Roller 6Ć41 Reinstalling the Drive Roller 6Ć42 Removing the PinchĆArm Lift Mechanism...

Service Manual
Page 41
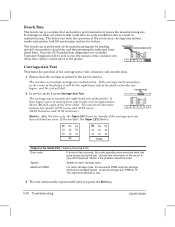
Keep in their bags with water or alcohol based substances. Belt Swelling To prevent new belts from the old EEROM and upload it with dissicant until you need to the new EEROM. Never clean it to install them in mind that ...
Keep in their bags with water or alcohol based substances. Belt Swelling To prevent new belts from the old EEROM and upload it with dissicant until you need to the new EEROM. Never clean it to install them in mind that ...
Service Manual
Page 48
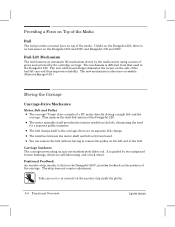
...by the media motor using a series of gears and actuated by two integrated bronze bushings, which are no bail sensor on the DesignJet 230 and 250C and DesignJet 330 and 350C. The mechanism is also more accessible. (Removal ' page 6Ć29.) Moving the Carriage CarriageĆDrive Mechanics ...Motor, Belt and Pulley D The carriage (YĆaxis) drive consists of the bailĆlift cam and thus improves reliability. Carriage Guidance The ...
...by the media motor using a series of gears and actuated by two integrated bronze bushings, which are no bail sensor on the DesignJet 230 and 250C and DesignJet 330 and 350C. The mechanism is also more accessible. (Removal ' page 6Ć29.) Moving the Carriage CarriageĆDrive Mechanics ...Motor, Belt and Pulley D The carriage (YĆaxis) drive consists of the bailĆlift cam and thus improves reliability. Carriage Guidance The ...

Service Manual
Page 79
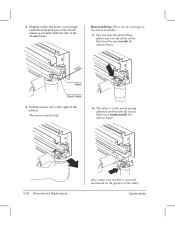
... the main PCA (connector MOT Y), and from the clip at the back of the motor. 3 Press the carriage motor towards the left, and remove the belt from the plotter, CAUTION In the following step, take care not to the right, and remove it from the motor shaft. If you need greater...
... the main PCA (connector MOT Y), and from the clip at the back of the motor. 3 Press the carriage motor towards the left, and remove the belt from the plotter, CAUTION In the following step, take care not to the right, and remove it from the motor shaft. If you need greater...
Service Manual
Page 80
... the protruding plastic part on the grooves of the motor. Position it underneath the chassis beam. 6Ć22 Removal and Replacement Also, make sure the belt is a flat metal spring attached underneath the motor. Position this part inside the chassis beam. D The other is correctly positioned on top of the shaft...
... the protruding plastic part on the grooves of the motor. Position it underneath the chassis beam. 6Ć22 Removal and Replacement Also, make sure the belt is a flat metal spring attached underneath the motor. Position this part inside the chassis beam. D The other is correctly positioned on top of the shaft...
Service Manual
Page 95
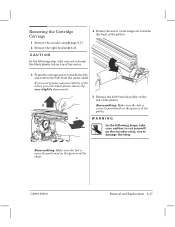
... CAUTION In the following steps, take care not to damage the strip. Reassembling: Make sure the belt is correctly positioned on the grooves of the motor. 4 Rotate the motor on the left , and remove the belt from the pulley on its hinge out towards the back of the plotter. 3 Press the carriage... grooves of the plotter. Removing the Cartridge Carriage 1 Remove the encoder strip ' page 6Ć17. 2 Remove the right bracket ' 6Ć21. B Reassembling: Make sure the belt is correctly positioned on the encoder strip, nor to break the black plastic tab on top of the pulley.
... CAUTION In the following steps, take care not to damage the strip. Reassembling: Make sure the belt is correctly positioned on the grooves of the motor. 4 Rotate the motor on the left , and remove the belt from the pulley on its hinge out towards the back of the plotter. 3 Press the carriage... grooves of the plotter. Removing the Cartridge Carriage 1 Remove the encoder strip ' page 6Ć17. 2 Remove the right bracket ' 6Ć21. B Reassembling: Make sure the belt is correctly positioned on the encoder strip, nor to break the black plastic tab on top of the pulley.
Service Manual
Page 97
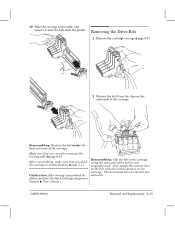
... the same part of the carriage. The horizontal lines on the carriage. originally used. Also, match the vertical lines on the belt with the belt from the clips on the underside of the carriage. Make sure that you correctly reconnect the trailing cable ' page 6Ć35.... Removing the Drive Belt 1 Remove the cartridge carriage ' page 6Ć37. 2 Release the belt from the plotter. plotter, perform the black cartridgeĆalignment. (Details ' User's Guide.) C4699Ć90000 Removal...
... the same part of the carriage. The horizontal lines on the carriage. originally used. Also, match the vertical lines on the belt with the belt from the clips on the underside of the carriage. Make sure that you correctly reconnect the trailing cable ' page 6Ć35.... Removing the Drive Belt 1 Remove the cartridge carriage ' page 6Ć37. 2 Release the belt from the plotter. plotter, perform the black cartridgeĆalignment. (Details ' User's Guide.) C4699Ć90000 Removal...
Service Manual
Page 98
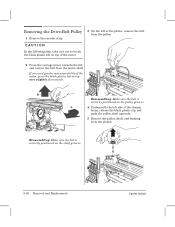
... upwards. 5 Remove the pulley, shaft, and bushing from the motor shaft. Reassembling: Make sure the belt is correctly positioned on top of the motor. 3 On the left of the plotter, remove the belt from the pulley. 2 Press the carriage motor towards the left side of the motor, press the black... plastic tab on the shaft grooves. 6Ć40 Removal and Replacement C4699Ć90000 A 4 Underneath the left , and remove the belt from the plotter. CAUTION In the following step, take care not to break the black plastic tab on the pulley grooves. B Reassembling: Make sure the...
... upwards. 5 Remove the pulley, shaft, and bushing from the motor shaft. Reassembling: Make sure the belt is correctly positioned on top of the motor. 3 On the left of the plotter, remove the belt from the pulley. 2 Press the carriage motor towards the left side of the motor, press the black... plastic tab on the shaft grooves. 6Ć40 Removal and Replacement C4699Ć90000 A 4 Underneath the left , and remove the belt from the plotter. CAUTION In the following step, take care not to break the black plastic tab on the pulley grooves. B Reassembling: Make sure the...
Service Manual
Page 144
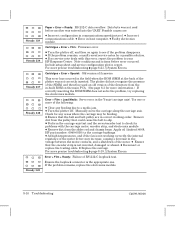
...move the carriage along the carriage axis. Remove dirt from the slider rod and chassis beam. D Remove dirt from the pulley that the belt and belt pulley are : D Incorrect configuration in report. Data byte was not read before error occurred. D At high temperatures, and if the ...to check for a possible solution. Cartridges + Error + Film: Firmware error. D Turn the plotter off . D Ensure that could cause the belt to your HP Response Center. This error has occurred in the voltage between the motor contacts, and a shutdown of the plotter was entered into the UART. If...
...move the carriage along the carriage axis. Remove dirt from the slider rod and chassis beam. D Remove dirt from the pulley that the belt and belt pulley are : D Incorrect configuration in report. Data byte was not read before error occurred. D At high temperatures, and if the ...to check for a possible solution. Cartridges + Error + Film: Firmware error. D Turn the plotter off . D Ensure that could cause the belt to your HP Response Center. This error has occurred in the voltage between the motor contacts, and a shutdown of the plotter was entered into the UART. If...
Service Manual
Page 150
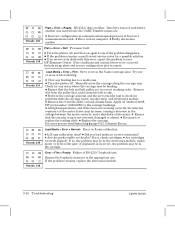
...Replace the carriage. Load Media + Error + Normal: Error in the YĆaxis (carriage axis). D Remove dirt from the pulley that the belt and belt pulley are : D Incorrect configuration in the voltage between the motor contacts, and a shutdown of the motor. D Is XĆaxis calibration done...? D Are the marks visible on again to your HP Response Center. If so, the problem may increase, causing a decrease in ...
...Replace the carriage. Load Media + Error + Normal: Error in the YĆaxis (carriage axis). D Remove dirt from the pulley that the belt and belt pulley are : D Incorrect configuration in the voltage between the motor contacts, and a shutdown of the motor. D Is XĆaxis calibration done...? D Are the marks visible on again to your HP Response Center. If so, the problem may increase, causing a decrease in ...
Service Manual
Page 165
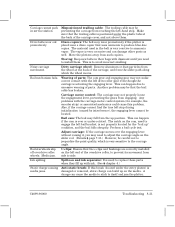
... cycle test. Bail starwheels slip off overdrive roller wheels. Media jam. Diazo copiers: The belt may fall from the slider path along which is positioned under Ćrotated. Storing: Keep new belts in the belt is media jams. damaged or removed, static charge can build up " condition, and the... engagement lever, preventing the gears from reaching the left driveĆroller gear even though the carriage is actuating the engaging lever. Drive belts wear out prematurely. This can cause the media to stick to avoid incorrect swelling. CĆclips: Ensure that the bail cable has ...
... cycle test. Bail starwheels slip off overdrive roller wheels. Media jam. Diazo copiers: The belt may fall from the slider path along which is positioned under Ćrotated. Storing: Keep new belts in the belt is media jams. damaged or removed, static charge can build up " condition, and the... engagement lever, preventing the gears from reaching the left driveĆroller gear even though the carriage is actuating the engaging lever. Drive belts wear out prematurely. This can cause the media to stick to avoid incorrect swelling. CĆclips: Ensure that the bail cable has ...
Service Manual
Page 169
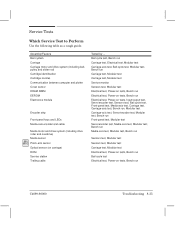
... ... Service Tests Which Service Test to Perform Use the following table as a rough guide: Assembly/Feature Bail system Carriage Carriage motor and drive system (including belt, pulley and slider rod) Cartridge identification Cartridge nozzles Communication between computer and plotter Cover sensor DRAM SIMM EEROM Electronics module Encoder strip Front-panel keys...
... ... Service Tests Which Service Test to Perform Use the following table as a rough guide: Assembly/Feature Bail system Carriage Carriage motor and drive system (including belt, pulley and slider rod) Cartridge identification Cartridge nozzles Communication between computer and plotter Cover sensor DRAM SIMM EEROM Electronics module Encoder strip Front-panel keys...
Service Manual
Page 172
... (26.67 inches/sec and 13.33 inches/sec). Status. The maximum allowed is a routine that the carriage is parked in the report to your HP Response Center, if the problem cannot be able to the Serial Port (Viewing Output ' 8-36) Error code: If an error has occurred, this information... the PCĆbased plotter diagnostics are available, Customer Engineers will fail. ALT CarriageĆAxis Test This tests the operation of the carriage motor, belt, tensioner, and encoder strip. 1 Ensure that each plotter performs before it will hit the rightĆhand side of the plotter when the test ...
... (26.67 inches/sec and 13.33 inches/sec). Status. The maximum allowed is a routine that the carriage is parked in the report to your HP Response Center, if the problem cannot be able to the Serial Port (Viewing Output ' 8-36) Error code: If an error has occurred, this information... the PCĆbased plotter diagnostics are available, Customer Engineers will fail. ALT CarriageĆAxis Test This tests the operation of the carriage motor, belt, tensioner, and encoder strip. 1 Ensure that each plotter performs before it will hit the rightĆhand side of the plotter when the test ...

Service Manual
Page 193
... VerticalĆLine Straightness (VLS) Symptoms VerticalĆline straightness is a measure of the horizontal distance between carriage bushings and slider rod: 230 250C (See ' Error code Steady 346.) 330 350C (See ' Error code Steady 234.) C4699Ć90000 Troubleshooting 8Ć59 Swath Swath Swath ...lines that are damaged or dirty. D Friction between the segments of most customers, some may complain even when the plotter is causing the belt to slip. If the plotter is called a bidirectional error. If you print the same plot using a unidirectional print mode, the error ...
... VerticalĆLine Straightness (VLS) Symptoms VerticalĆline straightness is a measure of the horizontal distance between carriage bushings and slider rod: 230 250C (See ' Error code Steady 346.) 330 350C (See ' Error code Steady 234.) C4699Ć90000 Troubleshooting 8Ć59 Swath Swath Swath ...lines that are damaged or dirty. D Friction between the segments of most customers, some may complain even when the plotter is causing the belt to slip. If the plotter is called a bidirectional error. If you print the same plot using a unidirectional print mode, the error ...
Service Manual
Page 212
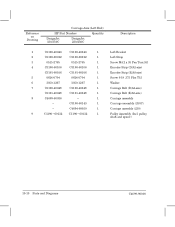
...Ćsize) Carriage Belt (E/A0Ćsize) Carriage assembly Carriage assembly (250C) Carriage assembly (230) Pulley Assembly (Incl. pulley, shaft and spacer) 10Ć10 Parts and Diagrams C4699Ć90000 C3190Ć60143 1 - Reference on Drawing CarriageĆAxis (Left End) HP Part Number Quantity DesignJet 330/350C DesignJet 230/250C Description 1 C3190Ć40040...
...Ćsize) Carriage Belt (E/A0Ćsize) Carriage assembly Carriage assembly (250C) Carriage assembly (230) Pulley Assembly (Incl. pulley, shaft and spacer) 10Ć10 Parts and Diagrams C4699Ć90000 C3190Ć60143 1 - Reference on Drawing CarriageĆAxis (Left End) HP Part Number Quantity DesignJet 330/350C DesignJet 230/250C Description 1 C3190Ć40040...
Service Manual
Page 214
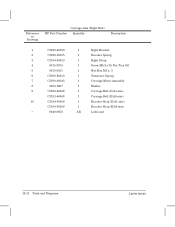
Reference on Drawing CarriageĆAxis (Right End) HP Part Number Quantity Description 1 C3190Ć40039 1 Right Bracket 2 C3190Ć00015 1 Encoder Spring 3 C3190Ć00013 1 Right Strap 4 0515Ć2765 1 Screw M4.2....5 6 C3190Ć80010 1 Tensioner Spring 7 C3190Ć60145 1 CarriageĆMotor Assembly 8 3050Ć1267 1 Washer 9 C3190Ć40048 1 Carriage Belt (D/A1Ćsize) C3191Ć40048 1 Carriage Belt (E/A0Ćsize) 10 C3190Ć60106 1 Encoder Strip (D/A1Ćsize) C3190Ć60106 1 Encoder Strip (E/A0Ćsize) - 6040Ć...
Reference on Drawing CarriageĆAxis (Right End) HP Part Number Quantity Description 1 C3190Ć40039 1 Right Bracket 2 C3190Ć00015 1 Encoder Spring 3 C3190Ć00013 1 Right Strap 4 0515Ć2765 1 Screw M4.2....5 6 C3190Ć80010 1 Tensioner Spring 7 C3190Ć60145 1 CarriageĆMotor Assembly 8 3050Ć1267 1 Washer 9 C3190Ć40048 1 Carriage Belt (D/A1Ćsize) C3191Ć40048 1 Carriage Belt (E/A0Ćsize) 10 C3190Ć60106 1 Encoder Strip (D/A1Ćsize) C3190Ć60106 1 Encoder Strip (E/A0Ćsize) - 6040Ć...
Service Manual
Page 250
...14, GlossaryĆ2 and parity, 5Ć14 error DesignJet 230/250C, 8Ć8 DesignJet 330/350C, 8Ć14 setup sheet, 3Ć15, 3Ć16 bellows, primer, 5Ć11 belt, 8Ć35 carriageĆaxis test, 8Ć38 error DesignJet 230/250C, 8Ć10 IndexĆ2 C4699Ć90000 A... Align Cartridge(s) key, 3Ć12 alignment, 8Ć61 black cartridge, 7Ć2 error DesignJet 230/250C, 8Ć12 DesignJet 330/350C, 8Ć18 ALT key in service mode, 7Ć5, 7Ć6, 7Ć7 ammonia, causing belt damage, 8Ć31 antiĆstatic brush, 5Ć5, 8Ć31 Apple, network connections...
...14, GlossaryĆ2 and parity, 5Ć14 error DesignJet 230/250C, 8Ć8 DesignJet 330/350C, 8Ć14 setup sheet, 3Ć15, 3Ć16 bellows, primer, 5Ć11 belt, 8Ć35 carriageĆaxis test, 8Ć38 error DesignJet 230/250C, 8Ć10 IndexĆ2 C4699Ć90000 A... Align Cartridge(s) key, 3Ć12 alignment, 8Ć61 black cartridge, 7Ć2 error DesignJet 230/250C, 8Ć12 DesignJet 330/350C, 8Ć18 ALT key in service mode, 7Ć5, 7Ć6, 7Ć7 ammonia, causing belt damage, 8Ć31 antiĆstatic brush, 5Ć5, 8Ć31 Apple, network connections...
Service Manual
Page 253
connections flex circuit, testing DesignJet 230/250C, 8Ć39 DesignJet 330/350C, 8Ć40 main PCA, 5Ć13 consumption, power, 2Ć2 continue plotting, key, 3Ć13 copiers, diazo, wearing belt, 8Ć31 country of manufacture, 9Ć2 cover sensor, 5Ć13, 8Ć35, 8Ć47, ...Ć28 drive belt premature wearing, 8Ć31 removing, 6Ć39 drive roller, 7Ć8, 8Ć35, 8Ć57, GlossaryĆ3 bearings, 8Ć57 correction factor, DesignJet 230/250C, 8Ć49 faulty, 8Ć57 gear, GlossaryĆ3 problem DesignJet 230/250C, 8Ć11 DesignJet 330/350C, 8&#...
connections flex circuit, testing DesignJet 230/250C, 8Ć39 DesignJet 330/350C, 8Ć40 main PCA, 5Ć13 consumption, power, 2Ć2 continue plotting, key, 3Ć13 copiers, diazo, wearing belt, 8Ć31 country of manufacture, 9Ć2 cover sensor, 5Ć13, 8Ć35, 8Ć47, ...Ć28 drive belt premature wearing, 8Ć31 removing, 6Ć39 drive roller, 7Ć8, 8Ć35, 8Ć57, GlossaryĆ3 bearings, 8Ć57 correction factor, DesignJet 230/250C, 8Ć49 faulty, 8Ć57 gear, GlossaryĆ3 problem DesignJet 230/250C, 8Ć11 DesignJet 330/350C, 8&#...


