
Service Manual
Page 8
... the EngagingĆLever Support 6Ć31 Removing the Overdrive Roller 6Ć32 Removing the Back Cover 6Ć33 Removing the Trailing Cable 6Ć34 Repositioning the Trailing Cable 6Ć35 Removing the TrailingĆCable Guide 6Ć36 Removing the Cartridge Carriage 6Ć37 Removing the Drive Belt 6Ć39 Removing the DriveĆBelt...
... the EngagingĆLever Support 6Ć31 Removing the Overdrive Roller 6Ć32 Removing the Back Cover 6Ć33 Removing the Trailing Cable 6Ć34 Repositioning the Trailing Cable 6Ć35 Removing the TrailingĆCable Guide 6Ć36 Removing the Cartridge Carriage 6Ć37 Removing the Drive Belt 6Ć39 Removing the DriveĆBelt...

Service Manual
Page 11
...Assemblies 10Ć2 Replacement Parts 10Ć3 Part Lists and ExplodedĆView Diagrams 10Ć4 Legs 10Ć4 Top and Back Covers, Electronics, Trailing Cable 10Ć6 End Covers 10Ć8 CarriageĆAxis (Left End 10Ć10 CarriageĆAxis (Right End 10Ć12 Service Station, Primer... and Overdrive 10Ć18 PinchĆArm Assembly 10Ć22 RollĆFeed Assembly 10Ć24 Accessories 10Ć26 Interface Cables 10Ć29 11 Support Services HewlettĆPackard support services in the United States 11Ć2 HewlettĆPackard support services in Europe...
...Assemblies 10Ć2 Replacement Parts 10Ć3 Part Lists and ExplodedĆView Diagrams 10Ć4 Legs 10Ć4 Top and Back Covers, Electronics, Trailing Cable 10Ć6 End Covers 10Ć8 CarriageĆAxis (Left End 10Ć10 CarriageĆAxis (Right End 10Ć12 Service Station, Primer... and Overdrive 10Ć18 PinchĆArm Assembly 10Ć22 RollĆFeed Assembly 10Ć24 Accessories 10Ć26 Interface Cables 10Ć29 11 Support Services HewlettĆPackard support services in the United States 11Ć2 HewlettĆPackard support services in Europe...

Service Manual
Page 58
...nozzle firing circuit Some electronic components on the DesignJet 250C and 350C carriage PCA are not present on that of the DesignJet 650C. At powerĆon the plotter firmware identifies whether the carriage is based on the DesignJet 230 and 330 carriage PCA. Carriage PCA The ...carriage PCA is for a color or a monochrome model, and behaves accordingly. It connects to the main PCA through a long 60Ćconductor (2x30) trailing cable...
...nozzle firing circuit Some electronic components on the DesignJet 250C and 350C carriage PCA are not present on that of the DesignJet 650C. At powerĆon the plotter firmware identifies whether the carriage is based on the DesignJet 230 and 330 carriage PCA. Carriage PCA The ...carriage PCA is for a color or a monochrome model, and behaves accordingly. It connects to the main PCA through a long 60Ćconductor (2x30) trailing cable...
Service Manual
Page 72
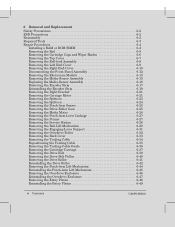
...X Media Motor Encoder MOT X MOT Y Media Motor Carriage Motor C Reassembling: After reinstalling the C electronics module, the plotter must be Prevent tugging on the cables at the point of connection by its location hook on the floor of the plotter. To configure plotter ' page 8Ć28. 8 Pull the electronics module... PCA. Calibrations: After having installed a new B electronics module, perform the following calibrations. (Details ' chapter 7.) A 1. right and out of the plotter. 9 Disconnect all cables from the old P1 Trailing Cable EEROM and upload it into the new one.
...X Media Motor Encoder MOT X MOT Y Media Motor Carriage Motor C Reassembling: After reinstalling the C electronics module, the plotter must be Prevent tugging on the cables at the point of connection by its location hook on the floor of the plotter. To configure plotter ' page 8Ć28. 8 Pull the electronics module... PCA. Calibrations: After having installed a new B electronics module, perform the following calibrations. (Details ' chapter 7.) A 1. right and out of the plotter. 9 Disconnect all cables from the old P1 Trailing Cable EEROM and upload it into the new one.

Service Manual
Page 75
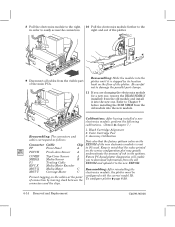
Removing the Encoder Strip 1 Move the cartridge carriage to the connector marked P1 on the trailingĆcable guide. 2 Remove the right endĆcover ' page 6Ć10. 3 Remove the left endĆcover ' page 6Ć9. 4 Disconnect the trailing cable from the main PCA. C4699Ć90000 Removal and Replacement 6Ć17 Reassembling: The cable connects to the left, over the service station. 5 Disconnect the trailing cable from the guides on the right bracket 6 Fold the trailing cable upwards and store it on the main PCA.
Removing the Encoder Strip 1 Move the cartridge carriage to the connector marked P1 on the trailingĆcable guide. 2 Remove the right endĆcover ' page 6Ć10. 3 Remove the left endĆcover ' page 6Ć9. 4 Disconnect the trailing cable from the main PCA. C4699Ć90000 Removal and Replacement 6Ć17 Reassembling: The cable connects to the left, over the service station. 5 Disconnect the trailing cable from the guides on the right bracket 6 Fold the trailing cable upwards and store it on the main PCA.
Service Manual
Page 79
...following step, take care not to the plotter chassis. 1 Remove the right bracket ' page 6Ć21. 2 Disconnect the carriageĆmotor cable from the main PCA (connector MOT Y), and from the motor shaft. C4699Ć90000 Removal and Replacement 6Ć21 If you need greater ...maneuverability of the trailingĆcable guide. Removing the Right Bracket Removing the Carriage Motor 1 Remove the encoder strip ' page 6Ć17. 2 Remove the screw that ...
...following step, take care not to the plotter chassis. 1 Remove the right bracket ' page 6Ć21. 2 Disconnect the carriageĆmotor cable from the main PCA (connector MOT Y), and from the motor shaft. C4699Ć90000 Removal and Replacement 6Ć21 If you need greater ...maneuverability of the trailingĆcable guide. Removing the Right Bracket Removing the Carriage Motor 1 Remove the encoder strip ' page 6Ć17. 2 Remove the screw that ...

Service Manual
Page 92
...DesignJet 230 only, it is also necessary to damage the strip. C C D B A 3 Move the carriage out of the cartridge carriage. 6Ć34 Removal and Replacement C4699Ć90000 WARNING In the following step, take care neither to cut yourself on the top of the cartridge carriage by pulling them slightly outwards. Removing the Trailing Cable... 1 Remove the right endĆcover ' page 6Ć10. 2 Disconnect the trailing cable from the connector marked P1 on the main PCA, and from the guides ...
...DesignJet 230 only, it is also necessary to damage the strip. C C D B A 3 Move the carriage out of the cartridge carriage. 6Ć34 Removal and Replacement C4699Ć90000 WARNING In the following step, take care neither to cut yourself on the top of the cartridge carriage by pulling them slightly outwards. Removing the Trailing Cable... 1 Remove the right endĆcover ' page 6Ć10. 2 Disconnect the trailing cable from the connector marked P1 on the main PCA, and from the guides ...

Service Manual
Page 93
Repositioning the Trailing Cable IMPORTANT When you reinstall the trailing cable, make sure that you position it under tabs ! Trailing cable under the plastic tabs at the back of the carriage up. 7 Release the trailing cable from the clips on the trailingĆcable guide, and remove the trailing cable from the plotter. 6 Disconnect the trailing cable from the connector on the carriage. Removal and Replacement 6Ć35 C4699Ć90000 Otherwise, the plotter will not be able to load media. 5 Pull the top of the carriage cover, and not above them.
Repositioning the Trailing Cable IMPORTANT When you reinstall the trailing cable, make sure that you position it under tabs ! Trailing cable under the plastic tabs at the back of the carriage up. 7 Release the trailing cable from the clips on the trailingĆcable guide, and remove the trailing cable from the plotter. 6 Disconnect the trailing cable from the connector on the carriage. Removal and Replacement 6Ć35 C4699Ć90000 Otherwise, the plotter will not be able to load media. 5 Pull the top of the carriage cover, and not above them.

Service Manual
Page 94
Removing the TrailingĆCable Guide 1 Remove the right bracket ' page 6Ć21. 5 Rotate the trailingĆcable guide back on its hinge, until it clicks off from the chassis beam. 2 Remove the back cover ' page 6Ć33. 3 Remove the trailing cable ' page 6Ć34. 4 Slide the trailingĆcable guide to the right, releasing it from the leftĆbracket tab. 6 Remove the trailingĆcable guide from the plotter. 6Ć36 Removal and Replacement C4699Ć90000
Removing the TrailingĆCable Guide 1 Remove the right bracket ' page 6Ć21. 5 Rotate the trailingĆcable guide back on its hinge, until it clicks off from the chassis beam. 2 Remove the back cover ' page 6Ć33. 3 Remove the trailing cable ' page 6Ć34. 4 Slide the trailingĆcable guide to the right, releasing it from the leftĆbracket tab. 6 Remove the trailingĆcable guide from the plotter. 6Ć36 Removal and Replacement C4699Ć90000

Service Manual
Page 96
6 Release the two indicated clips on the top of the carriage on the trailingĆcable guide. WARNING In the following step, take care not to spill ink from the connector on the carriage. 7 Pull the top of the carriage up. 9 Rest the top of the cartridge carriage by pulling them slightly outwards. 8 Disconnect the trailing cable from the carriage. 6Ć38 Removal and Replacement C4699Ć90000
6 Release the two indicated clips on the top of the carriage on the trailingĆcable guide. WARNING In the following step, take care not to spill ink from the connector on the carriage. 7 Pull the top of the carriage up. 9 Rest the top of the cartridge carriage by pulling them slightly outwards. 8 Disconnect the trailing cable from the carriage. 6Ć38 Removal and Replacement C4699Ć90000
Service Manual
Page 97
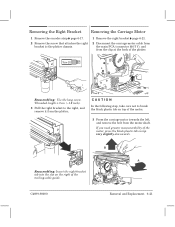
...;39 Removing the Drive Belt 1 Remove the cartridge carriage ' page 6Ć37. 2 Release the belt from the plotter. Make sure that you correctly reconnect the trailing cable ' page 6Ć35. 10 Slide the carriage to the right, and remove it with the vertical grooves on the carriage. originally used. Also, match the...
...;39 Removing the Drive Belt 1 Remove the cartridge carriage ' page 6Ć37. 2 Release the belt from the plotter. Make sure that you correctly reconnect the trailing cable ' page 6Ć35. 10 Slide the carriage to the right, and remove it with the vertical grooves on the carriage. originally used. Also, match the...

Service Manual
Page 122
...; Clockwise Gap ÎÎ Increases 4 Check the carriageĆtoĆmedia distance ' page 7Ć11. 5 Reinstall the top of the carriage. 6 Check the trailing cable to load media. 7Ć14 Calibrations and Adjustments C4699Ć90000 Otherwise, the plotter will adjust the carriage angle on the carriage.... Trailing cable under the plastic tabs at the back of the carriage cover, and not above them. This will not be able to make sure that ...
...; Clockwise Gap ÎÎ Increases 4 Check the carriageĆtoĆmedia distance ' page 7Ć11. 5 Reinstall the top of the carriage. 6 Check the trailing cable to load media. 7Ć14 Calibrations and Adjustments C4699Ć90000 Otherwise, the plotter will adjust the carriage angle on the carriage.... Trailing cable under the plastic tabs at the back of the carriage cover, and not above them. This will not be able to make sure that ...
Service Manual
Page 141
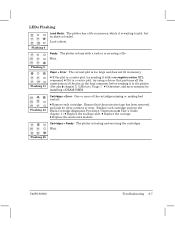
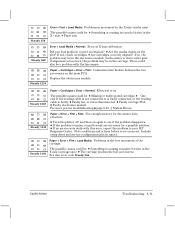
... removed, and look for dirty contacts or wear. D Remove each cartridge and run the BlackĆCartridge Alignment Procedure. (Instructions ' User's Guide, chapter 1.) D Replace the trailing cable. Wait. Flashing 29 C4699Ć90000 Troubleshooting 8Ć7 D If it to plot, but no negative motion RTL command. D Replace the carriage. Ensure that performs all...
... removed, and look for dirty contacts or wear. D Remove each cartridge and run the BlackĆCartridge Alignment Procedure. (Instructions ' User's Guide, chapter 1.) D Replace the trailing cable. Wait. Flashing 29 C4699Ć90000 Troubleshooting 8Ć7 D If it to plot, but no negative motion RTL command. D Replace the carriage. Ensure that performs all...
Service Manual
Page 142
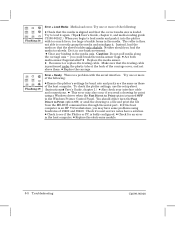
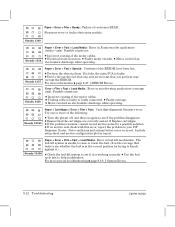
... and parity are the same as those of 19200 and 38400. D Are both mediaĆsensor flags installed? D Reconnect or replace the trailing cable. Make sure that the trailing cable is turned OFF in the host computer. D Replace the carriage. Error + Ready: There is badly configured. Try one brisk movement. You... guide C3190Ć90162.) When you could break the mediaĆsensor flags. Instead, load the media so that the correct media size is an HP 712 workstation, you send a drawing for an error in the Windows Printer Control Panel. Caution: Do not pull media along the carriage axis -...
... and parity are the same as those of 19200 and 38400. D Are both mediaĆsensor flags installed? D Reconnect or replace the trailing cable. Make sure that the trailing cable is turned OFF in the host computer. D Replace the carriage. Error + Ready: There is badly configured. Try one brisk movement. You... guide C3190Ć90162.) When you could break the mediaĆsensor flags. Instead, load the media so that the correct media size is an HP 712 workstation, you send a drawing for an error in the Windows Printer Control Panel. Caution: Do not pull media along the carriage axis -...
Service Manual
Page 143
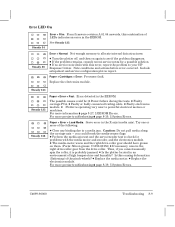
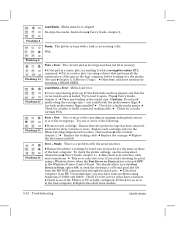
... service note deals with the media motor and encoder, and the electronics module. D Faulty or badly connected trailing cable. D Plotter is probably jammed. you cannot manually spin the roller, it is operating very near to your HP Response Center. Then, if you could be: D Power failure during the tests. D Replace the electronics module...
... service note deals with the media motor and encoder, and the electronics module. D Faulty or badly connected trailing cable. D Plotter is probably jammed. you cannot manually spin the roller, it is operating very near to your HP Response Center. Then, if you could be: D Power failure during the tests. D Replace the electronics module...
Service Manual
Page 144
...if the problem disappears. D Remove dirt from the in the YĆaxis (carriage axis). Apply oil (Anderol 4068, HP part number: 6040Ć0858) to your HP Response Center. For more precise troubleshooting ' page 8Ć23, w System Errors. For more precise troubleshooting ' page ...Include setup sheet and service configuration plot in communications speed/protocol. Error + Film + Ready: Failure of firmware. D Reconnect or replace the trailing cable. Steady 139 Steady 234 Steady 237 Steady 346 Steady 349 Paper + Error + Ready: RSĆ232ĆC data overflow. Check for ...
...if the problem disappears. D Remove dirt from the in the YĆaxis (carriage axis). Apply oil (Anderol 4068, HP part number: 6040Ć0858) to your HP Response Center. For more precise troubleshooting ' page 8Ć23, w System Errors. For more precise troubleshooting ' page ...Include setup sheet and service configuration plot in communications speed/protocol. Error + Film + Ready: Failure of firmware. D Reconnect or replace the trailing cable. Steady 139 Steady 234 Steady 237 Steady 346 Steady 349 Paper + Error + Ready: RSĆ232ĆC data overflow. Check for ...
Service Manual
Page 145
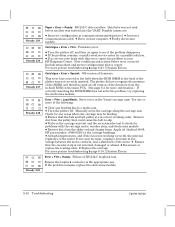
... module, media motor or driveĆroller gear; D Faulty carriage PCA. D Turn the plotter off, and then on again to your HP Response Center. Note conditions and actions before error occurred. D The carriage touches the bail as it moves. See also error code Steady 346... ' page 8Ć19, w System Errors. Include setup sheet and service configuration plot in the free movement of the trailing cable is not connected or is badly connected, or the trailing cable is causing excessive friction in the YĆaxis (carriage axis). D Are cartridges correctly aligned? There could be: D...
... module, media motor or driveĆroller gear; D Faulty carriage PCA. D Turn the plotter off, and then on again to your HP Response Center. Note conditions and actions before error occurred. D The carriage touches the bail as it moves. See also error code Steady 346... ' page 8Ć19, w System Errors. Include setup sheet and service configuration plot in the free movement of the trailing cable is not connected or is badly connected, or the trailing cable is causing excessive friction in the YĆaxis (carriage axis). D Are cartridges correctly aligned? There could be: D...
Service Manual
Page 146
Possible causes are : Steady 3456 D Incorrect routing of the motor cables. D Faulty carriage. D Motor received an electrostatic discharge while operating. D Ensure that you ...precise troubleshooting ' page 8Ć19, w System Errors. 8Ć12 Troubleshooting C4699Ć90000 Try one or more of the motor cables. Steady 13456 Paper + Error + Film + Fast + Load Media: Error in report. Firmware error or faulty electronics module. D ...recent service notes for a possible solution. D Use the bail cycle test to your HP Response Center. D Trailing cable is faulty.
Possible causes are : Steady 3456 D Incorrect routing of the motor cables. D Faulty carriage. D Motor received an electrostatic discharge while operating. D Ensure that you ...precise troubleshooting ' page 8Ć19, w System Errors. 8Ć12 Troubleshooting C4699Ć90000 Try one or more of the motor cables. Steady 13456 Paper + Error + Film + Fast + Load Media: Error in report. Firmware error or faulty electronics module. D ...recent service notes for a possible solution. D Use the bail cycle test to your HP Response Center. D Trailing cable is faulty.
Service Manual
Page 148
...you send a drawing for baud rate and parity are the same as those of the cartridges is missing, making bad contact or is an HP 712 workstation, you could break the mediaĆsensor flags. D Check for a faulty carriage PCA. D Check for a faulty media ...computer is of the following: D Remove each cartridge and run the BlackĆCartridge Alignment Procedure. (Instructions ' User's Guide, chapter 1.) D Replace the trailing cable. D Replace the electronics module. 8Ć14 Troubleshooting C4699Ć90000 Flashing 6 Flashing 13 Flashing 23 Plain + Error: The current plot is a raster...
...you send a drawing for baud rate and parity are the same as those of the cartridges is missing, making bad contact or is an HP 712 workstation, you could break the mediaĆsensor flags. D Check for a faulty carriage PCA. D Check for a faulty media ...computer is of the following: D Remove each cartridge and run the BlackĆCartridge Alignment Procedure. (Instructions ' User's Guide, chapter 1.) D Replace the trailing cable. D Replace the electronics module. 8Ć14 Troubleshooting C4699Ć90000 Flashing 6 Flashing 13 Flashing 23 Plain + Error: The current plot is a raster...
Service Manual
Page 149
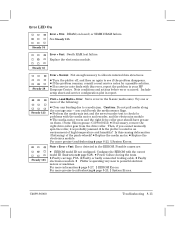
Steady 35 Steady 38 Error + Normal: Not enough memory to your HP Response Center. D If no service note deals with the media motor and encoder, and the electronics module. Include setup sheet and service configuration plot in ... before error occurred. Try one or more precise troubleshooting ' page 8Ć23, w System Errors. Plain + Error + Fast: Error detected in report. D Faulty or badly connected trailing cable. Error LED On Error + Film: DRAM (onĆboard) or SIMM DRAM failure. See Steady 135. Steady 34 Error + Fast: Swath RAM test failure. D If...
Steady 35 Steady 38 Error + Normal: Not enough memory to your HP Response Center. D If no service note deals with the media motor and encoder, and the electronics module. Include setup sheet and service configuration plot in ... before error occurred. Try one or more precise troubleshooting ' page 8Ć23, w System Errors. Plain + Error + Fast: Error detected in report. D Faulty or badly connected trailing cable. Error LED On Error + Film: DRAM (onĆboard) or SIMM DRAM failure. See Steady 135. Steady 34 Error + Fast: Swath RAM test failure. D If...


