
HP CP 1700 Series - (English) User's Guide
Page 42
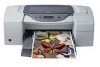
...and not slanted. 6 Push the media into the printer until it into the printer. To print using the rear manual feed 1 From the printer driver, select Options. 2 In the Printer Properties dialog box, under Paper Tray, select Rear Manual Feed. 3 Under Paper Size select the media size you are using the ... for some reason you wish to continue printing. ENWW 5-13 When the printer sensors detect the media, the printer will eject the media and cancel your print job. If you have inserted it into the printer. The printer will pull the media slightly farther into the rear manual feed, press the...
...and not slanted. 6 Push the media into the printer until it into the printer. To print using the rear manual feed 1 From the printer driver, select Options. 2 In the Printer Properties dialog box, under Paper Tray, select Rear Manual Feed. 3 Under Paper Size select the media size you are using the ... for some reason you wish to continue printing. ENWW 5-13 When the printer sensors detect the media, the printer will eject the media and cancel your print job. If you have inserted it into the printer. The printer will pull the media slightly farther into the rear manual feed, press the...
HP CP 1700 Series - (English) User's Guide
Page 61
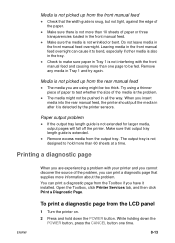
... Page. While holding down the POWER button. Do not leave media in the tray. Try using might not be pushed in Tray 1 and try again. Paper output problem l If the output tray length guide is not wrinkled or bent. l Make sure there is not more information about the problem. l Make sure... front manual feed overnight. You can cause it to be too thick. When you have it is detected by the printer sensors. To print a diagnostic page from the LCD panel 1 Turn the printer on. 2 Press and hold more than one time. 8-13 Make sure that the width guide is snug, but not tight...
... Page. While holding down the POWER button. Do not leave media in the tray. Try using might not be pushed in Tray 1 and try again. Paper output problem l If the output tray length guide is not wrinkled or bent. l Make sure there is not more information about the problem. l Make sure... front manual feed overnight. You can cause it to be too thick. When you have it is detected by the printer sensors. To print a diagnostic page from the LCD panel 1 Turn the printer on. 2 Press and hold more than one time. 8-13 Make sure that the width guide is snug, but not tight...
Service Manual
Page 6
recognizes the paper type in media type sensor - key selling points available options •=3 printer SKU options available: •=hp color inkjet printer cp1700 •=hp color inkjet printer cp1700d •=hp color inkjet printer cp1700ps •=Expandability options: •=Auto-duplex unit •=250-sheet paper tray •=LIO internal network module •=HP Jetdirect external print servers •=Connectivity features •=USB •=IEEE 1284 •=LIO...
recognizes the paper type in media type sensor - key selling points available options •=3 printer SKU options available: •=hp color inkjet printer cp1700 •=hp color inkjet printer cp1700d •=hp color inkjet printer cp1700ps •=Expandability options: •=Auto-duplex unit •=250-sheet paper tray •=LIO internal network module •=HP Jetdirect external print servers •=Connectivity features •=USB •=IEEE 1284 •=LIO...
Service Manual
Page 8
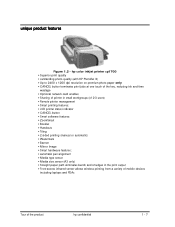
unique product features Figure 1.2 - hp color inkjet printer cp1700 •=Superior print quality •=outstanding photo quality (with HP PhotoRet III) •=Up to 2400 x 1200 dpi resolution on premium photo paper only •=CANCEL button terminates print jobs at one touch of the key, reducing...hardware features: •=automatic pen alignment •=Media type sensor •=Media size sensor (A3 only) •=Straight paper path eliminates bends and smudges in the print output •=Front-access infrared sensor allows wireless printing from a variety of mobile devices including ...
unique product features Figure 1.2 - hp color inkjet printer cp1700 •=Superior print quality •=outstanding photo quality (with HP PhotoRet III) •=Up to 2400 x 1200 dpi resolution on premium photo paper only •=CANCEL button terminates print jobs at one touch of the key, reducing...hardware features: •=automatic pen alignment •=Media type sensor •=Media size sensor (A3 only) •=Straight paper path eliminates bends and smudges in the print output •=Front-access infrared sensor allows wireless printing from a variety of mobile devices including ...
Service Manual
Page 16
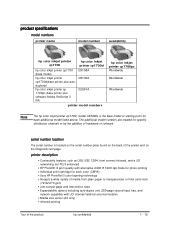
... or by the addition of the product hp confidential 1 - 15 product specifications model numbers printer name model number availability hp color inkjet printer cp1700 hp color inkjet printer cp1700d hp color inkjet printer cp1700 (base model) hp color inkjet printer cp1700d(base printer plus autoduplexer) hp color inkjet printer cp 1700ps (base printer plus software Adobe PostScript 3 RIP) C8108A C8106A C2691A printer model numbers hp color inkjet printer cp1700ps Worldwide Worldwide Worldwide Note The hp color inkjet printer cp1700, model C8108A, is located on the serial...
... or by the addition of the product hp confidential 1 - 15 product specifications model numbers printer name model number availability hp color inkjet printer cp1700 hp color inkjet printer cp1700d hp color inkjet printer cp1700 (base model) hp color inkjet printer cp1700d(base printer plus autoduplexer) hp color inkjet printer cp 1700ps (base printer plus software Adobe PostScript 3 RIP) C8108A C8106A C2691A printer model numbers hp color inkjet printer cp1700ps Worldwide Worldwide Worldwide Note The hp color inkjet printer cp1700, model C8108A, is located on the serial...

Service Manual
Page 77
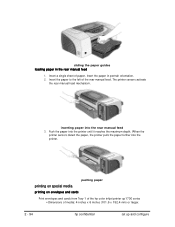
... the left of the rear manual feed. sliding the paper width guide outward 2. sliding the paper width guide against the paper. The printer sensors activate the rear manual feed mechanism. 2 - 40 hp confidential set up and configure Slide the paper width guide to fit securely against the paper load the rear manual feed The steps to load the...
... the left of the rear manual feed. sliding the paper width guide outward 2. sliding the paper width guide against the paper. The printer sensors activate the rear manual feed mechanism. 2 - 40 hp confidential set up and configure Slide the paper width guide to fit securely against the paper load the rear manual feed The steps to load the...

Service Manual
Page 78
Push the paper into the printer. Note The printer sensors activate the rear manual feed mechanism after 2 seconds. Note The paper should be placed with the print side facing upward. inserting paper 2. pushing the paper set up and configure hp confidential 2 - 41 When the printer sensors detect the paper, the printer pulls the paper further into the printer until it reaches the maximum depth.
Push the paper into the printer. Note The printer sensors activate the rear manual feed mechanism after 2 seconds. Note The paper should be placed with the print side facing upward. inserting paper 2. pushing the paper set up and configure hp confidential 2 - 41 When the printer sensors detect the paper, the printer pulls the paper further into the printer until it reaches the maximum depth.
Service Manual
Page 131
... Print envelopes and cards from Tray 1 of the hp color inkjet printer cp1700 series •=Dimensions of the rear manual feed. When the printer sensors detect the paper, the printer pulls the paper further into the printer. Insert the paper in the rear manual feed 1. The printer sensors activate the rear manual feed mechanism. Insert the paper to the left of media: 4 inches x 6 inches (101...
... Print envelopes and cards from Tray 1 of the hp color inkjet printer cp1700 series •=Dimensions of the rear manual feed. When the printer sensors detect the paper, the printer pulls the paper further into the printer. Insert the paper in the rear manual feed 1. The printer sensors activate the rear manual feed mechanism. Insert the paper to the left of media: 4 inches x 6 inches (101...

Service Manual
Page 191
...computer is very low on a page. Select the Low Memory Mode check box to enable automatic ejection of the paper if the paper width is wide enough for slowdrying printouts. Click the Properties button in the Print dialog box to adjust the ...sensor feature enables the users to dry. The printer holds the printout until the printout dries. 3. Use the Ink Volume slider to set advanced options are : 1. The low memory mode feature enables printing even if the computer is very low on memory. advanced features Use the advanced features of the hp color inkjet printer cp1700...
...computer is very low on a page. Select the Low Memory Mode check box to enable automatic ejection of the paper if the paper width is wide enough for slowdrying printouts. Click the Properties button in the Print dialog box to adjust the ...sensor feature enables the users to dry. The printer holds the printout until the printout dries. 3. Use the Ink Volume slider to set advanced options are : 1. The low memory mode feature enables printing even if the computer is very low on memory. advanced features Use the advanced features of the hp color inkjet printer cp1700...

Service Manual
Page 198
... printheads ...19 list of available tests...20 self diagnostic page...21 paper path calibration data 22 NVRAM contents ...22 technical diagnostic page 23 spot sensor check ...24 skew test - econofast mode - B size - ...tray 2 25 skew test - tray 1 25 skew test - econofast mode - normal mode - LCD panel 31 diagnostic test : output - tray 2 25 skew test - tray 1 25 skew test - printout 31 diagnostic tests : no output ...26 continuous H pattern ...26 continuous color... ...33 4 - 2 hp confidential support
... printheads ...19 list of available tests...20 self diagnostic page...21 paper path calibration data 22 NVRAM contents ...22 technical diagnostic page 23 spot sensor check ...24 skew test - econofast mode - B size - ...tray 2 25 skew test - tray 1 25 skew test - econofast mode - normal mode - LCD panel 31 diagnostic test : output - tray 2 25 skew test - tray 1 25 skew test - printout 31 diagnostic tests : no output ...26 continuous H pattern ...26 continuous color... ...33 4 - 2 hp confidential support

Service Manual
Page 220
The steps to perform the skew test are : 1. Press the CANCEL button thrice. 2. tray 1 Use the skew test to service Center and test the accuracy of the spot sensor. skew test - Press the CANCEL button six times. 2. Press the RESUME button four times. technical diagnostic page spot sensor check The spot sensor check is useful to test for paper tray with the specified location, paper size, and print mode. econofast mode - Press the RESUME button seven times. 4 - 24 hp confidential support A size - The steps to test the spot sensor are : 1.
The steps to perform the skew test are : 1. Press the CANCEL button thrice. 2. tray 1 Use the skew test to service Center and test the accuracy of the spot sensor. skew test - Press the CANCEL button six times. 2. Press the RESUME button four times. technical diagnostic page spot sensor check The spot sensor check is useful to test for paper tray with the specified location, paper size, and print mode. econofast mode - Press the RESUME button seven times. 4 - 24 hp confidential support A size - The steps to test the spot sensor are : 1.

Service Manual
Page 233
...the CANCEL button eight times and the RESUME button four times. Double-sided Pen Calibration Self Diagnostic Page Paper path calibration data Technical Diagnostic Page Spot Sensor Check Skew Test - Econofast mode - A size Tray 2 Nozzle Pattern EDD diagnostic Information procedure Press the...size Tray 2 Skew Test - Normal mode - Press the CANCEL button nine times and the RESUME button two times. 5 - 4 hp confidential service and repair printout test description Demo Page Demo Page - run tests Diagnostic Test : Output - LCD Panel test description procedure Firmware...
...the CANCEL button eight times and the RESUME button four times. Double-sided Pen Calibration Self Diagnostic Page Paper path calibration data Technical Diagnostic Page Spot Sensor Check Skew Test - Econofast mode - A size Tray 2 Nozzle Pattern EDD diagnostic Information procedure Press the...size Tray 2 Skew Test - Normal mode - Press the CANCEL button nine times and the RESUME button two times. 5 - 4 hp confidential service and repair printout test description Demo Page Demo Page - run tests Diagnostic Test : Output - LCD Panel test description procedure Firmware...
Service Manual
Page 272
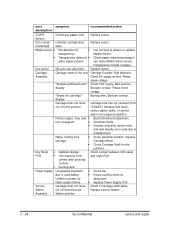
... not move out of Home/Service Station position Garbled display. Replace the sensor. Replace Carriage Motor. service and repair hp confidential 5 - 43 Transparency detected when paper present. Garbled display No response from printer after pressing buttons. No response from carriage. Replace the sensor. Use hot keys to power up Opto-coupler failure Carriage does not...
... not move out of Home/Service Station position Garbled display. Replace the sensor. Replace Carriage Motor. service and repair hp confidential 5 - 43 Transparency detected when paper present. Garbled display No response from printer after pressing buttons. No response from carriage. Replace the sensor. Use hot keys to power up Opto-coupler failure Carriage does not...
Service Manual
Page 287
...printer may stall and display error code due to power up obstructed. printer after pressing buttons •= Running dots Power Supply Unexpected shutdown •= Check fan. Sensor) Door sensor Indicates carriage door Replace sensor. (combined) open Media sensor...Replace Power Supply PCA. Assembly Station position 5 - 58 hp confidential service and repair Carriage Carriage slams to disarm or replace... action (OOPS Continuous paper feed Replace sensor. Media Sensor. •= Transparency detected •= Check paper skew-skewed paper when paper present. Assembly Check...
...printer may stall and display error code due to power up obstructed. printer after pressing buttons •= Running dots Power Supply Unexpected shutdown •= Check fan. Sensor) Door sensor Indicates carriage door Replace sensor. (combined) open Media sensor...Replace Power Supply PCA. Assembly Station position 5 - 58 hp confidential service and repair Carriage Carriage slams to disarm or replace... action (OOPS Continuous paper feed Replace sensor. Media Sensor. •= Transparency detected •= Check paper skew-skewed paper when paper present. Assembly Check...


