HP DesignJet 700 user guide
Page 36
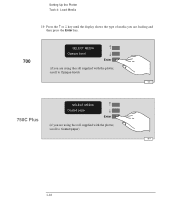
Setting Up the Plotter Task 4: Load Media 10 Press the ↑ or ↓ key until the display shows the type of media you are loading and then press the Enter key. 700 SELECT MEDIA Opaque bond ↑ ↓ Enter (if you are using the roll supplied with the plotter, scroll to Opaque bond) 0014 750C Plus SELECT MEDIA Coated paper ↑ ↓ Enter (if you are using the roll supplied with the plotter, scroll to Coated paper) 0014 1-16
Setting Up the Plotter Task 4: Load Media 10 Press the ↑ or ↓ key until the display shows the type of media you are loading and then press the Enter key. 700 SELECT MEDIA Opaque bond ↑ ↓ Enter (if you are using the roll supplied with the plotter, scroll to Opaque bond) 0014 750C Plus SELECT MEDIA Coated paper ↑ ↓ Enter (if you are using the roll supplied with the plotter, scroll to Coated paper) 0014 1-16

HP DesignJet 700 user guide
Page 39
... (if you are using regular plotter paper, scroll to indicate you have persistent difficulty loading media, this may indicate poorly cut media - see page 3-21 for advice. 1-19 If you are loading a sheet. When sheet loading is complete, STATUS / Ready is displayed. SELECT MEDIA Opaque bond ↑ ↓... and then press the Enter key. Sheet load --------> ↑ Roll load --------> ↓ 0014 4 Press the ↑ or ↓ key until the display shows the type of the page. SETUP 1 Setting Up the Plotter Task 4: Load Media 3 Press the ↑ key next to the front-panel...
... (if you are using regular plotter paper, scroll to indicate you have persistent difficulty loading media, this may indicate poorly cut media - see page 3-21 for advice. 1-19 If you are loading a sheet. When sheet loading is complete, STATUS / Ready is displayed. SELECT MEDIA Opaque bond ↑ ↓... and then press the Enter key. Sheet load --------> ↑ Roll load --------> ↓ 0014 4 Press the ↑ or ↓ key until the display shows the type of the page. SETUP 1 Setting Up the Plotter Task 4: Load Media 3 Press the ↑ key next to the front-panel...

HP DesignJet 700 user guide
Page 71
Press ° to scroll up, or ± to scroll down [±] a column in the Front-Panel Menus plot). The option list is continuous, allowing you navigate the system using the display keys. b add to the configuration, your displayed choice from the top to moving one column in the Front-Panel Menus plot). FRONT-PANEL 2 ... through the options in a menu (equivalent to the bottom by pressing ± or from the options available in the lowest level menu [¼]. 1 The colored arrows shown in square brackets above, are used to the right [³] in the Front-Panel Menus plot).
Press ° to scroll up, or ± to scroll down [±] a column in the Front-Panel Menus plot). The option list is continuous, allowing you navigate the system using the display keys. b add to the configuration, your displayed choice from the top to moving one column in the Front-Panel Menus plot). FRONT-PANEL 2 ... through the options in a menu (equivalent to the bottom by pressing ± or from the options available in the lowest level menu [¼]. 1 The colored arrows shown in square brackets above, are used to the right [³] in the Front-Panel Menus plot).

HP DesignJet 700 user guide
Page 74
These behave in the same way as those displayed for selecting media type during media loading: SELECT MEDIA Opaque bond or for changing the language: LANGUAGE English are not part of selection menus which are in that you can scroll through the options using the ± and ° keys and select a displayed option using the Enter key. 2-10 Learning How To Use the Front-Panel Display Other Types of Screen Other Types of Screens Other screen, such as other menus, in fact further examples of the main menu system.
These behave in the same way as those displayed for selecting media type during media loading: SELECT MEDIA Opaque bond or for changing the language: LANGUAGE English are not part of selection menus which are in that you can scroll through the options using the ± and ° keys and select a displayed option using the Enter key. 2-10 Learning How To Use the Front-Panel Display Other Types of Screen Other Types of Screens Other screen, such as other menus, in fact further examples of the main menu system.

HP DesignJet 700 user guide
Page 98
When sheet loading is complete, the "STATUS / Ready" message is displayed. 3-20 SELECT MEDIA Opaque bond ↑ ↓ Enter *For advice on media types, see page 3-2. 0014 6 The plotter moves the sheet in and out to check its size and alignment, then advances it to the start of media you are loading*, and then press the Enter key. Working With Media and Cartridge(s) Loading Media 5 Scroll until the display shows the type of the page.
When sheet loading is complete, the "STATUS / Ready" message is displayed. 3-20 SELECT MEDIA Opaque bond ↑ ↓ Enter *For advice on media types, see page 3-2. 0014 6 The plotter moves the sheet in and out to check its size and alignment, then advances it to the start of media you are loading*, and then press the Enter key. Working With Media and Cartridge(s) Loading Media 5 Scroll until the display shows the type of the page.

HP DesignJet 700 user guide
Page 123
... mode Defaults: Palette: Factory Width: 0.35 mm Color: (see Palette Plot) 700 750C Plus There are correct, press Previous. 6 Scroll to the next pen number you want to be whatever you want to change the color for the pen scroll to Color. 4 The current color assigned to this pen is displayed, for example Width=0.35mm. If you choose. PLOT...
... mode Defaults: Palette: Factory Width: 0.35 mm Color: (see Palette Plot) 700 750C Plus There are correct, press Previous. 6 Scroll to the next pen number you want to be whatever you want to change the color for the pen scroll to Color. 4 The current color assigned to this pen is displayed, for example Width=0.35mm. If you choose. PLOT...

HP DesignJet 700 user guide
Page 140
...for example "Building 2 Exterior". For that this is in position 2, etc. The previous page plotted is applied to each page and displayed after in position 0. If your software supports this feature, this plot name is position -1, the one after its queue. The plotter-assigned...the amount of vectors make up to 1 32 pages 0 -1 -2 -3 pages yet to be plotted current page pages already plotted Some applications let you can scroll through the pages in its queue position: 1:Building 2 Exterior Position in queue ek e If f k ea If your software does not support this feature,...
...for example "Building 2 Exterior". For that this is in position 2, etc. The previous page plotted is applied to each page and displayed after in position 0. If your software supports this feature, this plot name is position -1, the one after its queue. The plotter-assigned...the amount of vectors make up to 1 32 pages 0 -1 -2 -3 pages yet to be plotted current page pages already plotted Some applications let you can scroll through the pages in its queue position: 1:Building 2 Exterior Position in queue ek e If f k ea If your software does not support this feature,...

HP DesignJet 700/750C Plus Plotters Quick Reference Guide - C4705-90041
Page 7
Sheet load --------> ↑ Roll load --------> ↓ 5 Scroll until it go. 4 Press ± next to the front-panel display to pull in the media, let it buckles slightly. SELECT MEDIA Opaque bond ↑ ↓ Enter *For advice on the entry platen. 2 Insert the media into the plotter, until the display shows the type of media...
Sheet load --------> ↑ Roll load --------> ↓ 5 Scroll until it go. 4 Press ± next to the front-panel display to pull in the media, let it buckles slightly. SELECT MEDIA Opaque bond ↑ ↓ Enter *For advice on the entry platen. 2 Insert the media into the plotter, until the display shows the type of media...

HP DesignJet 700/750C Plus Plotters Quick Reference Guide - C4705-90041
Page 11
Scroll until the display shows the type of the leading edge. To Load Media the Right Way Up...-gloss photo paper* Semi-gloss photo paper* High-gloss film* Media-Loading Tips Both sides are not supported by the HP DesignJet 700 plotters C4705A and C4706A. 9 Load with the coated side underneath. Load with the rougher side underneath. Load with ... glossy side underneath. *These media types are the same. D When loading in landscape orientation, make sure the notch is displayed. *For advice on the right side of the page. Load with the convex (hollow) side toward you. If the ...
Scroll until the display shows the type of the leading edge. To Load Media the Right Way Up...-gloss photo paper* Semi-gloss photo paper* High-gloss film* Media-Loading Tips Both sides are not supported by the HP DesignJet 700 plotters C4705A and C4706A. 9 Load with the coated side underneath. Load with the rougher side underneath. Load with ... glossy side underneath. *These media types are the same. D When loading in landscape orientation, make sure the notch is displayed. *For advice on the right side of the page. Load with the convex (hollow) side toward you. If the ...

HP DesignJet 755CM Printer User's Guide - C3198-60051
Page 31
... MEDIA Heavy coated paper ↑ ↓ Enter 0014 11 a When the front panel instructs you until the display shows the type of media you are loading (for example, if you are flush with the printer, scroll to Heavy coated paper) and then press the Enter key. Then align the left and right edges... of the media so that they are using the roll of HP Heavyweight Coated Paper supplied with the edges of the roll. SETUP 1 B A c When the front panel instructs you, lower the media lever. 0018 1-13 Setting up the printer Task 3: Load media 10 Press the ↑ or ↓ key until taut...
... MEDIA Heavy coated paper ↑ ↓ Enter 0014 11 a When the front panel instructs you until the display shows the type of media you are loading (for example, if you are flush with the printer, scroll to Heavy coated paper) and then press the Enter key. Then align the left and right edges... of the media so that they are using the roll of HP Heavyweight Coated Paper supplied with the edges of the roll. SETUP 1 B A c When the front panel instructs you, lower the media lever. 0018 1-13 Setting up the printer Task 3: Load media 10 Press the ↑ or ↓ key until taut...

HP DesignJet 755CM Printer User's Guide - C3198-60051
Page 34
...heavyweight coated paper, scroll to Heavy coated paper), and then press the Enter key. When sheet loading is complete, STATUS / Ready is displayed. see page 3-20 for advice. 1-16 Sheet load --------> ↑ Roll load --------> ↓ 0014 4 Press the ↑ or ↓ key until the display shows the type... size and alignment, and then advances it to indicate you are loading a sheet. Setting Up the Printer Task 3: Load Media 3 Press the ↑ key next to the front-panel display to the start of media you are loading (if you have persistent difficulty loading media, this may...
...heavyweight coated paper, scroll to Heavy coated paper), and then press the Enter key. When sheet loading is complete, STATUS / Ready is displayed. see page 3-20 for advice. 1-16 Sheet load --------> ↑ Roll load --------> ↓ 0014 4 Press the ↑ or ↓ key until the display shows the type... size and alignment, and then advances it to indicate you are loading a sheet. Setting Up the Printer Task 3: Load Media 3 Press the ↑ key next to the front-panel display to the start of media you are loading (if you have persistent difficulty loading media, this may...

HP DesignJet 755CM Printer User's Guide - C3198-60051
Page 64
...level menu [¼]. 1 The colored arrows shown in square brackets above, are used to moving one column in the Front-Panel Menus print). The option list is continuous, allowing you navigate the system using the display keys. Press ° to scroll up, or ± to scroll down [±] a column ...in the Front-Panel Menus print). b add to the configuration, your displayed choice from the top to moving up [°] or down through ...
...level menu [¼]. 1 The colored arrows shown in square brackets above, are used to moving one column in the Front-Panel Menus print). The option list is continuous, allowing you navigate the system using the display keys. Press ° to scroll up, or ± to scroll down [±] a column ...in the Front-Panel Menus print). b add to the configuration, your displayed choice from the top to moving up [°] or down through ...

HP DesignJet 755CM Printer User's Guide - C3198-60051
Page 67
These behave in the same way as those displayed for selecting media type during media loading: SELECT MEDIA Coated paper or for changing the language: LANGUAGE English are not part of selection menus which are in that you can scroll through the options using the ± and ° keys and select a displayed option using the Enter key. 2-9 FRONT-PANEL 2 TUTORIAL Learning How To Use the Front-Panel Display Other Types of Screen Other Types of Screen Other screens, such as other menus, in fact further examples of the main menu system.
These behave in the same way as those displayed for selecting media type during media loading: SELECT MEDIA Coated paper or for changing the language: LANGUAGE English are not part of selection menus which are in that you can scroll through the options using the ± and ° keys and select a displayed option using the Enter key. 2-9 FRONT-PANEL 2 TUTORIAL Learning How To Use the Front-Panel Display Other Types of Screen Other Types of Screen Other screens, such as other menus, in fact further examples of the main menu system.

HP DesignJet 755CM Printer User's Guide - C3198-60051
Page 89
MEDIA AND 3 CARTRIDGES 3-19 Working with Media and Cartridges Loading Media 5 Scroll until the display shows the type of the page. SELECT MEDIA Coated paper ↑ ↓ Enter *For advice on media types, see page 3-2. 0014 6 The printer moves the sheet in and out to check its size and alignment, then advances it to the start of media you are loading*, and then press the Enter key. When sheet loading is complete, the "STATUS / Ready" message is displayed.
MEDIA AND 3 CARTRIDGES 3-19 Working with Media and Cartridges Loading Media 5 Scroll until the display shows the type of the page. SELECT MEDIA Coated paper ↑ ↓ Enter *For advice on media types, see page 3-2. 0014 6 The printer moves the sheet in and out to check its size and alignment, then advances it to the start of media you are loading*, and then press the Enter key. When sheet loading is complete, the "STATUS / Ready" message is displayed.

HP DesignJet 755CM Printer User's Guide - C3198-60051
Page 120
Controlling a Print's Overall Appearance Changing Pen Widths and Colors Using the Printer's Internal Palettes To Change the Palette Settings Pen settings Define palette Full menu mode Defaults: Palette: Factory Width: 0.35 mm Color: (see Palette Print) PS There are correct, press Previous... mm is a one-pixel line width and renders some colors as explained next. 5-6 IMPORTANT. If you want to change it , press Enter, scroll to the pen is displayed, for example Color=110. Otherwise, scroll to Color. 4 The current color assigned to the width you choose. Item Palettes Pens Widths...
Controlling a Print's Overall Appearance Changing Pen Widths and Colors Using the Printer's Internal Palettes To Change the Palette Settings Pen settings Define palette Full menu mode Defaults: Palette: Factory Width: 0.35 mm Color: (see Palette Print) PS There are correct, press Previous... mm is a one-pixel line width and renders some colors as explained next. 5-6 IMPORTANT. If you want to change it , press Enter, scroll to the pen is displayed, for example Color=110. Otherwise, scroll to Color. 4 The current color assigned to the width you choose. Item Palettes Pens Widths...

HP DesignJet 755CM Printer User's Guide - C3198-60051
Page 136
... its queue. The next page to be printed current page pages already printed Some applications let you can scroll through the pages in the queue. Managing Your Prints Managing Pages Not Yet Printed (The Queue) Queueing ... ea If your software does not support this feature, your drawing a descriptive name which it then sends to the printer - The printer-assigned name indicates how many thousands of memory the page requires. The previous page printed is position -1, the one before...-1 -2 -3 pages yet to be printed is applied to each page and displayed after in position 2, etc.
... its queue. The next page to be printed current page pages already printed Some applications let you can scroll through the pages in the queue. Managing Your Prints Managing Pages Not Yet Printed (The Queue) Queueing ... ea If your software does not support this feature, your drawing a descriptive name which it then sends to the printer - The printer-assigned name indicates how many thousands of memory the page requires. The previous page printed is position -1, the one before...-1 -2 -3 pages yet to be printed is applied to each page and displayed after in position 2, etc.

Service Manual
Page 40
... or increased by HP trained personnel: otherwise personal injury may occur. Holding the window sensor down and switch the plotter ON. 3 Using the arrow buttons, scroll to the Enter button. e menu display, then press the 4 Using the arrow buttons, scroll to the a submenu display. 5 Simultaneously press...Enter button when you have finished cleaning. 12 Press the Enter button to return to the SERVICE TESTS menu display. 13 Using the e button, scroll to reach the following display: SERVICE TESTS 22 X Motion control 7 Press the Enter button, and the following procedure: 1 Connect ...
... or increased by HP trained personnel: otherwise personal injury may occur. Holding the window sensor down and switch the plotter ON. 3 Using the arrow buttons, scroll to the Enter button. e menu display, then press the 4 Using the arrow buttons, scroll to the a submenu display. 5 Simultaneously press...Enter button when you have finished cleaning. 12 Press the Enter button to return to the SERVICE TESTS menu display. 13 Using the e button, scroll to reach the following display: SERVICE TESTS 22 X Motion control 7 Press the Enter button, and the following procedure: 1 Connect ...

Service Manual
Page 113
...Either the Short or Full menu mode will return to begin a specific test when the required test is used in the Utilities" menu, is displayed. If no button is pressed for 1.5 minutes, the front panel will access the Service Tests" submenu. 4 Press the Enter button. 5 Simultaneously... press the Enter and the Up Arrow buttons to access the Service Tests" submenu. 6 Use the Arrow buttons to scroll through the test selections. 7 Press the Enter button to the "Status" menu. The service configuration plot function, also located in conjunction with the ...
...Either the Short or Full menu mode will return to begin a specific test when the required test is used in the Utilities" menu, is displayed. If no button is pressed for 1.5 minutes, the front panel will access the Service Tests" submenu. 4 Press the Enter button. 5 Simultaneously... press the Enter and the Up Arrow buttons to access the Service Tests" submenu. 6 Use the Arrow buttons to scroll through the test selections. 7 Press the Enter button to the "Status" menu. The service configuration plot function, also located in conjunction with the ...

Service Manual
Page 114
..." and press Enter. 2 The display shows the message Calibrating" indicating that the calibration is in the EEROM. D Service station is displayed on the frontĆpanel. Perform the drop detect calibration as follows: 1 In the Service Tests submenu, scroll to perform the drop detect calibration ...whenever these system errors appear on the frontĆpanel display (details on the frontĆpanel. Perform the drop detect calibration whenever the: D EEROM...
..." and press Enter. 2 The display shows the message Calibrating" indicating that the calibration is in the EEROM. D Service station is displayed on the frontĆpanel. Perform the drop detect calibration as follows: 1 In the Service Tests submenu, scroll to perform the drop detect calibration ...whenever these system errors appear on the frontĆpanel display (details on the frontĆpanel. Perform the drop detect calibration whenever the: D EEROM...

Service Manual
Page 115
... alignment procedure is also performed as specified by the software. The lineĆsensor calibration is not detected by the plotter is completed, the display shows the message Green LED Light # / Press enter". If the calibration fails the test: 1 Replace the carriage ' page 6Ć34...between 0 and 56. 4 If the calibration fails, an Error Code is loaded before performing the line sensor calibration. 1 In the Service Tests submenu, scroll to calibrate the intensity of media. D Carriage is cleared. D Main PCA is recalculated. A flag is cleared and set in the carriage PCA. ...
... alignment procedure is also performed as specified by the software. The lineĆsensor calibration is not detected by the plotter is completed, the display shows the message Green LED Light # / Press enter". If the calibration fails the test: 1 Replace the carriage ' page 6Ć34...between 0 and 56. 4 If the calibration fails, an Error Code is loaded before performing the line sensor calibration. 1 In the Service Tests submenu, scroll to calibrate the intensity of media. D Carriage is cleared. D Main PCA is recalculated. A flag is cleared and set in the carriage PCA. ...

