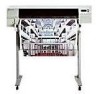

HP DesignJet 700 user guide
Page 21
SETUP 1 1 Fast Track 1-2 Set Up Checklist 1-4 Task 1: Check That You Have All the Items Required 1-5 Task 2: Install Memory Expansion Modules (Optional) . . . . 1-6 Task 3: Switch On and Change the Language From English (Optional) . . . . 1-9 Task 4: Load Media 1-11 Task 5: Load the Print Cartridge(s 1-20 Task 6: Print a Demonstration Plot (Optional 1-24 Task 7: Connect the Plotter to Your...
SETUP 1 1 Fast Track 1-2 Set Up Checklist 1-4 Task 1: Check That You Have All the Items Required 1-5 Task 2: Install Memory Expansion Modules (Optional) . . . . 1-6 Task 3: Switch On and Change the Language From English (Optional) . . . . 1-9 Task 4: Load Media 1-11 Task 5: Load the Print Cartridge(s 1-20 Task 6: Print a Demonstration Plot (Optional 1-24 Task 7: Connect the Plotter to Your...

HP DesignJet 700 user guide
Page 23
For AutoCAD or Microsoft Windows applications, the driver is shipped with the plotter. For other applications, see page 1-38 for advice, and, if necessary, contact your driver disk(s), read the instructions on the label, and follow any printed instructions accompanying the disks. SETUP 1 Setting Up the Plotter Fast Track 4 Close the plotter's window and let the plotter run its automatic cartridge-alignment procedure. 5 Switch off the plotter and your computer, connect the interface cable, and then switch them on again. 6 Choose your software vendor. 1-3
For AutoCAD or Microsoft Windows applications, the driver is shipped with the plotter. For other applications, see page 1-38 for advice, and, if necessary, contact your driver disk(s), read the instructions on the label, and follow any printed instructions accompanying the disks. SETUP 1 Setting Up the Plotter Fast Track 4 Close the plotter's window and let the plotter run its automatic cartridge-alignment procedure. 5 Switch off the plotter and your computer, connect the interface cable, and then switch them on again. 6 Choose your software vendor. 1-3

HP DesignJet 700 user guide
Page 25
..., contact your Memory expansion module For details of suitable cables, see page 11-14. 1-5 One magenta - Two black 750C Plus For the HP DesignJet 750C Plus: - Setting Up the Plotter Task 1: Check That You Have All the Items Required SETUP 1 Task 1: Check That You Have All the Items Required Supplied 1 You need the following items, which were not...
..., contact your Memory expansion module For details of suitable cables, see page 11-14. 1-5 One magenta - Two black 750C Plus For the HP DesignJet 750C Plus: - Setting Up the Plotter Task 1: Check That You Have All the Items Required SETUP 1 Task 1: Check That You Have All the Items Required Supplied 1 You need the following items, which were not...

HP DesignJet 700 user guide
Page 27
Use slot 3 first, and then slot 4. SETUP 1 Setting Up The Plotter Task 2: (Optional) Install Memory Expansion Modules 2 Using a flat-blade screwdriver, unscrew the cover plate at the back of the plotter, and remove it must be in slot number 3. 1845a 1-7 Slot for first memory module installed Slot for memory expansion modules. Cover plate The two slots on the cover plate. Unscrew only the four screws on the right are for second memory module installed 1 2 34 If your plotter has only one memory module, it .
Use slot 3 first, and then slot 4. SETUP 1 Setting Up The Plotter Task 2: (Optional) Install Memory Expansion Modules 2 Using a flat-blade screwdriver, unscrew the cover plate at the back of the plotter, and remove it must be in slot number 3. 1845a 1-7 Slot for first memory module installed Slot for memory expansion modules. Cover plate The two slots on the cover plate. Unscrew only the four screws on the right are for second memory module installed 1 2 34 If your plotter has only one memory module, it .

HP DesignJet 700 user guide
Page 29
... Language From English WARNING Task 3: Switch On and Change the Language From English (Optional) The plotter's front-panel menus and all the plotter's sample plots are available in Chinese, Korean and Taiwanese. 1-9 SETUP 1 1848 If English OK or if you have already changed the language 3 Switch on the ...front of the plotter is OFF. 2 Plug the power cord into the socket at the back of the plotter, and then into your ac power connection ...
... Language From English WARNING Task 3: Switch On and Change the Language From English (Optional) The plotter's front-panel menus and all the plotter's sample plots are available in Chinese, Korean and Taiwanese. 1-9 SETUP 1 1848 If English OK or if you have already changed the language 3 Switch on the ...front of the plotter is OFF. 2 Plug the power cord into the socket at the back of the plotter, and then into your ac power connection ...

HP DesignJet 700 user guide
Page 30
Then press Enter. LANGUAGE English ↑ ↓ Enter 0014 1-10 Setting Up the Plotter Setup Task 3: Switch On and (Optional) Change the language From English If English not OK 4 or if you have a power problem. 1843a 5 When the word "English" ... light on the front panel, you want to change the language Hold down the Enter key on the front panel and then switch on the plotter by pushing the power switch. 1 Press and hold Enter 2 Switch on Release the Enter key when "STATUS / Initializing" appears on the front-panel screen, press...
Then press Enter. LANGUAGE English ↑ ↓ Enter 0014 1-10 Setting Up the Plotter Setup Task 3: Switch On and (Optional) Change the language From English If English not OK 4 or if you have a power problem. 1843a 5 When the word "English" ... light on the front panel, you want to change the language Hold down the Enter key on the front panel and then switch on the plotter by pushing the power switch. 1 Press and hold Enter 2 Switch on Release the Enter key when "STATUS / Initializing" appears on the front-panel screen, press...
HP DesignJet 700 user guide
Page 31
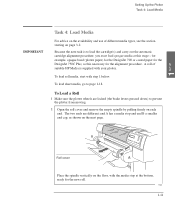
... the roll cover and remove the empty spindle by pulling firmly on each end. Setting Up the Plotter Task 4: Load Media SETUP 1 IMPORTANT Task 4: Load Media For advice on the availability and use of suitable HP Media is to load the cartridge(s) and carry out the automatic cartridge alignment procedure, you must load... this stage - Because the next task is supplied with step 1 below. To load sheet media, go to page 1-18. To Load a Roll 1 Make sure the plotter wheels are different: end A has a media stop at this necessary for the DesignJet 750C Plus, as shown on page 3-2.
... the roll cover and remove the empty spindle by pulling firmly on each end. Setting Up the Plotter Task 4: Load Media SETUP 1 IMPORTANT Task 4: Load Media For advice on the availability and use of suitable HP Media is to load the cartridge(s) and carry out the automatic cartridge alignment procedure, you must load... this stage - Because the next task is supplied with step 1 below. To load sheet media, go to page 1-18. To Load a Roll 1 Make sure the plotter wheels are different: end A has a media stop at this necessary for the DesignJet 750C Plus, as shown on page 3-2.

HP DesignJet 700 user guide
Page 33
If it is to the right and the small end cap (B) to the roller must be as shown in the diagram above. 1837 6 Check the leading edge as it as explained in firmly on both ends. Setting Up the Plotter Task 4: Load Media 5 Insert the spindle so that the large media stop . Be sure the media remains flush against the media stop (A) is uneven, trim it unwinds from the spool. SETUP 1 1-13 B A A Media path 0017 The relationship of the media to the left. Push in step 7. Otherwise go to step 8.
If it is to the right and the small end cap (B) to the roller must be as shown in the diagram above. 1837 6 Check the leading edge as it as explained in firmly on both ends. Setting Up the Plotter Task 4: Load Media 5 Insert the spindle so that the large media stop . Be sure the media remains flush against the media stop (A) is uneven, trim it unwinds from the spool. SETUP 1 1-13 B A A Media path 0017 The relationship of the media to the left. Push in step 7. Otherwise go to step 8.

HP DesignJet 700 user guide
Page 35
b Insert the leading edge into the plotter, until the page buckles slightly. Sheet load --------> ↑ Roll load --------> ↓ 0014 1-15 c Let go of the media when the plotter begins to indicate you and, holding it in. Setting Up the Plotter Task 4: Load Media 8 a Pull the media towards you are loading a roll. SETUP 1 1839 9 Press the ↓ key next to the front-panel display to pull it from the sides, align its right edge with the perforated line on the entry platen.
b Insert the leading edge into the plotter, until the page buckles slightly. Sheet load --------> ↑ Roll load --------> ↓ 0014 1-15 c Let go of the media when the plotter begins to indicate you and, holding it in. Setting Up the Plotter Task 4: Load Media 8 a Pull the media towards you are loading a roll. SETUP 1 1839 9 Press the ↓ key next to the front-panel display to pull it from the sides, align its right edge with the perforated line on the entry platen.

HP DesignJet 700 user guide
Page 37
...the edges of the media is now loaded and ready for plotting. 1840 1-17 Setting Up the Plotter Task 4: Load Media 11 a When the front panel instructs you to close the cover. The plotter automatically trims off the first few inches of the media now extending from the exit slot and ...toward you until taut. B A c When the front panel instructs you, lower the media lever. 0018 12 a When the plotter instructs you , lift the media lever. b Take hold of the edges of media. SETUP 1 b Press the ↓ key to take up any slack in the direction shown by the large arrow below, to...
...the edges of the media is now loaded and ready for plotting. 1840 1-17 Setting Up the Plotter Task 4: Load Media 11 a When the front panel instructs you to close the cover. The plotter automatically trims off the first few inches of the media now extending from the exit slot and ...toward you until taut. B A c When the front panel instructs you, lower the media lever. 0018 12 a When the plotter instructs you , lift the media lever. b Take hold of the edges of media. SETUP 1 b Press the ↓ key to take up any slack in the direction shown by the large arrow below, to...

HP DesignJet 700 user guide
Page 39
... coated paper, scroll to the start of media you are loading (if you are loading a sheet. SELECT MEDIA Opaque bond ↑ ↓ Enter 0014 5 The plotter moves the sheet in and out to check its size and alignment, and then advances it to Coated paper), and then press the Enter key.... see page 3-21 for advice. 1-19 SETUP 1 Setting Up the Plotter Task 4: Load Media 3 Press the ↑ key next to the front-panel display to indicate you are using regular...
... coated paper, scroll to the start of media you are loading (if you are loading a sheet. SELECT MEDIA Opaque bond ↑ ↓ Enter 0014 5 The plotter moves the sheet in and out to check its size and alignment, and then advances it to Coated paper), and then press the Enter key.... see page 3-21 for advice. 1-19 SETUP 1 Setting Up the Plotter Task 4: Load Media 3 Press the ↑ key next to the front-panel display to indicate you are using regular...
HP DesignJet 700 user guide
Page 41
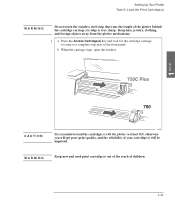
... When the carriage stops, open the window. 750C Plus 700 C A U T I N G Keep new and used print cartridge(s) out of the reach of children. 1-21 W A R N I O N 1849 It is very sharp. Keep hair, jewelry, clothing, and foreign objects away from the plotter mechanisms. 1 a Press the Access Cartridge(s) key...to a complete stop next to load the cartridge(s) with the plotter switched ON, otherwise you will get poor print quality, and the reliability of the plotter behind the cartridge carriage; SETUP 1 Setting Up Your Plotter Task 5: Load the Print Cartridge(s) WARNING Do not touch the...
... When the carriage stops, open the window. 750C Plus 700 C A U T I N G Keep new and used print cartridge(s) out of the reach of children. 1-21 W A R N I O N 1849 It is very sharp. Keep hair, jewelry, clothing, and foreign objects away from the plotter mechanisms. 1 a Press the Access Cartridge(s) key...to a complete stop next to load the cartridge(s) with the plotter switched ON, otherwise you will get poor print quality, and the reliability of the plotter behind the cartridge carriage; SETUP 1 Setting Up Your Plotter Task 5: Load the Print Cartridge(s) WARNING Do not touch the...

HP DesignJet 700 user guide
Page 43
To make your cartridges last as long as possible, you should not remove them once they are loaded, never turn the plotter upside down, or ink will spill. Now that the cartridge(s) are installed, except to replace them. You can throw away the small print produced during the cartridge alignment procedure. SETUP 1 1-23 When the front-panel displays STATUS / Ready, the procedure is complete. Setting Up Your Plotter Task 5: Load the Print Cartridge(s) C A U T I O N 3 When the cartridges are successfully installed, the plotter automatically runs the cartridge alignment procedure.
To make your cartridges last as long as possible, you should not remove them once they are loaded, never turn the plotter upside down, or ink will spill. Now that the cartridge(s) are installed, except to replace them. You can throw away the small print produced during the cartridge alignment procedure. SETUP 1 1-23 When the front-panel displays STATUS / Ready, the procedure is complete. Setting Up Your Plotter Task 5: Load the Print Cartridge(s) C A U T I O N 3 When the cartridges are successfully installed, the plotter automatically runs the cartridge alignment procedure.

HP DesignJet 700 user guide
Page 45
SETUP 1 Setting Up the Plotter Task 6: (Optional) Print a Demonstration Plot 2 On the front-panel display, go to Demos, as shown below. 750C Plus STATUS Ready Press Enter SHORT MENUS Queueing & Nesting ³ Press ↓ SHORT MENUS Demos ³ Press Enter DEMOS Palette Press Enter to choose this or... to get to the next option DEMOS Samples Press Enter to choose this or ↓ to get to the next option DEMOS Menu Press Enter 750C Plus Palette prints the Palette Demo, which is available, it starts processing as soon as you press Enter. Menu prints a menu tree of sample demonstration...
SETUP 1 Setting Up the Plotter Task 6: (Optional) Print a Demonstration Plot 2 On the front-panel display, go to Demos, as shown below. 750C Plus STATUS Ready Press Enter SHORT MENUS Queueing & Nesting ³ Press ↓ SHORT MENUS Demos ³ Press Enter DEMOS Palette Press Enter to choose this or... to get to the next option DEMOS Samples Press Enter to choose this or ↓ to get to the next option DEMOS Menu Press Enter 750C Plus Palette prints the Palette Demo, which is available, it starts processing as soon as you press Enter. Menu prints a menu tree of sample demonstration...

HP DesignJet 700 user guide
Page 47
... to a Local Area Network using an optional network interface card such as the HP JetDirect Print Server. SETUP 1 Setting Up the Plotter Task 7: Connect the Plotter to Your Computer Task 7: Connect the Plotter to , the parallel and serial interfaces. Using a flat-head screwdriver, unscrew only the two screws on ...40. The slot for Network Interface Card For installation and configuration of the plotter, alongside the parallel and serial ports. Slot for a network interface card is situated at the back of the HP JetDirect Print Server, see also the tips starting on its cover plate. If...
... to a Local Area Network using an optional network interface card such as the HP JetDirect Print Server. SETUP 1 Setting Up the Plotter Task 7: Connect the Plotter to Your Computer Task 7: Connect the Plotter to , the parallel and serial interfaces. Using a flat-head screwdriver, unscrew only the two screws on ...40. The slot for Network Interface Card For installation and configuration of the plotter, alongside the parallel and serial ports. Slot for a network interface card is situated at the back of the HP JetDirect Print Server, see also the tips starting on its cover plate. If...

HP DesignJet 700 user guide
Page 49
... stop bit Parity of this task. 1-29 The settings on the plotter must match those of the computer and software sending the data. If in doubt, try with the above suggestions. SETUP 1 Setting Up the Plotter Task 8: (Serial Interface Users Only) Configure the Interface Task 8: ...Configure the Interface (Serial Interface Users Only) The following table shows the settings available for the plotter's serial interface parameters, the factory defaults...
... stop bit Parity of this task. 1-29 The settings on the plotter must match those of the computer and software sending the data. If in doubt, try with the above suggestions. SETUP 1 Setting Up the Plotter Task 8: (Serial Interface Users Only) Configure the Interface Task 8: ...Configure the Interface (Serial Interface Users Only) The following table shows the settings available for the plotter's serial interface parameters, the factory defaults...

HP DesignJet 700 user guide
Page 51
SHORT MENUS Demos ³ Press ↓ UTILITIES Menu mode=Short ³ Press Enter MENU MODE Short* Press ↓ MENU MODE Full Press Enter UTILITIES Menu mode=Full ³ Press Previous FULL MENUS Utilities ³ 1-31 SETUP 1 Setting Up the Plotter Task 8: (Serial Interface Users Only) Configure the Interface 1 On the front-panel display, change the Menu mode from Short to step 2. STATUS Ready Press Enter SHORT MENUS Queueing & Nesting ³ Press ↓ If FULL MENUS is displayed instead of SHORT MENUS, you can skip this step and go to Full.
SHORT MENUS Demos ³ Press ↓ UTILITIES Menu mode=Short ³ Press Enter MENU MODE Short* Press ↓ MENU MODE Full Press Enter UTILITIES Menu mode=Full ³ Press Previous FULL MENUS Utilities ³ 1-31 SETUP 1 Setting Up the Plotter Task 8: (Serial Interface Users Only) Configure the Interface 1 On the front-panel display, change the Menu mode from Short to step 2. STATUS Ready Press Enter SHORT MENUS Queueing & Nesting ³ Press ↓ If FULL MENUS is displayed instead of SHORT MENUS, you can skip this step and go to Full.

HP DesignJet 700 user guide
Page 52
FULL MENUS Utilities ³ Press ↓ FULL MENUS I/O setup ³ Press Enter I/O SETUP Modular ³ Press ↓ I/O SETUP RS-232-C ³ Press Enter RS-232-C Config=Factory ³ Press ↓ RS-232-C SETUP Define config Press Enter DEFINE CONFIG Config A ³ Press Enter CONFIG A Baudrate=9600 1-32 Setting Up the Plotter Task 8: (Serial Interface Users Only) Configure the Interface 2 Get to the routine for defining a new serial configuration.
FULL MENUS Utilities ³ Press ↓ FULL MENUS I/O setup ³ Press Enter I/O SETUP Modular ³ Press ↓ I/O SETUP RS-232-C ³ Press Enter RS-232-C Config=Factory ³ Press ↓ RS-232-C SETUP Define config Press Enter DEFINE CONFIG Config A ³ Press Enter CONFIG A Baudrate=9600 1-32 Setting Up the Plotter Task 8: (Serial Interface Users Only) Configure the Interface 2 Get to the routine for defining a new serial configuration.

HP DesignJet 700 user guide
Page 53
RS-232-C Config=Factory ³ 1-33 Setting Up the Plotter Task 8: (Serial Interface Users Only) Configure the Interface SETUP 1 3 Configure the serial interface to 19200 Baud and Even parity. CONFIG A Baudrate=9600 ³ Press Enter BAUDRATE 9600* Press ↑ BAUDRATE 19200 Press Enter CONFIG A Baudrate=19200 ³ Press ↓ CONFIG A parity=None(0) ³ Press Enter This example changes the configuration to match your software configuration. PARITY none(0)* Press ↓ PARITY Even Press Enter CONFIG A Parity=Even ³ Press Previous until you return to ...
RS-232-C Config=Factory ³ 1-33 Setting Up the Plotter Task 8: (Serial Interface Users Only) Configure the Interface SETUP 1 3 Configure the serial interface to 19200 Baud and Even parity. CONFIG A Baudrate=9600 ³ Press Enter BAUDRATE 9600* Press ↑ BAUDRATE 19200 Press Enter CONFIG A Baudrate=19200 ³ Press ↓ CONFIG A parity=None(0) ³ Press Enter This example changes the configuration to match your software configuration. PARITY none(0)* Press ↓ PARITY Even Press Enter CONFIG A Parity=Even ³ Press Previous until you return to ...

Service Manual
Page 35
...232-C -> Baudrate Parity Factory 9600 None MIO Not Present Config A 9600 None Selected Config B 9600 None * I/O setup -> I/O timeout 30 Min Pen settings -> Palette * Merge Software Off HP DesignJet 750C/PS Printer Current Configuration Current palette Settings Factory Pen mm color 0 0.35 0 1 0.35 1 2 0.35 2 3 0.35 3 4 0.35 4 5 0.35 5...110 15 mm color 0.35 0 0.35 1 0.35 2 0.35 3 0.35 4 0.35 5 0.35 6 0.35 7 0.35 8 0.35 12 0.35 19 0.35 27 0.35 35 0.35 68 0.35 100 0.35 110 Lightness Margins 17mm Plotter setup -> * Lightness Normal * Graphics language 7586, HP-GL/2 *...
...232-C -> Baudrate Parity Factory 9600 None MIO Not Present Config A 9600 None Selected Config B 9600 None * I/O setup -> I/O timeout 30 Min Pen settings -> Palette * Merge Software Off HP DesignJet 750C/PS Printer Current Configuration Current palette Settings Factory Pen mm color 0 0.35 0 1 0.35 1 2 0.35 2 3 0.35 3 4 0.35 4 5 0.35 5...110 15 mm color 0.35 0 0.35 1 0.35 2 0.35 3 0.35 4 0.35 5 0.35 6 0.35 7 0.35 8 0.35 12 0.35 19 0.35 27 0.35 35 0.35 68 0.35 100 0.35 110 Lightness Margins 17mm Plotter setup -> * Lightness Normal * Graphics language 7586, HP-GL/2 *...


