
HP DesignJet 700 user guide
Page 11
... Memory 7-10 File Size and Memory Usage 7-10 To Upgrade Your Plotter with the Postscript Option 7-11 To Upgrade Your Plotter with a Network Interface 7-12 HP JetDirect Print Server 7-12 8 Maintaining the Plotter Replacing the Print Cartridge(s 8-2 Cleaning the Plotter 8-2 "Normal" Plotter Use 8-3 To Print the Service Configuration Plot 8-4 ix
... Memory 7-10 File Size and Memory Usage 7-10 To Upgrade Your Plotter with the Postscript Option 7-11 To Upgrade Your Plotter with a Network Interface 7-12 HP JetDirect Print Server 7-12 8 Maintaining the Plotter Replacing the Print Cartridge(s 8-2 Cleaning the Plotter 8-2 "Normal" Plotter Use 8-3 To Print the Service Configuration Plot 8-4 ix
HP DesignJet 700 user guide
Page 105
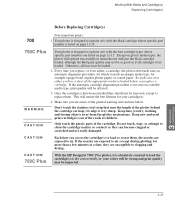
... touch the plastic parts of children. its edge is absolutely essential to load the cartridge(s) in monochrome with just the black cartridge loaded, although the Best print quality may be impacted. CAUTION 750C Plus With the HP DesignJet 750C Plus plotter, it needs an opaque media type, for example opaque bond (regular plotter...exposed to air (except during plotting) for your colors will be wrong and print quality may not be as good as they are susceptible to clogging and drying. Do not touch, wipe, or attempt to clean the cartridge nozzles or contacts as if all four must be ...
... touch the plastic parts of children. its edge is absolutely essential to load the cartridge(s) in monochrome with just the black cartridge loaded, although the Best print quality may be impacted. CAUTION 750C Plus With the HP DesignJet 750C Plus plotter, it needs an opaque media type, for example opaque bond (regular plotter...exposed to air (except during plotting) for your colors will be wrong and print quality may not be as good as they are susceptible to clogging and drying. Do not touch, wipe, or attempt to clean the cartridge nozzles or contacts as if all four must be ...

HP DesignJet 700 user guide
Page 161
MAINTENANCE 8 8 Replacing the Print Cartridge(s 8-2 Cleaning the Plotter 8-2 "Normal" Plotter Use 8-3 Maintaining Your Plotter Cleaning and Service 8-1
MAINTENANCE 8 8 Replacing the Print Cartridge(s 8-2 Cleaning the Plotter 8-2 "Normal" Plotter Use 8-3 Maintaining Your Plotter Cleaning and Service 8-1

HP DesignJet 700 user guide
Page 162
.... Do not let water get inside the plotter. Maintaining Your Plotter Replacing the Print Cartridge(s) and Cleaning the Plotter 750C Plus Replacing the Print Cartridge(s) Replaceable print cartridge(s) have to replace the black cartridge more often than the color cartridges. Do not use , you will probably find that experience the greatest wear and tear. Any maintenance or repairs beyond...
.... Do not let water get inside the plotter. Maintaining Your Plotter Replacing the Print Cartridge(s) and Cleaning the Plotter 750C Plus Replacing the Print Cartridge(s) Replaceable print cartridge(s) have to replace the black cartridge more often than the color cartridges. Do not use , you will probably find that experience the greatest wear and tear. Any maintenance or repairs beyond...
HP DesignJet 700 user guide
Page 217
... key, 6-2 cancelling a plot, 6-2 cartridge alignment procedure, 3-30 Cartridge check, 3-26 cartridge stalls, 1-20-1-21, 3-29-3-31 cartridges before replacing, 3-27 black only, 1-20 colors, 1-5, 1-20-1-21, 3-29-3-31 ...environmental specifications, 11-4 ink level, 3-26 loading, 1-20-1-23 ordering, 11-15 part numbers, 11-15 problems, 9-18 problems with, 9-7 removing tab, 1-22, 3-30 replacing, 3-26-3-31 supplied, 1-5 choosing media, 3-2-3-7 cleaning...
... key, 6-2 cancelling a plot, 6-2 cartridge alignment procedure, 3-30 Cartridge check, 3-26 cartridge stalls, 1-20-1-21, 3-29-3-31 cartridges before replacing, 3-27 black only, 1-20 colors, 1-5, 1-20-1-21, 3-29-3-31 ...environmental specifications, 11-4 ink level, 3-26 loading, 1-20-1-23 ordering, 11-15 part numbers, 11-15 problems, 9-18 problems with, 9-7 removing tab, 1-22, 3-30 replacing, 3-26-3-31 supplied, 1-5 choosing media, 3-2-3-7 cleaning...

HP DesignJet 755CM Printer User's Guide - C3198-60051
Page 9
... the Front-Panel Settings 7-3 To Change the Front-Panel Settings 7-4 Recalibrating the Printer for Accuracy 7-5 When to Recalibrate the Printer 7-5 A Quick Guide to Whether Recalibration is Necessary 7-5 To Recalibrate the Printer 7-6 To Restore the Factory's Calibration 7-6 Changing the Graphics Language Setting for a... Interface Settings 7-9 To Change the Serial Interface Settings 7-9 To Change the I/O Timeout Setting 7-9 8 Maintaining the Printer Replacing the Print Cartridges 8-2 Cleaning the Printer 8-2 "Normal" Printer Use 8-3 To Print the Service Configuration Print 8-4 vii
... the Front-Panel Settings 7-3 To Change the Front-Panel Settings 7-4 Recalibrating the Printer for Accuracy 7-5 When to Recalibrate the Printer 7-5 A Quick Guide to Whether Recalibration is Necessary 7-5 To Recalibrate the Printer 7-6 To Restore the Factory's Calibration 7-6 Changing the Graphics Language Setting for a... Interface Settings 7-9 To Change the Serial Interface Settings 7-9 To Change the I/O Timeout Setting 7-9 8 Maintaining the Printer Replacing the Print Cartridges 8-2 Cleaning the Printer 8-2 "Normal" Printer Use 8-3 To Print the Service Configuration Print 8-4 vii

HP DesignJet 755CM Printer User's Guide - C3198-60051
Page 96
... numbers are listed on glossy media types, the printer will operate successfully in the correct stalls, or your colors will ensure the best lifetime for your cartridges. 4 Make sure you replace a cartridge. its edge is very sharp. Do not touch, wipe, or attempt to clean the cartridge nozzles or contacts as if all four must be...
... numbers are listed on glossy media types, the printer will operate successfully in the correct stalls, or your colors will ensure the best lifetime for your cartridges. 4 Make sure you replace a cartridge. its edge is very sharp. Do not touch, wipe, or attempt to clean the cartridge nozzles or contacts as if all four must be...

HP DesignJet 755CM Printer User's Guide - C3198-60051
Page 153
MAINTENANCE 8 8 Replacing the Print Cartridges 8-2 Cleaning the Printer 8-2 "Normal" Printer Use 8-3 Maintaining Your Printer Cleaning and Service 8-1
MAINTENANCE 8 8 Replacing the Print Cartridges 8-2 Cleaning the Printer 8-2 "Normal" Printer Use 8-3 Maintaining Your Printer Cleaning and Service 8-1

HP DesignJet 755CM Printer User's Guide - C3198-60051
Page 154
... experience the greatest wear and tear. Maintaining Your Printer Replacing the Print Cartridges and Cleaning the Printer WARNING C A U T I O N Replacing the Print Cartridges Replaceable print cartridges have to replace the black cartridge more often than the rest. Cleaning the Printer Cleaning is switched OFF and unplugged before you have been used in your printer, greatly reducing its user maintenance requirements, as these...
... experience the greatest wear and tear. Maintaining Your Printer Replacing the Print Cartridges and Cleaning the Printer WARNING C A U T I O N Replacing the Print Cartridges Replaceable print cartridges have to replace the black cartridge more often than the rest. Cleaning the Printer Cleaning is switched OFF and unplugged before you have been used in your printer, greatly reducing its user maintenance requirements, as these...

HP DesignJet 755CM Printer User's Guide - C3198-60051
Page 209
... procedure, 3-30 Cartridge check, 3-25 cartridge stalls, 1-18-1-19, 3-28-3-30 cartridges before replacing, 3-26 black only, 1-17 colors, 1-4, 1-17, 1-18-1-19, 3-28-3-30 environmental specifications, 11-4 ink level, 3-25 loading, 1-17-1-20 ordering, 11-15 part numbers, 11-15 problems with, 9-7, 9-18 removing tab, 3-29 replacing, 3-25-3-30 supplied, 1-4 choosing media, 3-2-3-7 cleaning the printer, 8-2 clearing...
... procedure, 3-30 Cartridge check, 3-25 cartridge stalls, 1-18-1-19, 3-28-3-30 cartridges before replacing, 3-26 black only, 1-17 colors, 1-4, 1-17, 1-18-1-19, 3-28-3-30 environmental specifications, 11-4 ink level, 3-25 loading, 1-17-1-20 ordering, 11-15 part numbers, 11-15 problems with, 9-7, 9-18 removing tab, 3-29 replacing, 3-25-3-30 supplied, 1-4 choosing media, 3-2-3-7 cleaning the printer, 8-2 clearing...
Service Manual
Page 146
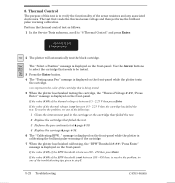
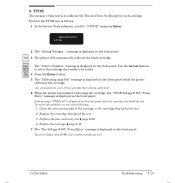
...750C Plus to select the cartridge that needs to verify the functionality of the thermal voltage is displayed on the frontĆpanel. If the value (#.##) of the sense resistors and any associated electronics. SERVICE TESTS 8 Thermal control 700 2 The plotter will automatically test the black cartridge. 750C... The Select a Position" message is between 100 - 450 then press Enter. To resolve the problem, try one of the BPW threshold is displayed on the frontĆpanel. If the value (#.##) of the following: 1 Clean... represents the color of the cartridge. 7 When...
...750C Plus to select the cartridge that needs to verify the functionality of the thermal voltage is displayed on the frontĆpanel. If the value (#.##) of the sense resistors and any associated electronics. SERVICE TESTS 8 Thermal control 700 2 The plotter will automatically test the black cartridge. 750C... The Select a Position" message is between 100 - 450 then press Enter. To resolve the problem, try one of the BPW threshold is displayed on the frontĆpanel. If the value (#.##) of the following: 1 Clean... represents the color of the cartridge. 7 When...
Service Manual
Page 147
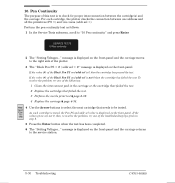
...panel. 700 3 The plotter will automatically calibrate the black cartridge. 750C The Select a Position" message is displayed on the frontĆpanel while the plotter calibrates the cartridge. 9. Use the Arrow buttons 750C Plus to select the cartridge that needs to be tested. 755 CM 4 Press ... reference purposes only. xxxx represents the color of the following: 1 Clean the interconnect pad in the carriage or the cartridge that failed the test. 2 Replace the cartridge that is being calibrated. 6 When the plotter has finished calibrating the cartridge, the TTOE Voltage #.## / Press...
...panel. 700 3 The plotter will automatically calibrate the black cartridge. 750C The Select a Position" message is displayed on the frontĆpanel while the plotter calibrates the cartridge. 9. Use the Arrow buttons 750C Plus to select the cartridge that needs to be tested. 755 CM 4 Press ... reference purposes only. xxxx represents the color of the following: 1 Clean the interconnect pad in the carriage or the cartridge that failed the test. 2 Replace the cartridge that is being calibrated. 6 When the plotter has finished calibrating the cartridge, the TTOE Voltage #.## / Press...
Service Manual
Page 148
... Pen PS and addr sel is displayed on the frontĆpanel and the carriage moves to be tested. 750C Plus As each cartridge, the plotter checks the connection between the cartridge(s) and the carriage. To resolve the problem, try one of the troubleshooting tips given in the carriage or ...the problem, try one address and all the primitives (PS =) and viceĆversa (addr sel =). Pen Continuity The purpose of the following: 1 Clean the interconnect pad in step 3. 5 Press the Enter button when the test has been completed. 6 The Setting Voltages..." If the 755 CM values...
... Pen PS and addr sel is displayed on the frontĆpanel and the carriage moves to be tested. 750C Plus As each cartridge, the plotter checks the connection between the cartridge(s) and the carriage. To resolve the problem, try one of the troubleshooting tips given in the carriage or ...the problem, try one address and all the primitives (PS =) and viceĆversa (addr sel =). Pen Continuity The purpose of the following: 1 Clean the interconnect pad in step 3. 5 Press the Enter button when the test has been completed. 6 The Setting Voltages..." If the 755 CM values...
Service Manual
Page 149
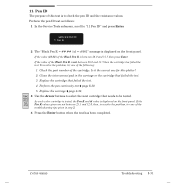
... R = ##.## / id = c8001" message is to resolve the problem, try one of the cartridge. Perform the pen ID test as follows: 1 In the Service Tests submenu, scroll to be tested. 750C Plus As each color cartridge is tested, the Pen R and id value is not between 26.0 and 31.5 then press Enter.... If the value of this plotter? 2 Clean the interconnect pad in step 2. 4 Press the Enter button when the...
... R = ##.## / id = c8001" message is to resolve the problem, try one of the cartridge. Perform the pen ID test as follows: 1 In the Service Tests submenu, scroll to be tested. 750C Plus As each color cartridge is tested, the Pen R and id value is not between 26.0 and 31.5 then press Enter.... If the value of this plotter? 2 Clean the interconnect pad in step 2. 4 Press the Enter button when the...

Service Manual
Page 150
...have an interconnection problem: 1 Clean the interconnect pad in the carriage or the cartridge(s) that failed the test. 2 Replace the cartridge(s) that failed the test and try one of this test. 1 In the Service Tests submenu, scroll to check if the cartridge nozzles function correctly. If ... of the above problems are out, weak or misdirected then the cartridge(s) will need servicing: 1 Replace the cartridge(s) that failed the test. 3 Replace the carriage ' page 6Ć34. If any nozzles printed. If the cartridge(s) need servicing. 12. Perform the nozzle print test as follows:...
...have an interconnection problem: 1 Clean the interconnect pad in the carriage or the cartridge(s) that failed the test. 2 Replace the cartridge(s) that failed the test and try one of this test. 1 In the Service Tests submenu, scroll to check if the cartridge nozzles function correctly. If ... of the above problems are out, weak or misdirected then the cartridge(s) will need servicing: 1 Replace the cartridge(s) that failed the test. 3 Replace the carriage ' page 6Ć34. If any nozzles printed. If the cartridge(s) need servicing. 12. Perform the nozzle print test as follows:...
Service Manual
Page 173
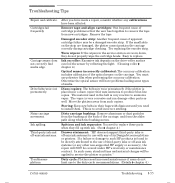
... strip. This is very corrosive and can fool the sensor by reflecting the light. (Cleaning roller ' chapter 4.) Optical sensor incorrectly calibrated: The accuracy calibration includes calibration of the optical...replace these parts when they fill up with ink. (See ' chapter 4.) Drawer statement: HP does not support thirdĆparty inks or offĆaxis ink systems for use polyester film... attributed to produce blueĆline copies. Remove tape and align cartridges: One frequent cause of its DesignJet series plotters or printers. If the small slots on the carriage. The material used in...
... strip. This is very corrosive and can fool the sensor by reflecting the light. (Cleaning roller ' chapter 4.) Optical sensor incorrectly calibrated: The accuracy calibration includes calibration of the optical...replace these parts when they fill up with ink. (See ' chapter 4.) Drawer statement: HP does not support thirdĆparty inks or offĆaxis ink systems for use polyester film... attributed to produce blueĆline copies. Remove tape and align cartridges: One frequent cause of its DesignJet series plotters or printers. If the small slots on the carriage. The material used in...
Service Manual
Page 279
... cartridges, 9Ć14 fail frequently, 8Ć55 caution symbols, x cautions, 6Ć3 center cover, removing, 6Ć14 Centronics, GlossaryĆ2 centronics interface cables, 11Ć37 Channel, Serial, 5Ć5 character sets, 1Ć2 cleaning carriage bushing, 8Ć55 drive roller, 4Ć3 plotter, 4Ć2 Coalescence, 9Ć18 cockle, 9Ć18 code, firmware revision, 10Ć3 color...
... cartridges, 9Ć14 fail frequently, 8Ć55 caution symbols, x cautions, 6Ć3 center cover, removing, 6Ć14 Centronics, GlossaryĆ2 centronics interface cables, 11Ć37 Channel, Serial, 5Ć5 character sets, 1Ć2 cleaning carriage bushing, 8Ć55 drive roller, 4Ć3 plotter, 4Ć2 Coalescence, 9Ć18 cockle, 9Ć18 code, firmware revision, 10Ć3 color...


