Service Manual
Page 8
... the YĆAxis Motor Holder 6Ć32 Removing the Cutter 6Ć33 Removing the Cartridge Carriage and Drive Belt 6Ć34 Removing the Trailing Cable 6Ć36 Reinstalling the Trailing Cable 6Ć39 Removing the Starguard Assembly 6Ć40 Removing the Primer 6Ć41 Removing the Service Station 6Ć42 Removing the Spittoon 6Ć...
... the YĆAxis Motor Holder 6Ć32 Removing the Cutter 6Ć33 Removing the Cartridge Carriage and Drive Belt 6Ć34 Removing the Trailing Cable 6Ć36 Reinstalling the Trailing Cable 6Ć39 Removing the Starguard Assembly 6Ć40 Removing the Primer 6Ć41 Removing the Service Station 6Ć42 Removing the Spittoon 6Ć...

Service Manual
Page 50
... contains an ASIC that controls the operation of the cartridge drivers that switch power pulses from the ASIC to border across the width of the trailing cable to the voltage regulators on the print mode) and extends from an external controller by the cartridges and is in the cartridge voltages supplied to...
... contains an ASIC that controls the operation of the cartridge drivers that switch power pulses from the ASIC to border across the width of the trailing cable to the voltage regulators on the print mode) and extends from an external controller by the cartridges and is in the cartridge voltages supplied to...
Service Manual
Page 54
... the YĆAxis Motor Holder 6Ć32 Removing the Cutter 6Ć33 Removing the Cartridge Carriage and Drive Belt 6Ć34 Removing the Trailing Cable 6Ć36 Reinstalling the Trailing Cable 6Ć39 Removing the Starguard Assembly 6Ć40 Removing the Primer 6Ć41 Removing the Service Station 6Ć42 Removing the Spittoon 6Ć...
... the YĆAxis Motor Holder 6Ć32 Removing the Cutter 6Ć33 Removing the Cartridge Carriage and Drive Belt 6Ć34 Removing the Trailing Cable 6Ć36 Reinstalling the Trailing Cable 6Ć39 Removing the Starguard Assembly 6Ć40 Removing the Primer 6Ć41 Removing the Service Station 6Ć42 Removing the Spittoon 6Ć...
Service Manual
Page 86
... 6Ć14. 3 Remove the left endcover ' page 6Ć16. 4 Remove the right endcover ' page 6Ć17. 5 Remove the encoder strip ' page 6Ć27. 6 Remove the trailingĆcable ' page 6Ć36. 7 Remove the YĆaxis motor ' page 6Ć24. 8 Remove the YĆaxis motor holder ' page 6Ć32. 9 Remove the cutter ' page...
... 6Ć14. 3 Remove the left endcover ' page 6Ć16. 4 Remove the right endcover ' page 6Ć17. 5 Remove the encoder strip ' page 6Ć27. 6 Remove the trailingĆcable ' page 6Ć36. 7 Remove the YĆaxis motor ' page 6Ć24. 8 Remove the YĆaxis motor holder ' page 6Ć32. 9 Remove the cutter ' page...

Service Manual
Page 88
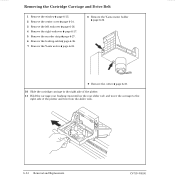
Reassembling: The connector will have the lever up. Put the cable into the connector. Do not strain cables. 6-36 Removal and Replacement C4705-90000 Removing the Trailing Cable 1 Remove the window ' page 6Ć13. 2 Remove the center cover ' page 6Ć14. 3 Remove the electronicsĆ...262;5. 4 Remove the left endcover ' page 6Ć16. 5 Remove the right endcover ' page 6Ć17. 6 Disconnect the trailingĆcable connector from the carriage PCA. Trailing-cable connectors 7 Use needle nose pliers to unclip them and lifting the strip. Lower the lever, making sure that the...
Reassembling: The connector will have the lever up. Put the cable into the connector. Do not strain cables. 6-36 Removal and Replacement C4705-90000 Removing the Trailing Cable 1 Remove the window ' page 6Ć13. 2 Remove the center cover ' page 6Ć14. 3 Remove the electronicsĆ...262;5. 4 Remove the left endcover ' page 6Ć16. 5 Remove the right endcover ' page 6Ć17. 6 Disconnect the trailingĆcable connector from the carriage PCA. Trailing-cable connectors 7 Use needle nose pliers to unclip them and lifting the strip. Lower the lever, making sure that the...

Service Manual
Page 89
... other three corners. In order to access the trailing cable behind the electronics enclosure, perform the following steps: 11 Remove the screw that attaches the trailing cable holder to the chassis. 12 Disconnect the following cables from the Main PCA: frontĆpanel cable, XĆaxis motor encoderĆcable, trailing cable, pinchĆwheel sensor and media sensor...
... other three corners. In order to access the trailing cable behind the electronics enclosure, perform the following steps: 11 Remove the screw that attaches the trailing cable holder to the chassis. 12 Disconnect the following cables from the Main PCA: frontĆpanel cable, XĆaxis motor encoderĆcable, trailing cable, pinchĆwheel sensor and media sensor...

Service Manual
Page 90
Lower trailing-cable holder 6-38 Removal and Replacement C4705-90000 14 Remove the clip from the lower trailing cable holder.
Lower trailing-cable holder 6-38 Removal and Replacement C4705-90000 14 Remove the clip from the lower trailing cable holder.
Service Manual
Page 91
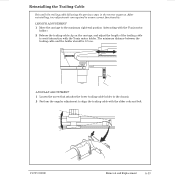
ANGULAR ADJUSTMENT 1 Loosen the screw that attaches the lower trailingĆcable holder to the chassis. 2 Perform the angular adjustment to avoid interaction with the slider rods and belt. After reinstalling, two adjustments are required...;end position (interacting with the YĆaxis motor holder). 2 Release the trailingĆcable clip on the carriage, and adjust the length of the trailing cable to align the trailing cable with the YĆaxis motor holder. The minimum distance between the trailing cable and the holder should be 0.5 cm. C4705-90000 Removal and Replacement 6-39...
ANGULAR ADJUSTMENT 1 Loosen the screw that attaches the lower trailingĆcable holder to the chassis. 2 Perform the angular adjustment to avoid interaction with the slider rods and belt. After reinstalling, two adjustments are required...;end position (interacting with the YĆaxis motor holder). 2 Release the trailingĆcable clip on the carriage, and adjust the length of the trailing cable to align the trailing cable with the YĆaxis motor holder. The minimum distance between the trailing cable and the holder should be 0.5 cm. C4705-90000 Removal and Replacement 6-39...

Service Manual
Page 99
... right endcover ' page 6Ć17. 5 Remove the left endcover ' page 6Ć16. 6 Remove the main PCA ' page 6Ć9. 7 Remove the screw that attaches the trailingĆcable holder to the chasis. 8 Remove the two upper screws that attach the electronics enclosure to the side plates. Loosen the two bottom screws. 9 Swing the...
... right endcover ' page 6Ć17. 5 Remove the left endcover ' page 6Ć16. 6 Remove the main PCA ' page 6Ć9. 7 Remove the screw that attaches the trailingĆcable holder to the chasis. 8 Remove the two upper screws that attach the electronics enclosure to the side plates. Loosen the two bottom screws. 9 Swing the...

Service Manual
Page 129
...detected in YĆaxis servo feedback loop. D Reroute the power cables away from the YĆaxis motor. D Trailing cable. Corrective Actions D For all 01003X codes, check the trailing cable connections and continuity. D Trailing cable ' page 6Ć36. D Refer to carriage ASIC. D Main...servo feedback loop. D Carriage assembly ' page 6Ć34. D Main PCA. D Replace the: D Trailing cable ' page 6Ć36. D Check the: D Encoder strip. D Check the: D XĆaxis encoder. D Encoder cable. D Main PCA ' page 6Ć9. D If required, replace the: D Main PCA ' page 6Ć...
...detected in YĆaxis servo feedback loop. D Reroute the power cables away from the YĆaxis motor. D Trailing cable. Corrective Actions D For all 01003X codes, check the trailing cable connections and continuity. D Trailing cable ' page 6Ć36. D Refer to carriage ASIC. D Main...servo feedback loop. D Carriage assembly ' page 6Ć34. D Main PCA. D Replace the: D Trailing cable ' page 6Ć36. D Check the: D Encoder strip. D Check the: D XĆaxis encoder. D Encoder cable. D Main PCA ' page 6Ć9. D If required, replace the: D Main PCA ' page 6Ć...

Service Manual
Page 144
... exactly which component failed. 8-26 Troubleshooting C4705-90000 SERVICE TESTS 6 Main-Carriage Com 2 The following components: 1 Main PCA ' page 6Ć9. 2 Carriage assembly ' page 6Ć34. 3 Trailing cable ' page 6Ć36. If the test fails, try replacing one component at a time and perform the MainĆCarriage Com" test again before replacing another...
... exactly which component failed. 8-26 Troubleshooting C4705-90000 SERVICE TESTS 6 Main-Carriage Com 2 The following components: 1 Main PCA ' page 6Ć9. 2 Carriage assembly ' page 6Ć34. 3 Trailing cable ' page 6Ć36. If the test fails, try replacing one component at a time and perform the MainĆCarriage Com" test again before replacing another...

Service Manual
Page 145
... and perform the Carriage" test again before replacing another component. SERVICE TESTS 7 Carriage 2 The following components: 1 Carriage assembly ' page 6Ć34. 2 Main PCA ' page 6Ć9. 3 Trailing cable ' page 6Ć36. Only replace one of the carriage PCA. Carriage The purpose of this procedure you will be able to 7 Carriage" and press Enter.
... and perform the Carriage" test again before replacing another component. SERVICE TESTS 7 Carriage 2 The following components: 1 Carriage assembly ' page 6Ć34. 2 Main PCA ' page 6Ć9. 3 Trailing cable ' page 6Ć36. Only replace one of the carriage PCA. Carriage The purpose of this procedure you will be able to 7 Carriage" and press Enter.

Service Manual
Page 212
...trailing cable ' page 6Ć36. 6 Slide the carriage to the right side of the plotter. 7 Grasp the carriage rear preload bushing and move the carriage to avoid this problem. The Aerosol Phenomena Causing a Servo Shutdown Error Date: 15 December 1995 Service Note: C3195AĆ03 C3196AĆ03 Supersedes: None Products: HP DesignJet 750C (C3195A) HP DesignJet 750C... (C3196A) Serial Numbers: C3195A ESA0000000/ESA5700250 C3196A ESA0000000/ESA5700400 To be performed by: HPĆQualified Personnel Parts ...
...trailing cable ' page 6Ć36. 6 Slide the carriage to the right side of the plotter. 7 Grasp the carriage rear preload bushing and move the carriage to avoid this problem. The Aerosol Phenomena Causing a Servo Shutdown Error Date: 15 December 1995 Service Note: C3195AĆ03 C3196AĆ03 Supersedes: None Products: HP DesignJet 750C (C3195A) HP DesignJet 750C... (C3196A) Serial Numbers: C3195A ESA0000000/ESA5700250 C3196A ESA0000000/ESA5700400 To be performed by: HPĆQualified Personnel Parts ...
Service Manual
Page 218
...thus preventing the error. The message Alignment Error" is caused by the inserted cartridges which cannot be performed by: HPĆQualified Personnel Parts Required: Part Number Description Qty C3195Ć60140 Pen Carriage 1 Situation In some cases, when...page 6Ć27. 5 Remove the trailing cable ' page 6Ć36. 6 Slide the carriage to the insertion problem. Problems with Pen Alignment Date: 15 December 1995 Service Note: C3196AĆ04 C3198AĆ02 Supersedes: None Products: HP DesignJet 750C (C3196A) HP DesignJet 750CM (C3198A) Serial Numbers: C3196A ...
...thus preventing the error. The message Alignment Error" is caused by the inserted cartridges which cannot be performed by: HPĆQualified Personnel Parts Required: Part Number Description Qty C3195Ć60140 Pen Carriage 1 Situation In some cases, when...page 6Ć27. 5 Remove the trailing cable ' page 6Ć36. 6 Slide the carriage to the insertion problem. Problems with Pen Alignment Date: 15 December 1995 Service Note: C3196AĆ04 C3198AĆ02 Supersedes: None Products: HP DesignJet 750C (C3196A) HP DesignJet 750CM (C3198A) Serial Numbers: C3196A ...

Service Manual
Page 230
...;1203 1 Switch Button 27 0515Ć0382 1 Screw Ć C4705Ć60111 1 Code SIMM (HP DesignJet 700) Ć C3195Ć60151 1 Code SIMM (HP DesignJet 750C) Ć C4708Ć60111 1 Code SIMM (HP DesignJet 750C Plus/755CM) Ć C3198Ć60151 1 Postscript SIMM Ć 5961Ć3524 1 Serial Number 28 C3195Ć80009 1 Trailing Cable 11-8 Parts and Diagrams C4705-90000
...;1203 1 Switch Button 27 0515Ć0382 1 Screw Ć C4705Ć60111 1 Code SIMM (HP DesignJet 700) Ć C3195Ć60151 1 Code SIMM (HP DesignJet 750C) Ć C4708Ć60111 1 Code SIMM (HP DesignJet 750C Plus/755CM) Ć C3198Ć60151 1 Postscript SIMM Ć 5961Ć3524 1 Serial Number 28 C3195Ć80009 1 Trailing Cable 11-8 Parts and Diagrams C4705-90000

Service Manual
Page 232
Reference on Drawing HP Part Number CarriageĆAxis Quantity Description 1 C3195Ć40017 1 Right Bracket 2 0515Ć0382 1 Screw 3 0515Ć2521 1 Screw 4 0515Ć2248 1 Screw 5 ... Left Bracket 7 C3195Ć60169 1 Pulley Assembly 8 C3195Ć40039 1 Wedge Tensioner 9 C3195Ć80002 1 Spring 10 C3195Ć80009 1 Trailing Cable 11 C3195Ć40024 1 Trailing Cable Clip 12 C3195Ć40025 1 Trailing Cable Bracket 13 C3195Ć40053 1 Bridge Foam 14 C4713Ć60098 1 Encoder Strip Assy (D/A1Ćsize) (Includes Item 19) C4714...
Reference on Drawing HP Part Number CarriageĆAxis Quantity Description 1 C3195Ć40017 1 Right Bracket 2 0515Ć0382 1 Screw 3 0515Ć2521 1 Screw 4 0515Ć2248 1 Screw 5 ... Left Bracket 7 C3195Ć60169 1 Pulley Assembly 8 C3195Ć40039 1 Wedge Tensioner 9 C3195Ć80002 1 Spring 10 C3195Ć80009 1 Trailing Cable 11 C3195Ć40024 1 Trailing Cable Clip 12 C3195Ć40025 1 Trailing Cable Bracket 13 C3195Ć40053 1 Bridge Foam 14 C4713Ć60098 1 Encoder Strip Assy (D/A1Ćsize) (Includes Item 19) C4714...
Service Manual
Page 284
...41 right endcover, 6Ć17 rollfeed cover assy, 6Ć51 rollfeed module assemblies, 6Ć52 service station, 6Ć42 spittoon, 6Ć44 starguard, 6Ć40 trailing cable, 6Ć36, 6Ć39 window, 6Ć13 window sensor, 6Ć20 YĆtensioner and housing, 6Ć31, 6Ć32 Y-axis motor, 6Ć..., 10Ć1 Service Tests, 8Ć17 area fill PQ plot, 8Ć35 bail stepper, 8Ć49 button test, 8Ć53 carriage, 8Ć27 color PQ plot, 8Ć34 cutter, 8Ć48 drop detector, 8Ć37 edge detector, 8Ć39 EEROM, 8Ć21 EEROM clear counters, 8Ć22 EEROM...
...41 right endcover, 6Ć17 rollfeed cover assy, 6Ć51 rollfeed module assemblies, 6Ć52 service station, 6Ć42 spittoon, 6Ć44 starguard, 6Ć40 trailing cable, 6Ć36, 6Ć39 window, 6Ć13 window sensor, 6Ć20 YĆtensioner and housing, 6Ć31, 6Ć32 Y-axis motor, 6Ć..., 10Ć1 Service Tests, 8Ć17 area fill PQ plot, 8Ć35 bail stepper, 8Ć49 button test, 8Ć53 carriage, 8Ć27 color PQ plot, 8Ć34 cutter, 8Ć48 drop detector, 8Ć37 edge detector, 8Ć39 EEROM, 8Ć21 EEROM clear counters, 8Ć22 EEROM...
Service Manual
Page 285
..., 2Ć3 thermal control, service test, 8Ć28 thetaĆZ error, 9Ć14 thirdĆparty ink, 3Ć11, 8Ć55 Token Ring, 1Ć3 tools, 6Ć4 trailing cable reinstaling, 6Ć39 removing, 6Ć36 training, for customer engineers, ii troubleshooting, 8Ć1 tips, 8Ć55 troubleshooting checklist, print quality, 9Ć2 troublesome plotters, 8Ć55...
..., 2Ć3 thermal control, service test, 8Ć28 thetaĆZ error, 9Ć14 thirdĆparty ink, 3Ć11, 8Ć55 Token Ring, 1Ć3 tools, 6Ć4 trailing cable reinstaling, 6Ć39 removing, 6Ć36 training, for customer engineers, ii troubleshooting, 8Ć1 tips, 8Ć55 troubleshooting checklist, print quality, 9Ć2 troublesome plotters, 8Ć55...


