
DesignJet - ZEHRaster Plus
Page 2
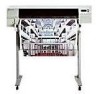
...149; Outputs for printing TIFF, JPEG, CALS Type 1, binary-encoded CGM*, and CGMATA files. • Displays files in Preview window for file verification. • Submits your file directly for printing. • Provides ...and 54 inches. • Prints files to HP 750 printers at 300 dpi and 600 dpi. • Prints files to CP Series and ColorPro CAD printers at 600 dpi. • Prints files to... fonts for CGM files. • Allows selection of three printer modes: best, normal, or fast. • Provides “Reverse Black-White” colors option for CGM files. * Support for worldwide clients with ...
...149; Outputs for printing TIFF, JPEG, CALS Type 1, binary-encoded CGM*, and CGMATA files. • Displays files in Preview window for file verification. • Submits your file directly for printing. • Provides ...and 54 inches. • Prints files to HP 750 printers at 300 dpi and 600 dpi. • Prints files to CP Series and ColorPro CAD printers at 600 dpi. • Prints files to... fonts for CGM files. • Allows selection of three printer modes: best, normal, or fast. • Provides “Reverse Black-White” colors option for CGM files. * Support for worldwide clients with ...

HP DesignJet 700 user guide
Page 7
... Up Your Software 1-35 Task 10: Print a Test Plot 1-39 Extra Tips for UNIX Users 1-40 2 Learning How to Use the Front-Panel Display (Tutorial) The Front Panel 2-2 The Display Section 2-3 Printing the Menus Plot 2-5 Description of the Menus Plot 2-5 Entering the Menu System 2-6 Navigating the Menu System 2-7 Menu Graphics Used in...
... Up Your Software 1-35 Task 10: Print a Test Plot 1-39 Extra Tips for UNIX Users 1-40 2 Learning How to Use the Front-Panel Display (Tutorial) The Front Panel 2-2 The Display Section 2-3 Printing the Menus Plot 2-5 Description of the Menus Plot 2-5 Entering the Menu System 2-6 Navigating the Menu System 2-7 Menu Graphics Used in...
HP DesignJet 700 user guide
Page 13
... Areas 9-16 If there are Other Gaps in Solid Areas or in Lines (DesignJet 750C Plus) . 9-17 If there are Jagged Vertical or Horizontal Lines 9-18 If there are Slightly Warped Lines 9-18 If there are Color "Shadows" (DesignJet 750C Plus 9-18 If One or More Cartridges are not Printing at All 9-18 If ...Panel Keys Work 9-21 If Page Format/Rotate Does Not Work 9-21 If A Display Message Will Not Clear 9-21 If A "System Error" Message Is Displayed 9-22 If An "Out Of Memory/Data Was Lost" Message Is Displayed 9-22 Solving Miscellaneous Problems 9-23 If the Plotter Does Not Plot 9-23 If the...
... Areas 9-16 If there are Other Gaps in Solid Areas or in Lines (DesignJet 750C Plus) . 9-17 If there are Jagged Vertical or Horizontal Lines 9-18 If there are Slightly Warped Lines 9-18 If there are Color "Shadows" (DesignJet 750C Plus 9-18 If One or More Cartridges are not Printing at All 9-18 If ...Panel Keys Work 9-21 If Page Format/Rotate Does Not Work 9-21 If A Display Message Will Not Clear 9-21 If A "System Error" Message Is Displayed 9-22 If An "Out Of Memory/Data Was Lost" Message Is Displayed 9-22 Solving Miscellaneous Problems 9-23 If the Plotter Does Not Plot 9-23 If the...
HP DesignJet 700 user guide
Page 17
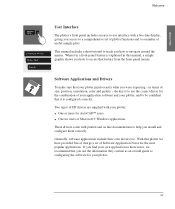
...or more for AutoCAD™ users, One for users of MicrosoftR Windows applications. Two types of HP drivers are supplied with your own application in terms of size, position, orientation, color and quality - WELCOME Welcome xxxxxxx yyyyy Queueing & Nesting Queue mgmt Page ID User Interface The... plotter's front panel includes an easy-to-use interface with a two-line display, giving you access to a comprehensive set of ...
...or more for AutoCAD™ users, One for users of MicrosoftR Windows applications. Two types of HP drivers are supplied with your own application in terms of size, position, orientation, color and quality - WELCOME Welcome xxxxxxx yyyyy Queueing & Nesting Queue mgmt Page ID User Interface The... plotter's front panel includes an easy-to-use interface with a two-line display, giving you access to a comprehensive set of ...

HP DesignJet 700 user guide
Page 19
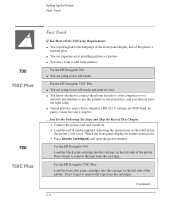
Front View Window Print Cartridge(s) (Inside) ON/OFF Switch Welcome Front Panel Display Front Panel Media Lever Media-Entry Slot Roll Cover Media Bin 1835 xvii WELCOME
Front View Window Print Cartridge(s) (Inside) ON/OFF Switch Welcome Front Panel Display Front Panel Media Lever Media-Entry Slot Roll Cover Media Bin 1835 xvii WELCOME
HP DesignJet 700 user guide
Page 22
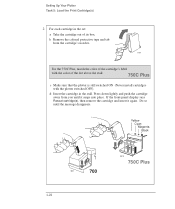
... tape from the cartridges. For the HP DesignJet 750C Plus: You are going to use the parallel or serial interface, and you already have the right cable. (Serial interface users) Your computer's RS-232-C settings are experienced at installing printers or plotters. You know whether to...of the plotter. Don't forget to use roll media. Watch the front-panel display for further instructions. 3 Press Access Cartridge(s) and open the plotter window. For the HP DesignJet 750C Plus: Load the four color print-cartridges into the carriage on the left side of the plotter. Continued... 1-2...
... tape from the cartridges. For the HP DesignJet 750C Plus: You are going to use the parallel or serial interface, and you already have the right cable. (Serial interface users) Your computer's RS-232-C settings are experienced at installing printers or plotters. You know whether to...of the plotter. Don't forget to use roll media. Watch the front-panel display for further instructions. 3 Press Access Cartridge(s) and open the plotter window. For the HP DesignJet 750C Plus: Load the four color print-cartridges into the carriage on the left side of the plotter. Continued... 1-2...

HP DesignJet 700 user guide
Page 35
Sheet load --------> ↑ Roll load --------> ↓ 0014 1-15 c Let go of the media when the plotter begins to indicate you and, holding it in. SETUP 1 1839 9 Press the ↓ key next to the front-panel display to pull it from the sides, align its right edge with the perforated line on the entry platen. Setting Up the Plotter Task 4: Load Media 8 a Pull the media towards you are loading a roll. b Insert the leading edge into the plotter, until the page buckles slightly.
Sheet load --------> ↑ Roll load --------> ↓ 0014 1-15 c Let go of the media when the plotter begins to indicate you and, holding it in. SETUP 1 1839 9 Press the ↓ key next to the front-panel display to pull it from the sides, align its right edge with the perforated line on the entry platen. Setting Up the Plotter Task 4: Load Media 8 a Pull the media towards you are loading a roll. b Insert the leading edge into the plotter, until the page buckles slightly.
HP DesignJet 700 user guide
Page 36
Setting Up the Plotter Task 4: Load Media 10 Press the ↑ or ↓ key until the display shows the type of media you are loading and then press the Enter key. 700 SELECT MEDIA Opaque bond ↑ ↓ Enter (if you are using the roll supplied with the plotter, scroll to Opaque bond) 0014 750C Plus SELECT MEDIA Coated paper ↑ ↓ Enter (if you are using the roll supplied with the plotter, scroll to Coated paper) 0014 1-16
Setting Up the Plotter Task 4: Load Media 10 Press the ↑ or ↓ key until the display shows the type of media you are loading and then press the Enter key. 700 SELECT MEDIA Opaque bond ↑ ↓ Enter (if you are using the roll supplied with the plotter, scroll to Opaque bond) 0014 750C Plus SELECT MEDIA Coated paper ↑ ↓ Enter (if you are using the roll supplied with the plotter, scroll to Coated paper) 0014 1-16

HP DesignJet 700 user guide
Page 39
Sheet load --------> ↑ Roll load --------> ↓ 0014 4 Press the ↑ or ↓ key until the display shows the type of the page. if coated paper, scroll to the start of media you are loading (if you are loading a sheet. see page 3-... its size and alignment, and then advances it to Coated paper), and then press the Enter key. When sheet loading is complete, STATUS / Ready is displayed. SETUP 1 Setting Up the Plotter Task 4: Load Media 3 Press the ↑ key next to the front-panel...
Sheet load --------> ↑ Roll load --------> ↓ 0014 4 Press the ↑ or ↓ key until the display shows the type of the page. if coated paper, scroll to the start of media you are loading (if you are loading a sheet. see page 3-... its size and alignment, and then advances it to Coated paper), and then press the Enter key. When sheet loading is complete, STATUS / Ready is displayed. SETUP 1 Setting Up the Plotter Task 4: Load Media 3 Press the ↑ key next to the front-panel...
HP DesignJet 700 user guide
Page 42
... so until it again. If the front-panel display says Reseat cartridge(s), then remove the cartridge and insert it snaps into place. d Insert the cartridge in the set: a Take the cartridge out of the dot above the stall. 750C Plus c Make sure that the plotter is still switched... 5: Load the Print Cartridge(s) 2 For each cartridge in the stall. b Remove the colored protective tape and tab from you until the message disappears. 2 1 r004 700 Yellow Cyan Magenta Black 2 1 0019 750C Plus 1-22 Press down lightly and push the cartridge away from the cartridge's nozzles. 1754 For...
... so until it again. If the front-panel display says Reseat cartridge(s), then remove the cartridge and insert it snaps into place. d Insert the cartridge in the set: a Take the cartridge out of the dot above the stall. 750C Plus c Make sure that the plotter is still switched... 5: Load the Print Cartridge(s) 2 For each cartridge in the stall. b Remove the colored protective tape and tab from you until the message disappears. 2 1 r004 700 Yellow Cyan Magenta Black 2 1 0019 750C Plus 1-22 Press down lightly and push the cartridge away from the cartridge's nozzles. 1754 For...

HP DesignJet 700 user guide
Page 43
SETUP 1 1-23 Setting Up Your Plotter Task 5: Load the Print Cartridge(s) C A U T I O N 3 When the cartridges are installed, except to replace them. When the front-panel displays STATUS / Ready, the procedure is complete. You can throw away the small print produced during the cartridge alignment procedure. To make your cartridges last as long as possible, you should not remove them once they are successfully installed, the plotter automatically runs the cartridge alignment procedure. Now that the cartridge(s) are loaded, never turn the plotter upside down, or ink will spill.
SETUP 1 1-23 Setting Up Your Plotter Task 5: Load the Print Cartridge(s) C A U T I O N 3 When the cartridges are installed, except to replace them. When the front-panel displays STATUS / Ready, the procedure is complete. You can throw away the small print produced during the cartridge alignment procedure. To make your cartridges last as long as possible, you should not remove them once they are successfully installed, the plotter automatically runs the cartridge alignment procedure. Now that the cartridge(s) are loaded, never turn the plotter upside down, or ink will spill.

HP DesignJet 700 user guide
Page 45
SETUP 1 Setting Up the Plotter Task 6: (Optional) Print a Demonstration Plot 2 On the front-panel display, go to Demos, as shown below. 750C Plus STATUS Ready Press Enter SHORT MENUS Queueing & Nesting ³ Press ↓ SHORT MENUS Demos ³ Press Enter DEMOS Palette Press Enter to choose this or ...; to get to the next option DEMOS Samples Press Enter to choose this or ↓ to get to the next option DEMOS Menu Press Enter 750C Plus Palette prints the Palette Demo, which is available, it starts processing as soon as you press Enter. Samples accesses a list of the entire front...
SETUP 1 Setting Up the Plotter Task 6: (Optional) Print a Demonstration Plot 2 On the front-panel display, go to Demos, as shown below. 750C Plus STATUS Ready Press Enter SHORT MENUS Queueing & Nesting ³ Press ↓ SHORT MENUS Demos ³ Press Enter DEMOS Palette Press Enter to choose this or ...; to get to the next option DEMOS Samples Press Enter to choose this or ↓ to get to the next option DEMOS Menu Press Enter 750C Plus Palette prints the Palette Demo, which is available, it starts processing as soon as you press Enter. Samples accesses a list of the entire front...
HP DesignJet 700 user guide
Page 46
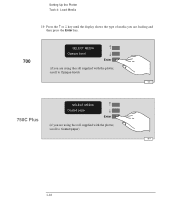
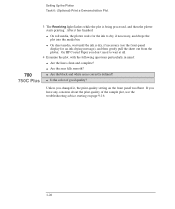
Is the color of the sample plot, use the troubleshooting advice starting on the front panel was Best. On HP Coated Paper you have any... concerns about the print quality of good quality? If you don't need to dry, if necessary, and drops the plot into the media bin. After it , the print-quality setting on page 9-16. 1-26 Are the area fills smooth? 700 750C Plus... The Receiving light flashes while the plot is dry, if necessary (see the front-panel display for the ink to wait at all. 4 Examine the plot, with the following questions particularly in ...
Is the color of the sample plot, use the troubleshooting advice starting on the front panel was Best. On HP Coated Paper you have any... concerns about the print quality of good quality? If you don't need to dry, if necessary, and drops the plot into the media bin. After it , the print-quality setting on page 9-16. 1-26 Are the area fills smooth? 700 750C Plus... The Receiving light flashes while the plot is dry, if necessary (see the front-panel display for the ink to wait at all. 4 Examine the plot, with the following questions particularly in ...

HP DesignJet 700 user guide
Page 50
... Configurations A and B. Setting Up the Plotter Task 8: (Serial Interface Users Only) Configure the Interface To Change the Plotter's Serial Interface Settings Through the front-panel display, you up to three stored configurations to choose from. The instructions that follow explain how to the factory defaults shown in the same way. To...
... Configurations A and B. Setting Up the Plotter Task 8: (Serial Interface Users Only) Configure the Interface To Change the Plotter's Serial Interface Settings Through the front-panel display, you up to three stored configurations to choose from. The instructions that follow explain how to the factory defaults shown in the same way. To...

HP DesignJet 700 user guide
Page 51
STATUS Ready Press Enter SHORT MENUS Queueing & Nesting ³ Press ↓ If FULL MENUS is displayed instead of SHORT MENUS, you can skip this step and go to Full. SHORT MENUS Demos ³ Press ↓ UTILITIES Menu mode=Short ³ Press Enter MENU MODE Short* Press ↓ MENU MODE Full Press Enter UTILITIES Menu mode=Full ³ Press Previous FULL MENUS Utilities ³ 1-31 SETUP 1 Setting Up the Plotter Task 8: (Serial Interface Users Only) Configure the Interface 1 On the front-panel display, change the Menu mode from Short to step 2.
STATUS Ready Press Enter SHORT MENUS Queueing & Nesting ³ Press ↓ If FULL MENUS is displayed instead of SHORT MENUS, you can skip this step and go to Full. SHORT MENUS Demos ³ Press ↓ UTILITIES Menu mode=Short ³ Press Enter MENU MODE Short* Press ↓ MENU MODE Full Press Enter UTILITIES Menu mode=Full ³ Press Previous FULL MENUS Utilities ³ 1-31 SETUP 1 Setting Up the Plotter Task 8: (Serial Interface Users Only) Configure the Interface 1 On the front-panel display, change the Menu mode from Short to step 2.
HP DesignJet 700 user guide
Page 59
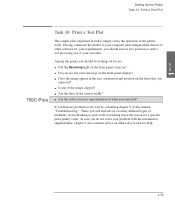
... no plot at all, to tracking down the reason for a specific print-quality issue. There you find advice on ? Are the colors an exact representation of your own files. 750C Plus Among the points you should be in a position to turn for are: Did the Receiving light on the front panel come on... your computer and configured the drivers or other software for your problem with the information supplied there, chapter 9 also contains advice on the front-panel display?
... no plot at all, to tracking down the reason for a specific print-quality issue. There you find advice on ? Are the colors an exact representation of your own files. 750C Plus Among the points you should be in a position to turn for are: Did the Receiving light on the front panel come on... your computer and configured the drivers or other software for your problem with the information supplied there, chapter 9 also contains advice on the front-panel display?

HP DesignJet 700 user guide
Page 65
FRONT-PANEL 2 TUTORIAL 2 The Front Panel 2-2 The Display Section 2-3 Printing the Menus Plot 2-5 Description of the Menus Plot 2-5 Entering the Menu System 2-6 Navigating the Menu System 2-7 Menu Graphics Used in This Manual 2-9 Other Types of Screen 2-10 Examples 2-11 Example 1: Changing Margins 2-11 Example 2: Changing the Drying Time 2-12 Learning How To Use the Front Panel Display Tutorial 2-1
FRONT-PANEL 2 TUTORIAL 2 The Front Panel 2-2 The Display Section 2-3 Printing the Menus Plot 2-5 Description of the Menus Plot 2-5 Entering the Menu System 2-6 Navigating the Menu System 2-7 Menu Graphics Used in This Manual 2-9 Other Types of Screen 2-10 Examples 2-11 Example 1: Changing Margins 2-11 Example 2: Changing the Drying Time 2-12 Learning How To Use the Front Panel Display Tutorial 2-1
HP DesignJet 700 user guide
Page 66
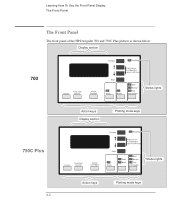
Learning How To Use the Front-Panel Display The Front Panel The Front Panel The front panel of the HP DesignJet 700 and 750C Plus plotters is shown below: Display section 700 Status lights Action keys Display section Plotting mode keys 750C Plus 2-2 Status lights Action keys Plotting mode keys
Learning How To Use the Front-Panel Display The Front Panel The Front Panel The front panel of the HP DesignJet 700 and 750C Plus plotters is shown below: Display section 700 Status lights Action keys Display section Plotting mode keys 750C Plus 2-2 Status lights Action keys Plotting mode keys

HP DesignJet 700 user guide
Page 67
... their use are described later in this tutorial is to explain the use of the display section. Press these two simultaneously The Display Section The display section of the front panel consists of the display itself and the four display keys to this afterwards. 1 Make sure that media is used primarily for setting the plotter...
... their use are described later in this tutorial is to explain the use of the display section. Press these two simultaneously The Display Section The display section of the front panel consists of the display itself and the four display keys to this afterwards. 1 Make sure that media is used primarily for setting the plotter...

HP DesignJet 700 user guide
Page 68
See chapter 10, "Front panel messages" for example Load error Remove media These messages may concern machine status, actions required or errors. In this case, you can use the display keys to respond to navigate the menu system and select menu options. S Messages, for more information. 2-4 Learning How To Use the Front-Panel Display The Front Panel The display can show two lines of text and is used for displaying: S Menus, for example UTILITIES Menu mode=short³ Menu title Menu option In this case, you can use the display keys to messages.
See chapter 10, "Front panel messages" for example Load error Remove media These messages may concern machine status, actions required or errors. In this case, you can use the display keys to respond to navigate the menu system and select menu options. S Messages, for more information. 2-4 Learning How To Use the Front-Panel Display The Front Panel The display can show two lines of text and is used for displaying: S Menus, for example UTILITIES Menu mode=short³ Menu title Menu option In this case, you can use the display keys to messages.

