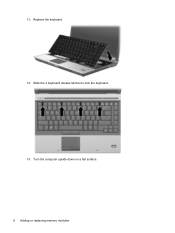
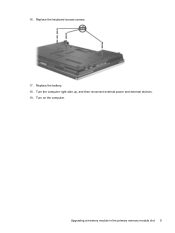
Computer Setup - Windows Vista and Windows XP
Page 10
... during the current session. Set or change the date and time on the computer. Replace the configuration settings in the system. ● View specification information for the processor, cache and memory size, system ROM, video revision, and keyboard controller version. Then exit and restart the computer. Save any changes entered during the...
Computer Setup - Windows Vista, Windows XP, and Windows 7
Page 10
...and exit To do this ● View identification information for the processor, cache and memory size, system ROM, video revision, and keyboard controller version. Then exit and restart the computer. Your changes go into effect when the computer restarts. 6 Chapter 3 Computer Setup menus... Save any changes entered during the current session. Set or change the date and time on the computer. Replace the configuration settings in the system. ● View specification information for the computer and the batteries in Computer Setup with the original ...
Computer Setup - Windows XP and Windows Vista
Page 10
...exit Save changes and exit To do this chapter may not be supported by your computer. Then exit and restart the computer. Replace the configuration settings in this section provide an overview of the Computer Setup menu items listed in the system. ● View specification...computer and the batteries in this ● View identification information for the processor, cache and memory size, system ROM, video revision, and keyboard controller version. Save any changes entered during the current session. Your changes go into effect when the computer restarts. 4 Chapter 3 Computer ...
Memory Modules - Windows Vista
Page 7
... and remove all batteries before installing a memory module. WARNING! CAUTION: Electrostatic discharge (ESD) can be sure that you are discharged of static electricity. Adding or replacing memory modules The computer has two memory module compartments. The expansion memory module compartment is located under the...
Memory Modules - Windows Vista
Page 12
...memory module by the edges only. Pull away the retention clips (1) on the memory module. 6 Adding or replacing memory modules ENWW The memory module tilts up. CAUTION: To prevent damage to release the keyboard. 12. Turn the computer over until it . 11. Remove the memory module: a. 9. Do not ...touch the components on each side of the computer. 13. Loosen the 3 keyboard access screws. 10. Gently lift the top edge of the keyboard (2) and tilt the keyboard over and open it rests on the palm rest of the memory module.
Memory Modules - Windows Vista
Page 13
... container. 14. CAUTION: To prevent damage to both the left and right edges of the memory module compartment, press the module (2) into place. 15. Replace the keyboard (1). Gently press the memory module (3) down, applying pressure to the memory module, hold the memory module by the edges only. Do not touch the components...
Memory Modules - Windows Vista
Page 14
Close the cover (2). 8 Adding or replacing memory modules ENWW Align the tabs (1) on the memory module compartment cover with the notches on a flat surface. 18. Slide the 4 keyboard release latches (2) to lock the keyboard. 17. 16. Turn the computer upside down on the computer. 20. Tighten the 3 keyboard access screws. 19.
Memory Modules - Windows Vista
Page 16
Index K keyboard screws removing 6 replacing 8 M memory replacing memory modules 2, 5 memory module inserting 7 removing 2, 6 replacing 2, 5 upgrading primary 5 memory module compartment cover removing 2 replacing 3 10 Index ENWW
Memory Modules - Windows Vista and Windows XP
Page 7
... the risk of the computer. The memory capacity of static electricity. 1 The expansion memory module compartment is located under the keyboard. CAUTION: Electrostatic discharge (ESD) can be sure that you are discharged of the computer can damage electronic components. WARNING! Adding or replacing memory modules The computer has two memory module compartments.
Memory Modules - Windows Vista and Windows XP
Page 12
Carefully lift the top edge of the keyboard and tilt the keyboard over until it rests on each side of the memory module. CAUTION: To prevent damage to release the keyboard. 10. Slide the 4 keyboard release latches to the memory module, hold the memory module by the edges only. 9. Remove the memory... module: a. Pull away the retention clips (1) on the palm rest of the keyboard releases before the right side, pull the keyboard slightly to the left side of the computer. The memory module tilts up. NOTE: If the left to release the right...
Memory Modules - Windows Vista and Windows XP
Page 14
Replace the keyboard. 14. Turn the computer upside down on a flat surface. 8 Adding or replacing memory modules 13. Slide the 4 keyboard release latches to lock the keyboard. 15.
Memory Modules - Windows Vista and Windows XP
Page 15
Turn on the computer. Replace the battery. 18. Upgrading a memory module in the primary memory module slot 9 16. Replace the keyboard access screws. 17. Turn the computer right-side up, and then reconnect external power and external devices. 19.
Memory Modules - Windows Vista and Windows XP
Page 16
Index K keyboard screws removing 5 replacing 9 M memory module inserting 7 removing 2, 6 replacing 2, 5 upgrading primary 5 memory module compartment cover removing 2 replacing 3 memory, replacing memory modules 2, 5 10 Index
Memory Modules - Windows XP
Page 7
The expansion memory module compartment is located under the keyboard. The memory capacity of static electricity. 1 Adding or replacing memory modules The computer has two memory module compartments. WARNING! CAUTION: Electrostatic discharge (ESD) can be sure that you are discharged of the computer can ...
Memory Modules - Windows XP
Page 12
... on the memory module. Gently lift the top edge of the keyboard (2) and tilt the keyboard over and open it in an electrostatic-safe container. 6 Chapter 1 Adding or replacing memory modules ENWW CAUTION: To prevent damage to release the keyboard. 12. Slide the 4 keyboard release latches (1) to the memory module, hold the memory module by...
Memory Modules - Windows XP
Page 13
... memory module, until the retention clips snap into the memory module slot until it is seated. CAUTION: To prevent damage to lock the keyboard. 17. c. Replace the keyboard (1). 16. Slide the 4 keyboard release latches (2) to the memory module, hold the memory module by the edges only. 14. ENWW Upgrading a memory module in the memory...
Memory Modules - Windows XP
Page 14
Close the cover (2). 21. Replace the battery. 23. Align the tabs (1) on the memory module compartment cover with the notches on the computer. 8 Chapter 1 Adding or replacing memory modules ENWW Tighten the memory module compartment cover screw (3). 22. Turn on the computer. 20. Tighten the 3 keyboard access screws. 19. Reconnect external power and external devices. 24. 18.
Memory Modules - Windows XP
Page 16
Index H hard disk drive space 9 hard drive space 9 Hibernation 9 Hibernation file 9 K keyboard screws removing 5 replacing 8 M memory increasing 9 replacing memory modules 2, 5 memory module inserting 7 removing 2, 6 replacing 2, 5 upgrading primary 5 memory module compartment cover removing 2 replacing 3 10 Index ENWW
HP EliteBook 6930p Notebook PC - Maintenance and Service Guide
Page 8
Electrostatic discharge damage 38 Packaging and transporting guidelines 39 Workstation guidelines 39 Equipment guidelines 40 Unknown user password 41 Component replacement procedures 42 Service tag ...42 Computer feet ...43 Battery ...44 SIM ...45 Display inverter ...46 Bluetooth module ...48 Hard ...drive ...50 Optical drive ...52 Upgrade bay device ...53 Expansion memory module 55 WWAN module ...56 Keyboard ...58 Primary memory module ...60 Modem module ...62 WLAN module ...63 RTC battery ...66 Switch cover ...67 Power button board ...69 Fan...
HP EliteBook 6930p Notebook PC - Maintenance and Service Guide
Page 31
...in Turkey For use in the United Kingdom For use in the United States Keyboard shield (included with keyboard spare part kit) Pointing stick rubber caps (not illustrated) Fan Heat sinks (include replacement thermal material) For use only with computer models with discrete graphics subsystem memory...compartment cover Cable Kit: Bluetooth module cable Modem module cable (includes RJ-11 connector) Intel Core 2 Duo processors (include replacement thermal material) T9600 2.80-GHz (1066-MHz FSB, 6-MB L2 cache) T9400 2.53-GHz (1066-MHz FSB, 6-MB L2 cache) Spare part number 483010-161 483010-B31 483010-...