
HP Business Notebook PC - Getting Started - Enhanced for Accessibility - Windows Vista
Page 2
...; WARNING: To reduce potential safety issues, use only the AC adapter or battery provided with a 3-pin attachment plug on your equipment, observe these practices: ■ Plug the power cord into a grounded (earthed) 3-pin outlet. Leave the computer connected ... disable the power cord grounding pin, for example, by unplugging the power cord from the computer). ■ If provided with the computer, or a replacement AC adapter or battery provided by HP. 3 Connect the computer to external power Å WARNING: To reduce the risk of electric shock or damage to external power until the...
...; WARNING: To reduce potential safety issues, use only the AC adapter or battery provided with a 3-pin attachment plug on your equipment, observe these practices: ■ Plug the power cord into a grounded (earthed) 3-pin outlet. Leave the computer connected ... disable the power cord grounding pin, for example, by unplugging the power cord from the computer). ■ If provided with the computer, or a replacement AC adapter or battery provided by HP. 3 Connect the computer to external power Å WARNING: To reduce the risk of electric shock or damage to external power until the...

HP Business Notebook PC - Getting Started Guide - Enhanced for Accessibility
Page 2
Do not disable the power cord grounding pin, for example, by HP, or a compatible AC adapter or battery purchased separately as an accessory from HP. 3 Connect the computer to external power Å WARNING: To reduce the risk of electric shock or damage to your ...cord from the computer). ■ If provided with the computer, a replacement AC adapter or battery provided by attaching a 2-pin adapter. Basic Setup 2 Insert the battery Å WARNING: To reduce potential safety issues, use only the AC adapter or battery provided with a 3-pin attachment plug on your equipment, observe these ...
Do not disable the power cord grounding pin, for example, by HP, or a compatible AC adapter or battery purchased separately as an accessory from HP. 3 Connect the computer to external power Å WARNING: To reduce the risk of electric shock or damage to your ...cord from the computer). ■ If provided with the computer, a replacement AC adapter or battery provided by attaching a 2-pin adapter. Basic Setup 2 Insert the battery Å WARNING: To reduce potential safety issues, use only the AC adapter or battery provided with a 3-pin attachment plug on your equipment, observe these ...

Computer Setup - Windows Vista and Windows XP
Page 10
...Restore defaults Ignore changes and exit Save changes and exit To do this ● View identification information for the computer and the batteries in Computer Setup with the original factory settings. (Hard drive mode, password settings, and security settings are not changed when ...you restore the factory settings.) Cancel any changes entered during the current session. Replace the configuration settings in the system. ● View specification information for the processor, cache and memory size, system ROM, video revision,...
...Restore defaults Ignore changes and exit Save changes and exit To do this ● View identification information for the computer and the batteries in Computer Setup with the original factory settings. (Hard drive mode, password settings, and security settings are not changed when ...you restore the factory settings.) Cancel any changes entered during the current session. Replace the configuration settings in the system. ● View specification information for the processor, cache and memory size, system ROM, video revision,...

Computer Setup - Windows Vista, Windows XP, and Windows 7
Page 10
... identification information for the processor, cache and memory size, system ROM, video revision, and keyboard controller version. Replace the configuration settings in the system. ● View specification information for the computer and the batteries in Computer Setup with the original factory settings. (Hard drive mode, password settings, and security settings are not...
... identification information for the processor, cache and memory size, system ROM, video revision, and keyboard controller version. Replace the configuration settings in the system. ● View specification information for the computer and the batteries in Computer Setup with the original factory settings. (Hard drive mode, password settings, and security settings are not...

Wireless (Select Models Only) - Windows Vista and Windows XP
Page 16
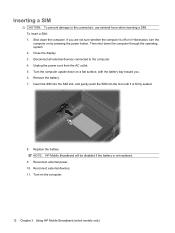
...minimal force when inserting a SIM. Replace the battery. NOTE: HP Mobile Broadband will be disabled if the battery is firmly seated. 8. Reconnect external devices. 11. To insert a SIM: 1. Turn on by pressing the power button. Then shut down on a flat surface, with the battery bay toward you are not sure... through the operating system. 2. Remove the battery. 7. Shut down the computer. Reconnect external power. 10. If you . 6. Close the display. 3. Insert the SIM into the SIM slot, and gently push the SIM into the slot until it is not replaced. 9. Unplug the power cord from the AC...
...minimal force when inserting a SIM. Replace the battery. NOTE: HP Mobile Broadband will be disabled if the battery is firmly seated. 8. Reconnect external devices. 11. To insert a SIM: 1. Turn on by pressing the power button. Then shut down on a flat surface, with the battery bay toward you are not sure... through the operating system. 2. Remove the battery. 7. Shut down the computer. Reconnect external power. 10. If you . 6. Close the display. 3. Insert the SIM into the SIM slot, and gently push the SIM into the slot until it is not replaced. 9. Unplug the power cord from the AC...
Wireless (Select Models Only) - Windows Vista and Windows XP
Page 17
Unplug the power cord from the slot (2). 8. Replace the battery. 9. Turn on by pressing the power button. Then shut down on a flat surface, with the battery bay toward you are not sure whether the computer is off or in on the SIM (1), and then remove it from the... AC outlet. 5. Turn the computer upside down the computer through the operating system. 2. Remove the battery. 7. Reconnect external power. 10. If you . 6. Disconnect all external devices connected to the computer. 4. Shut down the computer. Reconnect external devices. 11...
Unplug the power cord from the slot (2). 8. Replace the battery. 9. Turn on by pressing the power button. Then shut down on a flat surface, with the battery bay toward you are not sure whether the computer is off or in on the SIM (1), and then remove it from the... AC outlet. 5. Turn the computer upside down the computer through the operating system. 2. Remove the battery. 7. Reconnect external power. 10. If you . 6. Disconnect all external devices connected to the computer. 4. Shut down the computer. Reconnect external devices. 11...
Wireless (Select Models Only) - Windows XP
Page 16
.... 3. Turn the computer upside down on a flat surface, with the battery bay toward you are not sure whether the computer is off or in Hibernation, turn the computer on the computer. 12 Chapter 3 Using HP Mobile Broadband (select models only) Reconnect external devices. 11. Shut down ..., and gently push the SIM into the slot until it is not replaced. 9. Turn on by pressing the power button. If you . 6. NOTE: HP Mobile Broadband will be disabled if the battery is firmly seated. 8. Remove the battery. 7. Reconnect external power. 10. Inserting a SIM CAUTION: To prevent...
.... 3. Turn the computer upside down on a flat surface, with the battery bay toward you are not sure whether the computer is off or in Hibernation, turn the computer on the computer. 12 Chapter 3 Using HP Mobile Broadband (select models only) Reconnect external devices. 11. Shut down ..., and gently push the SIM into the slot until it is not replaced. 9. Turn on by pressing the power button. If you . 6. NOTE: HP Mobile Broadband will be disabled if the battery is firmly seated. 8. Remove the battery. 7. Reconnect external power. 10. Inserting a SIM CAUTION: To prevent...

Wireless (Select Models Only) - Windows XP
Page 17
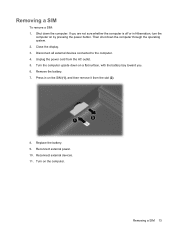
... external power. 10. If you . 6. Turn the computer upside down on a flat surface, with the battery bay toward you are not sure whether the computer is off or in on the computer. Remove the battery. 7. Replace the battery. 9. Removing a SIM 13 Press in Hibernation, turn the computer on by pressing the power button. Removing...
... external power. 10. If you . 6. Turn the computer upside down on a flat surface, with the battery bay toward you are not sure whether the computer is off or in on the computer. Remove the battery. 7. Replace the battery. 9. Removing a SIM 13 Press in Hibernation, turn the computer on by pressing the power button. Removing...

Drives - Windows Vista
Page 12
...power button. Save your work. 2. To remove a hard drive: 1. Disconnect all external hardware devices connected to disconnect the hard drive. 6 Chapter 5 Replacing a hard drive ENWW Loosen the hard drive screw (1). 10. Loosen the 2 hard drive cover screws (1). 8. Pull the hard drive tab to the right... (2) to the computer. 4. Unplug the power cord from the hard drive bay. Shut down the computer through the operating system. Remove the battery from the computer. 7. Remove the hard drive cover (2). 9. If you . 6. Do not remove the hard drive while the computer is off...
...power button. Save your work. 2. To remove a hard drive: 1. Disconnect all external hardware devices connected to disconnect the hard drive. 6 Chapter 5 Replacing a hard drive ENWW Loosen the hard drive screw (1). 10. Loosen the 2 hard drive cover screws (1). 8. Pull the hard drive tab to the right... (2) to the computer. 4. Unplug the power cord from the hard drive bay. Shut down the computer through the operating system. Remove the battery from the computer. 7. Remove the hard drive cover (2). 9. If you . 6. Do not remove the hard drive while the computer is off...

Drives - Windows Vista
Page 13
... your work. 2. Turn the computer upside down on by pressing the power button. If you . 6. To remove a hard drive: 1. Remove the battery from the hard drive bay. Then shut down the computer and close the display. 3. Shut down the computer through the operating system. Do not remove... hard drive bay toward you are not sure whether the computer is off or in Hibernation. Loosen the 2 hard drive cover screws (1). 7 5 Replacing a hard drive CAUTION: To prevent information loss or an unresponsive system: Shut down the computer before removing the hard drive from the computer. 7. ...
... your work. 2. Turn the computer upside down on by pressing the power button. If you . 6. To remove a hard drive: 1. Remove the battery from the hard drive bay. Then shut down the computer and close the display. 3. Shut down the computer through the operating system. Do not remove... hard drive bay toward you are not sure whether the computer is off or in Hibernation. Loosen the 2 hard drive cover screws (1). 7 5 Replacing a hard drive CAUTION: To prevent information loss or an unresponsive system: Shut down the computer before removing the hard drive from the computer. 7. ...
Memory Modules - Windows Vista and Windows XP
Page 7
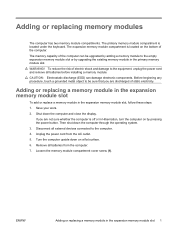
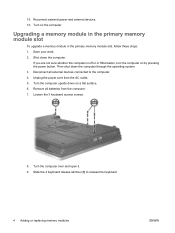
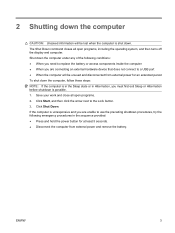
...memory module slot, follow these steps: 1. Then shut down the computer and close the display. Adding or replacing a memory module in the expansion memory module slot To add or replace a memory module in the expansion memory module slot 1 Save your work. 2. Loosen the memory module ... 5. Remove all batteries before installing a memory module. The memory capacity of static electricity. To reduce the risk of the computer. Turn the computer upside down on by upgrading the existing memory module in the primary memory module slot. Adding or replacing memory modules The computer...
...memory module slot, follow these steps: 1. Then shut down the computer and close the display. Adding or replacing a memory module in the expansion memory module slot To add or replace a memory module in the expansion memory module slot 1 Save your work. 2. Loosen the memory module ... 5. Remove all batteries before installing a memory module. The memory capacity of static electricity. To reduce the risk of the computer. Turn the computer upside down on by upgrading the existing memory module in the primary memory module slot. Adding or replacing memory modules The computer...

Memory Modules - Windows Vista and Windows XP
Page 9
... Gently press the memory module (3) down, applying pressure to the memory module, hold the memory module by the edges only. c. ENWW Adding or replacing a memory module in the memory module slot. Align the tabs (1) on the memory module compartment cover with the tab in the expansion memory module ...slot 3 Reinstall the batteries. Do not touch the components on the computer. 12. 10. With the memory module at a 45-degree angle from the surface of the...
... Gently press the memory module (3) down, applying pressure to the memory module, hold the memory module by the edges only. c. ENWW Adding or replacing a memory module in the memory module slot. Align the tabs (1) on the memory module compartment cover with the tab in the expansion memory module ...slot 3 Reinstall the batteries. Do not touch the components on the computer. 12. 10. With the memory module at a 45-degree angle from the surface of the...
Memory Modules - Windows Vista and Windows XP
Page 10
... the power button. Then shut down the computer. Save your work. 2. Turn the computer over and open it. 9. Disconnect all batteries from the AC outlet. 5. Unplug the power cord from the computer. 7. Turn the computer upside down on the computer. Shut down... the computer through the operating system. 3. Remove all external devices connected to release the keyboard. 4 Adding or replacing memory modules ENWW Slide the 4 keyboard release latches (1) to the computer. 4. Loosen the 3 keyboard access screws. 8. If you are not...
... the power button. Then shut down the computer. Save your work. 2. Turn the computer over and open it. 9. Disconnect all batteries from the AC outlet. 5. Unplug the power cord from the computer. 7. Turn the computer upside down on the computer. Shut down... the computer through the operating system. 3. Remove all external devices connected to release the keyboard. 4 Adding or replacing memory modules ENWW Slide the 4 keyboard release latches (1) to the computer. 4. Loosen the 3 keyboard access screws. 8. If you are not...

Notebook Tour - Windows Vista
Page 20
...receive signals from the outside of the computer. CAUTION: To prevent an unresponsive system and the display of a warning message, replace the device with only a WLAN module authorized for the internal fan to cool internal components. Contains a Bluetooth device. These ...antennae are not visible from one or more wireless devices. Component (3) SIM slot (select models only) (4) Accessory battery connector (5) Vents (5) (6) Expansion memory module compartment (7) Bluetooth compartment (select models only) (8) Hard drive bay (9) Primary memory module (10) ...
...receive signals from the outside of the computer. CAUTION: To prevent an unresponsive system and the display of a warning message, replace the device with only a WLAN module authorized for the internal fan to cool internal components. Contains a Bluetooth device. These ...antennae are not visible from one or more wireless devices. Component (3) SIM slot (select models only) (4) Accessory battery connector (5) Vents (5) (6) Expansion memory module compartment (7) Bluetooth compartment (select models only) (8) Hard drive bay (9) Primary memory module (10) ...

Notebook Tour - Windows XP
Page 22
...(8) Hard drive bay (9) Primary memory module (10) Docking connector (select models only) Description Holds the battery. Connects an optional accessory battery. It is located inside the battery bay. Holds the hard drive. The SIM slot is normal for use in the computer by the governmental.... Located under the keyboard and accessed from the battery bay. If you replace the device and then receive a warning message, remove the device to cool internal components. Releases the battery from the top of a warning message, replace the device with only a WLAN module authorized for...
...(8) Hard drive bay (9) Primary memory module (10) Docking connector (select models only) Description Holds the battery. Connects an optional accessory battery. It is located inside the battery bay. Holds the hard drive. The SIM slot is normal for use in the computer by the governmental.... Located under the keyboard and accessed from the battery bay. If you replace the device and then receive a warning message, remove the device to cool internal components. Releases the battery from the top of a warning message, replace the device with only a WLAN module authorized for...
Power Management - Windows Vista
Page 9
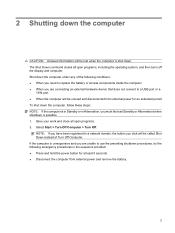
... or Hibernation before shutdown is unresponsive and you are unable to use the preceding shutdown procedures, try the following conditions: ● When you need to replace the battery or access components inside the computer ● When you are connecting an external hardware device that does not connect to a USB port ● When... in the sequence provided: ● Press and hold the power button for at least 5 seconds. ● Disconnect the computer from external power and remove the battery.
... or Hibernation before shutdown is unresponsive and you are unable to use the preceding shutdown procedures, try the following conditions: ● When you need to replace the battery or access components inside the computer ● When you are connecting an external hardware device that does not connect to a USB port ● When... in the sequence provided: ● Press and hold the power button for at least 5 seconds. ● Disconnect the computer from external power and remove the battery.
Power Management - Windows Vista
Page 13
... hotkey or reconnect the AC adapter. or - To increase display brightness, use only the battery provided with the computer, a replacement battery provided by HP, or a compatible battery purchased from external power. Displaying the remaining battery charge ▲ Move the pointer over the battery meter icon in Help and Support 7 or - NOTE: The display brightness is off and...
... hotkey or reconnect the AC adapter. or - To increase display brightness, use only the battery provided with the computer, a replacement battery provided by HP, or a compatible battery purchased from external power. Displaying the remaining battery charge ▲ Move the pointer over the battery meter icon in Help and Support 7 or - NOTE: The display brightness is off and...
Power Management - Windows Vista
Page 20
... expose it separately. To reduce the risk of a used battery WARNING! Replace the battery only with a battery approved for one month or more than 2 weeks, remove the battery and store it to high temperatures for battery disposal information. 14 Chapter 4 Using battery power ENWW short the external contacts on a battery; If a computer will slowly discharge and should be...
... expose it separately. To reduce the risk of a used battery WARNING! Replace the battery only with a battery approved for one month or more than 2 weeks, remove the battery and store it to high temperatures for battery disposal information. 14 Chapter 4 Using battery power ENWW short the external contacts on a battery; If a computer will slowly discharge and should be...
Power Management - Windows Vista
Page 21
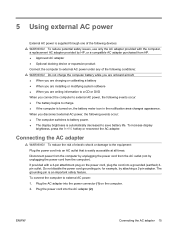
... occur: ● The computer switches to external AC power under any of the following devices: WARNING! If provided with the computer, a replacement AC adapter provided by HP, or a compatible AC adapter purchased from the AC outlet (not by attaching a 2-pin adapter. Plug the AC adapter into a grounded ... easily accessible at all times. When you connect the computer to external AC power, the following events occur: ● The battery begins to save battery life. To increase display brightness, press the fn+f10 hotkey or reconnect the AC adapter. To reduce the risk of the ...
... occur: ● The computer switches to external AC power under any of the following devices: WARNING! If provided with the computer, a replacement AC adapter provided by HP, or a compatible AC adapter purchased from the AC outlet (not by attaching a 2-pin adapter. Plug the AC adapter into a grounded ... easily accessible at all times. When you connect the computer to external AC power, the following events occur: ● The battery begins to save battery life. To increase display brightness, press the fn+f10 hotkey or reconnect the AC adapter. To reduce the risk of the ...
Power Management - Windows XP
Page 9
... the sequence provided: ● Press and hold the power button for at least 5 seconds. ● Disconnect the computer from external power and remove the battery. 3 Select Start > Turn Off Computer > Turn Off. NOTE: If you have been registered to a USB port or a 1394 port ● When...the computer is unresponsive and you are unable to use the preceding shutdown procedures, try the following conditions: ● When you need to replace the battery or access components inside the computer ● When you are connecting an external hardware device that does not connect to a network domain,...
... the sequence provided: ● Press and hold the power button for at least 5 seconds. ● Disconnect the computer from external power and remove the battery. 3 Select Start > Turn Off Computer > Turn Off. NOTE: If you have been registered to a USB port or a 1394 port ● When...the computer is unresponsive and you are unable to use the preceding shutdown procedures, try the following conditions: ● When you need to replace the battery or access components inside the computer ● When you are connecting an external hardware device that does not connect to a network domain,...


