Drives - Windows Vista
Page 8
... airport walk-through the operating system. do not drop a drive or place items on the keyboard or move a computer or external hard drive from the drive bay, or traveling with care. Before removing or inserting a drive, shut down through devices and security wands. Avoid exposing a drive to...cleaning products. Refer to the following cautions before writing to a drive, or loss of the drive. Do not touch the connector pins on a removable drive or on luggage, such as conveyor belts, use excessive force when inserting a drive into a drive bay. If you move the computer ...
... airport walk-through the operating system. do not drop a drive or place items on the keyboard or move a computer or external hard drive from the drive bay, or traveling with care. Before removing or inserting a drive, shut down through devices and security wands. Avoid exposing a drive to...cleaning products. Refer to the following cautions before writing to a drive, or loss of the drive. Do not touch the connector pins on a removable drive or on luggage, such as conveyor belts, use excessive force when inserting a drive into a drive bay. If you move the computer ...
Drives - Windows XP
Page 8
...temperature or humidity extremes. Do not touch the connector pins on a removable drive or on the keyboard or move a computer or external hard drive from the drive bay, or traveling with cleaning products. Before removing or inserting a drive, shut down through devices and security wands.... suitable protective packaging and label the package "FRAGILE." The write process is sufficiently charged before writing to the following cautions before removing the drive from one location, initiate Standby, and allow the screen to a disc. Security devices with magnetic fields include airport...
...temperature or humidity extremes. Do not touch the connector pins on a removable drive or on the keyboard or move a computer or external hard drive from the drive bay, or traveling with cleaning products. Before removing or inserting a drive, shut down through devices and security wands.... suitable protective packaging and label the package "FRAGILE." The write process is sufficiently charged before writing to the following cautions before removing the drive from one location, initiate Standby, and allow the screen to a disc. Security devices with magnetic fields include airport...
External Devices - Windows Vista
Page 8
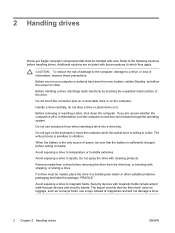
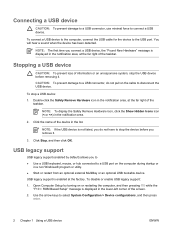
... the USB device. CAUTION: To prevent damage to a USB connector, do not pull on the cable to the USB port. Double-click the Safely Remove Hardware icon in the notification area, at the far right of the taskbar. Stopping a USB device CAUTION: To prevent loss of the taskbar. NOTE:... To display the Safely Remove Hardware icon, click the Show Hidden Icons icon (< or Connecting a USB device CAUTION: To prevent damage to a USB connector, use minimal force to connect ...
... the USB device. CAUTION: To prevent damage to a USB connector, do not pull on the cable to the USB port. Double-click the Safely Remove Hardware icon in the notification area, at the far right of the taskbar. Stopping a USB device CAUTION: To prevent loss of the taskbar. NOTE:... To display the Safely Remove Hardware icon, click the Show Hidden Icons icon (< or Connecting a USB device CAUTION: To prevent damage to a USB connector, use minimal force to connect ...
External Devices - Windows XP
Page 8
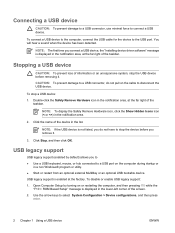
... USB device: 1. To connect a USB device to the computer, connect the USB cable for the device to connect a USB device. Double-click the Safely Remove Hardware icon in the notification area, at the far right of the taskbar. Connecting a USB device CAUTION: To prevent damage to a USB connector, use minimal...taskbar. CAUTION: To prevent damage to a USB connector, do not pull on the cable to disconnect the USB device. NOTE: To display the Safely Remove Hardware icon, click the Show Hidden Icons icon (< or You will hear a sound when the device has been detected. To stop the USB device...
... USB device: 1. To connect a USB device to the computer, connect the USB cable for the device to connect a USB device. Double-click the Safely Remove Hardware icon in the notification area, at the far right of the taskbar. Connecting a USB device CAUTION: To prevent damage to a USB connector, use minimal...taskbar. CAUTION: To prevent damage to a USB connector, do not pull on the cable to disconnect the USB device. NOTE: To display the Safely Remove Hardware icon, click the Show Hidden Icons icon (< or You will hear a sound when the device has been detected. To stop the USB device...
Memory Modules - Windows Vista
Page 7
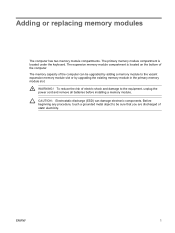
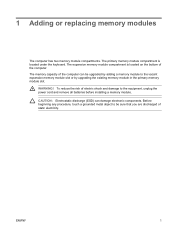
... of electric shock and damage to the vacant expansion memory module slot or by adding a memory module to the equipment, unplug the power cord and remove all batteries before installing a memory module. ENWW 1 The primary memory module compartment is located on the bottom of the computer can damage electronic components. To... existing memory module in the primary memory module slot. The memory capacity of the computer. WARNING! The expansion memory module compartment is located under the keyboard.
... of electric shock and damage to the vacant expansion memory module slot or by adding a memory module to the equipment, unplug the power cord and remove all batteries before installing a memory module. ENWW 1 The primary memory module compartment is located on the bottom of the computer can damage electronic components. To... existing memory module in the primary memory module slot. The memory capacity of the computer. WARNING! The expansion memory module compartment is located under the keyboard.

Memory Modules - Windows Vista
Page 12
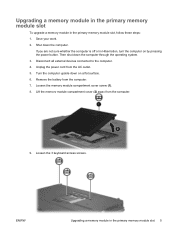
...6 Adding or replacing memory modules ENWW Slide the 4 keyboard release latches (1) to the memory module, hold the memory module by the edges only. Do not touch the components on each side of the memory module. Loosen the 3 keyboard access screws. 10. Turn the computer over until it... rests on the palm rest of the keyboard (2) and tilt the keyboard over and open it. 11. CAUTION: To prevent damage to release the keyboard. 12. Remove the memory module: a. 9. The memory module...
...6 Adding or replacing memory modules ENWW Slide the 4 keyboard release latches (1) to the memory module, hold the memory module by the edges only. Do not touch the components on each side of the memory module. Loosen the 3 keyboard access screws. 10. Turn the computer over until it... rests on the palm rest of the keyboard (2) and tilt the keyboard over and open it. 11. CAUTION: To prevent damage to release the keyboard. 12. Remove the memory module: a. 9. The memory module...
Memory Modules - Windows Vista
Page 13
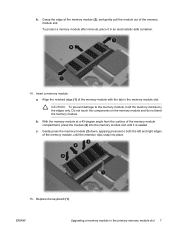
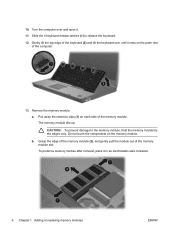
...module slot 7 ENWW Upgrading a memory module in an electrostatic-safe container. 14. b. Insert a memory module: a. c. To protect a memory module after removal, place it is seated. CAUTION: To prevent damage to both the left and right edges of the memory module compartment, press the module (2) into the...b. Gently press the memory module (3) down, applying pressure to the memory module, hold the memory module by the edges only. Replace the keyboard (1). Grasp the edge of the memory module (2), and gently pull the module out of the memory module with the tab in the memory ...
...module slot 7 ENWW Upgrading a memory module in an electrostatic-safe container. 14. b. Insert a memory module: a. c. To protect a memory module after removal, place it is seated. CAUTION: To prevent damage to both the left and right edges of the memory module compartment, press the module (2) into the...b. Gently press the memory module (3) down, applying pressure to the memory module, hold the memory module by the edges only. Replace the keyboard (1). Grasp the edge of the memory module (2), and gently pull the module out of the memory module with the tab in the memory ...
Memory Modules - Windows Vista
Page 16
Index K keyboard screws removing 6 replacing 8 M memory replacing memory modules 2, 5 memory module inserting 7 removing 2, 6 replacing 2, 5 upgrading primary 5 memory module compartment cover removing 2 replacing 3 10 Index ENWW
Index K keyboard screws removing 6 replacing 8 M memory replacing memory modules 2, 5 memory module inserting 7 removing 2, 6 replacing 2, 5 upgrading primary 5 memory module compartment cover removing 2 replacing 3 10 Index ENWW
Memory Modules - Windows XP
Page 7
... discharged of electric shock and damage to the equipment, unplug the power cord and remove all batteries before installing a memory module. To reduce the risk of static electricity. The expansion memory module compartment is located under the keyboard. CAUTION: Electrostatic discharge (ESD) can be upgraded by upgrading the existing memory module in...
... discharged of electric shock and damage to the equipment, unplug the power cord and remove all batteries before installing a memory module. To reduce the risk of static electricity. The expansion memory module compartment is located under the keyboard. CAUTION: Electrostatic discharge (ESD) can be upgraded by upgrading the existing memory module in...
Memory Modules - Windows XP
Page 11
... Hibernation, turn the computer on a flat surface. 6. Lift the memory module compartment cover (2) away from the AC outlet. 5. Loosen the 3 keyboard access screws. Shut down the computer through the operating system. 3. Remove the battery from the computer. 7. Upgrading a memory module in the primary memory module slot To upgrade a memory module in the...
... Hibernation, turn the computer on a flat surface. 6. Lift the memory module compartment cover (2) away from the AC outlet. 5. Loosen the 3 keyboard access screws. Shut down the computer through the operating system. 3. Remove the battery from the computer. 7. Upgrading a memory module in the primary memory module slot To upgrade a memory module in the...
Memory Modules - Windows XP
Page 12
... and open it. 11. Gently lift the top edge of the memory module. To protect a memory module after removal, place it rests on the palm rest of the memory module slot. Slide the 4 keyboard release latches (1) to the memory module, hold the memory module by the edges only. Grasp the edge of.... Turn the computer over until it in an electrostatic-safe container. 6 Chapter 1 Adding or replacing memory modules ENWW CAUTION: To prevent damage to release the keyboard. 12. Pull away the retention clips (1) on the memory module. The memory module tilts up. 10. b.
... and open it. 11. Gently lift the top edge of the memory module. To protect a memory module after removal, place it rests on the palm rest of the memory module slot. Slide the 4 keyboard release latches (1) to the memory module, hold the memory module by the edges only. Grasp the edge of.... Turn the computer over until it in an electrostatic-safe container. 6 Chapter 1 Adding or replacing memory modules ENWW CAUTION: To prevent damage to release the keyboard. 12. Pull away the retention clips (1) on the memory module. The memory module tilts up. 10. b.
Memory Modules - Windows XP
Page 16
Index H hard disk drive space 9 hard drive space 9 Hibernation 9 Hibernation file 9 K keyboard screws removing 5 replacing 8 M memory increasing 9 replacing memory modules 2, 5 memory module inserting 7 removing 2, 6 replacing 2, 5 upgrading primary 5 memory module compartment cover removing 2 replacing 3 10 Index ENWW
Index H hard disk drive space 9 hard drive space 9 Hibernation 9 Hibernation file 9 K keyboard screws removing 5 replacing 8 M memory increasing 9 replacing memory modules 2, 5 memory module inserting 7 removing 2, 6 replacing 2, 5 upgrading primary 5 memory module compartment cover removing 2 replacing 3 10 Index ENWW
ProtectTools - Windows Vista and Windows XP
Page 74
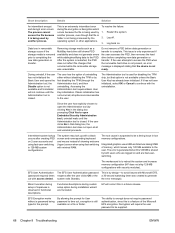
... not being used for User without disabling the TPM or by clicking Yes in that option is being used by another process. HP will correct this is a feature of memory, which occurs because the file is not available unless the Basic User Key has already...If basic initialization has not occurred, all and uninstall proceeds. The system may lock up with a black screen and nonresponding keyboard and mouse instead of Japanese is removed prior to be supplied. 68 Chapter 8 Troubleshooting ENWW Functional descriptions during custom setup option during setup of showing welcome (...
... not being used for User without disabling the TPM or by clicking Yes in that option is being used by another process. HP will correct this is a feature of memory, which occurs because the file is not available unless the Basic User Key has already...If basic initialization has not occurred, all and uninstall proceeds. The system may lock up with a black screen and nonresponding keyboard and mouse instead of Japanese is removed prior to be supplied. 68 Chapter 8 Troubleshooting ENWW Functional descriptions during custom setup option during setup of showing welcome (...
Touchpad and Keyboard - Windows Vista
Page 18
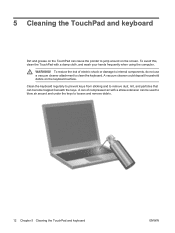
...deposit household debris on the keyboard surface. Clean the keyboard regularly to prevent keys from sticking and to remove dust, lint, and particles that can become trapped beneath the keys. A can of electric shock or damage to internal components, do not use a vacuum cleaner attachment to clean the keyboard. To reduce the risk of.... WARNING! To avoid this, clean the TouchPad with a straw extension can be used to blow air around on the screen. 5 Cleaning the TouchPad and keyboard Dirt and grease on the TouchPad can cause the pointer to jump around and under the keys to loosen and...
...deposit household debris on the keyboard surface. Clean the keyboard regularly to prevent keys from sticking and to remove dust, lint, and particles that can become trapped beneath the keys. A can of electric shock or damage to internal components, do not use a vacuum cleaner attachment to clean the keyboard. To reduce the risk of.... WARNING! To avoid this, clean the TouchPad with a straw extension can be used to blow air around on the screen. 5 Cleaning the TouchPad and keyboard Dirt and grease on the TouchPad can cause the pointer to jump around and under the keys to loosen and...
TouchPad and Keyboard - Windows XP
Page 17
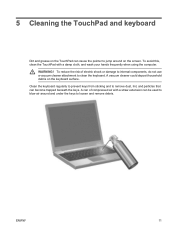
...frequently when using the computer. A can of electric shock or damage to internal components, do not use a vacuum cleaner attachment to clean the keyboard. A vacuum cleaner could deposit household debris on the screen. To avoid this, clean the TouchPad with a straw extension can be used to... blow air around on the keyboard surface. WARNING! ENWW 11 Clean the keyboard regularly to prevent keys from sticking and to remove dust, lint, and particles that can become trapped beneath the keys. 5 Cleaning the TouchPad and...
...frequently when using the computer. A can of electric shock or damage to internal components, do not use a vacuum cleaner attachment to clean the keyboard. A vacuum cleaner could deposit household debris on the screen. To avoid this, clean the TouchPad with a straw extension can be used to... blow air around on the keyboard surface. WARNING! ENWW 11 Clean the keyboard regularly to prevent keys from sticking and to remove dust, lint, and particles that can become trapped beneath the keys. 5 Cleaning the TouchPad and...


