
HP Color LaserJet 5550 series - User Guide
Page 173
...main thermistor. 2. If the problem persists, contact HP Support at http://www.hp.com/ support/clj5550. 53.XX.X CHECK RAM DIMM SLOT X An error occurred on Either a beam detects an error, or a laser error has occured. Otherwise: 1. ENWW Control panel...that all memory installed. Turn the printer off . 2. The following are : Y Description 0 - A fuser warm-up service error has occurred. 50.3 - A faulty fuser error has occurred. 50.8 - The values of all DDR SDRAM meets specifications and is correctly seated. 3. Magenta 3 - Values of X, Y, and ZZ are: X Device Location 1 Slot ...
...main thermistor. 2. If the problem persists, contact HP Support at http://www.hp.com/ support/clj5550. 53.XX.X CHECK RAM DIMM SLOT X An error occurred on Either a beam detects an error, or a laser error has occured. Otherwise: 1. ENWW Control panel...that all memory installed. Turn the printer off . 2. The following are : Y Description 0 - A fuser warm-up service error has occurred. 50.3 - A faulty fuser error has occurred. 50.8 - The values of all DDR SDRAM meets specifications and is correctly seated. 3. Magenta 3 - Values of X, Y, and ZZ are: X Device Location 1 Slot ...
HP Color LaserJet 5550 series - User Guide
Page 180
transfer unit. If the error persists, contact HP support at http://www.hp.com/ support/clj5550. Insert the supply item or make sure that the tray switch is loaded and configured for the supply. 4. INSUFFICIENT MEMORY TO LOAD FONTS/DATA For help press alternates with the specified paper. 3. ... and load Tray 1 with To continue press The device does not have enough memory to highlight the specific supply that the media guides are in the printer and another tray, remove paper from the location specified. Close the tray indicated. Insert the print cartridge and make sure the...
transfer unit. If the error persists, contact HP support at http://www.hp.com/ support/clj5550. Insert the supply item or make sure that the tray switch is loaded and configured for the supply. 4. INSUFFICIENT MEMORY TO LOAD FONTS/DATA For help press alternates with the specified paper. 3. ... and load Tray 1 with To continue press The device does not have enough memory to highlight the specific supply that the media guides are in the printer and another tray, remove paper from the location specified. Close the tray indicated. Insert the print cartridge and make sure the...
HP Color LaserJet 5550 series - User Guide
Page 255
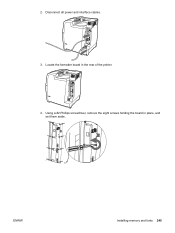
... the Cyrillic alphabet. Turn the printer off. 2. Locate the formatter board in the rear of the DIMM antistatic package and then touch bare metal on the printer. Disconnect all power and interface cables. 3. ENWW Installing memory and fonts 241 Installing memory and fonts CAUTION You can install more memory for the printer, and you can damage DIMMs...
... the Cyrillic alphabet. Turn the printer off. 2. Locate the formatter board in the rear of the DIMM antistatic package and then touch bare metal on the printer. Disconnect all power and interface cables. 3. ENWW Installing memory and fonts 241 Installing memory and fonts CAUTION You can install more memory for the printer, and you can damage DIMMs...
HP Color LaserJet 5550 series - User Guide
Page 256
Locate the alignment notch on a clean, flat, grounded surface. 6. Slide out the formatter board and set them aside. 5. To replace a DDR DIMM that is currently installed, spread the latches apart on each side of the DIMM slot, lift the DDR DIMM up at an angle, and pull it on the bottom edge of the DIMM. 242 Appendix A Working with memory and print server cards ENWW 4. Remove the new DIMM from the antistatic package. Using a #2 Phillips screwdriver, remove the eight screws holding the board in place, and set it out. 7.
Locate the alignment notch on a clean, flat, grounded surface. 6. Slide out the formatter board and set them aside. 5. To replace a DDR DIMM that is currently installed, spread the latches apart on each side of the DIMM slot, lift the DDR DIMM up at an angle, and pull it on the bottom edge of the DIMM. 242 Appendix A Working with memory and print server cards ENWW 4. Remove the new DIMM from the antistatic package. Using a #2 Phillips screwdriver, remove the eight screws holding the board in place, and set it out. 7.
HP Color LaserJet 5550 series - User Guide
Page 259
Locate the formatter board in place, and set them aside. Disconnect all power and interface cables. 3. Using a #2 Phillips screwdriver, remove the eight screws holding the board in the rear of the printer. 4. ENWW Installing memory and fonts 245 2.
Locate the formatter board in place, and set them aside. Disconnect all power and interface cables. 3. Using a #2 Phillips screwdriver, remove the eight screws holding the board in the rear of the printer. 4. ENWW Installing memory and fonts 245 2.
HP Color LaserJet 5550 series - User Guide
Page 262
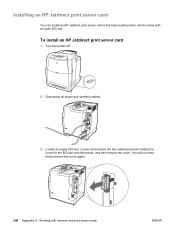
Installing an HP Jetdirect print server card You can install an HP Jetdirect print server card in the base model printer, which comes with memory and print server cards ENWW Turn the printer off. 2. You will not need these screws and cover again. 248 Appendix A Working with an open EIO slot. To install an HP Jetdirect print server card 1. Loosen and remove the two retaining screws holding the cover for the EIO slot onto the printer, and then remove the cover. Disconnect all power and interface cables. 3. Locate an empty EIO slot.
Installing an HP Jetdirect print server card You can install an HP Jetdirect print server card in the base model printer, which comes with memory and print server cards ENWW Turn the printer off. 2. You will not need these screws and cover again. 248 Appendix A Working with an open EIO slot. To install an HP Jetdirect print server card 1. Loosen and remove the two retaining screws holding the cover for the EIO slot onto the printer, and then remove the cover. Disconnect all power and interface cables. 3. Locate an empty EIO slot.

HP Color LaserJet 5550 series - User Guide
Page 289
... file directory page printing 114 flash memory card installing 244 font list printing 115 G grayscale printing 126 H HP fraud hotline 132 Index 275 monitor 128 sRGB 125 using 124 color options configuring 53 color supply out reporting 58 components locating 12 configuration page printing 112 configuring ... menus 36, 37 messages 155 overview 31 ENWW printer personalities 56 problems 224 using in shared environments 60 controlling print jobs 76 D Declaration of Conformity 268 diagnostics menu 50 DIMMs (dual inline memory modules) installing 241 double-sided printing 99 driver autoconfiguration...
... file directory page printing 114 flash memory card installing 244 font list printing 115 G grayscale printing 126 H HP fraud hotline 132 Index 275 monitor 128 sRGB 125 using 124 color options configuring 53 color supply out reporting 58 components locating 12 configuration page printing 112 configuring ... menus 36, 37 messages 155 overview 31 ENWW printer personalities 56 problems 224 using in shared environments 60 controlling print jobs 76 D Declaration of Conformity 268 diagnostics menu 50 DIMMs (dual inline memory modules) installing 241 double-sided printing 99 driver autoconfiguration...

HP Color LaserJet 5550 series - User Guide
Page 290
...141 envelopes 219 locations 181 recovery 181 Japanese VCCI statement 269 job held timeout 52 job storage limit 52 K Korean EMI statement 269 L language changing 59 lights 35 M maintenance agreements 259 media colored paper 96 envelopes 96 glossy paper 95 heavy paper 97 HP LaserJet Tough paper 98... labels 97 letterhead 98 preprinted forms 98 recycled paper 98 selecting 78 transparencies 95 276 Index memory adding 110, 239 enabling 247 menu map description...
...141 envelopes 219 locations 181 recovery 181 Japanese VCCI statement 269 job held timeout 52 job storage limit 52 K Korean EMI statement 269 L language changing 59 lights 35 M maintenance agreements 259 media colored paper 96 envelopes 96 glossy paper 95 heavy paper 97 HP LaserJet Tough paper 98... labels 97 letterhead 98 preprinted forms 98 recycled paper 98 selecting 78 transparencies 95 276 Index memory adding 110, 239 enabling 247 menu map description...


