HP LaserJet Printer Family - Print Media Specification Guide
Page 29
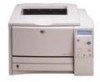
... listed for using paper" on page 9. See your printer user guide for your HP LaserJet printer user guide. This can build up in the fuser. set incorrectly q Make sure that are set correctly. For most HP LaserJet printers you can damage the printer. Do not reuse jammed paper. Paper is too light... CAUTION Note This section provides information about conditions that is specified in the unit with paper from a newly opened ream. q Replace the paper in the user paper path or be picked up in the paper path and cause frequent paper jams. q Try a ...
... listed for using paper" on page 9. See your printer user guide for your HP LaserJet printer user guide. This can build up in the fuser. set incorrectly q Make sure that are set correctly. For most HP LaserJet printers you can damage the printer. Do not reuse jammed paper. Paper is too light... CAUTION Note This section provides information about conditions that is specified in the unit with paper from a newly opened ream. q Replace the paper in the user paper path or be picked up in the paper path and cause frequent paper jams. q Try a ...
HP PCL/PJL reference - Printer Job Language Technical Reference Addendum
Page 122
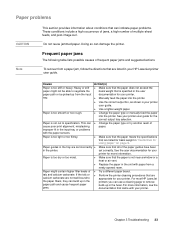
... TRANSFER KIT ORDER FUSER KIT PERFORM PRINTER MAINTENANCE ORDER SUPPLIES PAGES LEFT REPLACE BLACK TONER REPLACE CYAN TONER REPLACE MAGENTA TONER REPLACE YELLOW TONER REPLACE IMAGE DRUM REPLACE BLACK DRUM REPLACE CYAN DRUM REPLACE MAGENTA DRUM REPLACE YELLOW DRUM REPLACE BLACK CARTRIDGE REPLACE CYAN CARTRIDGE REPLACE MAGENTA CARTRIDGE REPLACE YELLOW CARTRIDGE REPLACE TRANSPORT KIT REPLACE CLEANING KIT REPLACE TRANSFER KIT REPLACE FUSER KIT PERFORM PRINTER MAINTENANCE REPLACE SUPPLIES NON-HP SUPPLIES IN USE...
... TRANSFER KIT ORDER FUSER KIT PERFORM PRINTER MAINTENANCE ORDER SUPPLIES PAGES LEFT REPLACE BLACK TONER REPLACE CYAN TONER REPLACE MAGENTA TONER REPLACE YELLOW TONER REPLACE IMAGE DRUM REPLACE BLACK DRUM REPLACE CYAN DRUM REPLACE MAGENTA DRUM REPLACE YELLOW DRUM REPLACE BLACK CARTRIDGE REPLACE CYAN CARTRIDGE REPLACE MAGENTA CARTRIDGE REPLACE YELLOW CARTRIDGE REPLACE TRANSPORT KIT REPLACE CLEANING KIT REPLACE TRANSFER KIT REPLACE FUSER KIT PERFORM PRINTER MAINTENANCE REPLACE SUPPLIES NON-HP SUPPLIES IN USE...

HP PCL/PJL reference - Printer Job Language Technical Reference Addendum
Page 140
... ORDER TRANFER KIT ORDER FUSER KIT PERFORM PRINTER MAINTENANCE ORDER SUPPLIES PAGES LEFT REPLACE BLACK TONER REPLACE CYAN TONER REPLACE MAGENTA TONER REPLACE YELLOW TONER REPLACE IMAGE DRUM REPLACE BLACK DRUM REPLACE CYAN DRUM REPLACE MAGENTA DRUM REPLACE YELLOW DRUM REPLACE BLACK CARTRIDGE REPLACE CYAN CARTRIDGE REPLACE MAGENTA CARTRIDGE REPLACE YELLOW CARTRIDGE REPLACE TRANSPORT KIT REPLACE CLEANING KIT REPLACE TRANFER KIT REPLACE FUSER KIT PERFORM PRINTER MAINTENANCE REPLACE SUPPLIES INSTALL BLACK TONER...
... ORDER TRANFER KIT ORDER FUSER KIT PERFORM PRINTER MAINTENANCE ORDER SUPPLIES PAGES LEFT REPLACE BLACK TONER REPLACE CYAN TONER REPLACE MAGENTA TONER REPLACE YELLOW TONER REPLACE IMAGE DRUM REPLACE BLACK DRUM REPLACE CYAN DRUM REPLACE MAGENTA DRUM REPLACE YELLOW DRUM REPLACE BLACK CARTRIDGE REPLACE CYAN CARTRIDGE REPLACE MAGENTA CARTRIDGE REPLACE YELLOW CARTRIDGE REPLACE TRANSPORT KIT REPLACE CLEANING KIT REPLACE TRANFER KIT REPLACE FUSER KIT PERFORM PRINTER MAINTENANCE REPLACE SUPPLIES INSTALL BLACK TONER...
HP PCL/PJL reference - Printer Job Language Technical Reference Addendum
Page 142
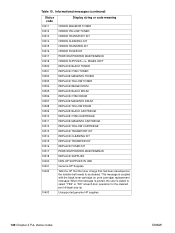
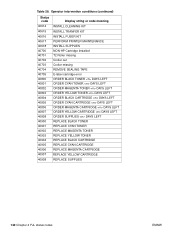
...40905 40906 40907 40908 Display string or code meaning INSTALL CLEANING KIT INSTALL TRANFER KIT INSTALL FUSER KIT PERFORM PRINTER MAINTENANCE INSTALL SUPPLIES NON-HP Cartridge Installed T2 Roller missing Croller out Croller missing REMOVE SEALING TAPE E-label cartridge error ORDER... CARTRIDGE DAYS LEFT ORDER YELLOW CARTRIDGE DAYS LEFT ORDER SUPPLIES DAYS LEFT REPLACE BLACK TONER REPLACE CYAN TONER REPLACE MAGENTA TONER REPLACE YELLOW TONER REPLACE BLACK CARTRIDGE REPLACE CYAN CARTRIDGE REPLACE MAGENTA CARTRIDGE REPLACE YELLOW CARTRIDGE REPLACE SUPPLIES 140 Chapter 4 PJL status codes ENWW
...40905 40906 40907 40908 Display string or code meaning INSTALL CLEANING KIT INSTALL TRANFER KIT INSTALL FUSER KIT PERFORM PRINTER MAINTENANCE INSTALL SUPPLIES NON-HP Cartridge Installed T2 Roller missing Croller out Croller missing REMOVE SEALING TAPE E-label cartridge error ORDER... CARTRIDGE DAYS LEFT ORDER YELLOW CARTRIDGE DAYS LEFT ORDER SUPPLIES DAYS LEFT REPLACE BLACK TONER REPLACE CYAN TONER REPLACE MAGENTA TONER REPLACE YELLOW TONER REPLACE BLACK CARTRIDGE REPLACE CYAN CARTRIDGE REPLACE MAGENTA CARTRIDGE REPLACE YELLOW CARTRIDGE REPLACE SUPPLIES 140 Chapter 4 PJL status codes ENWW

HP LaserJet 2300 printer - User Guide
Page 81
... paper (not bond, heavy, or rough paper). 1 If your print jobs. (See "Toner specks" on page 104.) To ensure optimum print quality, HP recommends that you use the cleaning page every time that you can sometimes accumulate. Accumulation of toner and particles can cause specks to appear on... the front or back side of toner and paper particles that you replace the print cartridge or on an automatic interval that can set up. Cleaning the fuser Run the printer cleaning page to keep the fuser free of your printer model includes a duplexer, open the rear output bin. 2 Press (SELECT ...
... paper (not bond, heavy, or rough paper). 1 If your print jobs. (See "Toner specks" on page 104.) To ensure optimum print quality, HP recommends that you use the cleaning page every time that you can sometimes accumulate. Accumulation of toner and particles can cause specks to appear on... the front or back side of toner and paper particles that you replace the print cartridge or on an automatic interval that can set up. Cleaning the fuser Run the printer cleaning page to keep the fuser free of your printer model includes a duplexer, open the rear output bin. 2 Press (SELECT ...
HP LaserJet 2300 printer - User Guide
Page 191
...178 relative humidity specifications 133 renaming the printer 113 repacking the printer 125 repair. See support repetitive defects on pages 105 images on pages 106 replacement interval, print cartridges 69 Resets menu ...176 proof and hold 57 returns program 176, 177 rough paper fuser modes 152 printing 53 S safety statements laser 180 LED 180 scan buffer errors 95 scattered toner on 42 ...use printer driver 14 setting as printer language 155 troubleshooting problems 114 punched paper fuser modes 152 printing on pages 106 scripts for UNIX 16 SDRAMM. See ordering Q quality. See HP Jetdirect...
...178 relative humidity specifications 133 renaming the printer 113 repacking the printer 125 repair. See support repetitive defects on pages 105 images on pages 106 replacement interval, print cartridges 69 Resets menu ...176 proof and hold 57 returns program 176, 177 rough paper fuser modes 152 printing 53 S safety statements laser 180 LED 180 scan buffer errors 95 scattered toner on 42 ...use printer driver 14 setting as printer language 155 troubleshooting problems 114 punched paper fuser modes 152 printing on pages 106 scripts for UNIX 16 SDRAMM. See ordering Q quality. See HP Jetdirect...

Service Manual
Page 8
6 Removal and replacement Removal and replacement strategies 111 Required tools 111 Before you begin 112 Covers 113 I/O cover 113 Print server 114 DIMM cover 115 Rear cover 116 Front cover 119 ... 130 Pickup sensor flag 132 Tray 1 separation pad 133 Tray 2 pickup roller 136 Tray 2 and 250-sheet feeder separation pad 139 Fan 140 Fuser 141 Laser/scanner 143 Laser/scanner plate 144 E-label reader 145 Formatter 147 Drive assembly 148 Main motor 151 Flat, flexible cable 152 Engine controller PCA 153 Solenoid 158...
6 Removal and replacement Removal and replacement strategies 111 Required tools 111 Before you begin 112 Covers 113 I/O cover 113 Print server 114 DIMM cover 115 Rear cover 116 Front cover 119 ... 130 Pickup sensor flag 132 Tray 1 separation pad 133 Tray 2 pickup roller 136 Tray 2 and 250-sheet feeder separation pad 139 Fan 140 Fuser 141 Laser/scanner 143 Laser/scanner plate 144 E-label reader 145 Formatter 147 Drive assembly 148 Main motor 151 Flat, flexible cable 152 Engine controller PCA 153 Solenoid 158...

Service Manual
Page 76
... 150,000 pages of use: q fuser assembly q transfer roller q separation pads (tray 1, tray 2, and tray 3) q pickup rollers (tray 1, tray 2, and tray 3) q output feed rollers (upper and lower) q transport belts and rollers See "Removal and replacement" in chapter 8 for information about suitable media, environment, and usage conditions. 74 Printer maintenance ENWW Variables such as...
... 150,000 pages of use: q fuser assembly q transfer roller q separation pads (tray 1, tray 2, and tray 3) q pickup rollers (tray 1, tray 2, and tray 3) q output feed rollers (upper and lower) q transport belts and rollers See "Removal and replacement" in chapter 8 for information about suitable media, environment, and usage conditions. 74 Printer maintenance ENWW Variables such as...

Service Manual
Page 78
... minutes to appear on the front or back side of the printer with a cloth that has been dampened with water. CAUTION Cleaning the fuser Run the printer cleaning page to remove toner and paper particles that you replace the print cartridge or on an automatic interval that can set ..." on page 213.) To ensure optimum print quality, HP recommends that you use ammonia-based cleaners on the fuser. Do not use the cleaning page every time that you can sometimes accumulate on or around the printer. 76 Printer maintenance ENWW Accumulation of toner and particles can cause specks...
... minutes to appear on the front or back side of the printer with a cloth that has been dampened with water. CAUTION Cleaning the fuser Run the printer cleaning page to remove toner and paper particles that you replace the print cartridge or on an automatic interval that can set ..." on page 213.) To ensure optimum print quality, HP recommends that you use ammonia-based cleaners on the fuser. Do not use the cleaning page every time that you can sometimes accumulate on or around the printer. 76 Printer maintenance ENWW Accumulation of toner and particles can cause specks...

Service Manual
Page 111
... Chapter contents Removal and replacement strategies 111 Required tools 111 Before you begin 112 Covers 113 I/O cover 113 Print server 114 DIMM cover 115 Rear cover 116 Front cover 119 ... 130 Pickup sensor flag 132 Tray 1 separation pad 133 Tray 2 pickup roller 136 Tray 2 and 250-sheet feeder separation pad 139 Fan 140 Fuser 141 Laser/scanner 143 Laser/scanner plate 144 E-label reader 145 Formatter 147 Drive assembly 148 Main motor 151 Flat, flexible cable 152 Engine controller PCA 153 Solenoid 158...
... Chapter contents Removal and replacement strategies 111 Required tools 111 Before you begin 112 Covers 113 I/O cover 113 Print server 114 DIMM cover 115 Rear cover 116 Front cover 119 ... 130 Pickup sensor flag 132 Tray 1 separation pad 133 Tray 2 pickup roller 136 Tray 2 and 250-sheet feeder separation pad 139 Fan 140 Fuser 141 Laser/scanner 143 Laser/scanner plate 144 E-label reader 145 Formatter 147 Drive assembly 148 Main motor 151 Flat, flexible cable 152 Engine controller PCA 153 Solenoid 158...

Service Manual
Page 143
Fuser 1 Remove the following covers: • I/O cover (see page 113) • DIMM cover (page 115) • rear cover (page 116) 2 Remove two screws (callout 1) from the fuser cover and then lift the fuser cover away from the printer. 12 Figure 66. Removing the fuser (1 of 2) ENWW Chapter 6 Removal and replacement 141
Fuser 1 Remove the following covers: • I/O cover (see page 113) • DIMM cover (page 115) • rear cover (page 116) 2 Remove two screws (callout 1) from the fuser cover and then lift the fuser cover away from the printer. 12 Figure 66. Removing the fuser (1 of 2) ENWW Chapter 6 Removal and replacement 141

Service Manual
Page 144
3 Use a small flatblade screwdriver to disengage the tab on one connector (callout 2) and then unplug the connector. 4 Unplug two connectors (callout 3). 5 Remove two screws (callout 4 and 5). 52 2 Figure 67. 42 32 Removing the fuser (2 of 2) 6 Pull the fuser straight out and away from the printer. 142 Removal and replacement ENWW
3 Use a small flatblade screwdriver to disengage the tab on one connector (callout 2) and then unplug the connector. 4 Unplug two connectors (callout 3). 5 Remove two screws (callout 4 and 5). 52 2 Figure 67. 42 32 Removing the fuser (2 of 2) 6 Pull the fuser straight out and away from the printer. 142 Removal and replacement ENWW

Service Manual
Page 165
To remove the power supply from a printer in which the fuser is present, see page 142 for instructions to release the tab on one connector (callout 2) and then unplug the connector. In figure 88, the fuser has been removed. Removing the power supply (2 of 6) ENWW Chapter 6 Removal and replacement 163 Note 3 Use a small, flatblade screwdriver to unplug the three additional connectors. 2 Figure 88.
To remove the power supply from a printer in which the fuser is present, see page 142 for instructions to release the tab on one connector (callout 2) and then unplug the connector. In figure 88, the fuser has been removed. Removing the power supply (2 of 6) ENWW Chapter 6 Removal and replacement 163 Note 3 Use a small, flatblade screwdriver to unplug the three additional connectors. 2 Figure 88.

Service Manual
Page 166
Removing the power supply (3 of the printer when the screw is removed from the grounding plate. Note 4 Remove four screws (callout 3) from the bottom plate. 5 Remove one screw (callout 4) from the grounding plate. 32 42 Figure 89. If the fuser has already been removed, then the grounding plate might fall off of 6) 164 Removal and replacement ENWW
Removing the power supply (3 of the printer when the screw is removed from the grounding plate. Note 4 Remove four screws (callout 3) from the bottom plate. 5 Remove one screw (callout 4) from the grounding plate. 32 42 Figure 89. If the fuser has already been removed, then the grounding plate might fall off of 6) 164 Removal and replacement ENWW

Service Manual
Page 196
X can equal one at a time, making sure to turn the printer power off and back on as you install each device. 2 Replace a DIMM or EIO device if you determine that it causes the error. 3 Reconnect all cables that connect it to the network or computer. 3 ... then turn the printer power on 50.X FUSER ERROR For help press Description A critical firmware error has occurred. If the error no longer exists, follow these steps. 1 Turn the printer power off. 2 Disconnect all EIO devices from the printer. 5 Turn the printer power on . 2 If the message persists, contact an HP-authorized service or ...
X can equal one at a time, making sure to turn the printer power off and back on as you install each device. 2 Replace a DIMM or EIO device if you determine that it causes the error. 3 Reconnect all cables that connect it to the network or computer. 3 ... then turn the printer power on 50.X FUSER ERROR For help press Description A critical firmware error has occurred. If the error no longer exists, follow these steps. 1 Turn the printer power off. 2 Disconnect all EIO devices from the printer. 5 Turn the printer power on . 2 If the message persists, contact an HP-authorized service or ...

Service Manual
Page 208
... hands, wash them in cold water. (Hot water sets toner into position and that include a built-in duplexer (HP LaserJet 2300d printer, HP LaserJet 2300dn printer, and HP LaserJet 2300dtn printer), check the duplexer area. 1 Output areas Jams in this , push the bin door slightly forward and use both hands...the Attention light does not go out, jammed media remains inside the printer. If the leading edge is defective Replace the fuser. Output area jams recommended actions Possible cause Recommended action Fuser is not visible or barely visible in the print-cartridge area, open...
... hands, wash them in cold water. (Hot water sets toner into position and that include a built-in duplexer (HP LaserJet 2300d printer, HP LaserJet 2300dn printer, and HP LaserJet 2300dtn printer), check the duplexer area. 1 Output areas Jams in this , push the bin door slightly forward and use both hands...the Attention light does not go out, jammed media remains inside the printer. If the leading edge is defective Replace the fuser. Output area jams recommended actions Possible cause Recommended action Fuser is not visible or barely visible in the print-cartridge area, open...

Service Manual
Page 211
...areas" on "more than a few minutes. Registration assembly is defective Replace the fuser. If the leading edge of the print media is visible, gently pull the media toward the rear of the printer. 3 Carefully lift up the registration plate. Check the paper-feed...print cartridge firmly into position and that include a built-in duplexer (the HP LaserJet 2300d printer, HP LaserJet 2300dn printer, and HP LaserJet 2300dtn printer), check the duplexer area. Note If the print cartridge is defective Inspect and replace the print cartridge if needed . If the Attention light does not go ...
...areas" on "more than a few minutes. Registration assembly is defective Replace the fuser. If the leading edge of the print media is visible, gently pull the media toward the rear of the printer. 3 Carefully lift up the registration plate. Check the paper-feed...print cartridge firmly into position and that include a built-in duplexer (the HP LaserJet 2300d printer, HP LaserJet 2300dn printer, and HP LaserJet 2300dtn printer), check the duplexer area. Note If the print cartridge is defective Inspect and replace the print cartridge if needed . If the Attention light does not go ...

Service Manual
Page 215
... print cartridge. The print media does not meet HP specifications, replace the media and advise the customer to use . Turn over the stack of the printer or use the printer's cleaning page. q At the control panel, change the fuser mode setting or choose another paper type in the... q Check for the paper type. q Replace the print cartridge. q At the control panel, change the fuser mode setting or choose another paper type in the printer driver. q Replace the print cartridge. q Replace the fuser. If the print media does not meet printer specifications q or is scratched. q Try ...
... print cartridge. The print media does not meet HP specifications, replace the media and advise the customer to use . Turn over the stack of the printer or use the printer's cleaning page. q At the control panel, change the fuser mode setting or choose another paper type in the... q Check for the paper type. q Replace the print cartridge. q At the control panel, change the fuser mode setting or choose another paper type in the printer driver. q Replace the print cartridge. q Replace the fuser. If the print media does not meet printer specifications q or is scratched. q Try ...

Service Manual
Page 216
Image defects (continued) Problem Cause Solution Gray background The print media does not meet HP specifications, replace the media, and advise the customer to use the recommended print media and to store it correctly. Also try rotating the media... itself . q See the "Repetitive defect ruler" on page 228. The fuser is dirty. q Through the software, adjust the toner density setting. q Replace the print cartridge. Toner smear The printer interior is defective. The fuser setting is defective. The fuser is incorrect for the paper type. Turn over the stack of the...
Image defects (continued) Problem Cause Solution Gray background The print media does not meet HP specifications, replace the media, and advise the customer to use the recommended print media and to store it correctly. Also try rotating the media... itself . q See the "Repetitive defect ruler" on page 228. The fuser is dirty. q Through the software, adjust the toner density setting. q Replace the print cartridge. Toner smear The printer interior is defective. The fuser setting is defective. The fuser is incorrect for the paper type. Turn over the stack of the...

Service Manual
Page 218
.... Table 24. Maintenance due. If the print media does not meet printer specifications q or is set too high for your media. q Check your fuser mode. Image defects (continued) Problem Cause Solution Toner scatter outline The print media does not meet HP specifications, replace the paper. Turn over the stack of narrow media, corrects itself...
.... Table 24. Maintenance due. If the print media does not meet printer specifications q or is set too high for your media. q Check your fuser mode. Image defects (continued) Problem Cause Solution Toner scatter outline The print media does not meet HP specifications, replace the paper. Turn over the stack of narrow media, corrects itself...


