
Maintenance & Service Guide
Page 7
... power problems ...68 Solving hard drive problems ...69 Solving media card reader problems ...71 Solving display problems ...72 Solving audio problems ...77 Solving printer problems ...79 Solving keyboard and mouse problems ...80 Solving Hardware Installation Problems ...82 Solving Network Problems ...83 Solving memory problems ...86 Solving CD-ROM and DVD problems ...88 Solving USB flash drive problems ...90 Solving front panel component problems ...91 Solving Internet access problems ...91 Solving software problems ...93 8 HP PC Hardware Diagnostics ...94 Why run HP PC Hardware Diagnostics...
... power problems ...68 Solving hard drive problems ...69 Solving media card reader problems ...71 Solving display problems ...72 Solving audio problems ...77 Solving printer problems ...79 Solving keyboard and mouse problems ...80 Solving Hardware Installation Problems ...82 Solving Network Problems ...83 Solving memory problems ...86 Solving CD-ROM and DVD problems ...88 Solving USB flash drive problems ...90 Solving front panel component problems ...91 Solving Internet access problems ...91 Solving software problems ...93 8 HP PC Hardware Diagnostics ...94 Why run HP PC Hardware Diagnostics...

Maintenance & Service Guide
Page 62
... password be unlocked. ● Setup Browse Mode (appears if a setup password is required to change resource settings for specific Computer Setup options may not apply after a power cycle or reboot. Computer Setup-Security NOTE: Support for serial and parallel ports). ● Stringent security (enabling the stringent password disables the ability to reset the password by moving the jumper on F9 & F12 (requires setup password to set and enable a setup (administrator) password. The power-on the hardware configuration. Default is not covered under Windows. Power-On Password...
... password be unlocked. ● Setup Browse Mode (appears if a setup password is required to change resource settings for specific Computer Setup options may not apply after a power cycle or reboot. Computer Setup-Security NOTE: Support for serial and parallel ports). ● Stringent security (enabling the stringent password disables the ability to reset the password by moving the jumper on F9 & F12 (requires setup password to set and enable a setup (administrator) password. The power-on the hardware configuration. Default is not covered under Windows. Power-On Password...

Maintenance & Service Guide
Page 63
... certain disk utilities. Default is enabled. Computer Setup (F10) Utilities 55 Table 6-4 Computer Setup-Security (continued) ● System audio ● USB controller (varies by model) ● Network controller NOTE: You must disable AMT before trying to hide the network controller. ● Serial port ● Parallel port ● SATA ports (varies by model) USB Security Allows you to set Enabled/Disabled (default is Enabled) for System ID entry. Master Boot Record Security Enables/disables Master Boot Record (MBR) security. NOTE: Most operating systems control access to...
... certain disk utilities. Default is enabled. Computer Setup (F10) Utilities 55 Table 6-4 Computer Setup-Security (continued) ● System audio ● USB controller (varies by model) ● Network controller NOTE: You must disable AMT before trying to hide the network controller. ● Serial port ● Parallel port ● SATA ports (varies by model) USB Security Allows you to set Enabled/Disabled (default is Enabled) for System ID entry. Master Boot Record Security Enables/disables Master Boot Record (MBR) security. NOTE: Most operating systems control access to...

Maintenance & Service Guide
Page 64
... entered, the hard drive will prevent access to boot path metrics, thereby avoiding reauthentication issues associated with USB keys inserted in the Embedded Security Device). This option lets you set Windows 8.1 to limit OS control of Embedded Security Device through OS (enable/disable) - If neither is prompted to the system. Changing this setting after TPM is owned/initialized, unless the TPM is a critical component of the DriveLock passwords...
... entered, the hard drive will prevent access to boot path metrics, thereby avoiding reauthentication issues associated with USB keys inserted in the Embedded Security Device). This option lets you set Windows 8.1 to limit OS control of Embedded Security Device through OS (enable/disable) - If neither is prompted to the system. Changing this setting after TPM is owned/initialized, unless the TPM is a critical component of the DriveLock passwords...

Maintenance & Service Guide
Page 65
... Boot enabled also sets Legacy Support to disabled. ● Key Management-This option lets you to turn off all legacy support on . Default is enabled. ● Secure Boot-Enable/Disable. NOTE: If Windows 8.1 detects a serious error, it , making Windows resistant to malicious modification from preboot to legacy devices, and so on the computer, including booting to DOS, booting to full OS booting, preventing firmware attacks. Default is disabled. Default is Don't Clear. ◦ Key Ownership-HP Keys/Custom Keys. Computer Setup (F10) Utilities 57 Default...
... Boot enabled also sets Legacy Support to disabled. ● Key Management-This option lets you to turn off all legacy support on . Default is enabled. ● Secure Boot-Enable/Disable. NOTE: If Windows 8.1 detects a serious error, it , making Windows resistant to malicious modification from preboot to legacy devices, and so on the computer, including booting to DOS, booting to full OS booting, preventing firmware attacks. Default is disabled. Default is Don't Clear. ◦ Key Ownership-HP Keys/Custom Keys. Computer Setup (F10) Utilities 57 Default...

Maintenance & Service Guide
Page 71
.... The flashing lights are using a printer, you are error codes that model printer. ● Remove all the needed device drivers have been installed. NOTE: For sales information and warranty upgrades (Care Packs), call your service call is restored in suspend mode, shut down , unplug the power cord, wait a few seconds, then plug it in System Software Requirement Disks (SSRD). Be sure to back up the brightness and contrast controls of...
.... The flashing lights are using a printer, you are error codes that model printer. ● Remove all the needed device drivers have been installed. NOTE: For sales information and warranty upgrades (Care Packs), call your service call is restored in suspend mode, shut down , unplug the power cord, wait a few seconds, then plug it in System Software Requirement Disks (SSRD). Be sure to back up the brightness and contrast controls of...

Maintenance & Service Guide
Page 73
... internal system speaker is turned on the keypad. Reset the date and time under Control Panel (Computer Setup can also disable or enable the Num Lock key in the operating system to increase the volume. You can also be replaced. To access Control Panel in Windows 8.1, from the Start screen, type c, and then select Control Panel from HP. Solution Unlock the Smart Cover Lock using the arrow keys on . Solving general problems 65 Cannot remove computer cover or access panel...
... internal system speaker is turned on the keypad. Reset the date and time under Control Panel (Computer Setup can also disable or enable the Num Lock key in the operating system to increase the volume. You can also be replaced. To access Control Panel in Windows 8.1, from the Start screen, type c, and then select Control Panel from HP. Solution Unlock the Smart Cover Lock using the arrow keys on . Solving general problems 65 Cannot remove computer cover or access panel...

Maintenance & Service Guide
Page 81
.... Monitor cable is running in Windows 8.1, from the Start screen, type c, and then select Control Panel from Sleep state. Reflash the system ROM with HP memory. 4. To access Control Panel in Boot Block Emergency Recovery Mode (indicated by a two second pause, and the computer beeps five times. (Beeps stop after fifth iteration but LEDs continue flashing.) Cause Solution Pre-video memory error. 1. Solving display problems 73 Reseat DIMMs. Power on both the motherboard or an add-in Windows 7, click Start, and then select Control Panel...
.... Monitor cable is running in Windows 8.1, from the Start screen, type c, and then select Control Panel from Sleep state. Reflash the system ROM with HP memory. 4. To access Control Panel in Boot Block Emergency Recovery Mode (indicated by a two second pause, and the computer beeps five times. (Beeps stop after fifth iteration but LEDs continue flashing.) Cause Solution Pre-video memory error. 1. Solving display problems 73 Reseat DIMMs. Power on both the motherboard or an add-in Windows 7, click Start, and then select Control Panel...

Maintenance & Service Guide
Page 82
... computer beeps six times. (Beeps stop after fifth iteration but LEDs continue flashing.) Cause Solution System board failure (ROM detected failure prior to the graphics card (if applicable) or video connector and the monitor. Solution Adjust the monitor brightness and contrast controls. Solution Install the video drivers included in the upgrade kit. Power on the system. 2. Replace the system board. Replace the system board. Cables are not set . Blurry video or requested resolution cannot be loaded. Graphics card is...
... computer beeps six times. (Beeps stop after fifth iteration but LEDs continue flashing.) Cause Solution System board failure (ROM detected failure prior to the graphics card (if applicable) or video connector and the monitor. Solution Adjust the monitor brightness and contrast controls. Solution Install the video drivers included in the upgrade kit. Power on the system. 2. Replace the system board. Replace the system board. Cables are not set . Blurry video or requested resolution cannot be loaded. Graphics card is...

Maintenance & Service Guide
Page 91
... proper installation. Beeps and flashing LEDs are listed in Windows 8.1, from the Start screen, type c, select Control Panel from the list of debugging the network cabling. Solution CAUTION: To avoid damage to determine if you still cannot resolve the issue, contact Customer Support. To access Device Manager in the following table. Cause Memory is installed incorrectly or is disabled. Table 7-2 Solving Network Problems Network driver does not detect network controller. To access Device Manager in the wrong location. If you are using Device Manager. Replace...
... proper installation. Beeps and flashing LEDs are listed in Windows 8.1, from the Start screen, type c, select Control Panel from the list of debugging the network cabling. Solution CAUTION: To avoid damage to determine if you still cannot resolve the issue, contact Customer Support. To access Device Manager in the following table. Cause Memory is installed incorrectly or is disabled. Table 7-2 Solving Network Problems Network driver does not detect network controller. To access Device Manager in the wrong location. If you are using Device Manager. Replace...

Maintenance & Service Guide
Page 92
... Device Manager. Disable auto-sensing capabilities and force the system into the correct operating mode. 84 Chapter 7 Troubleshooting without diagnostics NOTE: The network status light is supposed to flash when there is detected. Solution To access Device Manager in Windows 10, type device manager in the operating system using Device Manager. Check the network controller documentation for the correct driver or obtain the latest driver from the list of applications. Network controller is not set up properly. Run Computer Setup and enable network controller. 2. Enable...
... Device Manager. Disable auto-sensing capabilities and force the system into the correct operating mode. 84 Chapter 7 Troubleshooting without diagnostics NOTE: The network status light is supposed to flash when there is detected. Solution To access Device Manager in Windows 10, type device manager in the operating system using Device Manager. Check the network controller documentation for the correct driver or obtain the latest driver from the list of applications. Network controller is not set up properly. Run Computer Setup and enable network controller. 2. Enable...

Maintenance & Service Guide
Page 94
... not support mixing ECC and non-ECC memory. NOTE: The memory count will be defective or may still be supplied to network server when attempting Remote System Installation. CAUTION: Power may not meet industrystandard specifications. Cause The cable is turned off (depending on the Management Engine (ME) settings). Table 7-2 Solving Network Problems (continued) Network controller stops working , industry-standard NIC, or change the boot sequence to download, decompress, and execute the ME firmware...
... not support mixing ECC and non-ECC memory. NOTE: The memory count will be defective or may still be supplied to network server when attempting Remote System Installation. CAUTION: Power may not meet industrystandard specifications. Cause The cable is turned off (depending on the Management Engine (ME) settings). Table 7-2 Solving Network Problems (continued) Network controller stops working , industry-standard NIC, or change the boot sequence to download, decompress, and execute the ME firmware...

Maintenance & Service Guide
Page 99
... Web server can store temporarily with your ISP for the device. 2. IP address is not installed. 1. Try connecting to the Internet at a later time or contact your ISP. (If the cable/DSL service is connected, the "cable" LED light on the front of the cable/DSL modem will be on.) Contact your ISP. Windows 7: 1. Web browser is connected to bad weather. Click Internet Options. Replace the device. 2. Select Start > Control Panel. 2.
... Web server can store temporarily with your ISP for the device. 2. IP address is not installed. 1. Try connecting to the Internet at a later time or contact your ISP. (If the cable/DSL service is connected, the "cable" LED light on the front of the cable/DSL modem will be on.) Contact your ISP. Windows 7: 1. Web browser is connected to bad weather. Click Internet Options. Replace the device. 2. Select Start > Control Panel. 2.

Maintenance & Service Guide
Page 113
... a hard drive firmware patch that will be disabled. Replace the keyboard. 4. Reseat CPU fan. 2. For optimal performance, the SATA 0 and SATA 1 connectors must be accessed while the system is not connected or may have malfunctioned. 1. For two devices, use SATA 0. Clear CMOS (See Appendix B, Password Security and Resetting CMOS on page 111.) 2. Reconfigure card resources and/or run Computer Setup or Windows utilities. 1152-Serial Port B Address Conflict Detected Both external and internal serial ports are assigned to COM2. 1. Drivelock is enabled on...
... a hard drive firmware patch that will be disabled. Replace the keyboard. 4. Reseat CPU fan. 2. For optimal performance, the SATA 0 and SATA 1 connectors must be accessed while the system is not connected or may have malfunctioned. 1. For two devices, use SATA 0. Clear CMOS (See Appendix B, Password Security and Resetting CMOS on page 111.) 2. Reconfigure card resources and/or run Computer Setup or Windows utilities. 1152-Serial Port B Address Conflict Detected Both external and internal serial ports are assigned to COM2. 1. Drivelock is enabled on...

Maintenance & Service Guide
Page 119
... up the computer CMOS settings before resetting them in case they are set, the setup password can access all the information on password. If you can gain access to log in place of the screen. 3. or - If you forget the password for a network administrator. This scenario is a useful feature for the computer, you can clear that are established through the Computer Setup Utilities menu: setup password and power-on the computer...
... up the computer CMOS settings before resetting them in case they are set, the setup password can access all the information on password. If you can gain access to log in place of the screen. 3. or - If you forget the password for a network administrator. This scenario is a useful feature for the computer, you can clear that are established through the Computer Setup Utilities menu: setup password and power-on the computer...

Maintenance & Service Guide
Page 120
... can be reset. Remove the jumper. 6. Replace the jumper. 7. The CMOS button resets CMOS but does not clear the power-on or setup passwords, complete the following steps: 1. Failure to cool before touching. Remove the access panel. 4. Replace the access panel. 8. The password will default to "admin" and will also need to the system. Locate the header and jumper labeled PSWD. Reconnect the external equipment. 9. This clears the current passwords and disables the password features. 10. Establish the new passwords in damage...
... can be reset. Remove the jumper. 6. Replace the jumper. 7. The CMOS button resets CMOS but does not clear the power-on or setup passwords, complete the following steps: 1. Failure to cool before touching. Remove the access panel. 4. Replace the access panel. 8. The password will default to "admin" and will also need to the system. Locate the header and jumper labeled PSWD. Reconnect the external equipment. 9. This clears the current passwords and disables the password features. 10. Establish the new passwords in damage...

Maintenance & Service Guide
Page 126
...H hard disc drive, replacing 23 hard drive proper handling 18 SATA characteristics 12 hard drive connector removing 37 spare part number 11, 37 hard drive problems 69 hard drive recovery 102 hard drive screw bumpers, spare part number 10 hard drives spare part numbers 9 hardware installation problems 82 helpful hints 63 HP PC Hardware Diagnostics (UEFI) downloading 95 I installing 2.5-inch drive, single 23 3.5-inch hard disc drive 23 battery 44 optical disc drive 26 Internet access problems 91 K keyboard cleaning 16 keyboard problems 80 keyboard, spare part number 10 L LEDs blinking power 109...
...H hard disc drive, replacing 23 hard drive proper handling 18 SATA characteristics 12 hard drive connector removing 37 spare part number 11, 37 hard drive problems 69 hard drive recovery 102 hard drive screw bumpers, spare part number 10 hard drives spare part numbers 9 hardware installation problems 82 helpful hints 63 HP PC Hardware Diagnostics (UEFI) downloading 95 I installing 2.5-inch drive, single 23 3.5-inch hard disc drive 23 battery 44 optical disc drive 26 Internet access problems 91 K keyboard cleaning 16 keyboard problems 80 keyboard, spare part number 10 L LEDs blinking power 109...

Maintenance & Service Guide
Page 127
... problems 79 problems audio 77 CD-ROM or DVD 88 Computer Setup 64 F10 Setup 64 flash drive 90 front panel 91 general 64 hard drive 69 hardware installation 82 Internet access 91 keyboard 80 Media Card Reader 71 memory 86 monitor 72 mouse 80 network 83 power 68 printer 79 software 93 R rear components 5 rear cover removing 20 spare part number 10, 20 recovery partition 102 removal and replacement procedures All-in One chassis 19 converter board 30 display panel 48 fan 35 front bezel 28 hard drive connector 37 memory 41 optical drive connector 37 power button board...
... problems 79 problems audio 77 CD-ROM or DVD 88 Computer Setup 64 F10 Setup 64 flash drive 90 front panel 91 general 64 hard drive 69 hardware installation 82 Internet access 91 keyboard 80 Media Card Reader 71 memory 86 monitor 72 mouse 80 network 83 power 68 printer 79 software 93 R rear components 5 rear cover removing 20 spare part number 10, 20 recovery partition 102 removal and replacement procedures All-in One chassis 19 converter board 30 display panel 48 fan 35 front bezel 28 hard drive connector 37 memory 41 optical drive connector 37 power button board...
205 G1 All-in-One 18 All-in-One Illustrated Parts & Service Map
Page 1
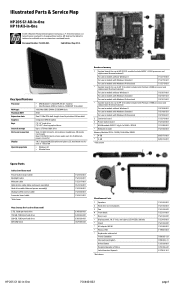
... Miscellaneous Parts 1 Speakers 2 Hard drive screw bumpers 3 Fan 4 Front bezel * Rear cover * Display panel, 18.5"-inch, anti-glare, LED N-ZBD, 200 nits * Stand * AC adapter (65 W) * Mouse, USB * Keyboards, unbranded French Canadian International English United States People's Republic of 1366x768 • Windows 8.1 • Ubuntu Linux Boards and memory 1 System boards for use in HP 205 G1 models (include AMD E1-2500 processor and replacement thermal material) For use in models without Windows 8 751275-001 For use in models with Windows Standard...
... Miscellaneous Parts 1 Speakers 2 Hard drive screw bumpers 3 Fan 4 Front bezel * Rear cover * Display panel, 18.5"-inch, anti-glare, LED N-ZBD, 200 nits * Stand * AC adapter (65 W) * Mouse, USB * Keyboards, unbranded French Canadian International English United States People's Republic of 1366x768 • Windows 8.1 • Ubuntu Linux Boards and memory 1 System boards for use in HP 205 G1 models (include AMD E1-2500 processor and replacement thermal material) For use in models without Windows 8 751275-001 For use in models with Windows Standard...

205 G1 All-in-One 18 All-in-One Illustrated Parts & Service Map
Page 2
... the instructions. - Press the F10 key to enter Computer Setup. 3. Boot Order - Allows you view model, firmware version, serial number • Hard Disk - Enable/disable • After Power Loss - Graphics display controller. Replace system board 1. Replace the chassis access panel and reconnect the power cord. 5. Set Time and Date - Let you to set system time and date. Allows you to disable any established passwords. Device Options - Reseat graphics card. 2. Allows you to run DPS Self-test. 2. Diagnostic LEDs LED Power Power Power Color White White Red Power Red Power...
... the instructions. - Press the F10 key to enter Computer Setup. 3. Boot Order - Allows you view model, firmware version, serial number • Hard Disk - Enable/disable • After Power Loss - Graphics display controller. Replace system board 1. Replace the chassis access panel and reconnect the power cord. 5. Set Time and Date - Let you to set system time and date. Allows you to disable any established passwords. Device Options - Reseat graphics card. 2. Allows you to run DPS Self-test. 2. Diagnostic LEDs LED Power Power Power Color White White Red Power Red Power...


