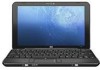
HP Mini 2102, HP Mini 210, and Compaq Mini 210 - Maintenance and Service Guide
Page 11
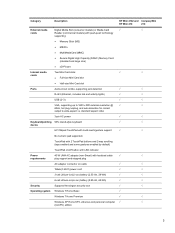
... HP Mini 2102 and Compaq Mini HP Mini 210 210 External media Digital Media Slot (consumer models) or Media Card √ √ cards Reader (commercial models) with localized cable √ √ requirements plug support and stepped plug AC adapter connector on /off button with LED indicator Power 40-W UMA AC adapter (non-Smart) with push-push technology supporting: ● Memory Stick (MS) ● MS/Pro ● MultiMediaCard (MMC) ● Secure Digital High Capacity (SDHC) Memory Card...
... HP Mini 2102 and Compaq Mini HP Mini 210 210 External media Digital Media Slot (consumer models) or Media Card √ √ cards Reader (commercial models) with localized cable √ √ requirements plug support and stepped plug AC adapter connector on /off button with LED indicator Power 40-W UMA AC adapter (non-Smart) with push-push technology supporting: ● Memory Stick (MS) ● MS/Pro ● MultiMediaCard (MMC) ● Secure Digital High Capacity (SDHC) Memory Card...
HP Mini 2102, HP Mini 210, and Compaq Mini 210 - Maintenance and Service Guide
Page 22
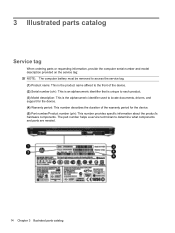
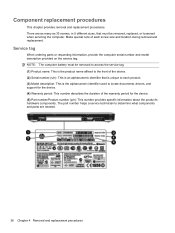
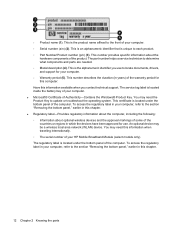
...: NOTE: The computer battery must be removed to access the service tag. (1) Product name: This is the product name affixed to the front of the warranty period for the device. (5) Part number/Product number (p/n): This number provides specific information about the product's hardware components. The part number helps a service technician to locate documents, drivers, and support for the device. (4) Warranty period: This number describes the duration of the device. (2) Serial number (s/n): This is...
...: NOTE: The computer battery must be removed to access the service tag. (1) Product name: This is the product name affixed to the front of the warranty period for the device. (5) Part number/Product number (p/n): This number provides specific information about the product's hardware components. The part number helps a service technician to locate documents, drivers, and support for the device. (4) Warranty period: This number describes the duration of the device. (2) Serial number (s/n): This is...
HP Mini 2102, HP Mini 210, and Compaq Mini 210 - Maintenance and Service Guide
Page 44
... 4 Removal and replacement procedures Service tag When ordering parts or requesting information, provide the computer serial number and model description provided on the service tag: NOTE: The computer battery must be removed to access the service tag. (1) Product name: This is the product name affixed to the front of the warranty period for the device. (5) Part number/Product number (p/n): This number provides specific information about the product's hardware components...
... 4 Removal and replacement procedures Service tag When ordering parts or requesting information, provide the computer serial number and model description provided on the service tag: NOTE: The computer battery must be removed to access the service tag. (1) Product name: This is the product name affixed to the front of the warranty period for the device. (5) Part number/Product number (p/n): This number provides specific information about the product's hardware components...
HP Mini 2102, HP Mini 210, and Compaq Mini 210 - Maintenance and Service Guide
Page 76
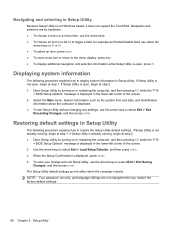
... Setup Utility default settings. To exit Setup Utility without changing any settings, use the arrow keys to display system information in the lower-left corner of the screen. 2. If Setup Utility is displayed in Setup Utility. When the Setup Confirmation is displayed. 3. NOTE: Your password, security, and language settings are by turning on or restarting the computer, and then pressing f10 while the "F10 = BIOS Setup Options" message is open , press f1. Select the Main menu. If Setup Utility...
... Setup Utility default settings. To exit Setup Utility without changing any settings, use the arrow keys to display system information in the lower-left corner of the screen. 2. If Setup Utility is displayed in Setup Utility. When the Setup Confirmation is displayed. 3. NOTE: Your password, security, and language settings are by turning on or restarting the computer, and then pressing f10 while the "F10 = BIOS Setup Options" message is open , press f1. Select the Main menu. If Setup Utility...
HP Mini 2102, HP Mini 210, and Compaq Mini 210 - Maintenance and Service Guide
Page 82
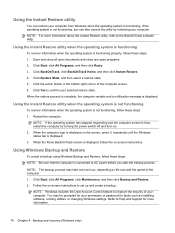
... restore your computer from Windows when the operating system is displayed on file size and the speed of the computer. 1. Click Restore State, and then select a restore state. 5. Using the Instant Restore utility You can also access the utility by turning the power switch off and then on -screen instructions to confirm your computer. Follow the on . 2. Using the Instant Restore utility when the operating system is functioning To recover information when the operating...
... restore your computer from Windows when the operating system is displayed on file size and the speed of the computer. 1. Click Restore State, and then select a restore state. 5. Using the Instant Restore utility You can also access the utility by turning the power switch off and then on -screen instructions to confirm your computer. Follow the on . 2. Using the Instant Restore utility when the operating system is functioning To recover information when the operating...
HP Mini 2102, HP Mini 210, and Compaq Mini 210 - Maintenance and Service Guide
Page 86
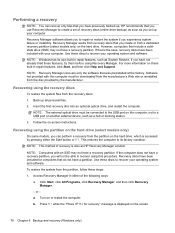
... discs to a USB port on another external device, such as System Restore. For more information on these steps: 1. Performing a recovery NOTE: You can perform a recovery from the partition on the hard drive, which is accessed by the manufacturer. If you have a recovery partition. To restore the system from the recovery discs: 1. Access Recovery Manager in either the Start button or f11. Recovering using the recovery discs To restore the system files from the partition, follow these...
... discs to a USB port on another external device, such as System Restore. For more information on these steps: 1. Performing a recovery NOTE: You can perform a recovery from the partition on the hard drive, which is accessed by the manufacturer. If you have a recovery partition. To restore the system from the recovery discs: 1. Access Recovery Manager in either the Start button or f11. Recovering using the recovery discs To restore the system files from the partition, follow these...

HP Mini 2102, HP Mini 210, and Compaq Mini 210 - Maintenance and Service Guide
Page 103
..., spare part number 21, 27 I internal media cards, product description 3 J jacks audio-in 11 audio-out 11 headphone 11 microphone 11 network 10 RJ-45 10 K keyboard product description 3 removal 49 spare part numbers 16, 28, 29, 49 keys action 8 fn 8 Windows applications 8 Windows logo 8 L language support 70 lights battery 10 caps lock 7 drive 10 mute 7 power 9 TouchPad 7 webcam 11 wireless 7 M Main Menu, Setup Utility 69 memory module product description 1 removal 47 spare part numbers 18, 27, 47 memory test 70 microphone 11 microphone jack...
..., spare part number 21, 27 I internal media cards, product description 3 J jacks audio-in 11 audio-out 11 headphone 11 microphone 11 network 10 RJ-45 10 K keyboard product description 3 removal 49 spare part numbers 16, 28, 29, 49 keys action 8 fn 8 Windows applications 8 Windows logo 8 L language support 70 lights battery 10 caps lock 7 drive 10 mute 7 power 9 TouchPad 7 webcam 11 wireless 7 M Main Menu, Setup Utility 69 memory module product description 1 removal 47 spare part numbers 18, 27, 47 memory test 70 microphone 11 microphone jack...
HP Mini 2102, HP Mini 210, and Compaq Mini 210 - Maintenance and Service Guide
Page 104
...menus 69 SIM, removal 39 speakers location 8 removal 55 spare part number 18, 30, 55 starting Setup Utility 67 static-shielding materials 35 system board removal 61 spare part numbers 18, 26, 61 System Configuration Menu, Setup Utility 70 system information 68, 69 TouchPad location 6 removal 56 spare part numbers 18, 28, 56 TouchPad button 6 TouchPad light 7 TouchPad on/off button 6 transporting guidelines 34 U Universal Serial Bus (USB) port connector pinout 85 location 9, 11 using Setup Utility 67 V vent 9, 10 video, product description 2 W webcam 11 webcam light 11 webcam/microphone module...
...menus 69 SIM, removal 39 speakers location 8 removal 55 spare part number 18, 30, 55 starting Setup Utility 67 static-shielding materials 35 system board removal 61 spare part numbers 18, 26, 61 System Configuration Menu, Setup Utility 70 system information 68, 69 TouchPad location 6 removal 56 spare part numbers 18, 28, 56 TouchPad button 6 TouchPad light 7 TouchPad on/off button 6 transporting guidelines 34 U Universal Serial Bus (USB) port connector pinout 85 location 9, 11 using Setup Utility 67 V vent 9, 10 video, product description 2 W webcam 11 webcam light 11 webcam/microphone module...
Mini User Guide - Windows 7
Page 22
...: ◦ Information about the hardware components of Authenticity-Contains the Windows® Product Key. An optional device may be a wireless local area network (WLAN) device. This certificate is the product name affixed to update or troubleshoot the operating system. This is an alphanumeric identifier that is located inside the battery bay of your computer. ◦ Warranty period (5). This number describes the duration (in...
...: ◦ Information about the hardware components of Authenticity-Contains the Windows® Product Key. An optional device may be a wireless local area network (WLAN) device. This certificate is the product name affixed to update or troubleshoot the operating system. This is an alphanumeric identifier that is located inside the battery bay of your computer. ◦ Warranty period (5). This number describes the duration (in...
Mini User Guide - Windows 7
Page 23
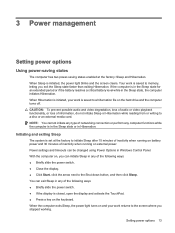
.... Setting power options 13 You can initiate Sleep in Windows Control Panel. Your work is initiated, the power light blinks and the screen clears. When the computer exits Sleep, the power light turns on and your work returns to a hibernation file on the keyboard. 3 Power management Setting power options Using power-saving states The computer has two power-saving states enabled at the factory to initiate Sleep after 15 minutes of inactivity when running on battery power...
.... Setting power options 13 You can initiate Sleep in Windows Control Panel. Your work is initiated, the power light blinks and the screen clears. When the computer exits Sleep, the power light turns on and your work returns to a hibernation file on the keyboard. 3 Power management Setting power options Using power-saving states The computer has two power-saving states enabled at the factory to initiate Sleep after 15 minutes of inactivity when running on battery power...
Mini User Guide - Windows 7
Page 56
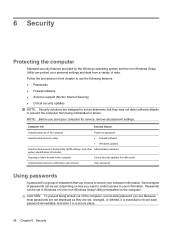
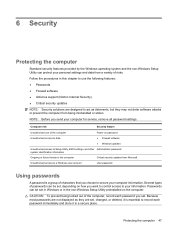
... mishandled or stolen. Several types of passwords can be set , depending on password ● Firewall software ● Windows updates Unauthorized access to Setup Utility, BIOS settings, and other Administrator password system identification information Ongoing or future threats to the computer Critical security updates from Microsoft Unauthorized access to a Windows user account User password Using passwords A password is a group of the computer, record each password you choose to record each password immediately and store it is...
... mishandled or stolen. Several types of passwords can be set , depending on password ● Firewall software ● Windows updates Unauthorized access to Setup Utility, BIOS settings, and other Administrator password system identification information Ongoing or future threats to the computer Critical security updates from Microsoft Unauthorized access to a Windows user account User password Using passwords A password is a group of the computer, record each password you choose to record each password immediately and store it is...

Mini User Guide - Windows 7
Page 62
... updates. Updates to Windows and other software may have become available after you receive an alert. Use the update link at Start > All Programs > Windows Update. ● Run Windows Update at regular intervals, such as once a month. ● Obtain updates to the operating system and other Microsoft programs, as they are installed on the computer, observe these guidelines: ● Run Windows Update as soon as you set...
... updates. Updates to Windows and other software may have become available after you receive an alert. Use the update link at Start > All Programs > Windows Update. ● Run Windows Update at regular intervals, such as once a month. ● Obtain updates to the operating system and other Microsoft programs, as they are installed on the computer, observe these guidelines: ● Run Windows Update as soon as you set...
Mini User Guide - Windows 7
Page 83
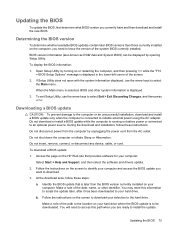
... BIOS updates contain later BIOS versions than the BIOS version currently installed on the screen to the location on your hard drive. Open Setup Utility by turning on the computer, you are ready to an optional power source. b. Updating the BIOS 73 You may need to access this information to locate the update later, after it has been downloaded to your hard drive where the BIOS update is connected to select the Main menu. Follow the instructions on battery power or connected to install...
... BIOS updates contain later BIOS versions than the BIOS version currently installed on the screen to the location on your hard drive. Open Setup Utility by turning on the computer, you are ready to an optional power source. b. Updating the BIOS 73 You may need to access this information to locate the update later, after it has been downloaded to your hard drive where the BIOS update is connected to select the Main menu. Follow the instructions on battery power or connected to install...
Mini User Guide - Windows 7
Page 88
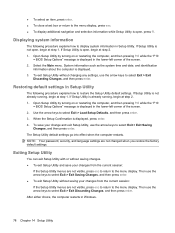
... Discarding Changes, and then press enter. NOTE: Your password, security, and language settings are not visible, press esc to return to the menu display. Then use the arrow keys to select Exit > Exit Discarding Changes, and then press enter. If Setup Utility is already running , begin at step 2. 1. After either choice, the computer restarts in Windows. 78 Chapter 14 Setup Utility If Setup Utility is displayed, press enter. 4. Restoring default settings in Setup Utility The...
... Discarding Changes, and then press enter. NOTE: Your password, security, and language settings are not visible, press esc to return to the menu display. Then use the arrow keys to select Exit > Exit Discarding Changes, and then press enter. If Setup Utility is already running , begin at step 2. 1. After either choice, the computer restarts in Windows. 78 Chapter 14 Setup Utility If Setup Utility is displayed, press enter. 4. Restoring default settings in Setup Utility The...
Mini User Guide - Windows 7
Page 92
... software 28 HP Mobile Broadband Module 33 HP Mobile Broadband, disabled 33 hubs 55 I icons Connection Manager 27 network 27 wired network 27 wireless 27 internal display switch, identifying 8 internal microphone, identifying 9, 38 Internet connection setup 30 J jacks audio-in (microphone) 8, 39 audio-out (headphone) 8, 39 RJ-45 (network) 7 K keyboard hotkeys, identifying 60 keys action 5 fn 5 Windows applications 5 Windows logo 5 TouchPad 4 webcam 8 local area network (LAN) cable required 26 connecting cable 26 low battery level 19 M Main menu 79 managing a power-on password 49 managing...
... software 28 HP Mobile Broadband Module 33 HP Mobile Broadband, disabled 33 hubs 55 I icons Connection Manager 27 network 27 wired network 27 wireless 27 internal display switch, identifying 8 internal microphone, identifying 9, 38 Internet connection setup 30 J jacks audio-in (microphone) 8, 39 audio-out (headphone) 8, 39 RJ-45 (network) 7 K keyboard hotkeys, identifying 60 keys action 5 fn 5 Windows applications 5 Windows logo 5 TouchPad 4 webcam 8 local area network (LAN) cable required 26 connecting cable 26 low battery level 19 M Main menu 79 managing a power-on password 49 managing...
Mini User Guide - Windows XP
Page 7
...Internet 42 Audio ...43 Connecting external audio devices 43 Checking your audio functions 43 Video ...45 Connecting an external monitor or projector 45 Webcam ...46 6 Security Protecting the computer ...47 Using passwords ...47 Passwords set in Windows 48 Passwords set in Setup Utility 48 Administrator password 49 Managing an administrator password 49 Entering an administrator password 49 Power-on password 49 Managing a power-on password 50 Entering a power-on password 50 Using antivirus software ...51 Using firewall software ...52 Installing critical updates ...53 7 Digital cards...
...Internet 42 Audio ...43 Connecting external audio devices 43 Checking your audio functions 43 Video ...45 Connecting an external monitor or projector 45 Webcam ...46 6 Security Protecting the computer ...47 Using passwords ...47 Passwords set in Windows 48 Passwords set in Setup Utility 48 Administrator password 49 Managing an administrator password 49 Entering an administrator password 49 Power-on password 49 Managing a power-on password 50 Entering a power-on password 50 Using antivirus software ...51 Using firewall software ...52 Installing critical updates ...53 7 Digital cards...
Mini User Guide - Windows XP
Page 57
Several types of passwords can be set in Windows or in the non-Windows Setup Utility preinstalled on the computer. Passwords can protect your information. Protecting the computer 47 Computer risk Security feature Unauthorized use the following features: ● Passwords ● Firewall software ● Antivirus support (Norton Internet Security) ● Critical security updates NOTE: Security solutions are designed to act as deterrents, but they are not displayed as they may...
Several types of passwords can be set in Windows or in the non-Windows Setup Utility preinstalled on the computer. Passwords can protect your information. Protecting the computer 47 Computer risk Security feature Unauthorized use the following features: ● Passwords ● Firewall software ● Antivirus support (Norton Internet Security) ● Critical security updates NOTE: Security solutions are designed to act as deterrents, but they are not displayed as they may...

Mini User Guide - Windows XP
Page 63
... updates. Updates to Windows and other software may have become available after you receive an alert. Use the update link at Start > All Programs > Windows Update. ● Run Windows Update at regular intervals, such as once a month. ● Obtain updates to the operating system and other Microsoft programs, as they are installed on the computer, observe these guidelines: ● Run Windows Update as soon as you set...
... updates. Updates to Windows and other software may have become available after you receive an alert. Use the update link at Start > All Programs > Windows Update. ● Run Windows Update at regular intervals, such as once a month. ● Obtain updates to the operating system and other Microsoft programs, as they are installed on the computer, observe these guidelines: ● Run Windows Update as soon as you set...
Mini User Guide - Windows XP
Page 84
... connected to the location on your hard drive where the BIOS update is running on your computer. At the download area, follow these steps: a. Make a note of the path to reliable external power using the AC adapter. Open Setup Utility by opening Setup Utility. If Setup Utility does not open with the system information displayed, use the arrow keys to install the update. 74 Chapter 12 Updating software Identify the BIOS update that provides software for your computer and access the BIOS update...
... connected to the location on your hard drive where the BIOS update is running on your computer. At the download area, follow these steps: a. Make a note of the path to reliable external power using the AC adapter. Open Setup Utility by opening Setup Utility. If Setup Utility does not open with the system information displayed, use the arrow keys to install the update. 74 Chapter 12 Updating software Identify the BIOS update that provides software for your computer and access the BIOS update...

Mini User Guide - Windows XP
Page 93
... 12 service tag 11 language support 80 latches, battery release 9 left TouchPad button, identifying 4 lights caps lock 4 webcam 8 local area network (LAN) cable required 25 connecting cable 25 low battery level 19 M Main menu 80 managing a power-on password 50 managing an administrator password 49 memory module removing 70 memory test 81 microphone (audio-in) jack 8, 39 monitor, connecting 45 mouse, external connecting 60 setting preferences 58 multimedia components, identifying 37 multimedia software installing 42 using 42 mute, identifying 38 N navigating in Setup Utility 78 network cable...
... 12 service tag 11 language support 80 latches, battery release 9 left TouchPad button, identifying 4 lights caps lock 4 webcam 8 local area network (LAN) cable required 25 connecting cable 25 low battery level 19 M Main menu 80 managing a power-on password 50 managing an administrator password 49 memory module removing 70 memory test 81 microphone (audio-in) jack 8, 39 monitor, connecting 45 mouse, external connecting 60 setting preferences 58 multimedia components, identifying 37 multimedia software installing 42 using 42 mute, identifying 38 N navigating in Setup Utility 78 network cable...


