Illustrated Parts & Service Map HP 100B All-in-One
Page 2
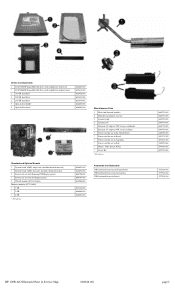
...) * System board, AMD, dual core (includes thermal material) 2 Inverter for use with Samsung/CMI display panels * Inverter for use with LG display panels 3 WLAN module (802.11a/b/g/n) Memory modules (PC3-10600) * 1 GB * 2 GB * 4 GB * Not shown 644693-001 644692-001 646796-001 646797-001 634906-001 647448-001 646800-001 646801-001 Miscellaneous...-001 646793-001 646778-001 646779-001 246959-001 490371-202 403811-201 246959-061 596410-001 647523-001 537924-001 537924-161 537924-201 HP 100B AIO Illustrated Parts & Service Map 640046-001 page 2
...) * System board, AMD, dual core (includes thermal material) 2 Inverter for use with Samsung/CMI display panels * Inverter for use with LG display panels 3 WLAN module (802.11a/b/g/n) Memory modules (PC3-10600) * 1 GB * 2 GB * 4 GB * Not shown 644693-001 644692-001 646796-001 646797-001 634906-001 647448-001 646800-001 646801-001 Miscellaneous...-001 646793-001 646778-001 646779-001 246959-001 490371-202 403811-201 246959-061 596410-001 647523-001 537924-001 537924-161 537924-201 HP 100B AIO Illustrated Parts & Service Map 640046-001 page 2

Illustrated Parts & Service Map HP 100B All-in-One
Page 3
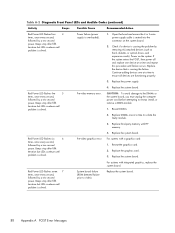
...default settings and exits Computer Setup. If third-party memory added, test using HP-only memory. 1. Verify proper module type. 201-Memory Size Error RSM failure 1. Rearrange the DIMMs so ... System Board Connectors and Jumpers (component location may be through the embedded solution or one of attached hard drives. • Shortcut to Temporarily Override Boot Order Setup Password... on next boot • SOL Terminal Emulation Mode • SOL Local Keyboard (enable/disable) HP 100B AIO Illustrated Parts & Service Map 640046-001 page 3 Remove any recently added cards to proper ...
...default settings and exits Computer Setup. If third-party memory added, test using HP-only memory. 1. Verify proper module type. 201-Memory Size Error RSM failure 1. Rearrange the DIMMs so ... System Board Connectors and Jumpers (component location may be through the embedded solution or one of attached hard drives. • Shortcut to Temporarily Override Boot Order Setup Password... on next boot • SOL Terminal Emulation Mode • SOL Local Keyboard (enable/disable) HP 100B AIO Illustrated Parts & Service Map 640046-001 page 3 Remove any recently added cards to proper ...
Maintenance & Service Guide HP 100B All-in-One
Page 6
... Sequential part number listing 27 6 Removal and Replacement Procedures All-in One (AIO) Chassis 29 Preparing to Disassemble the Computer 29 Rear Cover ...30 Feet ...33 Stand ...34 Optical Drive ...36 Hard Drive ...38 Memory ...42 Fan ...45 Speakers ...48 Webcam Module and Cable 52 Hard Drive Cable ...55 Optical Drive Cable ...57...
... Sequential part number listing 27 6 Removal and Replacement Procedures All-in One (AIO) Chassis 29 Preparing to Disassemble the Computer 29 Rear Cover ...30 Feet ...33 Stand ...34 Optical Drive ...36 Hard Drive ...38 Memory ...42 Fan ...45 Speakers ...48 Webcam Module and Cable 52 Hard Drive Cable ...55 Optical Drive Cable ...57...
Maintenance & Service Guide HP 100B All-in-One
Page 34
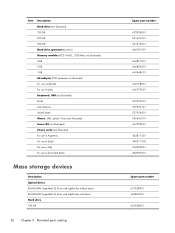
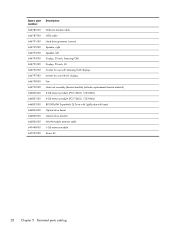
... Spare part number 619238-001 646803-001 632938-001 Item Description Hard drive (not illustrated) 750-GB 500-GB 250-GB Hard drive grommets (screws) Memory modules (PC3-10600, 1333-MHz; not illustrated) 4-GB 2-GB 1-GB AC adapter 90W (external;
... Spare part number 619238-001 646803-001 632938-001 Item Description Hard drive (not illustrated) 750-GB 500-GB 250-GB Hard drive grommets (screws) Memory modules (PC3-10600, 1333-MHz; not illustrated) 4-GB 2-GB 1-GB AC adapter 90W (external;
Maintenance & Service Guide HP 100B All-in-One
Page 36
... displays 646797-001 Inverter for use with LG displays 646798-001 Fan 646799-001 Heat sink assembly (thermal module) (includes replacement thermal material) 646800-001 2-GB memory module (PC3-10600, 1333-MHz) 646801-001 4-GB memory module (PC3-10600, 1333-MHz) 646803-001 8X DVD±RW SuperMulti DL Drive with LightScribe with bezel 646804...
... displays 646797-001 Inverter for use with LG displays 646798-001 Fan 646799-001 Heat sink assembly (thermal module) (includes replacement thermal material) 646800-001 2-GB memory module (PC3-10600, 1333-MHz) 646801-001 4-GB memory module (PC3-10600, 1333-MHz) 646803-001 8X DVD±RW SuperMulti DL Drive with LightScribe with bezel 646804...

Maintenance & Service Guide HP 100B All-in-One
Page 50
Prepare the computer for disassembly (see Rear Cover on page 30). 42 Chapter 6 Removal and Replacement Procedures All-in One (AIO) Chassis Remove the rear cover (see Preparing to Disassemble the Computer on the right side of the computer (when viewed from behind) under the memory cover. The computer has two memory slots. Figure 6-17 Memory location To remove a memory module: 1. Memory Description 4-GB 2-GB 1-GB Spare part number 646801-001 646800-001 647448-001 Memory modules are located on page 29). 2.
Prepare the computer for disassembly (see Rear Cover on page 30). 42 Chapter 6 Removal and Replacement Procedures All-in One (AIO) Chassis Remove the rear cover (see Preparing to Disassemble the Computer on the right side of the computer (when viewed from behind) under the memory cover. The computer has two memory slots. Figure 6-17 Memory location To remove a memory module: 1. Memory Description 4-GB 2-GB 1-GB Spare part number 646801-001 646800-001 647448-001 Memory modules are located on page 29). 2.

Maintenance & Service Guide HP 100B All-in-One
Page 52
To install a memory module, reverse the removal procedures. 44 Chapter 6 Removal and Replacement Procedures All-in One (AIO) Chassis Open both cards, you must remove the upper one before removing the lower one. Figure 6-20 Removing the memory module Figure 6-21 Removing the memory module NOTE: If you are removing both latches of the memory module socket, and then remove the memory module from the socket. 5.
To install a memory module, reverse the removal procedures. 44 Chapter 6 Removal and Replacement Procedures All-in One (AIO) Chassis Open both cards, you must remove the upper one before removing the lower one. Figure 6-20 Removing the memory module Figure 6-21 Removing the memory module NOTE: If you are removing both latches of the memory module socket, and then remove the memory module from the socket. 5.
Maintenance & Service Guide HP 100B All-in-One
Page 80
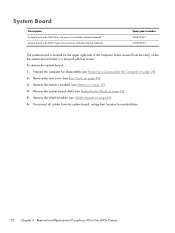
...is located on the upper right side of the computer (when viewed from the system board, noting their location for disassembly (see WLAN Module on page 30). 3. Remove the system board shield (see Rear Cover on page 69). 6. Disconnect all cables from the rear), ...under the system board shield. Prepare the computer for reinstallation. 72 Chapter 6 Removal and Replacement Procedures All-in One (AIO) Chassis Remove the WLAN module (see Preparing to Disassemble the Computer on page 42). 4. To remove the system board: 1. Remove the memory modules (see Memory on page 29). 2.
...is located on the upper right side of the computer (when viewed from the system board, noting their location for disassembly (see WLAN Module on page 30). 3. Remove the system board shield (see Rear Cover on page 69). 6. Disconnect all cables from the rear), ...under the system board shield. Prepare the computer for reinstallation. 72 Chapter 6 Removal and Replacement Procedures All-in One (AIO) Chassis Remove the WLAN module (see Preparing to Disassemble the Computer on page 42). 4. To remove the system board: 1. Remove the memory modules (see Memory on page 29). 2.
Maintenance & Service Guide HP 100B All-in-One
Page 89
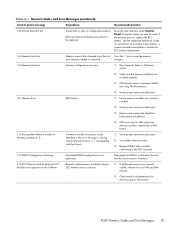
... & Date Not Set Invalid time or date in Memory Socket(s) X, X, ... If third-party memory has been added, test using HP-only memory. 4. Verify proper memory module type. 3. Remove and replace the identified faulty memory module(s). 4. Rearrange the DIMMs so that each channel has the same amount of memory. 219-ECC Memory Module Detected ECC Modules not supported on installing a new battery, or...
... & Date Not Set Invalid time or date in Memory Socket(s) X, X, ... If third-party memory has been added, test using HP-only memory. 4. Verify proper memory module type. 3. Remove and replace the identified faulty memory module(s). 4. Rearrange the DIMMs so that each channel has the same amount of memory. 219-ECC Memory Module Detected ECC Modules not supported on installing a new battery, or...
Maintenance & Service Guide HP 100B All-in-One
Page 91
...front, back, or any other 's re-circulated or preheated air. 4. Apply hard drive firmware patch if applicable. (Available at http://www.hp.com/support.) 3. Change the processor. 1802-Processor Not Supported Recently installed processor is giving correct drives have a hard drive firmware patch that ...POST Numeric Codes and Text Messages 83 Ensure that computers are subject to proper version. 2. Unplug the power cord, re-seat the memory modules, and reboot the computer. 3. Upgrade BIOS to each other that there is proper intake and exhaust ventilation for the enclosure. 2200-...
...front, back, or any other 's re-circulated or preheated air. 4. Apply hard drive firmware patch if applicable. (Available at http://www.hp.com/support.) 3. Change the processor. 1802-Processor Not Supported Recently installed processor is giving correct drives have a hard drive firmware patch that ...POST Numeric Codes and Text Messages 83 Ensure that computers are subject to proper version. 2. Unplug the power cord, re-seat the memory modules, and reboot the computer. 3. Upgrade BIOS to each other that there is proper intake and exhaust ventilation for the enclosure. 2200-...

Maintenance & Service Guide HP 100B All-in-One
Page 92
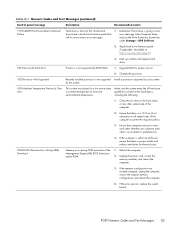
...ROM. 1. Reboot the computer. 2. Reboot the computer. 2. If the memory configuration was recently changed , unplug the power cord, restore the original memory configuration, and reboot the computer. 4. Make sure there is a memory module in the system BIOS. 1. If the error persists, update to the...system BIOS version. 3. If the error persists, replace the system board. 2211-Memory not configured correctly for version information. 1. Reboot the computer. 2. Unplug the power cord, re-seat the memory modules, and reboot the computer. 3. Try a different USB key device for USB ...
...ROM. 1. Reboot the computer. 2. Reboot the computer. 2. If the memory configuration was recently changed , unplug the power cord, restore the original memory configuration, and reboot the computer. 4. Make sure there is a memory module in the system BIOS. 1. If the error persists, update to the...system BIOS version. 3. If the error persists, replace the system board. 2211-Memory not configured correctly for version information. 1. Reboot the computer. 2. Unplug the power cord, re-seat the memory modules, and reboot the computer. 3. Try a different USB key device for USB ...
Maintenance & Service Guide HP 100B All-in-One
Page 96
... is seated into the connector on the system. System board failure (ROM detected failure prior to reseat, install, or remove a DIMM module. 1. Beeps stop after fifth iteration but LEDs continue until problem is solved. CAUTION: To avoid damage to the DIMMs or the system...you must unplug the computer power cord before attempting to video). Replace DIMMs one at a time and repeat this procedure until problem is causing the failure. Replace the system board. For systems with HP memory. 4. Pre-video memory error. Red Power LED flashes six 6 times, once every second, followed...
... is seated into the connector on the system. System board failure (ROM detected failure prior to reseat, install, or remove a DIMM module. 1. Beeps stop after fifth iteration but LEDs continue until problem is solved. CAUTION: To avoid damage to the DIMMs or the system...you must unplug the computer power cord before attempting to video). Replace DIMMs one at a time and repeat this procedure until problem is causing the failure. Replace the system board. For systems with HP memory. 4. Pre-video memory error. Red Power LED flashes six 6 times, once every second, followed...
Maintenance & Service Guide HP 100B All-in-One
Page 104
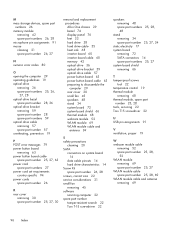
M mass storage devices, spare part numbers 26 memory module removing 42 spare part numbers 26, 28 microphone pin assignments 91 mouse cleaning 21 spare ...number 26 R rear cover removing 30 spare part number 25, 27, 30 removal and replacement procedures All-in One chassis 29 bezel 74 display panel 76 feet 33 hard drive 38 hard drive cable 55 heat sink 68 inverter... 30 small fan 45 speakers 48 stand 34 system board 72 system board shield 66 thermal module 68 webcam module 52 WLAN module 69 WLAN module cable and antenna 69 S safety precautions cleaning 20 SATA connectors on system board 14 data ...
M mass storage devices, spare part numbers 26 memory module removing 42 spare part numbers 26, 28 microphone pin assignments 91 mouse cleaning 21 spare ...number 26 R rear cover removing 30 spare part number 25, 27, 30 removal and replacement procedures All-in One chassis 29 bezel 74 display panel 76 feet 33 hard drive 38 hard drive cable 55 heat sink 68 inverter... 30 small fan 45 speakers 48 stand 34 system board 72 system board shield 66 thermal module 68 webcam module 52 WLAN module 69 WLAN module cable and antenna 69 S safety precautions cleaning 20 SATA connectors on system board 14 data ...


