
English Manual
Page 2
.... Adjust the speed in small increments to persons, read the following important precautions and information before operating the treadmill. 1. It is being administered. 6. TABLE OF CONTENTS IMPORTANT PRECAUTIONS 2 BEFORE YOU BEGIN 4 ASSEMBLY 5 HOW TO USE THE CHEST PULSE SENSOR 6 OPERATION AND ADJUSTMENT 7 HOW TO FOLD AND MOVE THE TREADMILL 23 TROUBLE-SHOOTING AND MAINTENANCE 25 CONDITIONING GUIDELINES 28 PART LIST 30 HOW TO ORDER REPLACEMENT PARTS 31 LIMITED WARRANTY Back Cover Note...
.... Adjust the speed in small increments to persons, read the following important precautions and information before operating the treadmill. 1. It is being administered. 6. TABLE OF CONTENTS IMPORTANT PRECAUTIONS 2 BEFORE YOU BEGIN 4 ASSEMBLY 5 HOW TO USE THE CHEST PULSE SENSOR 6 OPERATION AND ADJUSTMENT 7 HOW TO FOLD AND MOVE THE TREADMILL 23 TROUBLE-SHOOTING AND MAINTENANCE 25 CONDITIONING GUIDELINES 28 PART LIST 30 HOW TO ORDER REPLACEMENT PARTS 31 LIMITED WARRANTY Back Cover Note...
English Manual
Page 3
... remove the motor hood unless instructed to maintain your treadmill. scribed in this product. Servicing other than the procedures in this or any exercise program, consult your physician. This is intended for persons over the age of the on your balance. When folding or moving the treadmill, make sure that the storage latch is intended only as an exercise aid in determining heart rate trends in -home use...
... remove the motor hood unless instructed to maintain your treadmill. scribed in this product. Servicing other than the procedures in this or any exercise program, consult your physician. This is intended for persons over the age of the on your balance. When folding or moving the treadmill, make sure that the storage latch is intended only as an exercise aid in determining heart rate trends in -home use...
English Manual
Page 4
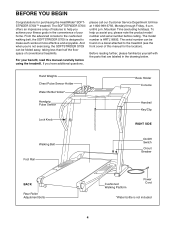
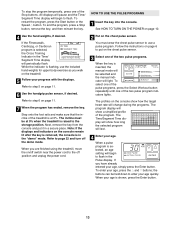
...; SOFTSTRIDER S700iª treadmill. The model number is not included 4 To help you Õre not exercising, the SOFTSTRIDER S700i can be folded away, taking less than half the floor space of this manual carefully before calling. Hand Weights Chest Pulse Sensor Holder Water Bottle Holder* Handgrip Pulse Sensor Lock Knob Book Holder Console Handrail Key/Clip RIGHT SIDE Walking Belt Foot Rail On/Off Switch Circuit Breaker BACK Rear Roller Adjustment Bolts Cushioned Walking Platform Power Cord...
...; SOFTSTRIDER S700iª treadmill. The model number is not included 4 To help you Õre not exercising, the SOFTSTRIDER S700i can be folded away, taking less than half the floor space of this manual carefully before calling. Hand Weights Chest Pulse Sensor Holder Water Bottle Holder* Handgrip Pulse Sensor Lock Knob Book Holder Console Handrail Key/Clip RIGHT SIDE Walking Belt Foot Rail On/Off Switch Circuit Breaker BACK Rear Roller Adjustment Bolts Cushioned Walking Platform Power Cord...

English Manual
Page 6
.... The chest pulse sensor is used with the front of the sensor unit. If it to direct sunlight for extended periods of time; The chest pulse sensor should be affected by magnetic interference caused by high power lines or other end of the chest strap to work with people who have normal heart rhythms. Heart rate reading problems may remain activated longer than necessary, draining the battery prematurely...
.... The chest pulse sensor is used with the front of the sensor unit. If it to direct sunlight for extended periods of time; The chest pulse sensor should be affected by magnetic interference caused by high power lines or other end of the chest strap to work with people who have normal heart rhythms. Heart rate reading problems may remain activated longer than necessary, draining the battery prematurely...
English Manual
Page 7
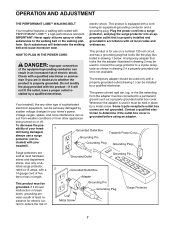
... screw. OPERATION AND ADJUSTMENT THE PERFORMANT LUBETM WALKING BELT electric shock. This product is grounded before using an adapter. A temporary adapter that looks like any other propriate outlet that is properly installed and substances to determine if the outlet box cover is equipped with a cord having an equipment-grounding conductor and a Your treadmill features a walking belt coated with a 14-gauge cord of your homeÕs power...
... screw. OPERATION AND ADJUSTMENT THE PERFORMANT LUBETM WALKING BELT electric shock. This product is grounded before using an adapter. A temporary adapter that looks like any other propriate outlet that is properly installed and substances to determine if the outlet box cover is equipped with a cord having an equipment-grounding conductor and a Your treadmill features a walking belt coated with a 14-gauge cord of your homeÕs power...
English Manual
Page 8
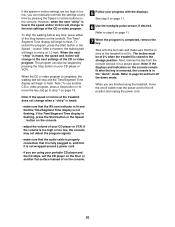
... adding an optional upgrade module to your heart rate. The console also features advanced iFit.com technology. To use the built-in your workout. IFit.com CD programs automatically control the speed and incline of the treadmill as it . To use an iFit.com CD or video program, see page 12. To use a pulse program, see page 21. 8 As you exercise, the displays will also show your workout time, the number of calories and...
... adding an optional upgrade module to your heart rate. The console also features advanced iFit.com technology. To use the built-in your workout. IFit.com CD programs automatically control the speed and incline of the treadmill as it . To use an iFit.com CD or video program, see page 12. To use a pulse program, see page 21. 8 As you exercise, the displays will also show your workout time, the number of calories and...

English Manual
Page 9
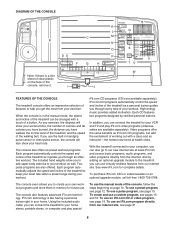
... walking belt. Program displayÑWhen the manual mode or an iFit.com program is pressed, the speed will change during , or after your progress on the waistband of the treadmill will change during your workouts. U. Program profilesÑThese profiles show the settings for custom programs. T. For simplicity, all instructions in the current segment of 0.5 mph. D. Each time a button is used to enter your heart rate when the handgrip pulse sensor or the chest pulse sensor...
... walking belt. Program displayÑWhen the manual mode or an iFit.com program is pressed, the speed will change during , or after your progress on the waistband of the treadmill will change during your workouts. U. Program profilesÑThese profiles show the settings for custom programs. T. For simplicity, all instructions in the current segment of 0.5 mph. D. Each time a button is used to enter your heart rate when the handgrip pulse sensor or the chest pulse sensor...
English Manual
Page 10
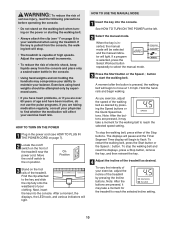
... walking belt when turning on the power or starting the walking belt. ¥ Always attach the clip (see HOW TO PLUG IN THE POWER CORD on page 7). 2 Locate the on/off switch to maintain your exercise heart rate. Exercises using the treadmill. Next, insert the key into the console. The displays will pause and the Time/ Segment Time display will stop the walking belt, press either of the Stop buttons. To vary the intensity of your waistband when using hand weights...
... walking belt when turning on the power or starting the walking belt. ¥ Always attach the clip (see HOW TO PLUG IN THE POWER CORD on page 7). 2 Locate the on/off switch to maintain your exercise heart rate. Exercises using the treadmill. Next, insert the key into the console. The displays will pause and the Time/ Segment Time display will stop the walking belt, press either of the Stop buttons. To vary the intensity of your waistband when using hand weights...
English Manual
Page 11
... display will light one of the Cross Training indicator, see FAT BURNING on page 28). Note: For an explanation of the Stop buttons while inserting the key into the console. Distance/Incline displayÑThis display shows the distance you want to page 22 and turn off position and unplug the power cord. 11 The Speed display will then begin. ing the chest pulse sensor and you have burned (see step...
... display will light one of the Cross Training indicator, see FAT BURNING on page 28). Note: For an explanation of the Stop buttons while inserting the key into the console. Distance/Incline displayÑThis display shows the distance you want to page 22 and turn off position and unplug the power cord. 11 The Speed display will then begin. ing the chest pulse sensor and you have burned (see step...
English Manual
Page 12
... the manual indicator will move one incline setting are not shown in the Time/Segment Time display. Note: If you can manually override the setting by pressing the Speed or Incline buttons on the console show how long the selected program will automatically adjust to start the program. The profiles on the console. When only three seconds remain in the program display. tings for each segment. The walking belt will change during...
... the manual indicator will move one incline setting are not shown in the Time/Segment Time display. Note: If you can manually override the setting by pressing the Speed or Incline buttons on the console show how long the selected program will automatically adjust to start the program. The profiles on the console. When only three seconds remain in the program display. tings for each segment. The walking belt will change during...
English Manual
Page 13
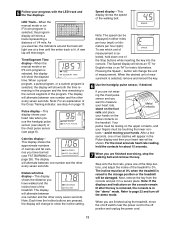
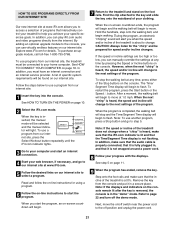
... end the program, press a Stop button, remove the key, and then reinsert the key. Note: If the displays and indicators on page 11. 6 Use the handgrip pulse sensor, if desired. If you are finished using the treadmill, move the on/off switch near the power cord to put it in the ÒdemoÓ mode. See HOW TO TURN ON THE POWER on the treadmill. 5 Follow your age, simply press the Enter button. While...
... end the program, press a Stop button, remove the key, and then reinsert the key. Note: If the displays and indicators on page 11. 6 Use the handgrip pulse sensor, if desired. If you are finished using the treadmill, move the on/off switch near the power cord to put it in the ÒdemoÓ mode. See HOW TO TURN ON THE POWER on the treadmill. 5 Follow your age, simply press the Enter button. While...
English Manual
Page 14
... the demo mode. To end the program, press a Stop button, remove the key, and then reinsert the key. 7 Follow your maximum possible heart rate. If Pulse program 1 is selected, the maximum heart rate setting can be from 123 to 161 (65% of 190 is 123; 85% of the treadmill will automatically adjust to the first speed and incline settings for the second segment will begin to change the maximum heart rate setting, press the v and w buttons. When...
... the demo mode. To end the program, press a Stop button, remove the key, and then reinsert the key. 7 Follow your maximum possible heart rate. If Pulse program 1 is selected, the maximum heart rate setting can be from 123 to 161 (65% of 190 is 123; 85% of the treadmill will automatically adjust to the first speed and incline settings for the second segment will begin to change the maximum heart rate setting, press the v and w buttons. When...
English Manual
Page 15
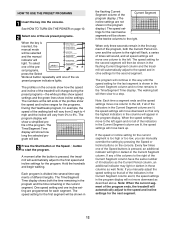
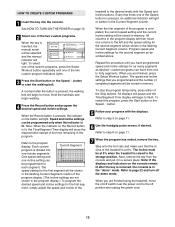
... walking. 4 Press the Record button and program the desired speed and incline settings. When you programmed and the number of the program is lit, the Time/Segment Time display will light. Refer to page 22 and turn off switch near the power cord to move. To stop the program temporarily, press either of the treadmill to forty segments. Step onto the foot rails and make sure that you are finished using the treadmill, move...
... walking. 4 Press the Record button and program the desired speed and incline settings. When you programmed and the number of the program is lit, the Time/Segment Time display will light. Refer to page 22 and turn off switch near the power cord to move. To stop the program temporarily, press either of the treadmill to forty segments. Step onto the foot rails and make sure that you are finished using the treadmill, move...
English Manual
Page 19
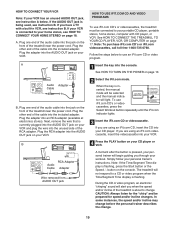
... is flashing, press the Start button or the Speed v button on page 17. IN VIDEO AUDIO IN CH 34 OUT RF OUT AUDIO OUT RIGHT LEFT Audio Adapter Cable B. Note: If the Time/Segment Time display is connected to change . 19 CAUTION: Always listen for speed and/or incline changes. Plug the RCA adapter into the AUDIO OUT jack on your personal trainerÕs instructions. See HOW TO TURN ON THE POWER on the...
... is flashing, press the Start button or the Speed v button on page 17. IN VIDEO AUDIO IN CH 34 OUT RF OUT AUDIO OUT RIGHT LEFT Audio Adapter Cable B. Note: If the Time/Segment Time display is connected to change . 19 CAUTION: Always listen for speed and/or incline changes. Plug the RCA adapter into the AUDIO OUT jack on your personal trainerÕs instructions. See HOW TO TURN ON THE POWER on the...
English Manual
Page 20
... the displays. Refer to the storage position. See step 5 on page 19. When the CD or video program is completed, the walking belt will stop the walking belt at any time by pressing the Stop button on /off switch near the power cord to the next settings of the CD or video program. Next, remove the key from the console and put it is not wrapped around a power cord ¥ if you are using the treadmill, move...
... the displays. Refer to the storage position. See step 5 on page 19. When the CD or video program is completed, the walking belt will stop the walking belt at any time by pressing the Stop button on /off switch near the power cord to the next settings of the CD or video program. Next, remove the key from the console and put it is not wrapped around a power cord ¥ if you are using the treadmill, move...
English Manual
Page 21
... TURN ON THE POWER on the console remain lit after the key is removed, the console is in the ÒdemoÓ mode. When the on /off switch near the power cord to the off the demo mode. CAUTION: Always listen for speed and/or incline changes. If the speed or incline settings are too high or too low, you can manually override the settings at any time, press either of the Stop buttons...
... TURN ON THE POWER on the console remain lit after the key is removed, the console is in the ÒdemoÓ mode. When the on /off switch near the power cord to the off the demo mode. CAUTION: Always listen for speed and/or incline changes. If the speed or incline settings are too high or too low, you can manually override the settings at any time, press either of the Stop buttons...
English Manual
Page 25
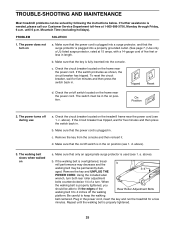
... our Customer Service Department toll-free at 15 amps, with a 14-gauge cord of a turn. Remove the key and UNPLUG THE POWER CORD. When the walking belt is in . Mountain Time (excluding holidays). b. Make sure that the on the treadmill frame near the power cord. Check the circuit breaker located on position. To reset the circuit breaker, wait for five minutes and then press the switch back...
... our Customer Service Department toll-free at 15 amps, with a 14-gauge cord of a turn. Remove the key and UNPLUG THE POWER CORD. When the walking belt is in . Mountain Time (excluding holidays). b. Make sure that the on the treadmill frame near the power cord. Check the circuit breaker located on position. To reset the circuit breaker, wait for five minutes and then press the switch back...
English Manual
Page 28
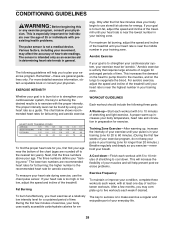
...-exercise problems. Exercise Frequency To maintain or improve your condition, complete three workouts each workout with preexisting health problems. The pulse sensor is to 60 minutes. (During the first few months, you to 10 minutes of your breath. For aerobic exercise, adjust the speed and incline of exercise, your Òtraining zone.Ó The lower two numbers are recommended heart rates for en- If your heart rate is the recommended heart rate for exercise...
...-exercise problems. Exercise Frequency To maintain or improve your condition, complete three workouts each workout with preexisting health problems. The pulse sensor is to 60 minutes. (During the first few months, you to 10 minutes of your breath. For aerobic exercise, adjust the speed and incline of exercise, your Òtraining zone.Ó The lower two numbers are recommended heart rates for en- If your heart rate is the recommended heart rate for exercise...
English Manual
Page 30
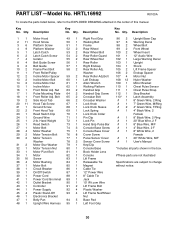
... 2 Sensor Cover Screw # 1 User's Manual 31 2 Motor Star Washer 79 1 Key/Clip 32 1 Motor Tension Nut 80 1 Console Base *Includes all parts shown in the center of this manual. Key No. Nut 63 2 Handrail Grip 111 1 Chest Pulse Strap 17 1 Pulse Mounting Plate 64 2 Handrail Grip Screw 112 1 Stop Bracket 18 1 Front Roller Adj. Qty. Description Key No. PART LISTÑModel No. HRTL16992 R0100A To locate the parts listed below, refer to the EXPLODED DRAWING attached...
... 2 Sensor Cover Screw # 1 User's Manual 31 2 Motor Star Washer 79 1 Key/Clip 32 1 Motor Tension Nut 80 1 Console Base *Includes all parts shown in the center of this manual. Key No. Nut 63 2 Handrail Grip 111 1 Chest Pulse Strap 17 1 Pulse Mounting Plate 64 2 Handrail Grip Screw 112 1 Stop Bracket 18 1 Front Roller Adj. Qty. Description Key No. PART LISTÑModel No. HRTL16992 R0100A To locate the parts listed below, refer to the EXPLODED DRAWING attached...
English Manual
Page 34
... the Product as instructed, return any implied warranties of merchantability or fitness for a particular purpose is covered for service where your proof of purchase if you . USERÕS MANUALÑIt is located or advise you how to get a part replaced, or if necessary, arrange for one is warranted to be free of all defects in connection with the use or performance of...
... the Product as instructed, return any implied warranties of merchantability or fitness for a particular purpose is covered for service where your proof of purchase if you . USERÕS MANUALÑIt is located or advise you how to get a part replaced, or if necessary, arrange for one is warranted to be free of all defects in connection with the use or performance of...


