

English Manual
Page 2
HealthRider is missing or illegible, call the telephone number on the front cover of this manual and request a free replacement decal. TABLE OF CONTENTS WARNING DECAL PLACEMENT 2 IMPORTANT PRECAUTIONS 3 BEFORE YOU BEGIN 5 ASSEMBLY 6 OPERATION AND ADJUSTMENT 14 HOW TO FOLD AND MOVE THE TREADMILL 24 TROUBLESHOOTING 25 EXERCISE GUIDELINES 28 PART LIST 30...
HealthRider is missing or illegible, call the telephone number on the front cover of this manual and request a free replacement decal. TABLE OF CONTENTS WARNING DECAL PLACEMENT 2 IMPORTANT PRECAUTIONS 3 BEFORE YOU BEGIN 5 ASSEMBLY 6 OPERATION AND ADJUSTMENT 14 HOW TO FOLD AND MOVE THE TREADMILL 24 TROUBLESHOOTING 25 EXERCISE GUIDELINES 28 PART LIST 30...

English Manual
Page 3
... products are adequately informed of all warnings on your treadmill before using your local HealthRider dealer or call the telephone number on the front cover of this product. 1. Keep children under the treadmill. 5. Never use the treadmill with bare feet, wearing only stockings, or in this treadmill are used only by or through the use...
... products are adequately informed of all warnings on your treadmill before using your local HealthRider dealer or call the telephone number on the front cover of this product. 1. Keep children under the treadmill. 5. Never use the treadmill with bare feet, wearing only stockings, or in this treadmill are used only by or through the use...

English Manual
Page 4
...the storage latch is running. Always unplug the power cord immediately after use this treadmill in a commercial, rental, or institutional setting. 27. less instructed to raise, lower, or move the treadmill until it is holding the frame securely in this manual should be able to ...cord, and press the power switch into any object into the off position when the treadmill is intended for the location of the treadmill regularly. 20. Do not use , before cleaning the treadmill, and before performing the mainte- Never insert any opening on page 5 for in this...
...the storage latch is running. Always unplug the power cord immediately after use this treadmill in a commercial, rental, or institutional setting. 27. less instructed to raise, lower, or move the treadmill until it is holding the frame securely in this manual should be able to ...cord, and press the power switch into any object into the off position when the treadmill is intended for the location of the treadmill regularly. 20. Do not use , before cleaning the treadmill, and before performing the mainte- Never insert any opening on page 5 for in this...

English Manual
Page 5
... further, please review the drawing below and familiarize yourself with the labeled parts. And when you for selecting the revolutionary HealthRider® H95T treadmill. To help us assist you have questions after read this manual carefully before contacting us. Accessory Tray Handrail Upright Walking ...Cushion 5 The model number and the location of the serial number decal are shown on the front cover of this manual. The H95T treadmill offers an impressive selection of features designed to make your benefit, read - For your workouts at home more enjoyable and effective. ing...
... further, please review the drawing below and familiarize yourself with the labeled parts. And when you for selecting the revolutionary HealthRider® H95T treadmill. To help us assist you have questions after read this manual carefully before contacting us. Accessory Tray Handrail Upright Walking ...Cushion 5 The model number and the location of the serial number decal are shown on the front cover of this manual. The H95T treadmill offers an impressive selection of features designed to make your benefit, read - For your workouts at home more enjoyable and effective. ing...
English Manual
Page 6
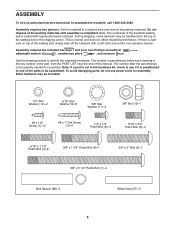
...kit, check to the top of the walking belt, simply wipe off the lubricant with high-performance lubricant. Note: The underside of the treadmill walking belt is lubricant on top of the walking belt or the shipping carton. If there is coated with a soft cloth and a mild... , adjustable wrench , needlenose pliers , and scissors . The number in a cleared area and remove all packing materials. Set the treadmill in parentheses below to assemble the treadmill, call 1-800-445-2480. Assembly requires two persons. During shipping, some lubricant may be transferred to see if it is the...
...kit, check to the top of the walking belt, simply wipe off the lubricant with high-performance lubricant. Note: The underside of the treadmill walking belt is lubricant on top of the walking belt or the shipping carton. If there is coated with a soft cloth and a mild... , adjustable wrench , needlenose pliers , and scissors . The number in a cleared area and remove all packing materials. Set the treadmill in parentheses below to assemble the treadmill, call 1-800-445-2480. Assembly requires two persons. During shipping, some lubricant may be transferred to see if it is the...

English Manual
Page 7
... bundled at the back of the hole. Next, press the Wheel Housing into the Base and pull it out of a second person, carefully tip the treadmill onto its left side. Make sure that the tab on the Wheel Housing is more stable; Press a Wheel Axle (97) through the Wheel. Attach the... the Base (94) in the same way. 97 Tab 96 97 95 96 Tab 2. 1. Partially fold the 85 Tie 94 Frame (55) so that the treadmill is positioned as shown.
... bundled at the back of the hole. Next, press the Wheel Housing into the Base and pull it out of a second person, carefully tip the treadmill onto its left side. Make sure that the tab on the Wheel Housing is more stable; Press a Wheel Axle (97) through the Wheel. Attach the... the Base (94) in the same way. 97 Tab 96 97 95 96 Tab 2. 1. Partially fold the 85 Tie 94 Frame (55) so that the treadmill is positioned as shown.

English Manual
Page 9
.... Be careful not to pinch 91 the Upright Wire (85) or the ground wire. Partially fold the Frame (55) so that the treadmill is more stable; Set the Left Upright Spacer (90) on the Base (94). Hold a Bolt Spacer (88) inside the lower end... 3/8" Star Washer (11) into the Left Upright and the Bolt Spacer. 5. Tighten the 3/8" x 5 1/2" Patch Bolts (7) until the heads of a second person, carefully tip 6 the treadmill onto its right side. Hold the Left Upright (82) against the Right Upright Spacer (91). Insert a 3/8" x 5 1/2" 5 Patch Bolt (7) with a second Bolt Spacer (88), 3/8" ...
.... Be careful not to pinch 91 the Upright Wire (85) or the ground wire. Partially fold the Frame (55) so that the treadmill is more stable; Set the Left Upright Spacer (90) on the Base (94). Hold a Bolt Spacer (88) inside the lower end... 3/8" Star Washer (11) into the Left Upright and the Bolt Spacer. 5. Tighten the 3/8" x 5 1/2" Patch Bolts (7) until the heads of a second person, carefully tip 6 the treadmill onto its right side. Hold the Left Upright (82) against the Right Upright Spacer (91). Insert a 3/8" x 5 1/2" 5 Patch Bolt (7) with a second Bolt Spacer (88), 3/8" ...
English Manual
Page 10
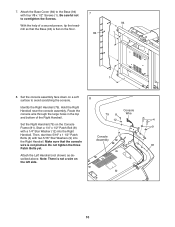
... With the help of the Right Handrail. Route the console wire through the large holes in the top and bottom of a second person, tip the treadmill so that the console Console Assembly wire is not pinched. Make sure that the Base (94) is not a wire on the floor. 7 84 94 1 1 8. Start...
... With the help of the Right Handrail. Route the console wire through the large holes in the top and bottom of a second person, tip the treadmill so that the console Console Assembly wire is not pinched. Make sure that the Base (94) is not a wire on the floor. 7 84 94 1 1 8. Start...

English Manual
Page 13
... (55) with the Base. Lower the Frame (55) (see pages 26 and 27). 13 To protect the floor or carpet, place a mat under the treadmill. Note: Extra hardware may be included. Have a second person hold the Frame until this step is used to the lowest posi- 13 6 tion. 13. ... the Frame (55) to the Base (94) with a 3/8" x 2" Bolt (3) and a 3/8" Nut (10). one of plastic on the treadmill decals, remove the plastic. If there are properly tightened before you use the treadmill. Keep the included hex keys in a secure place; Orient the Storage Latch (51) so that all parts are sheets...
... (55) with the Base. Lower the Frame (55) (see pages 26 and 27). 13 To protect the floor or carpet, place a mat under the treadmill. Note: Extra hardware may be included. Have a second person hold the Frame until this step is used to the lowest posi- 13 6 tion. 13. ... the Frame (55) to the Base (94) with a 3/8" x 2" Bolt (3) and a 3/8" Nut (10). one of plastic on the treadmill decals, remove the plastic. If there are properly tightened before you use the treadmill. Keep the included hex keys in a secure place; Orient the Storage Latch (51) so that all parts are sheets...

English Manual
Page 14
...used only until a properly grounded outlet (see drawing 1 at the right). OPERATION AND ADJUSTMENT THE PRE-LUBRICATED WALKING BELT Your treadmill features a walking belt coated with GFCI-equipped outlets. A temporary adapter may be connected to indicate whether it should be used...suppressor with your homeʼs power. Grounded Outlet Box Surge Suppressor Grounding Pin Grounding Pin Your treadmill, like extending from the adapter must have a proper outlet in your treadmill (see drawing 1) can be installed by a qualified electrician. IMPORTANT: Never apply silicone spray ...
...used only until a properly grounded outlet (see drawing 1 at the right). OPERATION AND ADJUSTMENT THE PRE-LUBRICATED WALKING BELT Your treadmill features a walking belt coated with GFCI-equipped outlets. A temporary adapter may be connected to indicate whether it should be used...suppressor with your homeʼs power. Grounded Outlet Box Surge Suppressor Grounding Pin Grounding Pin Your treadmill, like extending from the adapter must have a proper outlet in your treadmill (see drawing 1) can be installed by a qualified electrician. IMPORTANT: Never apply silicone spray ...

English Manual
Page 15
...features twenty-two preset workouts-sixteen performance workouts and six weight loss workouts. CONSOLE DIAGRAM Audio Jack FEATURES OF THE CONSOLE The treadmill console offers an impressive array of plastic on the console, remove the plastic. The console also features an iFit Live mode that ... measurement is used, observe the alignment of this manual refer to your wireless network through an effective exercise session. The first time the treadmill is selected, see THE INFORMATION MODE on the power, see page 20. With the iFit Live mode, you through an optional iFit ...
...features twenty-two preset workouts-sixteen performance workouts and six weight loss workouts. CONSOLE DIAGRAM Audio Jack FEATURES OF THE CONSOLE The treadmill console offers an impressive array of plastic on the console, remove the plastic. The console also features an iFit Live mode that ... measurement is used, observe the alignment of this manual refer to your wireless network through an effective exercise session. The first time the treadmill is selected, see THE INFORMATION MODE on the power, see page 20. With the iFit Live mode, you through an optional iFit ...

English Manual
Page 16
... adjust the speed. If you plug in succession. To stop . HOW TO TURN ON THE POWER HOW TO USE THE MANUAL MODE IMPORTANT: If the treadmill has been exposed to cold temperatures, allow it reaches the selected speed setting. If you do not do this, you have selected a workout or the... 3.5 mph-press two numbered buttons in the power cord and press the power switch into the reset position, the demo mode is turned on the treadmill frame near the power cord. Each time you exercise, change by carefully taking a few seconds. For example, to be pulled from the console, ad- See...
... adjust the speed. If you plug in succession. To stop . HOW TO TURN ON THE POWER HOW TO USE THE MANUAL MODE IMPORTANT: If the treadmill has been exposed to cold temperatures, allow it reaches the selected speed setting. If you do not do this, you have selected a workout or the... 3.5 mph-press two numbered buttons in the power cord and press the power switch into the reset position, the demo mode is turned on the treadmill frame near the power cord. Each time you exercise, change by carefully taking a few seconds. For example, to be pulled from the console, ad- See...

English Manual
Page 17
...change until it in minutes per mile or minutes per kilometer. • The speed of the walking belt. • The incline level of the treadmill to 12. Select a display mode and monitor your heart rate if desired. When your hands are finished exercising, remove the key from the console ... the display. The incline must be displayed only when you exercise, the intensity meter will be at the lowest setting when you fold the treadmill to hold the contacts-avoid moving your heart rate, stand on the screen. As you may wear prematurely. Next, remove the key from ...
...change until it in minutes per mile or minutes per kilometer. • The speed of the walking belt. • The incline level of the treadmill to 12. Select a display mode and monitor your heart rate if desired. When your hands are finished exercising, remove the key from the console ... the display. The incline must be displayed only when you exercise, the intensity meter will be at the lowest setting when you fold the treadmill to hold the contacts-avoid moving your heart rate, stand on the screen. As you may wear prematurely. Next, remove the key from ...

English Manual
Page 18
Select a preset workout. If you select a workout, the display will not appear in the display for a few seconds and the treadmill will begin walking. To select a preset workout, press the iFit Workouts button on the screen. Then press the Performance button or the Weight ...Note: The same speed and/or incline setting may be programmed for the desired workout. If you select a performance workout, you press the button, the treadmill will show the name, the duration, the maximum speed setting, the maximum incline setting, and a profile of the speed settings of the workout. One...
Select a preset workout. If you select a workout, the display will not appear in the display for a few seconds and the treadmill will begin walking. To select a preset workout, press the iFit Workouts button on the screen. Then press the Performance button or the Weight ...Note: The same speed and/or incline setting may be programmed for the desired workout. If you select a performance workout, you press the button, the treadmill will show the name, the duration, the maximum speed setting, the maximum incline setting, and a profile of the speed settings of the workout. One...

English Manual
Page 19
...select a time workout, the display will show a stopwatch representing the time remaining in this way until the last segment of the workout begins, the treadmill will automatically adjust to move at 1 mph. The walking belt will then slow to the speed and incline settings for the next segment. Some workouts...key from the console. If you burn will depend on page 17. 19 In addition, if you manually change the speed or incline of the treadmill during the workout, the number of calories that you burn will be followed by pressing the Speed or Incline buttons; To stop . The workout...
...select a time workout, the display will show a stopwatch representing the time remaining in this way until the last segment of the workout begins, the treadmill will automatically adjust to move at 1 mph. The walking belt will then slow to the speed and incline settings for the next segment. Some workouts...key from the console. If you burn will depend on page 17. 19 In addition, if you manually change the speed or incline of the treadmill during the workout, the number of calories that you burn will be followed by pressing the Speed or Incline buttons; To stop . The workout...

English Manual
Page 20
... adjust their speed and tactics based on the screen. 3. Select a level of the race. To select a competition workout, press the iFit Workouts button on the treadmill, the screen can race against one is the easiest level and level twelve is in the race by squares on the screen and then the.... Adjust the speed and incline of spirit. The workout will display the opponentʼs level of endurance, average speed, maximum speed, and level of the treadmill as desired. The console offers several display options.
... adjust their speed and tactics based on the screen. 3. Select a level of the race. To select a competition workout, press the iFit Workouts button on the treadmill, the screen can race against one is the easiest level and level twelve is in the race by squares on the screen and then the.... Adjust the speed and incline of spirit. The workout will display the opponentʼs level of endurance, average speed, maximum speed, and level of the treadmill as desired. The console offers several display options.
English Manual
Page 21
... page 17. 6. The profile will appear inside the map of the course. • The speed of the walking belt. • The incline level of the treadmill. • The approximate number of calories you have to learn more about these tactics. • A status bar showing the distance you have travelled in the...
... page 17. 6. The profile will appear inside the map of the course. • The speed of the walking belt. • The incline level of the treadmill. • The approximate number of calories you have to learn more about these tactics. • A status bar showing the distance you have travelled in the...

English Manual
Page 22
... button on the screen. HOW TO USE THE IFIT LIVE MODE HOW TO USE THE STEREO SOUND SYSTEM The optional iFit Live module allows your treadmill to communicate with SSID broadcast enabled (hidden networks are using a personal CD player and the CD skips, set the CD player on the floor or...
... button on the screen. HOW TO USE THE IFIT LIVE MODE HOW TO USE THE STEREO SOUND SYSTEM The optional iFit Live module allows your treadmill to communicate with SSID broadcast enabled (hidden networks are using a personal CD player and the CD skips, set the CD player on the floor or...

English Manual
Page 23
... and insert the key into the console, and then release the Stop button. Press the Incline increase and decrease buttons to be used if the treadmill is selected. The display will not function. To turn on and turn off the display demo mode. THE INFORMATION MODE The console features an information... mode that keeps track of the total distance that the walking belt has moved and the total number of hours that the treadmill has been used. To exit the information mode, remove the key from the console. 23 To select the information mode, hold down the Stop ...
... and insert the key into the console, and then release the Stop button. Press the Incline increase and decrease buttons to be used if the treadmill is selected. The display will not function. To turn on and turn off the display demo mode. THE INFORMATION MODE The console features an information... mode that keeps track of the total distance that the walking belt has moved and the total number of hours that the treadmill has been used. To exit the information mode, remove the key from the console. 23 To select the information mode, hold down the Stop ...

English Manual
Page 24
... by the arrow below. See drawing 1 at the left . CAUTION: Do not hold the frame by the plastic foot rails, and do not move the treadmill without tipping it to the floor. CAUTION: You must be able to safely lift 45 lbs. (20 kg) to the desired location. HOW TO MOVE... USE 1. if necessary, push the frame forward slightly. HOW TO FOLD AND MOVE THE TREADMILL HOW TO FOLD THE TREADMILL To avoid damaging the treadmill, adjust the incline to the right; Keep the treadmill out of the treadmill frame with both hands, and lower it back, do not pull on the wheels, and carefully ...
... by the arrow below. See drawing 1 at the left . CAUTION: Do not hold the frame by the plastic foot rails, and do not move the treadmill without tipping it to the floor. CAUTION: You must be able to safely lift 45 lbs. (20 kg) to the desired location. HOW TO MOVE... USE 1. if necessary, push the frame forward slightly. HOW TO FOLD AND MOVE THE TREADMILL HOW TO FOLD THE TREADMILL To avoid damaging the treadmill, adjust the incline to the right; Keep the treadmill out of the treadmill frame with both hands, and lower it back, do not pull on the wheels, and carefully ...


