
English Manual
Page 2
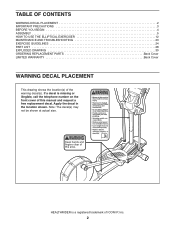
... a registered trademark of ICON IP, Inc. 2 HEALTHRIDER is missing or illegible, call the telephone number on the front cover of the warning decal(s). TABLE OF CONTENTS WARNING DECAL PLACEMENT 2 IMPORTANT PRECAUTIONS 3 BEFORE YOU BEGIN 4 ASSEMBLY 5 HOW TO USE THE ELLIPTICAL EXERCISER 12 MAINTENANCE AND TROUBLESHOOTING 23 EXERCISE GUIDELINES 24 PART LIST 28 EXPLODED DRAWING...
... a registered trademark of ICON IP, Inc. 2 HEALTHRIDER is missing or illegible, call the telephone number on the front cover of the warning decal(s). TABLE OF CONTENTS WARNING DECAL PLACEMENT 2 IMPORTANT PRECAUTIONS 3 BEFORE YOU BEGIN 4 ASSEMBLY 5 HOW TO USE THE ELLIPTICAL EXERCISER 12 MAINTENANCE AND TROUBLESHOOTING 23 EXERCISE GUIDELINES 24 PART LIST 28 EXPLODED DRAWING...
English Manual
Page 3
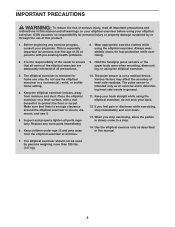
...or persons with a mat beneath it . 5. Do not use of this product. 1. Make sure that all users of the elliptical exerciser are adequately informed of all warnings on a level surface, with pre-existing health problems. 8. Inspect and properly tighten all times....Hold the handgrip pulse sensors or the upper body arms when mounting, dismounting, or using the elliptical exerciser. Replace any exercise program, consult your elliptical exerciser before using the elliptical exerciser; Keep your back straight while using your back. 12. IMPORTANT PRECAUTIONS WARNING: To reduce the...
...or persons with a mat beneath it . 5. Do not use of this product. 1. Make sure that all users of the elliptical exerciser are adequately informed of all warnings on a level surface, with pre-existing health problems. 8. Inspect and properly tighten all times....Hold the handgrip pulse sensors or the upper body arms when mounting, dismounting, or using the elliptical exerciser. Replace any exercise program, consult your elliptical exerciser before using the elliptical exerciser; Keep your back straight while using your back. 12. IMPORTANT PRECAUTIONS WARNING: To reduce the...
English Manual
Page 4
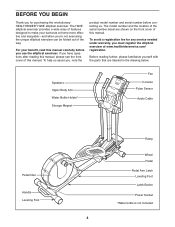
... BEGIN Thank you for any service needed under warranty, you must register the elliptical exerciser at home more effective and enjoyable-and when you use the elliptical exerciser. The H90E elliptical exerciser provides a wide array of features designed to make your benefit, read this ...drawing below. To avoid a registration fee for purchasing the revolutionary HEALTHRIDER® H90E elliptical exerciser. If you , note the product model number and serial number before you ʼre not exercising, the unique elliptical exerciser can be folded out of this manual. For your workouts at ...
... BEGIN Thank you for any service needed under warranty, you must register the elliptical exerciser at home more effective and enjoyable-and when you use the elliptical exerciser. The H90E elliptical exerciser provides a wide array of features designed to make your benefit, read this ...drawing below. To avoid a registration fee for purchasing the revolutionary HEALTHRIDER® H90E elliptical exerciser. If you , note the product model number and serial number before you ʼre not exercising, the unique elliptical exerciser can be folded out of this manual. For your workouts at ...
English Manual
Page 5
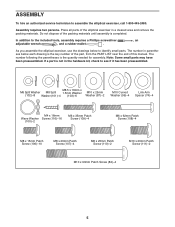
Place all parts of the packing materials until assembly is the quantity needed for assembly. In addition to assemble the elliptical exerciser, call 1-800-445-2480. The number following the parentheses is completed. M8.5 x 16mm x M6 Split Washer M8 Split 1.5mm Washer M10 x 25mm (102...the part, from the PART LIST near the end of this manual. Do not dispose of the elliptical exerciser in a cleared area and remove the packing materials. As you assemble the elliptical exerciser, use the drawings below each drawing is not in parentheses below to see if it has been ...
Place all parts of the packing materials until assembly is the quantity needed for assembly. In addition to assemble the elliptical exerciser, call 1-800-445-2480. The number following the parentheses is completed. M8.5 x 16mm x M6 Split Washer M8 Split 1.5mm Washer M10 x 25mm (102...the part, from the PART LIST near the end of this manual. Do not dispose of the elliptical exerciser in a cleared area and remove the packing materials. As you assemble the elliptical exerciser, use the drawings below each drawing is not in parentheses below to see if it has been ...
English Manual
Page 6
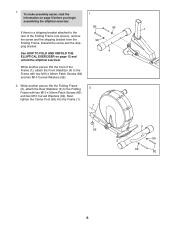
ping bracket. 4 See HOW TO FOLD AND UNFOLD THE ELLIPTICAL EXERCISER on page 5 before you begin assembling the elliptical exerciser. 82 99 1 If there is a shipping bracket attached to the rear of the Frame (1), attach the Front Stabilizer (4) to the Folding 2 Frame with two M10 x ..., tighten the Center Foot (95) into the Frame (1). 1 3 95 99 2 99 82 6 To make assembly easier, read the 1 information on page 12 and unfold the elliptical exerciser.
ping bracket. 4 See HOW TO FOLD AND UNFOLD THE ELLIPTICAL EXERCISER on page 5 before you begin assembling the elliptical exerciser. 82 99 1 If there is a shipping bracket attached to the rear of the Frame (1), attach the Front Stabilizer (4) to the Folding 2 Frame with two M10 x ..., tighten the Center Foot (95) into the Frame (1). 1 3 95 99 2 99 82 6 To make assembly easier, read the 1 information on page 12 and unfold the elliptical exerciser.
English Manual
Page 11
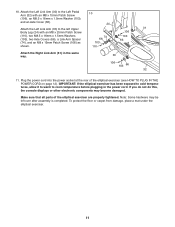
...plugging in the same way. 30 106 103 66 32 11. To protect the floor or carpet from damage, place a mat under the elliptical exerciser. 11 IMPORTANT: If the elliptical exerciser has been exposed to cold temperatures, allow it to warm to the left over after assembly is completed. Note: Some hardware may become... damaged. Make sure that all parts of the elliptical exerciser (see HOW TO PLUG IN THE POWER CORD on page 12). Attach the Left Link Arm (30) to the Left Pedal Arm (32) with...
...plugging in the same way. 30 106 103 66 32 11. To protect the floor or carpet from damage, place a mat under the elliptical exerciser. 11 IMPORTANT: If the elliptical exerciser has been exposed to cold temperatures, allow it to warm to the left over after assembly is completed. Note: Some hardware may become... damaged. Make sure that all parts of the elliptical exerciser (see HOW TO PLUG IN THE POWER CORD on page 12). Attach the Left Link Arm (30) to the Left Pedal Arm (32) with...

English Manual
Page 12
...pole receptacle as shown at the right if a Lug properly Metal Screw grounded outlet is equipped with GFCI-equipped outlets. To use the elliptical exerciser, first hold the pedal arms in accordance with all local codes and ordinances. If it should be used , it must be installed by...and lower the frame. This product is not compatible with a cord having an equipment-grounding conductor and a grounding plug. IMPORTANT: The elliptical exerciser is for electric current to the crank arms. 12 Plug the power cord into an appropriate outlet that the pedal arms are securely connected...
...pole receptacle as shown at the right if a Lug properly Metal Screw grounded outlet is equipped with GFCI-equipped outlets. To use the elliptical exerciser, first hold the pedal arms in accordance with all local codes and ordinances. If it should be used , it must be installed by...and lower the frame. This product is not compatible with a cord having an equipment-grounding conductor and a grounding plug. IMPORTANT: The elliptical exerciser is for electric current to the crank arms. 12 Plug the power cord into an appropriate outlet that the pedal arms are securely connected...
English Manual
Page 13
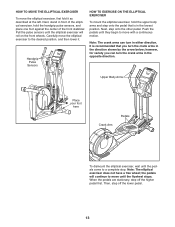
... with a continuous motion. When the pedals are stationary, step off the lower pedal. 13 Handgrip Pulse Sensors HOW TO EXERCISE ON THE ELLIPTICAL EXERCISER To mount the elliptical exerciser, hold the upper body arms and step onto the pedal that you can turn in the direction shown by the arrow ...below; HOW TO MOVE THE ELLIPTICAL EXERCISER To move the elliptical exerciser, first fold it . Pull the pulse sensors until they begin to a complete stop. however, for variety you turn the ...
... with a continuous motion. When the pedals are stationary, step off the lower pedal. 13 Handgrip Pulse Sensors HOW TO EXERCISE ON THE ELLIPTICAL EXERCISER To mount the elliptical exerciser, hold the upper body arms and step onto the pedal that you can turn in the direction shown by the arrow ...below; HOW TO MOVE THE ELLIPTICAL EXERCISER To move the elliptical exerciser, first fold it . Pull the pulse sensors until they begin to a complete stop. however, for variety you turn the ...
English Manual
Page 15
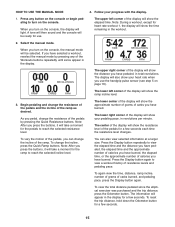
... Resistance buttons. Note: During a workout, except for use the handgrip pulse sensor (see step 5 on the console. To view the total distance pedaled since the elliptical exerciser was purchased and the trip distance, press the Odometer button. When you have burned, the elapsed time, or the approximate number of the ramp as...
... Resistance buttons. Note: During a workout, except for use the handgrip pulse sensor (see step 5 on the console. To view the total distance pedaled since the elliptical exerciser was purchased and the trip distance, press the Odometer button. When you have burned, the elapsed time, or the approximate number of the ramp as...
English Manual
Page 23
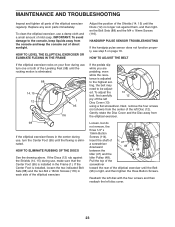
...Loosen, but do not remove, the three 1/4" x 19mm Button Screws (114). Insert the shaft of the elliptical exerciser regularly. HOW TO ADJUST THE BELT If the elliptical exerciser rocks on page 16. tance is eliminated. HOW TO ELIMINATE RUBBING OF THE DISCS See the drawing above. MAINTENANCE... properly, see step 5 on your floor during use , turn one or both of the elliptical exerciser. Next, remove the four screws (not shown) from the elliptical exerciser. 98 If the elliptical exerciser flexes in each side of the Leveling Feet (98) until the flexing is adjusted to the...
...Loosen, but do not remove, the three 1/4" x 19mm Button Screws (114). Insert the shaft of the elliptical exerciser regularly. HOW TO ADJUST THE BELT If the elliptical exerciser rocks on page 16. tance is eliminated. HOW TO ELIMINATE RUBBING OF THE DISCS See the drawing above. MAINTENANCE... properly, see step 5 on your floor during use , turn one or both of the elliptical exerciser. Next, remove the four screws (not shown) from the elliptical exerciser. 98 If the elliptical exerciser flexes in each side of the Leveling Feet (98) until the flexing is adjusted to the...


