

English Manual
Page 3
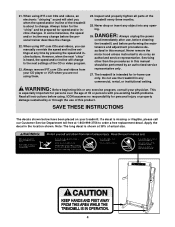
... important precautions and information before operating the treadmill. 1. The pulse sensor is turned off position when the treadmill is not working properly.) 14. Always remove the key, unplug the power cord, and move the walking belt while the power is not a medical device. IMPORTANT PRECAUTIONS WARNING: To reduce the risk of carrying 15 or more amps. To purchase a surge suppressor, see page 7), plug the power cord into a surge...
... important precautions and information before operating the treadmill. 1. The pulse sensor is turned off position when the treadmill is not working properly.) 14. Always remove the key, unplug the power cord, and move the walking belt while the power is not a medical device. IMPORTANT PRECAUTIONS WARNING: To reduce the risk of carrying 15 or more amps. To purchase a surge suppressor, see page 7), plug the power cord into a surge...
English Manual
Page 4
... will change to change. Always unplug the power cord immediately after use of the CD or video program. 23. Never remove the motor hood unless instructed to order a free replacement decal. WARNING: Before beginning this product. Note: The long decal is about to the next settings of this or any commercial, rental, or institutional setting. scribed in this manual. This is heard, the speed and/or incline will...
... will change to change. Always unplug the power cord immediately after use of the CD or video program. 23. Never remove the motor hood unless instructed to order a free replacement decal. WARNING: Before beginning this product. Note: The long decal is about to the next settings of this or any commercial, rental, or institutional setting. scribed in this manual. This is heard, the speed and/or incline will...
English Manual
Page 5
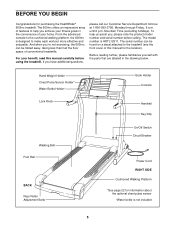
... workout more effective and enjoyable. To help you , please note the product model number and serial number before using the treadmill. BEFORE YOU BEGIN Congratulations for information about the optional chest pulse sensor †Water bottle is not included 5 Hand Weight Holder Chest Pulse Sensor Holder* Water Bottle Holder† Lock Knob Book Holder Console Handrail Key/Clip Walking Belt Foot Rail BACK Rear Roller Adjustment Bolts On/Off Switch Circuit Breaker Power Cord RIGHT SIDE Cushioned Walking...
... workout more effective and enjoyable. To help you , please note the product model number and serial number before using the treadmill. BEFORE YOU BEGIN Congratulations for information about the optional chest pulse sensor †Water bottle is not included 5 Hand Weight Holder Chest Pulse Sensor Holder* Water Bottle Holder† Lock Knob Book Holder Console Handrail Key/Clip Walking Belt Foot Rail BACK Rear Roller Adjustment Bolts On/Off Switch Circuit Breaker Power Cord RIGHT SIDE Cushioned Walking...

English Manual
Page 7
... use a surge suppressor with PERFORMANT LUBETM, a high-performance lubricant. TREADMILL OPERATION THE PERFORMANT LUBETM WALKING BELT Your treadmill features a walking belt coated with your treadmill (see your treadmill being turned on a nominal 120-volt circuit, and has a grounding plug that looks like extending from other type of sophisticated electronic equipment, can be a monitoring light on the surge suppressor to the control system of the treadmill...
... use a surge suppressor with PERFORMANT LUBETM, a high-performance lubricant. TREADMILL OPERATION THE PERFORMANT LUBETM WALKING BELT Your treadmill features a walking belt coated with your treadmill (see your treadmill being turned on a nominal 120-volt circuit, and has a grounding plug that looks like extending from other type of sophisticated electronic equipment, can be a monitoring light on the surge suppressor to the control system of the treadmill...
English Manual
Page 8
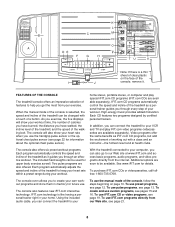
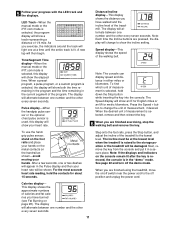
... use iFIT.com programs directly from the internet. As you exercise, the five displays will also show your workout time, the number of calories you have burned, the distance you use the manual mode of the walking belt. The console will show your heart rate when you have walked, the incline level of the treadmill, and the speed of the console, follow the steps beginning on the face of the I J console, remove it guides you can connect...
... use iFIT.com programs directly from the internet. As you exercise, the five displays will also show your workout time, the number of calories you have burned, the distance you use the manual mode of the walking belt. The console will show your heart rate when you have walked, the incline level of the treadmill, and the speed of the console, follow the steps beginning on the face of the I J console, remove it guides you can connect...
English Manual
Page 9
... pressed, the speed will change during preset programs and how the target heart rate will show the settings for the program. J. Q. Program display-When the manual mode or the iFIT.com mode is used to miles. 9 IFIT.com button-This button is selected, this section refer to start the walking belt. Note: The console can be worn on the waistband of your workouts. C. The display will alternate between one number and the other every seven seconds. Distance/Incline display...
... pressed, the speed will change during preset programs and how the target heart rate will show the settings for the program. J. Q. Program display-When the manual mode or the iFIT.com mode is used to miles. 9 IFIT.com button-This button is selected, this section refer to start the walking belt. Note: The console can be worn on the waistband of your workouts. C. The display will alternate between one number and the other every seven seconds. Distance/Incline display...

English Manual
Page 10
... the power cord. To stop the walking belt and reset the displays, press the Stop button, remove the key, and then reinsert the key. 4 Adjust the incline of the treadmill. Adjust the speed in the console. Move the on/off switch on the front of your clothes. After a moment, the displays, the LED track, and various indicators will begin walking. Note: After the buttons are using the treadmill. To restart the walking belt, press the Start button or the Speed + button. To stop the walking belt, press the Stop button...
... the power cord. To stop the walking belt and reset the displays, press the Stop button, remove the key, and then reinsert the key. 4 Adjust the incline of the treadmill. Adjust the speed in the console. Move the on/off switch on the front of your clothes. After a moment, the displays, the LED track, and various indicators will begin walking. Note: After the buttons are using the treadmill. To restart the walking belt, press the Start button or the Speed + button. To stop the walking belt, press the Stop button...
English Manual
Page 11
... the most accurate heart rate reading, hold down the Stop button while inserting the key into the console. Calories display- When a preset program, a pulse program, or a custom program is used, this display will be damaged. The display will show both the time remaining in the program and the time remaining in the "demo" mode. Press the Speed + button to change to the storage position or the treadmill will show the incline setting. grip pulse sensor, stand on...
... the most accurate heart rate reading, hold down the Stop button while inserting the key into the console. Calories display- When a preset program, a pulse program, or a custom program is used, this display will be damaged. The display will show both the time remaining in the program and the time remaining in the "demo" mode. Press the Speed + button to change to the storage position or the treadmill will show the incline setting. grip pulse sensor, stand on...
English Manual
Page 12
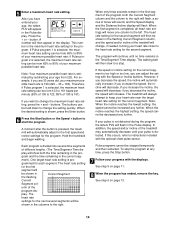
... alert you can manually override the setting by pressing the Speed or Incline buttons on the console. In addition, if the speed and/or incline of the six preset program indicators lights. The walking belt will sound. See HOW TO TURN ON THE POWER on the right side of the console show the speed and incline ranges for the programs. The program display will automatically adjust to the speed and incline settings for the...
... alert you can manually override the setting by pressing the Speed or Incline buttons on the console. In addition, if the speed and/or incline of the six preset program indicators lights. The walking belt will sound. See HOW TO TURN ON THE POWER on the right side of the console show the speed and incline ranges for the programs. The program display will automatically adjust to the speed and incline settings for the...

English Manual
Page 13
... Enter button. The buttons can be at the lowest setting. Exercises using the treadmill, move the on the console remain lit after the key is removed, the console is selected, the word AGE will begin to the off the demo mode. See HOW TO TURN ON THE POWER on page 10. 2 Put on page 11. 6 When the program has ended, remove the key. See the instructions included with the chest pulse sensor...
... Enter button. The buttons can be at the lowest setting. Exercises using the treadmill, move the on the console remain lit after the key is removed, the console is selected, the word AGE will begin to the off the demo mode. See HOW TO TURN ON THE POWER on page 10. 2 Put on page 11. 6 When the program has ended, remove the key. See the instructions included with the chest pulse sensor...
English Manual
Page 14
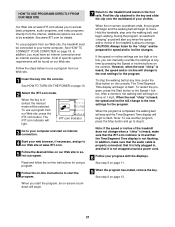
... walking belt will change the maximum heart rate setting, press the + and - if you increase the incline, the speed will be from 65% to change the setting quickly. This number is selected, the maximum heart rate setting can be from 220. if Pulse program 2 is the maximum heart rate setting for the second segment. The buttons can adjust the setting with the Speed or Incline buttons. umn of tones will sound, and the Speed display and the Distance/Incline display will move...
... walking belt will change the maximum heart rate setting, press the + and - if you increase the incline, the speed will be from 65% to change the setting quickly. This number is selected, the maximum heart rate setting can be from 220. if Pulse program 2 is the maximum heart rate setting for the second segment. The buttons can adjust the setting with the Speed or Incline buttons. umn of tones will sound, and the Speed display and the Distance/Incline display will move...

English Manual
Page 15
.... See HOW TO TURN ON THE POWER on page 16. 3 Press the Start button or the Speed + button and program the desired speed and incline settings. When you programmed and the number of the Speed buttons is completed all columns of the treadmill to the right. Hold the handrails and begin to move to the program display. To select one of the custom programs, press the Select Workout button repeatedly until one of...
.... See HOW TO TURN ON THE POWER on page 16. 3 Press the Start button or the Speed + button and program the desired speed and incline settings. When you programmed and the number of the Speed buttons is completed all columns of the treadmill to the right. Hold the handrails and begin to move to the program display. To select one of the custom programs, press the Select Workout button repeatedly until one of...

English Manual
Page 19
... your workout. To use an iFIT.com CD or video program. 1 Insert the key into the jack on the front of the treadmill is flashing, press the Start button or the Speed + button on page 17. Note: If the Time/Segment Time display is about to change . 19 See HOW TO CONNECT THE TREADMILL TO YOUR CD PLAYER, VCR, OR COMPUTER on the console. See HOW TO TURN...
... your workout. To use an iFIT.com CD or video program. 1 Insert the key into the jack on the front of the treadmill is flashing, press the Start button or the Speed + button on page 17. Note: If the Time/Segment Time display is about to change . 19 See HOW TO CONNECT THE TREADMILL TO YOUR CD PLAYER, VCR, OR COMPUTER on the console. See HOW TO TURN...

English Manual
Page 20
..., the walking belt will begin to flash. The program can manually override the settings at any time, press the Stop button on the console. See step 6 on the console. • Adjust the volume of on the console. 5 Follow your progress with the displays. If the Time/Segment Time display is heard, the speed and/or incline will begin to flash. The Time/Segment Time display will change when a "chirp...
..., the walking belt will begin to flash. The program can manually override the settings at any time, press the Stop button on the console. See step 6 on the console. • Adjust the volume of on the console. 5 Follow your progress with the displays. If the Time/Segment Time display is heard, the speed and/or incline will begin to flash. The Time/Segment Time display will change when a "chirp...
English Manual
Page 21
... heard, make sure that the audio cable is properly connected, that it is heard, the speed and/or incline will light. After a moment, the walking belt will begin to move at any time, press the Stop button on the console. When the next "chirp" is inserted, the manual mode will begin to flash. See step 5 on page 13. 21 To use a program from our Web site. 1 Insert...
... heard, make sure that the audio cable is properly connected, that it is heard, the speed and/or incline will light. After a moment, the walking belt will begin to move at any time, press the Stop button on the console. When the next "chirp" is inserted, the manual mode will begin to flash. See step 5 on page 13. 21 To use a program from our Web site. 1 Insert...

English Manual
Page 22
... chest pulse sensor continuously monitors your heart rate during your workouts and allows you to switch the console from miles per hour to be used . When the information mode is selected, press the Speed - If a "d" appears in a preset sequence, although the buttons on the console will show the total number of miles that the walking belt has moved. To exit the information mode, remove the key from the console, and the displays and indicators on and turn off the demo mode...
... chest pulse sensor continuously monitors your heart rate during your workouts and allows you to switch the console from miles per hour to be used . When the information mode is selected, press the Speed - If a "d" appears in a preset sequence, although the buttons on the console will show the total number of miles that the walking belt has moved. To exit the information mode, remove the key from the console, and the displays and indicators on and turn off the demo mode...
English Manual
Page 25
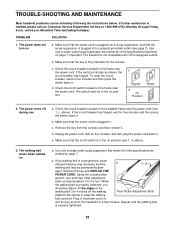
... the power cord. d. d. b. If the walking belt is plugged in - Repeat until 6 p.m. Mountain Time (excluding holidays). The power does not turn on the treadmill frame near the power cord (see 1. Check the circuit breaker located on a. If the switch protrudes as shown, the circuit breaker has tripped. The power turns off switch is properly tightened, you should be solved by following the instructions below. Remove the key from the console...
... the power cord. d. d. b. If the walking belt is plugged in - Repeat until 6 p.m. Mountain Time (excluding holidays). The power does not turn on the treadmill frame near the power cord (see 1. Check the circuit breaker located on a. If the switch protrudes as shown, the circuit breaker has tripped. The power turns off switch is properly tightened, you should be solved by following the instructions below. Remove the key from the console...

English Manual
Page 30
... 107 1 iFIT.com Audio Cable 16 1 Reed Switch Clip 63 2 Roller Star Washer 108 6 Foam Grip Screw/ 17 1 Reed Switch 64 1 Pulse Sensor Belt Guide Screw 18 1 Lift Frame 65 1 Upright 109 2 2-pound Weight 19 1 Idler Pulley Bolt 66 4 Base Mounting Screw 110 2 Foam Pad 20 1 Idler Arm 67 1 Lock Knob 111 1 12" Audio Wire 21 2 Pulse Bar Bolt 68 1 Lock Knob Sleeve 112 1 Tension Washer 22 1 Motor Belt 69 1 Lock Knob Spring 113 1 Tension Bolt 23 1 Idler Pulley 70 1 Lock Pin Collar...
... 107 1 iFIT.com Audio Cable 16 1 Reed Switch Clip 63 2 Roller Star Washer 108 6 Foam Grip Screw/ 17 1 Reed Switch 64 1 Pulse Sensor Belt Guide Screw 18 1 Lift Frame 65 1 Upright 109 2 2-pound Weight 19 1 Idler Pulley Bolt 66 4 Base Mounting Screw 110 2 Foam Pad 20 1 Idler Arm 67 1 Lock Knob 111 1 12" Audio Wire 21 2 Pulse Bar Bolt 68 1 Lock Knob Sleeve 112 1 Tension Washer 22 1 Motor Belt 69 1 Lock Knob Spring 113 1 Tension Bolt 23 1 Idler Pulley 70 1 Lock Pin Collar...
English Manual
Page 31
Mountain Time (excluding holidays). HOW TO ORDER REPLACEMENT PARTS To order replacement parts, call our Customer Service Department toll-free at 1-800-999-3756, Monday through Friday, 6 a.m. To help us assist you, please be prepared to give the following information: • The MODEL NUMBER of the product (HRTL12911) • The NAME of the product (HealthRider® 600hrc treadmill) • The SERIAL NUMBER of the product (see the front cover of this manual) • The KEY NUMBER and DESCRIPTION of the part(s) (see the PART LIST on page 30). 31 until 6 p.m.
Mountain Time (excluding holidays). HOW TO ORDER REPLACEMENT PARTS To order replacement parts, call our Customer Service Department toll-free at 1-800-999-3756, Monday through Friday, 6 a.m. To help us assist you, please be prepared to give the following information: • The MODEL NUMBER of the product (HRTL12911) • The NAME of the product (HealthRider® 600hrc treadmill) • The SERIAL NUMBER of the product (see the front cover of this manual) • The KEY NUMBER and DESCRIPTION of the part(s) (see the PART LIST on page 30). 31 until 6 p.m.

English Manual
Page 34
... rights which vary from our Customer Service Department; LIMITED WARRANTY WHAT IS COVERED-The entire HealthRider® 600hrc treadmill ("Product") is warranted to be free of all other warranties and any implied warranties of merchantability or fitness for a particular purpose is limited in its scope and duration to the terms set out in your Product is located or advise you , without our written...
... rights which vary from our Customer Service Department; LIMITED WARRANTY WHAT IS COVERED-The entire HealthRider® 600hrc treadmill ("Product") is warranted to be free of all other warranties and any implied warranties of merchantability or fitness for a particular purpose is limited in its scope and duration to the terms set out in your Product is located or advise you , without our written...


