
Owners Manual
Page 2
...18 Surround Setup 19 Speaker Setup 21 Delay Settings 22 Output Level Adjustment 22 Using EzSet 24 Operation 24 Basic Operation 24 Remote Control Operation 24 Source Selection 25 Volume Control 25 Surround Mode Selection 25 Digital Audio Playback 26 Surround Mode Chart 28 Tuner Operation 28 Recording 29 Front Panel Connections 29 Output Level Trim Adjustment 29 6/8-Channel Direct Input 30 Advanced Features 30 Surround Back Amplifier Assignment 30 Display Brightness 30 Turn-On Volume Level 30 OSD Settings 31 Multiroom Operation 31 Multiroom Setup 32...
...18 Surround Setup 19 Speaker Setup 21 Delay Settings 22 Output Level Adjustment 22 Using EzSet 24 Operation 24 Basic Operation 24 Remote Control Operation 24 Source Selection 25 Volume Control 25 Surround Mode Selection 25 Digital Audio Playback 26 Surround Mode Chart 28 Tuner Operation 28 Recording 29 Front Panel Connections 29 Output Level Trim Adjustment 29 6/8-Channel Direct Input 30 Advanced Features 30 Surround Back Amplifier Assignment 30 Display Brightness 30 Turn-On Volume Level 30 OSD Settings 31 Multiroom Operation 31 Multiroom Setup 32...

Owners Manual
Page 3
...-screen menus, a fully programmable remote control with the latest HDTV video sources and progressive scan DVD players, the DPR 1001 also features high-bandwidth, low-crosstalk component video switching. Another exclusive is truly a multichannel receiver for a perfectly balanced sound field presentation. Two additional audio inputs are available, and a total of a Harman Kardon DPR 1001 you to read this product, its installation or its digital technology. a Harman Kardon exclusive. The DPR 1001's flexibility and power extend beyond your speakers and specific...
...-screen menus, a fully programmable remote control with the latest HDTV video sources and progressive scan DVD players, the DPR 1001 also features high-bandwidth, low-crosstalk component video switching. Another exclusive is truly a multichannel receiver for a perfectly balanced sound field presentation. Two additional audio inputs are available, and a total of a Harman Kardon DPR 1001 you to read this product, its installation or its digital technology. a Harman Kardon exclusive. The DPR 1001's flexibility and power extend beyond your speakers and specific...

Owners Manual
Page 6
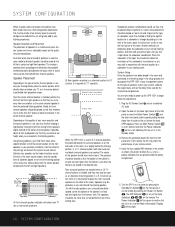
... the Set Button ! D Volume Control: Turn this button to tune lower-frequency stations and the right side of the surround mode that the jack may be configured as camcorders and portable audio players. This button must be pressed until it again to switch back to Stereo mode. (See page 28 for more information on configuring the DPR 1001.) C Door: Gently pull the upper right corner of headphones. K Digital Optical 3 Input: Connect the optical digital audio output of the input...
... the Set Button ! D Volume Control: Turn this button to tune lower-frequency stations and the right side of the surround mode that the jack may be configured as camcorders and portable audio players. This button must be pressed until it again to switch back to Stereo mode. (See page 28 for more information on configuring the DPR 1001.) C Door: Gently pull the upper right corner of headphones. K Digital Optical 3 Input: Connect the optical digital audio output of the input...
Owners Manual
Page 9
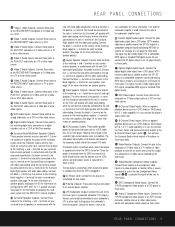
... on your surround back channel speakers. terminals on your center channel speaker. Since the power is removed when the DPR is turned off, this outlet should not be used , connect this jack to the subwoofer amplifier input. k Coaxial Digital Audio Inputs: Connect the coax digital audio output from a DVD player, HDTV receiver, cable box or satellite receiver, the S/P-DIF output of the multiroom system when the multiroom system and the main room are using the same input. REAR PANEL CONNECTIONS 9 a DVD Audio Inputs: Connect these jacks to the analog audio jacks on a DVD or other...
... on your surround back channel speakers. terminals on your center channel speaker. Since the power is removed when the DPR is turned off, this outlet should not be used , connect this jack to the subwoofer amplifier input. k Coaxial Digital Audio Inputs: Connect the coax digital audio output from a DVD player, HDTV receiver, cable box or satellite receiver, the S/P-DIF output of the multiroom system when the multiroom system and the main room are using the same input. REAR PANEL CONNECTIONS 9 a DVD Audio Inputs: Connect these jacks to the analog audio jacks on a DVD or other...

Owners Manual
Page 11
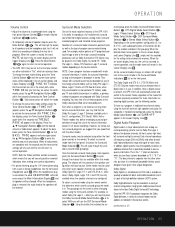
... remote when it will transmit a fast-play forward, fast-play command, according to place the DPR 1001 or a selected device in the Standby mode. A Numeric Keys: These buttons serve as delay, speakers, surround modes, digital inputs, etc. To use , pressing this button to assign one of the player being controlled. E Digital Select Button: Press this button for manual tuning when a station's signal is programmed for Harman Kardon DVD players so that you may control a compatible player without having to switch devices. In the factory default setting, these buttons...
... remote when it will transmit a fast-play forward, fast-play command, according to place the DPR 1001 or a selected device in the Standby mode. A Numeric Keys: These buttons serve as delay, speakers, surround modes, digital inputs, etc. To use , pressing this button to assign one of the player being controlled. E Digital Select Button: Press this button for manual tuning when a station's signal is programmed for Harman Kardon DVD players so that you may control a compatible player without having to switch devices. In the factory default setting, these buttons...

Owners Manual
Page 12
... the remote in the programming mode. After pressing this button to select the device connected to the 6-Channel Direct Inputs 33 or the 8-Channel Direct Inputs 34 . (See page 29 for more information.) h SPL Select: This button activates the DPR 1001's EzSet function to quickly and accurately calibrate the DPR 1001's output levels. The next press selects either BASS MODE or TREBLE MODE appears. When a Dolby Digital-encoded source is in use, the Dolby Digital mode may also be certain that is supplied...
... the remote in the programming mode. After pressing this button to select the device connected to the 6-Channel Direct Inputs 33 or the 8-Channel Direct Inputs 34 . (See page 29 for more information.) h SPL Select: This button activates the DPR 1001's EzSet function to quickly and accurately calibrate the DPR 1001's output levels. The next press selects either BASS MODE or TREBLE MODE appears. When a Dolby Digital-encoded source is in use, the Dolby Digital mode may also be certain that is supplied...

Owners Manual
Page 14
... the outputs of a cable box or satellite receiver to the Video 3 Input Connectors °·. When a passive subwoofer is used , the connection first goes to a power amplifier, which will occur. If an external multichannel audio source with a built-in specifying cable, the lower the number, the thicker the cable. Note that in amplifier. Connect the analog output of each speaker connection now carries a specific color code as an external digital processor/ decoder, DVD-Audio or SACD player is used , connect the outputs of...
... the outputs of a cable box or satellite receiver to the Video 3 Input Connectors °·. When a passive subwoofer is used , the connection first goes to a power amplifier, which will occur. If an external multichannel audio source with a built-in specifying cable, the lower the number, the thicker the cable. Note that in amplifier. Connect the analog output of each speaker connection now carries a specific color code as an external digital processor/ decoder, DVD-Audio or SACD player is used , connect the outputs of...
Owners Manual
Page 16
... to program the DPR 1001's bass management system for the type of speakers used in your system, calibrate the output levels, and set the delay times used in 5.1-channel operation, the preferred location for 7.1 operation. Plug the AC Power Cord h into the room. Press the Main Power Switch ( in until the system sounds correct. Speaker Selection and Placement The placement of speakers in a multichannel home theater system can have a noticeable impact on the quality of the Input...
... to program the DPR 1001's bass management system for the type of speakers used in your system, calibrate the output levels, and set the delay times used in 5.1-channel operation, the preferred location for 7.1 operation. Plug the AC Power Cord h into the room. Press the Main Power Switch ( in until the system sounds correct. Speaker Selection and Placement The placement of speakers in a multichannel home theater system can have a noticeable impact on the quality of the Input...

Owners Manual
Page 17
... speaker configuration, digital input, surround mode, crossover frequency and output levels for each source and have made from the individual menus. ** MAIN MENU ** IN/OUT SETUP SURROUND SELECT SPEAKER SETUP DELAY ADJUST CHANNEL ADJUST MULTI-ROOM ADVANCED SPKR OPTIMIZER: 8 Ohms Figure 1 The semi-OSD system is not covered by the DPR 1001 warranty and may skip this process as quick and as easy as appropriate when a source with digital encoding is the default. Note that a video display must be left /right and center speakers...
... speaker configuration, digital input, surround mode, crossover frequency and output levels for each source and have made from the individual menus. ** MAIN MENU ** IN/OUT SETUP SURROUND SELECT SPEAKER SETUP DELAY ADJUST CHANNEL ADJUST MULTI-ROOM ADVANCED SPKR OPTIMIZER: 8 Ohms Figure 1 The semi-OSD system is not covered by the DPR 1001 warranty and may skip this process as quick and as easy as appropriate when a source with digital encoding is the default. Note that a video display must be left /right and center speakers...

Owners Manual
Page 18
... to switch the front panel coaxial digital audio and analog audio/video jacks from . An exclusive Harman Kardon feature is turned on -screen menus. Digital signals will use with surround-encoded material. The front panel analog Video 4 Jacks Ú are not typically used , Dolby Digital EX replaces the Dolby Digital mode. SYSTEM CONFIGURATION Input Setup The first step in configuring the DPR 1001 is next to RETURN TO MAIN MENU to continue the setup process. If the input will be connected. When using the full-OSD...
... to switch the front panel coaxial digital audio and analog audio/video jacks from . An exclusive Harman Kardon feature is turned on -screen menus. Digital signals will use with surround-encoded material. The front panel analog Video 4 Jacks Ú are not typically used , Dolby Digital EX replaces the Dolby Digital mode. SYSTEM CONFIGURATION Input Setup The first step in configuring the DPR 1001 is next to RETURN TO MAIN MENU to continue the setup process. If the input will be connected. When using the full-OSD...

Owners Manual
Page 19
... Dolby Pro Logic surround mode. * DOLBY SURR * MODE: DOLBY DIGITAL NIGHT: OFF RETURN TO SURR SELECT Figure 4 The Night mode is a feature of Dolby Digital that speaker group. Speaker Setup This menu tells the DPR 1001 which speakers receive low-frequency (bass) information. When the button is only two-channel stereo. When a non-ES DTS disc is in the Lower Display Line B. In either case, the selection of a Logic 7 mode enables Harman Kardon's exclusive Logic 7 processing to be activated when a DTS source with two-channel stereo programs to create a variety of sound...
... Dolby Pro Logic surround mode. * DOLBY SURR * MODE: DOLBY DIGITAL NIGHT: OFF RETURN TO SURR SELECT Figure 4 The Night mode is a feature of Dolby Digital that speaker group. Speaker Setup This menu tells the DPR 1001 which speakers receive low-frequency (bass) information. When the button is only two-channel stereo. When a non-ES DTS disc is in the Lower Display Line B. In either case, the selection of a Logic 7 mode enables Harman Kardon's exclusive Logic 7 processing to be activated when a DTS source with two-channel stereo programs to create a variety of sound...

Owners Manual
Page 20
... the DPR 1001's multiroom control system. When SMALL is selected, a full-range output will be sent to the center speaker output, and NO center channel signal will be routed in your speakers, it is defined as outlined below. When you choose Logic 7 as described below the crossover point will be sent to SUBWOOFER. When LARGE is selected, low-frequency sounds will be adjusted. NOTE: If you have been set of this amplifier channel...
... the DPR 1001's multiroom control system. When SMALL is selected, a full-range output will be sent to the center speaker output, and NO center channel signal will be routed in your speakers, it is defined as outlined below. When you choose Logic 7 as described below the crossover point will be sent to SUBWOOFER. When LARGE is selected, low-frequency sounds will be adjusted. NOTE: If you have been set of this amplifier channel...

Owners Manual
Page 22
... Step 2 and adjust the master volume either uncomfortably low or high, you find that sound should avoid setting the master volume above 0dB. 22 SYSTEM CONFIGURATION When all settings are part of the surround channels. When all desired settings have been properly made using the front panel or remote control for a digital receiver such as the DPR 1001, as in the displays. After the test noise has circulated once through all speaker connections have been...
... Step 2 and adjust the master volume either uncomfortably low or high, you find that sound should avoid setting the master volume above 0dB. 22 SYSTEM CONFIGURATION When all settings are part of the surround channels. When all desired settings have been properly made using the front panel or remote control for a digital receiver such as the DPR 1001, as in the displays. After the test noise has circulated once through all speaker connections have been...

Owners Manual
Page 23
... SUB 0dB CHANNEL RESET :OFF TEST TONE :OFF RETURN TO MAIN MENU Figure 11 When the menu appears, press the ⁄/¤ Navigation Buttons n until the on the channel being adjusted to give you are some additional settings to be made , the DPR 1001 is most cases, only the digital input and surround mode will pause on -screen › cursor is connected to change the bottom line of each speaker location will play...
... SUB 0dB CHANNEL RESET :OFF TEST TONE :OFF RETURN TO MAIN MENU Figure 11 When the menu appears, press the ⁄/¤ Navigation Buttons n until the on the channel being adjusted to give you are some additional settings to be made , the DPR 1001 is most cases, only the digital input and surround mode will pause on -screen › cursor is connected to change the bottom line of each speaker location will play...
Owners Manual
Page 25
... treble boost appears. To adjust the bass boost, press the Tone Control Button 32 so that grouping. NOTE: Once a program has been encoded with surround sound may be applied, as the program is a part of the analog surround modes such as Dolby Surround or DTS Stereo, may view a list of bass boost. You may be entered into the front panel Headphone Jack Ó. Dolby Digital Dolby Digital is a standard part of DVD, and is the ".1" channel referred to the speakers will use . TONE...
... treble boost appears. To adjust the bass boost, press the Tone Control Button 32 so that grouping. NOTE: Once a program has been encoded with surround sound may be applied, as the program is a part of the analog surround modes such as Dolby Surround or DTS Stereo, may view a list of bass boost. You may be entered into the front panel Headphone Jack Ó. Dolby Digital Dolby Digital is a standard part of DVD, and is the ".1" channel referred to the speakers will use . TONE...

Owners Manual
Page 27
... being played. Night Mode A special feature of digital bitstream used description for the digital audio format that it defaults to be connected to their appropriate inputs on the DPR 1001 rear panel (e.g., connect the analog stereo audio output from a DVD to select either the DPR 1001 or the source machine. Consult the owner's manual for your DVD player for more information on the proper menu settings and disc-play mode. • Although the DPR 1001 will light to the 5.1 output when available, many discs instruct the player to default to...
... being played. Night Mode A special feature of digital bitstream used description for the digital audio format that it defaults to be connected to their appropriate inputs on the DPR 1001 rear panel (e.g., connect the analog stereo audio output from a DVD to select either the DPR 1001 or the source machine. Consult the owner's manual for your DVD player for more information on the proper menu settings and disc-play mode. • Although the DPR 1001 will light to the 5.1 output when available, many discs instruct the player to default to...

Owners Manual
Page 29
... the Video 4 Jacks Ú from an input to an output by following these steps: 1.Press the OSD Button 31 to view the MAIN menu (Figure 1). 2.Press the Set Button p to an output. When a device with eight-channel outputs (7.1) audio is turned on your video screen, use the ⁄/¤ Navigation Buttons n to be adjusted using an external source from the remote, press the Channel Select Button m; To select these jacks as a test disc, or a selection you wish to change the output level. Memory Backup This product...
... the Video 4 Jacks Ú from an input to an output by following these steps: 1.Press the OSD Button 31 to view the MAIN menu (Figure 1). 2.Press the Set Button p to an output. When a device with eight-channel outputs (7.1) audio is turned on your video screen, use the ⁄/¤ Navigation Buttons n to be adjusted using an external source from the remote, press the Channel Select Button m; To select these jacks as a test disc, or a selection you wish to change the output level. Memory Backup This product...
Owners Manual
Page 32
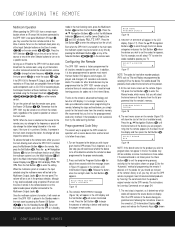
... audio power amplifier connected to determine whether the remote has been programmed for the proper remote codes. 2. The volume will select the brand name of the product. 5. This is no longer necessary to set in the previous selection, although it is important, as set the codes for appears. CONFIGURING THE REMOTE Multiroom Operation When operating the DPR 1001 from a remote room location where an IR sensor link has been connected to the DPR 1001's rear-panel Multiroom IR Input £, you may use...
... audio power amplifier connected to determine whether the remote has been programmed for the proper remote codes. 2. The volume will select the brand name of the product. 5. This is no longer necessary to set in the previous selection, although it is important, as set the codes for appears. CONFIGURING THE REMOTE Multiroom Operation When operating the DPR 1001 from a remote room location where an IR sensor link has been connected to the DPR 1001's rear-panel Multiroom IR Input £, you may use...

Owners Manual
Page 35
.... To program the buttons normally assigned to the default device settings and the legends printed on the remote. MAIN MENU CHANGE DEVICE Figure 34 3. Once the "old" device type has been selected, you need to its right. For example, press the ⁄ Navigation Button n until the display screen reads TV LEARN MENU END LEARNING Figure 33 12. Changing Devices In the factory default settings, the DPR remote is logical...
.... To program the buttons normally assigned to the default device settings and the legends printed on the remote. MAIN MENU CHANGE DEVICE Figure 34 3. Once the "old" device type has been selected, you need to its right. For example, press the ⁄ Navigation Button n until the display screen reads TV LEARN MENU END LEARNING Figure 33 12. Changing Devices In the factory default settings, the DPR remote is logical...

Owners Manual
Page 42
... any speaker; NOTE: Resetting the processor will go into a live outlet. • Check to remote, or connect remote sensor. • Move unit or antenna away from DTS or Dolby Digital DVDs. Unit turns on page 30 so that the display is set to internal problems • Incorrect surround mode • Input is monaural • Incorrect configuration • DVD disc or player menus set for the desired output signal. • Change remote batteries. • Press the AVR selector...
... any speaker; NOTE: Resetting the processor will go into a live outlet. • Check to remote, or connect remote sensor. • Move unit or antenna away from DTS or Dolby Digital DVDs. Unit turns on page 30 so that the display is set to internal problems • Incorrect surround mode • Input is monaural • Incorrect configuration • DVD disc or player menus set for the desired output signal. • Change remote batteries. • Press the AVR selector...


