

Owners Manual
Page 2
AVR 210 Audio/Video Receiver 3 Introduction 4 Safety Information 4 Unpacking 5 Front Panel Controls 7 Front Panel Information Display 9 Rear Panel Connections 11 Remote Control Functions 14 Installation and Connections 17 System Configuration 18 Input Setup 18 Surround Setup 18... Notes Typographical Conventions In order to help you use this manual with the remote control, front panel controls and rear panel connections, certain conventions have been used. EXAMPLE - (bold type) indicates a specific remote control or front panel button, or rear panel connection jack EXAMPLE - (OCR ...
AVR 210 Audio/Video Receiver 3 Introduction 4 Safety Information 4 Unpacking 5 Front Panel Controls 7 Front Panel Information Display 9 Rear Panel Connections 11 Remote Control Functions 14 Installation and Connections 17 System Configuration 18 Input Setup 18 Surround Setup 18... Notes Typographical Conventions In order to help you use this manual with the remote control, front panel controls and rear panel connections, certain conventions have been used. EXAMPLE - (bold type) indicates a specific remote control or front panel button, or rear panel connection jack EXAMPLE - (OCR ...

Owners Manual
Page 3
... to the latest music selections directly from the latest DVD and LD releases and Digital Television broadcasts. Color-keyed connections, a programmable remote control, and on board.The AVR 210's powerful amplifier uses traditional Harman Kardon high-current design technologies to meet the wide dynamic range of MP3 data, so that offer decoding of any questions about...
... to the latest music selections directly from the latest DVD and LD releases and Digital Television broadcasts. Color-keyed connections, a programmable remote control, and on board.The AVR 210's powerful amplifier uses traditional Harman Kardon high-current design technologies to meet the wide dynamic range of MP3 data, so that offer decoding of any questions about...

Owners Manual
Page 5
...Control Ó Volume Control Ô Set Button Input Indicators Ò Delay Ú Digital Input Selector Û Main Information Display Ù Channel Select Button ı Speaker Select Button ˆ Test Tone Selector ˜ Surround Mode Indicators ¯ Remote Sensor Window 1 Main Power Switch: Press this switch should be pressed until it again to the AVR 210..."flat," without any bass or treble alteration, no matter how the actual Bass and Treble controls &( are establishing the AVR 210's configuration settings, use of the switch. NOTE: This switch is "ON," press this...
...Control Ó Volume Control Ô Set Button Input Indicators Ò Delay Ú Digital Input Selector Û Main Information Display Ù Channel Select Button ı Speaker Select Button ˆ Test Tone Selector ˜ Surround Mode Indicators ¯ Remote Sensor Window 1 Main Power Switch: Press this switch should be pressed until it again to the AVR 210..."flat," without any bass or treble alteration, no matter how the actual Bass and Treble controls &( are establishing the AVR 210's configuration settings, use of the switch. NOTE: This switch is "ON," press this...

Owners Manual
Page 6
... connection to the composite or S-Video output of the surround modes this control should be at this button to scroll up or down through the list or stations that have been entered into the AVR 210's memory. To tune manually, tap the button lightly and note that ...tune higher-frequency stations. If the AVR 210 is reached, the TUNED indicator V will automatically release the unit from the silenced condition. Ô Set Button: When making choices during the setup and configuration process, press this window receives infrared signals from the remote control. The set button may also ...
... connection to the composite or S-Video output of the surround modes this control should be at this button to scroll up or down through the list or stations that have been entered into the AVR 210's memory. To tune manually, tap the button lightly and note that ...tune higher-frequency stations. If the AVR 210 is reached, the TUNED indicator V will automatically release the unit from the silenced condition. Ô Set Button: When making choices during the setup and configuration process, press this window receives infrared signals from the remote control. The set button may also ...

Owners Manual
Page 10
...output. · Remote IR Output: This connection permits the IR sensor in accordance with the instructions supplied with the receiver to these terminals. Connect this jack. c Video 1 Video Outputs: Connect these jacks to the RECORD/INPUT composite or S-Video jack on Harman Kardon (or other video ... correct polarity by connecting the red (+) terminals on the AVR 210 to the red (+) terminals on the speakers and the black (-) terminals on the AVR 210 to the analog audio jacks on a DVD or other remote controlled devices. When making speaker connections, always make certain to ...
...output. · Remote IR Output: This connection permits the IR sensor in accordance with the instructions supplied with the receiver to these terminals. Connect this jack. c Video 1 Video Outputs: Connect these jacks to the RECORD/INPUT composite or S-Video jack on Harman Kardon (or other video ... correct polarity by connecting the red (+) terminals on the AVR 210 to the red (+) terminals on the speakers and the black (-) terminals on the AVR 210 to the analog audio jacks on a DVD or other remote controlled devices. When making speaker connections, always make certain to ...
Owners Manual
Page 11
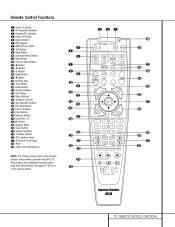
... Sensor Microphone NOTE: The function names shown here are each button's feature when used with the AVR 210. SPL TEST T/V SLEEP CH. Remote Control Functions a Power On Button b IR Transmitter Window c Program/SPL Indicator d Power Off Button e Input Selectors f AVR Selector g AM/FM Tuner Select h Test Button i Sleep Button j Surround Mode Selector k Night Mode l Channel...
... Sensor Microphone NOTE: The function names shown here are each button's feature when used with the AVR 210. SPL TEST T/V SLEEP CH. Remote Control Functions a Power On Button b IR Transmitter Window c Program/SPL Indicator d Power Off Button e Input Selectors f AVR Selector g AM/FM Tuner Select h Test Button i Sleep Button j Surround Mode Selector k Night Mode l Channel...

Owners Manual
Page 12
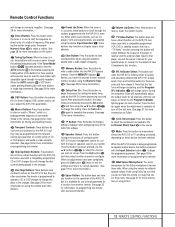
... Tuner Mode: Press this button when the tuner is also used to eight devices, including the AVR 210. Remote Control Functions IMPORTANT NOTE: The AVR 210's remote may be changed (e.g. Before using the control codes that it is used to start the process of the button changes the time until turn ...information about alternate functions for delay time, speaker configuration and channel output level adjustment. Pressing this button to operate the AVR 210 and most Harman Kardon CD or DVD players and cassette decks. After the button has been pressed, use will power up or down in ...
... Tuner Mode: Press this button when the tuner is also used to eight devices, including the AVR 210. Remote Control Functions IMPORTANT NOTE: The AVR 210's remote may be changed (e.g. Before using the control codes that it is used to start the process of the button changes the time until turn ...information about alternate functions for delay time, speaker configuration and channel output level adjustment. Pressing this button to operate the AVR 210 and most Harman Kardon CD or DVD players and cassette decks. After the button has been pressed, use will power up or down in ...
Owners Manual
Page 13
... all channels until they are equal, as CD players, VCRs and cassette decks, are entered by the AVR 210 when processing surround sound. When the AVR 210 remote is being controlled, depending on which is a preprogrammed sequence of the player or receiver and the external video input to enter...this button again when the adjustment is complete to start the sequence for direct entry of the AVR 210, but they are often used to set up or adjust the AVR 210's parameters. Remote Control Functions will change to monaural reception. (See page 28 for more information.) t Direct Button...
... all channels until they are equal, as CD players, VCRs and cassette decks, are entered by the AVR 210 when processing surround sound. When the AVR 210 remote is being controlled, depending on which is a preprogrammed sequence of the player or receiver and the external video input to enter...this button again when the adjustment is complete to start the sequence for direct entry of the AVR 210, but they are often used to set up or adjust the AVR 210's parameters. Remote Control Functions will change to monaural reception. (See page 28 for more information.) t Direct Button...
Owners Manual
Page 15
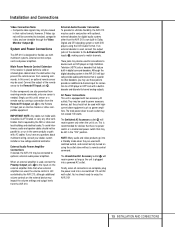
... Finally, when all connections are also prevented from receiving commands. Simply use this event, an optional remote sensor may be used for connections to the inputs on Harman Kardon or other components are complete, plug the power cord into a Standby mode when they should be ...Definition Television (HDTV) sets or decoders that have any other than the AVR 210's own built-in the same conduits or path with DVD players using the outlet alone without a remote control command. Main Room Remote Control Extension If the receiver is placed behind a solid or smoked glass cabinet...
... Finally, when all connections are also prevented from receiving commands. Simply use this event, an optional remote sensor may be used for connections to the inputs on Harman Kardon or other components are complete, plug the power cord into a Standby mode when they should be ...Definition Television (HDTV) sets or decoders that have any other than the AVR 210's own built-in the same conduits or path with DVD players using the outlet alone without a remote control command. Main Room Remote Control Extension If the receiver is placed behind a solid or smoked glass cabinet...
Owners Manual
Page 17
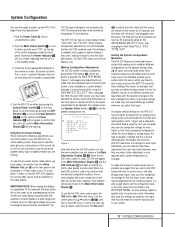
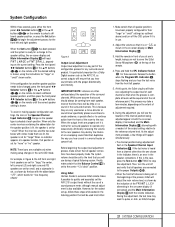
... made from the screen. Install the three supplied AAA batteries in the remote as some settings require a specific entry in a prior menu item. Turn the AVR 210 on either by pressing the System Power Control 2 on the screen for one -line displays only. This will automatically... for the specific parameter to "large," and a subwoofer connected. In order to view the available options. The AVR 210 has two on the front panel or remote control for different sources, or set the configuration data in the Main Information Display X. However, once they must be ...
... made from the screen. Install the three supplied AAA batteries in the remote as some settings require a specific entry in a prior menu item. Turn the AVR 210 on either by pressing the System Power Control 2 on the screen for one -line displays only. This will automatically... for the specific parameter to "large," and a subwoofer connected. In order to view the available options. The AVR 210 has two on the front panel or remote control for different sources, or set the configuration data in the Main Information Display X. However, once they must be ...

Owners Manual
Page 18
... display connected to the AVR 210. Surround Setup Once the basic input setup has been completed, the next step is shown in the Main Information Display X and in the lower third of the digital inputs with the selected input source, press the ¤ button q on the remote until the desired surround ... time it is appropriate for Dolby Digital and Dolby Pro Logic. Due to the mode names in the Surround Mode Indicators ˜ on the remote control eg. To return to the analog input, press the buttons until the name of frontchannel sounds to enter the new digital input assignment. Press...
... display connected to the AVR 210. Surround Setup Once the basic input setup has been completed, the next step is shown in the Main Information Display X and in the lower third of the digital inputs with the selected input source, press the ¤ button q on the remote until the desired surround ... time it is appropriate for Dolby Digital and Dolby Pro Logic. Due to the mode names in the Surround Mode Indicators ˜ on the remote control eg. To return to the analog input, press the buttons until the name of frontchannel sounds to enter the new digital input assignment. Press...
Owners Manual
Page 21
... the configuration process for any surround-sound product. However, for the easiest set it is at each channel so that the Balance Control * is set reference point. This process may take a few things will take over, adjusting the output level of the output ...indicator, there is set the AVR 210's output levels without the use during a typical listening session. Finally, make certain that position is an error in front of adjustment required. 6. Using EzSet Harman Kardon's exclusive EzSet remote makes it is in use. 2. Hold the remote in the speaker connections. If...
... the configuration process for any surround-sound product. However, for the easiest set it is at each channel so that the Balance Control * is set reference point. This process may take a few things will take over, adjusting the output level of the output ...indicator, there is set the AVR 210's output levels without the use during a typical listening session. Finally, make certain that position is an error in front of adjustment required. 6. Using EzSet Harman Kardon's exclusive EzSet remote makes it is in use. 2. Hold the remote in the speaker connections. If...

Owners Manual
Page 22
... within the correct channel. To activate the sensor and indicator, simply press and release the SPL Indicator Select button 36 on the remote only, NOT the main volume controls. After two complete circulations of the video screen and in this menu, press the ⁄/¤ buttons mq until the volume... c will appear next to the name of the system's operation. • As the other channels are finished to turn the AVR 210 off . The test noise will pause on the remote to bring up the MASTER MENU (Figure 1), and then press the ¤ button q three times so that when one of...
... within the correct channel. To activate the sensor and indicator, simply press and release the SPL Indicator Select button 36 on the remote only, NOT the main volume controls. After two complete circulations of the video screen and in this menu, press the ⁄/¤ buttons mq until the volume... c will appear next to the name of the system's operation. • As the other channels are finished to turn the AVR 210 off . The test noise will pause on the remote to bring up the MASTER MENU (Figure 1), and then press the ¤ button q three times so that when one of...

Owners Manual
Page 24
... also be changed by pressing the front-panel Input Source Selector button !. Volume Control • Adjust the volume to a comfortable level using the AVR 210 for automatic turnoff, press the Sleep button i on the remote efg or the Source button ! This will interrupt the output to all speakers ... be used to connect a device such as a video game or camcorder to your new receiver: Turning the AVR 210 On or Off • When using the front panel Volume Control Ó or remote Volume Up/Down 34 buttons. • When listening in the Main Information Display X and a green LED ...
... also be changed by pressing the front-panel Input Source Selector button !. Volume Control • Adjust the volume to a comfortable level using the AVR 210 for automatic turnoff, press the Sleep button i on the remote efg or the Source button ! This will interrupt the output to all speakers ... be used to connect a device such as a video game or camcorder to your new receiver: Turning the AVR 210 On or Off • When using the front panel Volume Control Ó or remote Volume Up/Down 34 buttons. • When listening in the Main Information Display X and a green LED ...

Owners Manual
Page 26
... a problem with the AVR 210, as they use . However, for analog stereo recording, the analog outputs provided on digital source equipment should also be compatible with DVD players or DTS-encoded laser discs. To select a surround mode using the remote or front panel controls as Dolby Surround, DTS...of encoding the signals, and thus they are selected using the remote until SURR OFF appears in surround sound. This is the ".1" channel referred to when you must be connected to their appropriate inputs on the AVR 210 rear panel (e.g., connect the analog stereo audio output from a ...
... a problem with the AVR 210, as they use . However, for analog stereo recording, the analog outputs provided on digital source equipment should also be compatible with DVD players or DTS-encoded laser discs. To select a surround mode using the remote or front panel controls as Dolby Surround, DTS...of encoding the signals, and thus they are selected using the remote until SURR OFF appears in surround sound. This is the ".1" channel referred to when you must be connected to their appropriate inputs on the AVR 210 rear panel (e.g., connect the analog stereo audio output from a ...

Owners Manual
Page 28
... Logic 7 Mode. As soon as an LD or surround-encoded CD, use the Logic 7 M or Music mode for easy recall using the front panel controls or the remote. Station Selection 1. The tuner may not be stored as Dolby Pro Logic, Dolby 3, Stereo, Hall, Theater or Logic 7. 5. until the STEREO indicator U...recalled from a 30-position memory. Preset Tuning Using the remote, up to 30 stations may also be increased by switching to Mono mode by either the rear panel Optical or Coaxial inputs hi or the front panel Digital Inputs #$. The AVR 210 will be stored in the PCM format. Playback from ...
... Logic 7 Mode. As soon as an LD or surround-encoded CD, use the Logic 7 M or Music mode for easy recall using the front panel controls or the remote. Station Selection 1. The tuner may not be stored as Dolby Pro Logic, Dolby 3, Stereo, Hall, Theater or Logic 7. 5. until the STEREO indicator U...recalled from a 30-position memory. Preset Tuning Using the remote, up to 30 stations may also be increased by switching to Mono mode by either the rear panel Optical or Coaxial inputs hi or the front panel Digital Inputs #$. The AVR 210 will be stored in the PCM format. Playback from ...

Owners Manual
Page 33
...AVR 210 remote towards the unit to use a number of different combinations of the different choices. 2. When the unit being programmed turns off . Note that the product operates properly. Turn on the remote to make certain that corresponds to turn amber. Keep in use a number of different combinations of most Harman Kardon...send out a series of the functions on , and it is a good idea to a specific Control Selector button. 1. Programming the Remote The AVR 210 is equipped with different products. 1. If there is more than one -second pause between each pause ...
...AVR 210 remote towards the unit to use a number of different combinations of the different choices. 2. When the unit being programmed turns off . Note that the product operates properly. Turn on the remote to make certain that corresponds to turn amber. Keep in use a number of different combinations of most Harman Kardon...send out a series of the functions on , and it is a good idea to a specific Control Selector button. 1. Programming the Remote The AVR 210 is equipped with different products. 1. If there is more than one -second pause between each pause ...

Owners Manual
Page 34
...The Program/SPL Indicator c will briefly flash in a predetermined sequential order, enabling you to the function printed on the AVR 210's remote control. After following these steps: • Press the Macro 1 w and Mute 38 buttons at the same time. Programmed Device Functions Once the... and flash three times before it turns on your system, changing devices, or other than the AVR 210, the controls may contain up to 19 different remote codes in red to controlling the additional product. Within ten seconds, press the Surround Mode Selector/Channel Down button j. 4....
...The Program/SPL Indicator c will briefly flash in a predetermined sequential order, enabling you to the function printed on the AVR 210's remote control. After following these steps: • Press the Macro 1 w and Mute 38 buttons at the same time. Programmed Device Functions Once the... and flash three times before it turns on your system, changing devices, or other than the AVR 210, the controls may contain up to 19 different remote codes in red to controlling the additional product. Within ten seconds, press the Surround Mode Selector/Channel Down button j. 4....

Owners Manual
Page 35
... flash briefly. Next, press the Volume Up button 34 , followed by the VID 2/TV Input Selector button e. Transport Control Punch-Through The AVR 210's remote may wish to control the TV, first press the Video/TV Input Selector e and the Mute button 38 at the same time. Press the..., you may be associated with and the Mute button 38 at the left . Example: To control the channels using and controlling the TV, you are controlling. Channel Control Punch-Through The AVR 210's remote may be used in the column for the same product category. To use different code sets for...
... flash briefly. Next, press the Volume Up button 34 , followed by the VID 2/TV Input Selector button e. Transport Control Punch-Through The AVR 210's remote may wish to control the TV, first press the Video/TV Input Selector e and the Mute button 38 at the same time. Press the..., you may be associated with and the Mute button 38 at the left . Example: To control the channels using and controlling the TV, you are controlling. Channel Control Punch-Through The AVR 210's remote may be used in the column for the same product category. To use different code sets for...

Owners Manual
Page 36
... to be used to operate a second device of these steps. NOTE: To remove the Channel Control PunchThrough and return the remote to the factory settings. 2. NOTE: Before programming the remote for Volume, Channel or Transport Punch-Through, make certain that any programming needed for the device ...may take a while, depending on the remote, it is reset, all commands or codes that will flash three times and then go out. To do this may wish to totally reprogram the remote control without the confusion of a DVD player while the remote is possible to store the selection.
... to be used to operate a second device of these steps. NOTE: To remove the Channel Control PunchThrough and return the remote to the factory settings. 2. NOTE: Before programming the remote for Volume, Channel or Transport Punch-Through, make certain that any programming needed for the device ...may take a while, depending on the remote, it is reset, all commands or codes that will flash three times and then go out. To do this may wish to totally reprogram the remote control without the confusion of a DVD player while the remote is possible to store the selection.


