
User Manual
Page 2
... Player Using Component Video/Audio, Composite Video/Audio, or S-Video/Audio ........ 21 2.2.4 Connecting a PC using VGA 22 2.2.5 Connecting a PC using DVI 22 2.2.6 Connecting HDMI 23 2.2.7 Connecting USB 23 2.2.8 Connecting a VCR/ STB/ DVD Player using SCART . 24 2.3 Using the TV 25 2.3.1 Turning the TV On and Off 25 2.3.2 Switching Source Signals 25 2.3.3 Performing an Automatic Channel Search 25 2.3.4 Selecting Channels 25 2.3.5 Adjusting the Volume 25 3. Getting Started 8 1.1 Package Contents 8 1.2 Introducing the TV 9 1.3 Features 9 1.4 Control Panel 10 1.5 Input and Output...
... Player Using Component Video/Audio, Composite Video/Audio, or S-Video/Audio ........ 21 2.2.4 Connecting a PC using VGA 22 2.2.5 Connecting a PC using DVI 22 2.2.6 Connecting HDMI 23 2.2.7 Connecting USB 23 2.2.8 Connecting a VCR/ STB/ DVD Player using SCART . 24 2.3 Using the TV 25 2.3.1 Turning the TV On and Off 25 2.3.2 Switching Source Signals 25 2.3.3 Performing an Automatic Channel Search 25 2.3.4 Selecting Channels 25 2.3.5 Adjusting the Volume 25 3. Getting Started 8 1.1 Package Contents 8 1.2 Introducing the TV 9 1.3 Features 9 1.4 Control Panel 10 1.5 Input and Output...
User Manual
Page 3
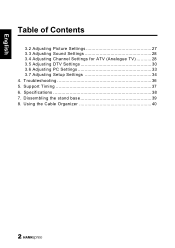
Specifications 38 7. Support Timing 37 6. Dissembling the stand base 39 8. Using the Cable Organizer 40 2 English Table of Contents 3.2 Adjusting Picture Settings 27 3.3 Adjusting Sound Settings 28 3.4 Adjusting Channel Settings for ATV (Analogue TV 28 3.5 Adjusting DTV Settings 30 3.6 Adjusting PC Settings 33 3.7 Adjusting Setup Settings 34 4. Troubleshooting 36 5.
Specifications 38 7. Support Timing 37 6. Dissembling the stand base 39 8. Using the Cable Organizer 40 2 English Table of Contents 3.2 Adjusting Picture Settings 27 3.3 Adjusting Sound Settings 28 3.4 Adjusting Channel Settings for ATV (Analogue TV 28 3.5 Adjusting DTV Settings 30 3.6 Adjusting PC Settings 33 3.7 Adjusting Setup Settings 34 4. Troubleshooting 36 5.
User Manual
Page 5
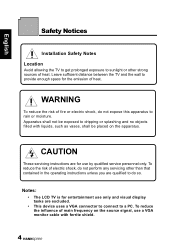
Apparatus shall not be placed on the source signal, use a VGA monitor cable with liquids, such as vases, shall be exposed to dripping or splashing and no objects filled with ferrite shield. 4 To reduce the ...CAUTION These servicing instructions are for entertainment use by qualified service personnel only. Leave sufficient distance between the TV and the wall to sunlight or other than that contained in the operating instructions unless you are excluded. • This device uses a VGA connector to connect to rain or moisture. Notes: • The LCD TV is for use only and ...
Apparatus shall not be placed on the source signal, use a VGA monitor cable with liquids, such as vases, shall be exposed to dripping or splashing and no objects filled with ferrite shield. 4 To reduce the ...CAUTION These servicing instructions are for entertainment use by qualified service personnel only. Leave sufficient distance between the TV and the wall to sunlight or other than that contained in the operating instructions unless you are excluded. • This device uses a VGA connector to connect to rain or moisture. Notes: • The LCD TV is for use only and ...
User Manual
Page 7
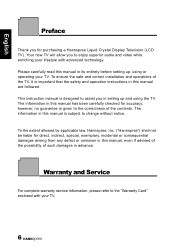
... a Hannspree Liquid Crystal Display Television (LCD TV). The information in this manual is designed to assist you for direct, indirect, special, exemplary, incidental or consequential damages arising from any defect or omission in this manual are followed. English Preface Thank you in setting up , using the TV. Warranty and Service For complete warranty service information, please refer to change without notice. This instruction manual is...
... a Hannspree Liquid Crystal Display Television (LCD TV). The information in this manual is designed to assist you for direct, indirect, special, exemplary, incidental or consequential damages arising from any defect or omission in this manual are followed. English Preface Thank you in setting up , using the TV. Warranty and Service For complete warranty service information, please refer to change without notice. This instruction manual is...
User Manual
Page 10
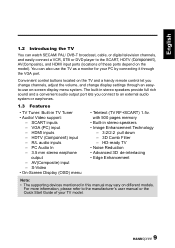
... digital television channels, and easily connect a VCR, STB or DVD player to the manufacturer's user manual or the Quick Start Guide of these ports depend on the TV and a handy remote control let you connect to an external audio system or earphones. 1.3 Features • TV Tuner: Built-in stereo speakers provide full rich sound and a convenient audio output port lets you change channels, adjust the volume, and change display settings through an easyto-use the TV as a monitor for your TV model. 9 HDMI inputs...
... digital television channels, and easily connect a VCR, STB or DVD player to the manufacturer's user manual or the Quick Start Guide of these ports depend on the TV and a handy remote control let you connect to an external audio system or earphones. 1.3 Features • TV Tuner: Built-in stereo speakers provide full rich sound and a convenient audio output port lets you change channels, adjust the volume, and change display settings through an easyto-use the TV as a monitor for your TV model. 9 HDMI inputs...

User Manual
Page 11
... left on the OSD menu. Receive incoming remote control commands. English 1.4 Control Panel Description Button Power Input source INPUT Menu MENU Program select P Program select Volume adjust Volume adjust Remote IR sensor Power/Standby indicator Speakers P VOL + VOL - Press to a CI device. 10 Press to increase the volume or move downward to turn the TV on the OSD menu. Deliver high-quality sounds. 1.5 Input and Output Jacks Description Connector Function CI CI Connect to select the proper input source. Function Press to the...
... left on the OSD menu. Receive incoming remote control commands. English 1.4 Control Panel Description Button Power Input source INPUT Menu MENU Program select P Program select Volume adjust Volume adjust Remote IR sensor Power/Standby indicator Speakers P VOL + VOL - Press to a CI device. 10 Press to increase the volume or move downward to turn the TV on the OSD menu. Deliver high-quality sounds. 1.5 Input and Output Jacks Description Connector Function CI CI Connect to select the proper input source. Function Press to the...

User Manual
Page 13
... HDMI IN 1 HDMI IN 2 HDMI IN 3 HDMI 4 Connect to a PC's line/audio port. Connect a HDMI equipment or a HDMIDVI adapter cable to devices such as a DVD player or set -top box. Connect a HDMI equipment or a HDMIDVI adapter cable to devices such as a DVD player or set -top box. Connect a HDMI equipment or a HDMIDVI adapter cable to devices such as a DVD player or set -top box. Connect to a PC's VGA port. Connect to the included power cord. 1.6 Remote Control Description Icon Power Input Signal Type INPUT Function Press to select the input signal types: TV, DTV, AV, S-Video...
... HDMI IN 1 HDMI IN 2 HDMI IN 3 HDMI 4 Connect to a PC's line/audio port. Connect a HDMI equipment or a HDMIDVI adapter cable to devices such as a DVD player or set -top box. Connect a HDMI equipment or a HDMIDVI adapter cable to devices such as a DVD player or set -top box. Connect a HDMI equipment or a HDMIDVI adapter cable to devices such as a DVD player or set -top box. Connect to a PC's VGA port. Connect to the included power cord. 1.6 Remote Control Description Icon Power Input Signal Type INPUT Function Press to select the input signal types: TV, DTV, AV, S-Video...

User Manual
Page 15
... specific tasks in the OSD menu or teletext mode. Press to inactivate automatic page change the multi sound selection of the available teletext subjects (programmable in the teletext mode only). Press the colored buttons to display a table of the TV channel. English Description Dual sound Select program Red, Green, Yellow, Blue Index Mix Adjust size Subtitle Hold Reveal Sound Mode Icon P /P INDEX MIX SIZE SUBTITLE HOLD REVEAL SOUND Function Press to change...
... specific tasks in the OSD menu or teletext mode. Press to inactivate automatic page change the multi sound selection of the available teletext subjects (programmable in the teletext mode only). Press the colored buttons to display a table of the TV channel. English Description Dual sound Select program Red, Green, Yellow, Blue Index Mix Adjust size Subtitle Hold Reveal Sound Mode Icon P /P INDEX MIX SIZE SUBTITLE HOLD REVEAL SOUND Function Press to change...

User Manual
Page 16
... to toggle through all the picture settings: Vivid, Soft, User, Standard. Freeze FREEZE Press to pause a video frame on the remote control at the signal sensor and ensure that there are no obstacles between them. 15 English Description Picture Mode Icon PIC Function Press continuously to select favorite channels and FAV. Note: • For best results, use the remote control within a proper distance from the...
... to toggle through all the picture settings: Vivid, Soft, User, Standard. Freeze FREEZE Press to pause a video frame on the remote control at the signal sensor and ensure that there are no obstacles between them. 15 English Description Picture Mode Icon PIC Function Press continuously to select favorite channels and FAV. Note: • For best results, use the remote control within a proper distance from the...

User Manual
Page 21
... a set of Component/YPbPr group in your TV via HDMI (A), YPbPr/AUDIO (B), SCART (C), AV/SV (D) ports. AV/SV (D) ports should connect AV/SV ones. A B C HDMI IN 1 2 3 HDMI 4 or AUDIO R L VIDEO PR PB Y or D R-AUDIO-L VIDEO S-VIDEO or HDMI Cable (Optional) Video Cable (Optional) SCART Adapter (Optional) R-AUDIO-L/MONO VIDEO S.VIDEO SCART Cable (Optional) Audio Cable (Optional) Audio/Video Cable (Optional) Audio/Video Cable (Optional) HDMI R L PR PB Y L R VIDEO S-VIDEO SCART R L VIDEO S-VIDEO Video Game Console VCR or STB DVD Note: • Please connect...
... a set of Component/YPbPr group in your TV via HDMI (A), YPbPr/AUDIO (B), SCART (C), AV/SV (D) ports. AV/SV (D) ports should connect AV/SV ones. A B C HDMI IN 1 2 3 HDMI 4 or AUDIO R L VIDEO PR PB Y or D R-AUDIO-L VIDEO S-VIDEO or HDMI Cable (Optional) Video Cable (Optional) SCART Adapter (Optional) R-AUDIO-L/MONO VIDEO S.VIDEO SCART Cable (Optional) Audio Cable (Optional) Audio/Video Cable (Optional) Audio/Video Cable (Optional) HDMI R L PR PB Y L R VIDEO S-VIDEO SCART R L VIDEO S-VIDEO Video Game Console VCR or STB DVD Note: • Please connect...

User Manual
Page 22
VCR STB DVD Video Cable (Optional) Audio Cable (Optional) VIDEO Y PB PR AUDIO L R R-AUDIO-L VIDEO VCR STB DVD Audio Cable (Optional) Video Cable (Optional) R-AUDIO-L S-VIDEO VCR STB DVD Audio Cable (Optional) S-Video Cable (Optional) 21 English 2.2.3 Connecting a VCR/ STB/ DVD Player Using Component Video/Audio, Composite Video/Audio, or S-Video/Audio Connect the TV to a VCR/ STB/ DVD player using three different types of video/audio inputs.
VCR STB DVD Video Cable (Optional) Audio Cable (Optional) VIDEO Y PB PR AUDIO L R R-AUDIO-L VIDEO VCR STB DVD Audio Cable (Optional) Video Cable (Optional) R-AUDIO-L S-VIDEO VCR STB DVD Audio Cable (Optional) S-Video Cable (Optional) 21 English 2.2.3 Connecting a VCR/ STB/ DVD Player Using Component Video/Audio, Composite Video/Audio, or S-Video/Audio Connect the TV to a VCR/ STB/ DVD player using three different types of video/audio inputs.

User Manual
Page 25
... connect a TV, VCR, VCD, DVD player or video game console. Connect each color-coded cable to use a SCART cable or adapter for the connection depending on the ports available on your player. English 2.2.8 Connecting a VCR/ STB/ DVD Player using SCART Use the SCART ports to S-Video connectors SCART 1 SCART 2 SCART Cable (Optional) Note: • The S-Video connector and AV connectors cannot be connected at the same time, or the wrong signals might be generated. • The cables are color-coded (black, red, white...
... connect a TV, VCR, VCD, DVD player or video game console. Connect each color-coded cable to use a SCART cable or adapter for the connection depending on the ports available on your player. English 2.2.8 Connecting a VCR/ STB/ DVD Player using SCART Use the SCART ports to S-Video connectors SCART 1 SCART 2 SCART Cable (Optional) Note: • The S-Video connector and AV connectors cannot be connected at the same time, or the wrong signals might be generated. • The cables are color-coded (black, red, white...

User Manual
Page 26
... power LED changes from red to green, indicating that the TV is on the control panel or remote control to increase the volume. 2 Press VOL- on the control panel or remote control to decrease the volume. 3 Press MUTE to eliminate sounds, and press MUTE again or press the volume buttons to red, indicating that the TV is off. 2.3.2 Switching Source Signals Press INPUT on the control panel or remote control to select the incoming source signal. 2.3.3 Performing an Automatic Channel...
... power LED changes from red to green, indicating that the TV is on the control panel or remote control to increase the volume. 2 Press VOL- on the control panel or remote control to decrease the volume. 3 Press MUTE to eliminate sounds, and press MUTE again or press the volume buttons to red, indicating that the TV is off. 2.3.2 Switching Source Signals Press INPUT on the control panel or remote control to select the incoming source signal. 2.3.3 Performing an Automatic Channel...
User Manual
Page 28
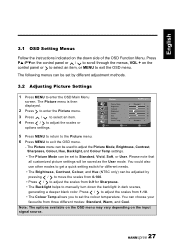
... Menu screen. Picture Picture Mode Brightness Contrast Sharpness Colour Hue Backlight Colour Temp Move Select Standard 50 50 3 45 50 2 1 Standard Menu Return 5 Press MENU to return to the Picture menu. 6 Press MENU to adjust the scales or options settings. English 3.1 OSD Setting Menus Follow the instructions indicated on the down the backlight in dark scenes, generating a deeper black color. You could also use other modes to get a quick setting switch...
... Menu screen. Picture Picture Mode Brightness Contrast Sharpness Colour Hue Backlight Colour Temp Move Select Standard 50 50 3 45 50 2 1 Standard Menu Return 5 Press MENU to return to the Picture menu. 6 Press MENU to adjust the scales or options settings. English 3.1 OSD Setting Menus Follow the instructions indicated on the down the backlight in dark scenes, generating a deeper black color. You could also use other modes to get a quick setting switch...
User Manual
Page 30
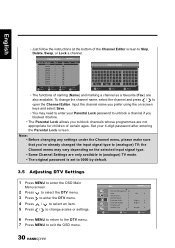
... channel frequency. • To lock on a frequency and let the TV automatically fine-tune it can be set to On or Off. • The Channel Edit enables you can be set to further manage your channel list: 29 The setting of one system may then change automatically because of the setting of the other. • Select Auto Search to scan the TV channels manually...
... channel frequency. • To lock on a frequency and let the TV automatically fine-tune it can be set to On or Off. • The Channel Edit enables you can be set to further manage your channel list: 29 The setting of one system may then change automatically because of the setting of the other. • Select Auto Search to scan the TV channels manually...
User Manual
Page 31
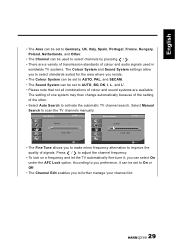
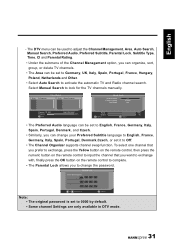
.... Fav. DTV Channel Management Area Auto Search Manual Search Preferred Audio Preferred Subtitle Parental Lock Subtitle Type Move Select UK English English Normal Menu Return 30 Set your Parental Lock password to unblock a channel if you blocked it before. • The Parental Lock allows you 've already changed the input signal type to (analogue) TV; You may vary depending on screen keys and select Save. - the Channel memu may need to open...
.... Fav. DTV Channel Management Area Auto Search Manual Search Preferred Audio Preferred Subtitle Parental Lock Subtitle Type Move Select UK English English Normal Menu Return 30 Set your Parental Lock password to unblock a channel if you blocked it before. • The Parental Lock allows you 've already changed the input signal type to (analogue) TV; You may vary depending on screen keys and select Save. - the Channel memu may need to open...
User Manual
Page 32
... remote control to input the channel that you want to exchange with, finally press the OK button on the remote control to complete. • The Parental Lock allows you can change the password. S.No TV Channel Cannel Search S.No Radio Channel Manual Search Channel Name Frequency(KHz) Bandwidth 21 474000 8M Channel 35 UHF Progress Menu Exit 586000KHz/8M 28% Signal Quality Select Menu Return 48% 0% • The Preferred Audio...
... remote control to input the channel that you want to exchange with, finally press the OK button on the remote control to complete. • The Parental Lock allows you can change the password. S.No TV Channel Cannel Search S.No Radio Channel Manual Search Channel Name Frequency(KHz) Bandwidth 21 474000 8M Channel 35 UHF Progress Menu Exit 586000KHz/8M 28% Signal Quality Select Menu Return 48% 0% • The Preferred Audio...
User Manual
Page 35
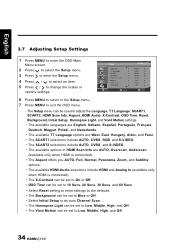
... HDMI and Analog In (available only when HDMI is connected). • The X-Contrast can be set to On or Off. • OSD Time can be set to 10 Secs, 20 Secs, 30 Secs, and 60 Secs. • Select Reset setting to reset settings to the defaults. • The Background can be set to Blue or Off. • Select Initial Setup to do auto Channel Scan. • The Hannspree Light...
... HDMI and Analog In (available only when HDMI is connected). • The X-Contrast can be set to On or Off. • OSD Time can be set to 10 Secs, 20 Secs, 30 Secs, and 60 Secs. • Select Reset setting to reset settings to the defaults. • The Background can be set to Blue or Off. • Select Initial Setup to do auto Channel Scan. • The Hannspree Light...

User Manual
Page 37
... the source device is connected securely. Try the Auto Search function in color. • • Picture is clear. Adjust the Sharpness setting. Adjust the direction of the antenna or replace the video signal cable. Make sure the path between the remote control and the sensor is OK, no sound. • Cannot receive some TV • channels using cable TV. Try operating the remote control at a closer distance to reset TV settings. • Cannot operate menus. • Screen image turns...
... the source device is connected securely. Try the Auto Search function in color. • • Picture is clear. Adjust the Sharpness setting. Adjust the direction of the antenna or replace the video signal cable. Make sure the path between the remote control and the sensor is OK, no sound. • Cannot receive some TV • channels using cable TV. Try operating the remote control at a closer distance to reset TV settings. • Cannot operate menus. • Screen image turns...
User Manual
Page 40
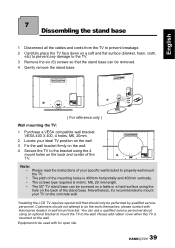
... service personnel about using an optional bracket to mount the TV to the wall. please contact with for open site. 39 Please add rubber cover when this TV is mounted on the concrete wall. *Installing the LCD TV requires special skill that the stand base can be removed. 4 Gently remove the stand base. ( For reference only ) Wall mounting the TV: 1 Purchase a VESA compatible wall bracket: VESA 400 X 400, 4 holes, M6, 20mm. 2 Locate your specific wall bracket...
... service personnel about using an optional bracket to mount the TV to the wall. please contact with for open site. 39 Please add rubber cover when this TV is mounted on the concrete wall. *Installing the LCD TV requires special skill that the stand base can be removed. 4 Gently remove the stand base. ( For reference only ) Wall mounting the TV: 1 Purchase a VESA compatible wall bracket: VESA 400 X 400, 4 holes, M6, 20mm. 2 Locate your specific wall bracket...


