User Manual
Page 1
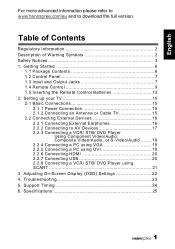
... Connecting HDMI 20 2.2.7 Connecting USB 20 2.2.8 Connecting a VCR/ STB/ DVD Player using SCART 21 3. Setting up your TV 15 2.1 Basic Connections 15 2.1.1 Power Connection 15 2.1.2 Connecting an Antenna or Cable TV 15 2.2 Connecting External Devices 16 2.2.1 Connecting External Earphones 16 2.2.2 Connecting to download the full version. Troubleshooting 23 5. Table of Contents Regulatory Information 2 Description of Warning Symbols 2 Safety Notices 3 1. Support Timing 24 6. Specifications 25 1 Getting Started 6 1.1 Package Contents 6 1.2 Control Panel 7 1.3 Input and Output...
... Connecting HDMI 20 2.2.7 Connecting USB 20 2.2.8 Connecting a VCR/ STB/ DVD Player using SCART 21 3. Setting up your TV 15 2.1 Basic Connections 15 2.1.1 Power Connection 15 2.1.2 Connecting an Antenna or Cable TV 15 2.2 Connecting External Devices 16 2.2.1 Connecting External Earphones 16 2.2.2 Connecting to download the full version. Troubleshooting 23 5. Table of Contents Regulatory Information 2 Description of Warning Symbols 2 Safety Notices 3 1. Support Timing 24 6. Specifications 25 1 Getting Started 6 1.1 Package Contents 6 1.2 Control Panel 7 1.3 Input and Output...
User Manual
Page 3
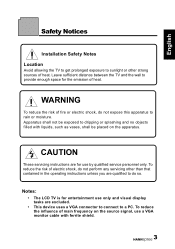
... the apparatus. CAUTION These servicing instructions are excluded. • This device uses a VGA connector to connect to a PC. English Safety Notices Installation Safety Notes Location Avoid allowing the TV to get prolonged exposure to sunlight or other than that contained in the operating instructions unless you are qualified to do so. Notes: • The LCD TV is for entertainment...
... the apparatus. CAUTION These servicing instructions are excluded. • This device uses a VGA connector to connect to a PC. English Safety Notices Installation Safety Notes Location Avoid allowing the TV to get prolonged exposure to sunlight or other than that contained in the operating instructions unless you are qualified to do so. Notes: • The LCD TV is for entertainment...
User Manual
Page 4
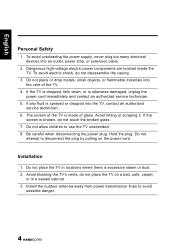
... cabinet. 3. Avoid blocking the TV's vents, do not place the TV on the power cord. Dangerous high-voltage electric power components are located inside the TV. The screen of the TV. 4. Be careful when disconnecting the power plug. Install the outdoor antenna away from power transmission lines to use the TV unattended. 8. Avoid hitting or scraping it. If any fluid is excessive...
... cabinet. 3. Avoid blocking the TV's vents, do not place the TV on the power cord. Dangerous high-voltage electric power components are located inside the TV. The screen of the TV. 4. Be careful when disconnecting the power plug. Install the outdoor antenna away from power transmission lines to use the TV unattended. 8. Avoid hitting or scraping it. If any fluid is excessive...
User Manual
Page 6
...• User's manual • Quick start guide • Warranty card • Power cord • Remote control and batteries • TV cleaning cloth According to WEEE regulation, this product meets the ENERGY STAR® guidelines for energy efficiency. 6 As an ENERGY STAR® Partner, Hannspree has determined... that this TV can't be handled as normal trash in the box. English 1 Getting Started 1.1 Package Contents Make sure the following components are included in Europe when it . Please contact Hannspree Customer Service immediately if anything...
...• User's manual • Quick start guide • Warranty card • Power cord • Remote control and batteries • TV cleaning cloth According to WEEE regulation, this product meets the ENERGY STAR® guidelines for energy efficiency. 6 As an ENERGY STAR® Partner, Hannspree has determined... that this TV can't be handled as normal trash in the box. English 1 Getting Started 1.1 Package Contents Make sure the following components are included in Europe when it . Please contact Hannspree Customer Service immediately if anything...

User Manual
Page 7
... proper input source. English 1.2 Control Panel Description Button Power Input source INPUT Menu MENU Program select P Program select Volume adjust Volume adjust Remote IR sensor Power/Standby indicator Speakers P VOL + VOL - Press to the left on the OSD menu. Press to decrease the program number or move to open the OSD menu. Indicate power (green) or standby (red) status. Press to the next item on or off. Receive incoming remote control commands. Deliver high-quality sounds. 1.3 Input and Output Jacks Description Connector Function CI CI Connect to turn...
... proper input source. English 1.2 Control Panel Description Button Power Input source INPUT Menu MENU Program select P Program select Volume adjust Volume adjust Remote IR sensor Power/Standby indicator Speakers P VOL + VOL - Press to the left on the OSD menu. Press to decrease the program number or move to open the OSD menu. Indicate power (green) or standby (red) status. Press to the next item on or off. Receive incoming remote control commands. Deliver high-quality sounds. 1.3 Input and Output Jacks Description Connector Function CI CI Connect to turn...

User Manual
Page 8
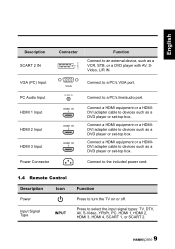
... Service only. Cable/Antenna Connect to earphones or external speakers with AV, SVideo, RGB, L/R IN, Analog TV Out, and L/R Out. 8 Not available for users. Connect to an antenna or cable TV. Connect to an external device, such as a DVD player or set-top box. Component Inputs (Video) Component Inputs (Audio) SCART 1 IN/OUT Connect to an external device, such as a VCR, STB, or a DVD player. S-Video Input Composite Input (Video) Composite Inputs (Audio) Earphone Output HDMI 4 Input S-VIDEO VIDEO R-AUDIO-L HDMI 4 Connect to an external device, such as a VCR, STB, or a DVD player...
... Service only. Cable/Antenna Connect to earphones or external speakers with AV, SVideo, RGB, L/R IN, Analog TV Out, and L/R Out. 8 Not available for users. Connect to an antenna or cable TV. Connect to an external device, such as a DVD player or set-top box. Component Inputs (Video) Component Inputs (Audio) SCART 1 IN/OUT Connect to an external device, such as a VCR, STB, or a DVD player. S-Video Input Composite Input (Video) Composite Inputs (Audio) Earphone Output HDMI 4 Input S-VIDEO VIDEO R-AUDIO-L HDMI 4 Connect to an external device, such as a VCR, STB, or a DVD player...
User Manual
Page 9
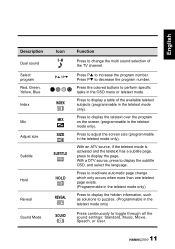
... included power cord. 1.4 Remote Control Description Icon Power Input Signal Type INPUT Function Press to select the input signal types: TV, DTV, AV, S-Video, YPbPr, PC, HDMI 1, HDMI 2, HDMI 3, HDMI 4, SCART 1, or SCART 2. 9 English Description SCART 2 IN Connector SCART 2 Function Connect to an external device, such as a DVD player or set-top box. Connect a HDMI equipment or a HDMIDVI adapter cable to devices such as a DVD player or set -top box. Connect a HDMI equipment or a HDMIDVI adapter cable to devices such as a DVD player or set -top box. Press to turn...
... included power cord. 1.4 Remote Control Description Icon Power Input Signal Type INPUT Function Press to select the input signal types: TV, DTV, AV, S-Video, YPbPr, PC, HDMI 1, HDMI 2, HDMI 3, HDMI 4, SCART 1, or SCART 2. 9 English Description SCART 2 IN Connector SCART 2 Function Connect to an external device, such as a DVD player or set-top box. Connect a HDMI equipment or a HDMIDVI adapter cable to devices such as a DVD player or set -top box. Connect a HDMI equipment or a HDMIDVI adapter cable to devices such as a DVD player or set -top box. Press to turn...

User Manual
Page 10
... decrease audio volume. Press VOL + to display current channel/program information. 2. Press to increase audio volume. Press to activate the teletext mode. Press to display detailed programming information for channels (only for program 10). Information INFO Menu MENU OK OK Arrows Electronic Program Guide Teletext mode EPG TEXT Volume adjustment VOL / VOL Mute MUTE 1. English Description Keypad Pro.List Last Icon Pro.LIST LAST Function Use to turn the on-screen display (OSD) menu on -screen display menus...
... decrease audio volume. Press VOL + to display current channel/program information. 2. Press to increase audio volume. Press to activate the teletext mode. Press to display detailed programming information for channels (only for program 10). Information INFO Menu MENU OK OK Arrows Electronic Program Guide Teletext mode EPG TEXT Volume adjustment VOL / VOL Mute MUTE 1. English Description Keypad Pro.List Last Icon Pro.LIST LAST Function Use to turn the on-screen display (OSD) menu on -screen display menus...
User Manual
Page 11
... has a subtitle page, press to perform specific tasks in the OSD menu or teletext mode. Press the colored buttons to display the page. With a DTV source, press to increase the program number. English Description Dual sound Select program Red, Green, Yellow, Blue Index Mix Adjust size Subtitle Hold Reveal Sound Mode Icon P /P INDEX MIX SIZE SUBTITLE HOLD REVEAL SOUND Function Press to change which only occurs when more than one...
... has a subtitle page, press to perform specific tasks in the OSD menu or teletext mode. Press the colored buttons to display the page. With a DTV source, press to increase the program number. English Description Dual sound Select program Red, Green, Yellow, Blue Index Mix Adjust size Subtitle Hold Reveal Sound Mode Icon P /P INDEX MIX SIZE SUBTITLE HOLD REVEAL SOUND Function Press to change which only occurs when more than one...

User Manual
Page 12
...; The operational distance may be shortened when the signal sensor is directly exposed to strong light. • Aim the transmitter on -screen. (Programmable in the ATV source only) Sleep timer Aspect ratio SLEEP ASPECT Press repeatedly to toggle through all the picture settings: Vivid, Soft, User, Standard. press / to go to -height ratio of the TV. Note: • For best results, use the remote control within...
...; The operational distance may be shortened when the signal sensor is directly exposed to strong light. • Aim the transmitter on -screen. (Programmable in the ATV source only) Sleep timer Aspect ratio SLEEP ASPECT Press repeatedly to toggle through all the picture settings: Vivid, Soft, User, Standard. press / to go to -height ratio of the TV. Note: • For best results, use the remote control within...

User Manual
Page 14
English CAUTION • If the remote control is incorrectly replaced. Discard used batteries according to manufacturer's instructions. • Refer to your remote control has two batteries, do not mix new and old batteries, or the life of used for a long period, remove the batteries and store them properly...cards, or flash media close to dispose of the new batteries will be shortened. Chemical fluids may leak from the old batteries. • Danger of explosion if battery is not used batteries. • The remote control cover may damage the hinge. 14 Replace only with leaked...
English CAUTION • If the remote control is incorrectly replaced. Discard used batteries according to manufacturer's instructions. • Refer to your remote control has two batteries, do not mix new and old batteries, or the life of used for a long period, remove the batteries and store them properly...cards, or flash media close to dispose of the new batteries will be shortened. Chemical fluids may leak from the old batteries. • Danger of explosion if battery is not used batteries. • The remote control cover may damage the hinge. 14 Replace only with leaked...
User Manual
Page 15
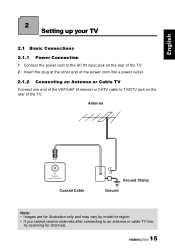
... receive channels after connecting to TV/DTV jack on the rear of the TV. 2 Insert the plug at the other end of the power cord into a power outlet. 2.1.2 Connecting an Antenna or Cable TV Connect one end of the TV. English 2 Setting up your TV 2.1 Basic Connections 2.1.1 Power Connection 1 Connect the power cord to the AC IN input jack on the rear of the VHF/UHF (Antenna) or CATV cable to an antenna or cable...
... receive channels after connecting to TV/DTV jack on the rear of the TV. 2 Insert the plug at the other end of the power cord into a power outlet. 2.1.2 Connecting an Antenna or Cable TV Connect one end of the TV. English 2 Setting up your TV 2.1 Basic Connections 2.1.1 Power Connection 1 Connect the power cord to the AC IN input jack on the rear of the VHF/UHF (Antenna) or CATV cable to an antenna or cable...

User Manual
Page 16
English 2.2 Connecting External Devices Connect external devices such as VCRs, STBs, DVD players, video game consoles, earphones, or a PC to the TV using the appropriate ports on the rear of the TV. 2.2.1 Connecting External Earphones Headphones Speakers (Built-in Amplifiers) Note: • External speakers or headphones are not included with the TV. • The internal TV speakers will not output sound when headphones are plugged in. • Use external speakers with built-in amplifiers only. • Only one external device for sound can be connected at a time. 16
English 2.2 Connecting External Devices Connect external devices such as VCRs, STBs, DVD players, video game consoles, earphones, or a PC to the TV using the appropriate ports on the rear of the TV. 2.2.1 Connecting External Earphones Headphones Speakers (Built-in Amplifiers) Note: • External speakers or headphones are not included with the TV. • The internal TV speakers will not output sound when headphones are plugged in. • Use external speakers with built-in amplifiers only. • Only one external device for sound can be connected at a time. 16
User Manual
Page 17
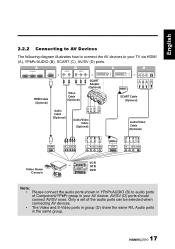
Only a set of Component/YPbPr group in your TV via HDMI (A), YPbPr/AUDIO (B), SCART (C), AV/SV (D) ports. A B C HDMI IN 1 2 3 HDMI 4 or AUDIO R L VIDEO PR PB Y or D R-AUDIO-L VIDEO S-VIDEO or SCART 2 SCART 1 HDMI Cable (Optional) Video Cable (Optional) SCART Adapter (Optional) R-AUDIO-L/MONO VIDEO S.VIDEO SCART Cable (Optional) Audio Cable (Optional) Audio/Video Cable (Optional) Audio/Video Cable (Optional) HDMI R L PR PB Y L R VIDEO S-VIDEO SCART R L VIDEO S-VIDEO Video Game Console VCR or STB DVD Note: • Please connect the audio ports shown in...
Only a set of Component/YPbPr group in your TV via HDMI (A), YPbPr/AUDIO (B), SCART (C), AV/SV (D) ports. A B C HDMI IN 1 2 3 HDMI 4 or AUDIO R L VIDEO PR PB Y or D R-AUDIO-L VIDEO S-VIDEO or SCART 2 SCART 1 HDMI Cable (Optional) Video Cable (Optional) SCART Adapter (Optional) R-AUDIO-L/MONO VIDEO S.VIDEO SCART Cable (Optional) Audio Cable (Optional) Audio/Video Cable (Optional) Audio/Video Cable (Optional) HDMI R L PR PB Y L R VIDEO S-VIDEO SCART R L VIDEO S-VIDEO Video Game Console VCR or STB DVD Note: • Please connect the audio ports shown in...

User Manual
Page 18
VCR STB DVD Video Cable (Optional) Audio Cable (Optional) VIDEO Y PB PR AUDIO L R R-AUDIO-L VIDEO VCR STB DVD Audio Cable (Optional) Video Cable (Optional) R-AUDIO-L S-VIDEO VCR STB DVD 18 Audio Cable (Optional) S-Video Cable (Optional) English 2.2.3 Connecting a VCR/ STB/ DVD Player Using Component Video/Audio, Composite Video/Audio, or S-Video/Audio Connect the TV to a VCR/ STB/ DVD player using three different types of video/audio inputs.
VCR STB DVD Video Cable (Optional) Audio Cable (Optional) VIDEO Y PB PR AUDIO L R R-AUDIO-L VIDEO VCR STB DVD Audio Cable (Optional) Video Cable (Optional) R-AUDIO-L S-VIDEO VCR STB DVD 18 Audio Cable (Optional) S-Video Cable (Optional) English 2.2.3 Connecting a VCR/ STB/ DVD Player Using Component Video/Audio, Composite Video/Audio, or S-Video/Audio Connect the TV to a VCR/ STB/ DVD player using three different types of video/audio inputs.

User Manual
Page 19
... Audio In port of your TV to listen to audio from the PC. HDMI IN 1 2 3 HDMI 4 AUDIO IN HDMI to audio from the PC. AUDIO IN VGA PC VGA Cable (Optional) Audio Cable (Optional) 2.2.5 Connecting a PC using DVI Connect the TV to your PC to use it as the monitor using the VGA port as shown. 1 Connect the HDMI port of the TV to the DVI output of the PC. 2 Connect the line out port...
... Audio In port of your TV to listen to audio from the PC. HDMI IN 1 2 3 HDMI 4 AUDIO IN HDMI to audio from the PC. AUDIO IN VGA PC VGA Cable (Optional) Audio Cable (Optional) 2.2.5 Connecting a PC using DVI Connect the TV to your PC to use it as the monitor using the VGA port as shown. 1 Connect the HDMI port of the TV to the DVI output of the PC. 2 Connect the line out port...

User Manual
Page 20
However, it is connected. 2.2.7 Connecting USB Service port, for DTV F/W update only. Refer to the following illustration to connect a HDMI device to DVI cable is necessary to do so if a HDMI to the TV. HDMI IN 1 2 3 HDMI 4 HDMI Cable (Optional) DVD Player Note: When the HDMI cable is connected, connecting the audio cable is always sent from source to the TV. SERVICE USB Drive (Optional) 20 English 2.2.6 Connecting HDMI HDMI (High Definition Multimedia Interface) assures that the best video signal is not necessary.
However, it is connected. 2.2.7 Connecting USB Service port, for DTV F/W update only. Refer to the following illustration to connect a HDMI device to DVI cable is necessary to do so if a HDMI to the TV. HDMI IN 1 2 3 HDMI 4 HDMI Cable (Optional) DVD Player Note: When the HDMI cable is connected, connecting the audio cable is always sent from source to the TV. SERVICE USB Drive (Optional) 20 English 2.2.6 Connecting HDMI HDMI (High Definition Multimedia Interface) assures that the best video signal is not necessary.

User Manual
Page 21
... Adapter (Optional) R-AUDIO-L/MONO VIDEO S.VIDEO Connect to AV connectors Connect to connect a TV, VCR, VCD, DVD player or video game console. English 2.2.8 Connecting a VCR/ STB/ DVD Player using SCART Use the SCART ports to S-Video connectors SCART 1 SCART 2 SCART Cable (Optional) Note: • The S-Video connector and AV connectors cannot be connected at the same time, or the wrong signals might be generated. • The cables are color-coded (black, red, white, and yellow). Connect each color-coded cable to use a SCART cable or adapter...
... Adapter (Optional) R-AUDIO-L/MONO VIDEO S.VIDEO Connect to AV connectors Connect to connect a TV, VCR, VCD, DVD player or video game console. English 2.2.8 Connecting a VCR/ STB/ DVD Player using SCART Use the SCART ports to S-Video connectors SCART 1 SCART 2 SCART Cable (Optional) Note: • The S-Video connector and AV connectors cannot be connected at the same time, or the wrong signals might be generated. • The cables are color-coded (black, red, white, and yellow). Connect each color-coded cable to use a SCART cable or adapter...
User Manual
Page 22
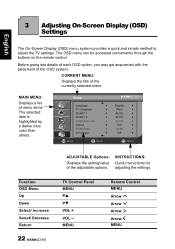
... ADJUSTABLE Options: Displays the setting/value of the currently selected menu. MAIN MENU: Displays a list of menu items. The selected item is highlighted by a darker blue color than others. 3 Adjusting On-Screen Display (OSD) Settings English The On-Screen Display (OSD) menu system provides a quick and simple method to adjust the TV settings. MENU Remote Control MENU Arrow Arrow Arrow Arrow MENU TV Control Panel MENU PS PT VOL + VOL - The OSD menu can be accessed conveniently through the buttons...
... ADJUSTABLE Options: Displays the setting/value of the currently selected menu. MAIN MENU: Displays a list of menu items. The selected item is highlighted by a darker blue color than others. 3 Adjusting On-Screen Display (OSD) Settings English The On-Screen Display (OSD) menu system provides a quick and simple method to adjust the TV settings. MENU Remote Control MENU Arrow Arrow Arrow Arrow MENU TV Control Panel MENU PS PT VOL + VOL - The OSD menu can be accessed conveniently through the buttons...
User Manual
Page 23
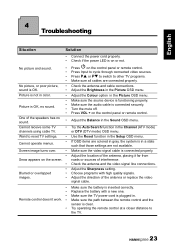
... such that those settings are connected properly. Try the Auto Search function in the Setup OSD menu. Use the Reset function in the Channel (ATV mode) or DTV (DTV mode) OSD menu. English 4 Troubleshooting Situation Solution • Connect the power cord properly. • Check if the power LED is on the control panel or remote control. Press Input to other TV programs. Make sure all cables are not available. Make sure the video signal cable is connected properly.
... such that those settings are connected properly. Try the Auto Search function in the Setup OSD menu. Use the Reset function in the Channel (ATV mode) or DTV (DTV mode) OSD menu. English 4 Troubleshooting Situation Solution • Connect the power cord properly. • Check if the power LED is on the control panel or remote control. Press Input to other TV programs. Make sure all cables are not available. Make sure the video signal cable is connected properly.


