User Manual
Page 2
... Control Panel 14 1.4 Input and Output Jacks 15 1.5 Remote Control 16 1.6 Inserting the Remote Control Batteries 19 2. Setting up your TV 21 2.1 Basic Connections 21 2.1.1 Power Connection 21 2.1.2 Connecting an Antenna or Cable TV 21 2.2 Connecting External Devices 22 2.2.1 Connecting External Earphones 22 2.2.2 Connecting to AV Devices 23 2.2.3 Connecting a VCR/ STB/ DVD Player Using Component Video 24 2.2.4 Connecting a VCR/ STB/ DVD Player Using Composite Video 24 2.2.5 Connecting a PC using VGA 25 2.2.6 Connecting a PC using DVI 25 2.2.7 Connecting HDMI 26 2.2.8 Connecting...
... Control Panel 14 1.4 Input and Output Jacks 15 1.5 Remote Control 16 1.6 Inserting the Remote Control Batteries 19 2. Setting up your TV 21 2.1 Basic Connections 21 2.1.1 Power Connection 21 2.1.2 Connecting an Antenna or Cable TV 21 2.2 Connecting External Devices 22 2.2.1 Connecting External Earphones 22 2.2.2 Connecting to AV Devices 23 2.2.3 Connecting a VCR/ STB/ DVD Player Using Component Video 24 2.2.4 Connecting a VCR/ STB/ DVD Player Using Composite Video 24 2.2.5 Connecting a PC using VGA 25 2.2.6 Connecting a PC using DVI 25 2.2.7 Connecting HDMI 26 2.2.8 Connecting...
User Manual
Page 3
... the Wall 58 8. Specifications 43 6. Appendix: Remote Control Guide 45 6.1 Introduction 45 6.1.2 Setting Program Codes 45 6.1.3 Searching Codes 46 6.1.4 Setting Volume Lock 46 6.1.5 Setting Channel Lock 47 6.1.6 Factory Setting Mode 48 6.1.7 Description 50 6.2 Other Descriptions 50 6.2.1 Double Clicking 50 6.2.2 Buttons Information 50 6.2.3 Power-out Protection Capability 50 6.3 Component Program Codes 51 7. Using the Cable Organizer 59 2 Adjusting On-Screen Display (OSD) Settings 29 3.1 OSD Setting Menus 30 3.2 Storing Channels into Memory 30 3.3 Viewing the Menus...
... the Wall 58 8. Specifications 43 6. Appendix: Remote Control Guide 45 6.1 Introduction 45 6.1.2 Setting Program Codes 45 6.1.3 Searching Codes 46 6.1.4 Setting Volume Lock 46 6.1.5 Setting Channel Lock 47 6.1.6 Factory Setting Mode 48 6.1.7 Description 50 6.2 Other Descriptions 50 6.2.1 Double Clicking 50 6.2.2 Buttons Information 50 6.2.3 Power-out Protection Capability 50 6.3 Component Program Codes 51 7. Using the Cable Organizer 59 2 Adjusting On-Screen Display (OSD) Settings 29 3.1 OSD Setting Menus 30 3.2 Storing Channels into Memory 30 3.3 Viewing the Menus...

User Manual
Page 6
... service personnel only. CAUTION These servicing instructions are for entertainment use a VGA monitor cable with liquids, such as vases, shall be exposed to dripping or splashing and no objects filled with ferrite shield. 5 Leave sufficient distance between the TV and the wall to provide enough space for the emission of main frequency on the source signal, use only and visual display...
... service personnel only. CAUTION These servicing instructions are for entertainment use a VGA monitor cable with liquids, such as vases, shall be exposed to dripping or splashing and no objects filled with ferrite shield. 5 Leave sufficient distance between the TV and the wall to provide enough space for the emission of main frequency on the source signal, use only and visual display...

User Manual
Page 7
... are provided for replacement of the polarized or grounding-type plug. Keep these instructions. 2. Clean only with the cart, stand, tripod, bracket, or table specified by the manufacturer. 12. Protect the power cord from being walked on or pinched, particularly at plugs, convenience receptacles, and the point where they exit from tip-over. 6 Read these instructions. 3. Do not use this apparatus near...
... are provided for replacement of the polarized or grounding-type plug. Keep these instructions. 2. Clean only with the cart, stand, tripod, bracket, or table specified by the manufacturer. 12. Protect the power cord from being walked on or pinched, particularly at plugs, convenience receptacles, and the point where they exit from tip-over. 6 Read these instructions. 3. Do not use this apparatus near...
User Manual
Page 10
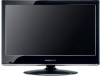
... of the TV, it is given to enjoy superior audio and video while enriching your lifestyle with your TV. As an ENERGY STAR® Partner, Hannspree has determined that the safety and operation instructions in advance. Warranty and Service For complete warranty service information, please refer to change without notice. This instruction manual is subject to the "Warranty card" enclosed with advanced technology.
... of the TV, it is given to enjoy superior audio and video while enriching your lifestyle with your TV. As an ENERGY STAR® Partner, Hannspree has determined that the safety and operation instructions in advance. Warranty and Service For complete warranty service information, please refer to change without notice. This instruction manual is subject to the "Warranty card" enclosed with advanced technology.
User Manual
Page 14
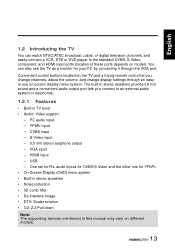
... remote control let you connect to the standard CVBS, S-Video, component, and HDMI input ports (location of these ports depends on -screen display menu system. YPbPr input - VGA input - You can watch NTSC/ATSC broadcast, cable, or digital television channels, and easily connect a VCR, STB or DVD player to an external audio system or earphones. 1.2.1 Features • Built-in TV tuner • Audio/ Video support: - PC audio input - USB - Convenient control buttons located on different models. 13 S-Video input - 3.5 mm stereo earphone output - CVBS input - One set for...
... remote control let you connect to the standard CVBS, S-Video, component, and HDMI input ports (location of these ports depends on -screen display menu system. YPbPr input - VGA input - You can watch NTSC/ATSC broadcast, cable, or digital television channels, and easily connect a VCR, STB or DVD player to an external audio system or earphones. 1.2.1 Features • Built-in TV tuner • Audio/ Video support: - PC audio input - USB - Convenient control buttons located on different models. 13 S-Video input - 3.5 mm stereo earphone output - CVBS input - One set for...
User Manual
Page 16
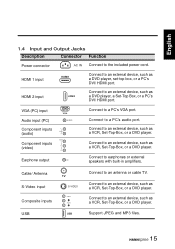
...antenna or cable TV. Connect to a PC's VGA port. VGA (PC) input Audio input (PC) Component inputs (audio) Component inputs (video) AUDIO L AUDIO R VIDEO Y PB PR Earphone output Connect to a PC's audio port. Connect to an external device, such as a VCR, Set-Top-Box, or a DVD player. English 1.4 Input and Output Jacks Description Connector Function Power connector AC IN Connect to an external device, such as a VCR, Set-Top-Box, or a DVD player. Connect to an external device, such as a DVD player, set-top box, or a PC's DVI/ HDMI port. Connect to the included power cord...
...antenna or cable TV. Connect to a PC's VGA port. VGA (PC) input Audio input (PC) Component inputs (audio) Component inputs (video) AUDIO L AUDIO R VIDEO Y PB PR Earphone output Connect to a PC's audio port. Connect to an external device, such as a VCR, Set-Top-Box, or a DVD player. English 1.4 Input and Output Jacks Description Connector Function Power connector AC IN Connect to an external device, such as a VCR, Set-Top-Box, or a DVD player. Connect to an external device, such as a DVD player, set-top box, or a PC's DVI/ HDMI port. Connect to the included power cord...

User Manual
Page 17
... to open the input source list. Press to the previous menu. Press to view the Electronic Prgramming Guide screen. Press VOL - Program entry Last Information Menu LAST INFO MENU Arrows Select Guide channel list Return OK GUIDE RETURN CH / CH Select channel Volume adjust VOL / VOL Press this button for channel 10). Press to confirm your selection. English 1.5 Remote Control Description Icon Power Input source INPUT Keypad Function Press to turn the on-screen display (OSD) menu on/ off...
... to open the input source list. Press to the previous menu. Press to view the Electronic Prgramming Guide screen. Press VOL - Program entry Last Information Menu LAST INFO MENU Arrows Select Guide channel list Return OK GUIDE RETURN CH / CH Select channel Volume adjust VOL / VOL Press this button for channel 10). Press to confirm your selection. English 1.5 Remote Control Description Icon Power Input source INPUT Keypad Function Press to turn the on-screen display (OSD) menu on/ off...

User Manual
Page 18
... restore sound. The available options are: Full, Normal, Zoom and Cinema. Press it again or press the volume adjust buttons to set -top box. Press to select a programmed DVD player. ASPECT C.C. Press to open or close the close caption. Press to select a programmed Cable TV set-top box or a satellite TV set the sleep time (Sleep off mode. English Description Sleep timer Mute Multichannel television sound DVD AUDIO CABLE TV Favorite channels Aspect ratio Close caption Record Pause Icon SLEEP MUTE MTS DVD AUDIO CABLE...
... restore sound. The available options are: Full, Normal, Zoom and Cinema. Press it again or press the volume adjust buttons to set -top box. Press to select a programmed DVD player. ASPECT C.C. Press to open or close the close caption. Press to select a programmed Cable TV set-top box or a satellite TV set the sleep time (Sleep off mode. English Description Sleep timer Mute Multichannel television sound DVD AUDIO CABLE TV Favorite channels Aspect ratio Close caption Record Pause Icon SLEEP MUTE MTS DVD AUDIO CABLE...

User Manual
Page 23
English 2.2 Connecting External Devices Connect external devices such as VCRs, Set-Top-Box, DVD players, video game consoles, earphones, or a PC to the TV using the appropriate ports on the rear of the TV. 2.2.1 Connecting External Earphones Headphones Speakers (Built-in Amplifiers) Note: • External speakers or headphones are not included with the TV. • The internal TV speakers will not output sound when headphones are plugged in. • Use external speakers with built-in amplifiers only. • Only one external device for sound can be connected at a time. 22
English 2.2 Connecting External Devices Connect external devices such as VCRs, Set-Top-Box, DVD players, video game consoles, earphones, or a PC to the TV using the appropriate ports on the rear of the TV. 2.2.1 Connecting External Earphones Headphones Speakers (Built-in Amplifiers) Note: • External speakers or headphones are not included with the TV. • The internal TV speakers will not output sound when headphones are plugged in. • Use external speakers with built-in amplifiers only. • Only one external device for sound can be connected at a time. 22

User Manual
Page 28
... for analog channels only, select Analog channel only. • To search for channel search. English 2.3 Using the TV 2.3.1 Turning the TV On and Off 1 Press on the control panel or remote control, then select to enter the Channel menu. 2 Select Air/Cable to set the signal source. (Air or Cable, default is off. 2.3.2 Switching Source Signals Press INPUT on . 2 Press again. The power LED changes from amber to decrease the channel number. • Enter the specific channel number by pressing the number buttons...
... for analog channels only, select Analog channel only. • To search for channel search. English 2.3 Using the TV 2.3.1 Turning the TV On and Off 1 Press on the control panel or remote control, then select to enter the Channel menu. 2 Select Air/Cable to set the signal source. (Air or Cable, default is off. 2.3.2 Switching Source Signals Press INPUT on . 2 Press again. The power LED changes from amber to decrease the channel number. • Enter the specific channel number by pressing the number buttons...

User Manual
Page 29
... and apply the onscreen buttons to play music files. 5 Use / to select a folder (if any) and press OK to open the input source list. 3 Select USB to switch to the external storage screen. 4 Use / on the remote control to check/uncheck the channel. on the control panel or VOL / VOL on the remote control to select Photo/Music to view images or play music. • Use / to view the previous/next image...
... and apply the onscreen buttons to play music files. 5 Use / to select a folder (if any) and press OK to open the input source list. 3 Select USB to switch to the external storage screen. 4 Use / on the remote control to check/uncheck the channel. on the control panel or VOL / VOL on the remote control to select Photo/Music to view images or play music. • Use / to view the previous/next image...
User Manual
Page 32
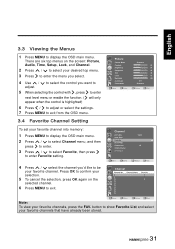
Channel Air/Cable Auto Scan Favorite Show/Hide Channel No. Channel Label DTV Signal Cable 19 Move OK Enter Return Return Menu Exit 4 Press / select the channel you'd like to exit. Press OK to confirm your selection. 5 To cancel the selection, press OK again on the screen: Picture, Audio, Time, Setup, Lock, and Channel. 2 Press / to select your favorite channels, press the FAV. Channel Channel No. 8 9 10 11 12 13 14...
Channel Air/Cable Auto Scan Favorite Show/Hide Channel No. Channel Label DTV Signal Cable 19 Move OK Enter Return Return Menu Exit 4 Press / select the channel you'd like to exit. Press OK to confirm your selection. 5 To cancel the selection, press OK again on the screen: Picture, Audio, Time, Setup, Lock, and Channel. 2 Press / to select your favorite channels, press the FAV. Channel Channel No. 8 9 10 11 12 13 14...

User Manual
Page 33
... Channel Label setting. 5 Use / to choose letters or signs, / to move forward or backward. 6 After you input the channel name, press RETURN or OK to complete the setting. 7 Press RETURN to return back to Show/Hide, and check or uncheck it will not appear on the screen when you want to previous menu in Channel. Channel Air/Cable Auto Scan Favorite Show/Hide Channel...
... Channel Label setting. 5 Use / to choose letters or signs, / to move forward or backward. 6 After you input the channel name, press RETURN or OK to complete the setting. 7 Press RETURN to return back to Show/Hide, and check or uncheck it will not appear on the screen when you want to previous menu in Channel. Channel Air/Cable Auto Scan Favorite Show/Hide Channel...

User Manual
Page 34
... OK Enter Return Return Menu Exit 3.9 Configuring System Setting 1 Press MENU to display the OSD main menu. 2 Press / to select Setup menu, and then press to enter. 3 Press / to select the control of Menu Language, Transparent, OSD Time Out, Closed Caption, Restore Default, Input Label, Setup Menu Language Transparent OSD Time Out Closed Caption Restore Default Input Label Media English 25% 15 Sec. Picture Picture Mode Contrast Brightness Sharpness Tint Color Backlight X-Contrast Color Mode Move OK Enter...
... OK Enter Return Return Menu Exit 3.9 Configuring System Setting 1 Press MENU to display the OSD main menu. 2 Press / to select Setup menu, and then press to enter. 3 Press / to select the control of Menu Language, Transparent, OSD Time Out, Closed Caption, Restore Default, Input Label, Setup Menu Language Transparent OSD Time Out Closed Caption Restore Default Input Label Media English 25% 15 Sec. Picture Picture Mode Contrast Brightness Sharpness Tint Color Backlight X-Contrast Color Mode Move OK Enter...

User Manual
Page 36
Setup Menu Language Transparent OSD Time Out Closed Caption Restore Default Input Label Media English 25% 15 Sec. Basic Selection: To set basic analog closed caption options. (CC1~CC4, Text1~Text4, Off) Advanced Selection: To select closed caption signal formats and set up caption modes for digital TV channels. (Service1~6, Basic) For detailed Close Caption setting: 1 Press / to select Option, and then press to enter Option setting. 2 press / to select the Mode to be set according to broadcast...
Setup Menu Language Transparent OSD Time Out Closed Caption Restore Default Input Label Media English 25% 15 Sec. Basic Selection: To set basic analog closed caption options. (CC1~CC4, Text1~Text4, Off) Advanced Selection: To select closed caption signal formats and set up caption modes for digital TV channels. (Service1~6, Basic) For detailed Close Caption setting: 1 Press / to select Option, and then press to enter Option setting. 2 press / to select the Mode to be set according to broadcast...

User Manual
Page 43
... or sources of the antenna or change the video signal cable. Choose programs with a new one. Check the antenna and the video signal line connections. Make sure the audio cable is OK, no sound. • • • One of the speakers has no • sound. Adjust the balance in the OSD menus. Try the Auto Scan function in the OSD Channel menu. Turn the mute off. 4 Troubleshooting English Situation Solution • Connect the power cord properly...
... or sources of the antenna or change the video signal cable. Choose programs with a new one. Check the antenna and the video signal line connections. Make sure the audio cable is OK, no sound. • • • One of the speakers has no • sound. Adjust the balance in the OSD menus. Try the Auto Scan function in the OSD Channel menu. Turn the mute off. 4 Troubleshooting English Situation Solution • Connect the power cord properly...

User Manual
Page 48
... current DVD mode, just perform this unlock operation, while those electronic equipment modes not operated still have channel locked up ). While holding the electronic equipment button, press CH+ twice consecutively to assign channel lock to that electronic equipment (meaning the volume buttons will only transmit code values to transmit code values under current CABLE mode, just perform this unlock operation, while those electronic equipment modes not so operated still have volume locked up ). Volume buttons...
... current DVD mode, just perform this unlock operation, while those electronic equipment modes not operated still have channel locked up ). While holding the electronic equipment button, press CH+ twice consecutively to assign channel lock to that electronic equipment (meaning the volume buttons will only transmit code values to transmit code values under current CABLE mode, just perform this unlock operation, while those electronic equipment modes not so operated still have volume locked up ). Volume buttons...
User Manual
Page 50
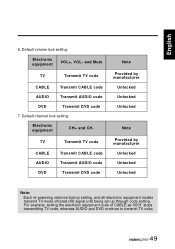
...Default channel lock setting: Electronic equipment CH+ and CH- and Mute TV Transmit TV code CABLE Transmit CABLE code AUDIO Transmit AUDIO code DVD Transmit DVD code 7. English 6. TV Transmit TV code CABLE AUDIO DVD Transmit CABLE code Transmit AUDIO code Transmit DVD code Note Provided by manufacturer Unlocked Unlocked Unlocked Note Provided by manufacturer Unlocked Unlocked Unlocked Note: Each re-powering restores factory setting, and all electronic equipment modes transmit TV-mode infrared (IR) signal until being set up through code setting. Default volume lock setting...
...Default channel lock setting: Electronic equipment CH+ and CH- and Mute TV Transmit TV code CABLE Transmit CABLE code AUDIO Transmit AUDIO code DVD Transmit DVD code 7. English 6. TV Transmit TV code CABLE AUDIO DVD Transmit CABLE code Transmit AUDIO code Transmit DVD code Note Provided by manufacturer Unlocked Unlocked Unlocked Note Provided by manufacturer Unlocked Unlocked Unlocked Note: Each re-powering restores factory setting, and all electronic equipment modes transmit TV-mode infrared (IR) signal until being set up through code setting. Default volume lock setting...
User Manual
Page 59
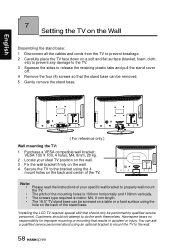
... be removed. 5 Gently remove the stand base. ( For reference only ) Wall mounting the TV: 1 Purchase a VESA compatible wall bracket: VESA 100 X 100, 4 holes, M4, 8mm, 20 kg. 2 Locate your specific wall bracket to properly wall mount the TV. • The pitch of the mounting holes is 100mm horizontally and 100mm vertically. • The screws type required is metric: M4, 8 mm length. • The 18.5" TV stand base can ask a qualified service personnel about using...
... be removed. 5 Gently remove the stand base. ( For reference only ) Wall mounting the TV: 1 Purchase a VESA compatible wall bracket: VESA 100 X 100, 4 holes, M4, 8mm, 20 kg. 2 Locate your specific wall bracket to properly wall mount the TV. • The pitch of the mounting holes is 100mm horizontally and 100mm vertically. • The screws type required is metric: M4, 8 mm length. • The 18.5" TV stand base can ask a qualified service personnel about using...


