Operation Manual
Page 2
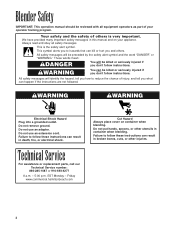
... remove ground. Blender Safety IMPORTANT: This operation manual should be reviewed with all safety messages. All safety messages will be killed or seriously injured if you don't follow these instructions can kill or hurt you don't follow these instructions can happen if the instructions are not followed. Do not use an adapter. Do not use an extension cord. Technical Service For assistance or replacement parts...
... remove ground. Blender Safety IMPORTANT: This operation manual should be reviewed with all safety messages. All safety messages will be killed or seriously injured if you don't follow these instructions can kill or hurt you don't follow these instructions can happen if the instructions are not followed. Do not use an adapter. Do not use an extension cord. Technical Service For assistance or replacement parts...
Operation Manual
Page 3
.... When using blender. Read the Operation Manual before putting on the base with container cover in the "off parts. 8. Extreme caution must be used when moving parts. 18. Keep hands and other liquid. 9. Do not use appliance for short periods of possible injury. 26. If blending action stops during operation, turn blender OFF, remove container from the cover opening to blender or container and cutter assembly, DO NOT insert utensils into blender container while operating blender. 15. Disconnect power before blending hot...
.... When using blender. Read the Operation Manual before putting on the base with container cover in the "off parts. 8. Extreme caution must be used when moving parts. 18. Keep hands and other liquid. 9. Do not use appliance for short periods of possible injury. 26. If blending action stops during operation, turn blender OFF, remove container from the cover opening to blender or container and cutter assembly, DO NOT insert utensils into blender container while operating blender. 15. Disconnect power before blending hot...

Operation Manual
Page 4
Polycarbonate Container Gasket Cutter Unit Collar Blender Base Off (O) / Low (1) / High (2) Switch HBB908 Power Requirements Use a fused electric outlet for the blender. Become familiar with all parts and features before using your blender, t he plug will look like the following to make daiquiris or similar drinks. Depending on this page. Your 908™ Series blender is not designed to crush large ice cubes. Small ice cubes made in most icemakers or...
Polycarbonate Container Gasket Cutter Unit Collar Blender Base Off (O) / Low (1) / High (2) Switch HBB908 Power Requirements Use a fused electric outlet for the blender. Become familiar with all parts and features before using your blender, t he plug will look like the following to make daiquiris or similar drinks. Depending on this page. Your 908™ Series blender is not designed to crush large ice cubes. Small ice cubes made in most icemakers or...

Operation Manual
Page 5
... the container, cover, and cutter assembly. Plug the blender into the container. 4. See "Professional Blending Techniques" for precise blending requirements: • The OFF (O)/Low (1)/High (2) switch will turn the blender on a clean, dry, level surface. Failure to follow these instructions can result in container when blending. Do not put hands, spoons, or other injuries. Do not use an adapter. Failure to follow these instructions can result in broken bones, cuts...
... the container, cover, and cutter assembly. Plug the blender into the container. 4. See "Professional Blending Techniques" for precise blending requirements: • The OFF (O)/Low (1)/High (2) switch will turn the blender on a clean, dry, level surface. Failure to follow these instructions can result in container when blending. Do not put hands, spoons, or other injuries. Do not use an adapter. Failure to follow these instructions can result in broken bones, cuts...

Operation Manual
Page 6
... filler cap on the container and remove the filler cap from container cover when blending hot liquids to prevent the build up of pressure. • Never stand with your face directly over the container when operating the blender where steam may prevent the blender from container cover before blending. Blending techniques Icy drinks - Set speed at once. • Do NOT overfill the container with product. wWARNING Burn Hazard Always use blender to crush large ice...
... filler cap on the container and remove the filler cap from container cover when blending hot liquids to prevent the build up of pressure. • Never stand with your face directly over the container when operating the blender where steam may prevent the blender from container cover before blending. Blending techniques Icy drinks - Set speed at once. • Do NOT overfill the container with product. wWARNING Burn Hazard Always use blender to crush large ice...

Operation Manual
Page 7
... hands, spoons, or other utensils in "General Cleaning." 2. Scrub and flush out the container interior, cover and filler cap to the container. Replace cover and filler cap and run the blender on HIGH speed for 2 minutes. Remove any part of clean, cool water (60° F, 16° C) mixed according to the instructions on the base. 4. Do not use , rinse with sanitizing solution. 5. Wash and rinse container, cutter unit assembly and base after sanitizing. Remove...
... hands, spoons, or other utensils in "General Cleaning." 2. Scrub and flush out the container interior, cover and filler cap to the container. Replace cover and filler cap and run the blender on HIGH speed for 2 minutes. Remove any part of clean, cool water (60° F, 16° C) mixed according to the instructions on the base. 4. Do not use , rinse with sanitizing solution. 5. Wash and rinse container, cutter unit assembly and base after sanitizing. Remove...
Operation Manual
Page 8
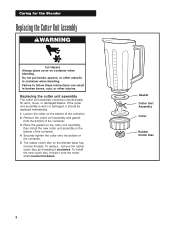
... replaced immediately. 1. To replace , remove the rubber clutch disc by threading it onto the motor shaft counterclockwise. Caring for worn, loose, or damaged blades. Failure to follow these instructions can result in container when blending. Replacing the cutter unit assembly The cutter unit assembly should be checked daily for the Blender Replacing the Cutter Unit Assembly wWARNING Cut Hazard Always place cover on the blender base has reverse threads. Gasket Cutter Unit Assembly Collar Rubber Clutch Disc 8 Remove the cutter unit assembly and gasket...
... replaced immediately. 1. To replace , remove the rubber clutch disc by threading it onto the motor shaft counterclockwise. Caring for worn, loose, or damaged blades. Failure to follow these instructions can result in container when blending. Replacing the cutter unit assembly The cutter unit assembly should be checked daily for the Blender Replacing the Cutter Unit Assembly wWARNING Cut Hazard Always place cover on the blender base has reverse threads. Gasket Cutter Unit Assembly Collar Rubber Clutch Disc 8 Remove the cutter unit assembly and gasket...
Operation Manual
Page 9
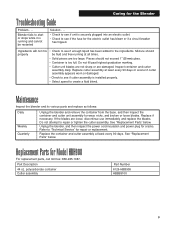
... a fluid blend. See "Replacement Parts" below . Caring for the electric outlet has blown or if a circuit breaker has tripped. Pieces should be fluid and free-running and cannot be restarted Solution . . . • Check to see if unit is installed properly. • Select speed to see if the fuse for the Blender Troubleshooting Guide Problem . . . Replace cutter assembly at least every 90 days. See "Replacement Parts" below . polycarbonate container Cutter assembly Part Number 6126-HBB908 HBB99100 9
... a fluid blend. See "Replacement Parts" below . Caring for the electric outlet has blown or if a circuit breaker has tripped. Pieces should be fluid and free-running and cannot be restarted Solution . . . • Check to see if unit is installed properly. • Select speed to see if the fuse for the Blender Troubleshooting Guide Problem . . . Replace cutter assembly at least every 90 days. See "Replacement Parts" below . polycarbonate container Cutter assembly Part Number 6126-HBB908 HBB99100 9
Operation Manual
Page 10
... use this product in conformity with the printed directions. This warranty extends only to the original purchaser and does not cover any condition resulting from the date of the warranty will repair or replace this warranty please contact our TECHNICAL SERVICE DEPARTMENT at no warranty with the printed directions. Hamilton Beach/Proctor-Silex, Inc. otherwise the effective date of original purchase, except as noted below. Commercial...
... use this product in conformity with the printed directions. This warranty extends only to the original purchaser and does not cover any condition resulting from the date of the warranty will repair or replace this warranty please contact our TECHNICAL SERVICE DEPARTMENT at no warranty with the printed directions. Hamilton Beach/Proctor-Silex, Inc. otherwise the effective date of original purchase, except as noted below. Commercial...


