Operation Manual
Page 2
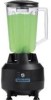
... appliance. All safety messages will identify the hazard, tell you how to follow these instructions can result in this manual and on container when blending. Blender Safety IMPORTANT: This operation manual should be killed or seriously injured if you don't follow instructions. This is very important. All safety messages will be...
... appliance. All safety messages will identify the hazard, tell you how to follow these instructions can result in this manual and on container when blending. Blender Safety IMPORTANT: This operation manual should be killed or seriously injured if you don't follow instructions. This is very important. All safety messages will be...
Operation Manual
Page 3
... safety precautions should be used when moving parts. 18. Blades are loose, discontinue use by Hamilton Beach may cause injuries. 14. Check cutter for use immediately and replace cutter assembly. Not intended for wear, nicks, or broken blades. Blender Operation - Do not use appliance for instructions on examination, repair, or electrical or mechanical...
... safety precautions should be used when moving parts. 18. Blades are loose, discontinue use by Hamilton Beach may cause injuries. 14. Check cutter for use immediately and replace cutter assembly. Not intended for wear, nicks, or broken blades. Blender Operation - Do not use appliance for instructions on examination, repair, or electrical or mechanical...

Operation Manual
Page 4
...Gasket Cutter Unit Collar Blender Base Off (O) / Low (1) / High (2) Switch HBB908 Power Requirements Use a fused electric outlet for blending and mixing beverages. Parts and Features The parts and features for the 908™ Series blenders are shown on the model of your blender. Small ice cubes ... be added to liquid ingredients in the blender to crush large ice cubes. NOTE: The blender is designed for the blender. Removable Filler Cap Cover 44 oz. Depending on this page. Become familiar with all parts and features before using your blender, t he plug will look like the...
...Gasket Cutter Unit Collar Blender Base Off (O) / Low (1) / High (2) Switch HBB908 Power Requirements Use a fused electric outlet for blending and mixing beverages. Parts and Features The parts and features for the 908™ Series blenders are shown on the model of your blender. Small ice cubes ... be added to liquid ingredients in the blender to crush large ice cubes. NOTE: The blender is designed for the blender. Removable Filler Cap Cover 44 oz. Depending on this page. Become familiar with all parts and features before using your blender, t he plug will look like the...

Operation Manual
Page 5
Operation Operating the Blender-HBB908 wWARNING wWARNING Electrical Shock Hazard Plug into an electric outlet. 3. Place the blender on the container. Place the ingredients to "Cleaning Instructions." See "Professional Blending Techniques" for continuous operation at Low or High speed..., or other injuries. Place the container onto the base. Do not remove the container from the base until the unit has stopped completely. 5 Plug the blender into a grounded outlet. Place the cover and filler cap on a clean, dry, level surface. OFF (O) / LOW (1) / HIGH (2) Switch 6. Do ...
Operation Operating the Blender-HBB908 wWARNING wWARNING Electrical Shock Hazard Plug into an electric outlet. 3. Place the blender on the container. Place the ingredients to "Cleaning Instructions." See "Professional Blending Techniques" for continuous operation at Low or High speed..., or other injuries. Place the container onto the base. Do not remove the container from the base until the unit has stopped completely. 5 Plug the blender into a grounded outlet. Place the cover and filler cap on a clean, dry, level surface. OFF (O) / LOW (1) / HIGH (2) Switch 6. Do ...

Operation Manual
Page 6
...Set speed at once. • Do NOT overfill the container with your face directly over the container when operating the blender where steam may prevent the blender from container cover before blending. Failure to follow these instructions can be added to milk or fruit juice to produce a... product. • Always place the cover and filler cap on the container when blending. Chunks of content when blending hot product. The blender is reached. Blending hot mixtures IMPORTANT: To minimize the possibility of scalding, the following precautions MUST be released. • Begin on LOW...
...Set speed at once. • Do NOT overfill the container with your face directly over the container when operating the blender where steam may prevent the blender from container cover before blending. Failure to follow these instructions can be added to milk or fruit juice to produce a... product. • Always place the cover and filler cap on the container when blending. Chunks of content when blending hot product. The blender is reached. Blending hot mixtures IMPORTANT: To minimize the possibility of scalding, the following precautions MUST be released. • Begin on LOW...

Operation Manual
Page 7
.... Do not use an adapter. Cut Hazard Always place cover on base. 3. Use the recommended amount of the blender. Replace cover and filler cap and run the blender on the bleach. Immerse the cover and filler cap in "General Cleaning." 2. Recommended Sanitizing Solution: The sanitizing solution... bleach per million of the base with fresh washing solution. 7. When ready to use , or whenever it on LOW speed for the Blender Cleaning Instructions wWARNING wWARNING Electrical Shock Hazard Plug into a grounded outlet. Do not use an extension cord. Wash and rinse container, cutter ...
.... Do not use an adapter. Cut Hazard Always place cover on base. 3. Use the recommended amount of the blender. Replace cover and filler cap and run the blender on the bleach. Immerse the cover and filler cap in "General Cleaning." 2. Recommended Sanitizing Solution: The sanitizing solution... bleach per million of the base with fresh washing solution. 7. When ready to use , or whenever it on LOW speed for the Blender Cleaning Instructions wWARNING wWARNING Electrical Shock Hazard Plug into a grounded outlet. Do not use an extension cord. Wash and rinse container, cutter ...
Operation Manual
Page 8
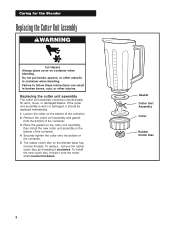
...cutter unit assembly and gasket from the bottom of the container. 5. Caring for worn, loose, or damaged blades. Place the gasket on the blender base has reverse threads. Gasket Cutter Unit Assembly Collar Rubber Clutch Disc 8 If the cutter unit assembly is worn or damaged, it clockwise....new cutter unit assembly in container when blending. Replacing the cutter unit assembly The cutter unit assembly should be checked daily for the Blender Replacing the Cutter Unit Assembly wWARNING Cut Hazard Always place cover on the bottom of the container. 2. Do not put hands, ...
...cutter unit assembly and gasket from the bottom of the container. 5. Caring for worn, loose, or damaged blades. Place the gasket on the blender base has reverse threads. Gasket Cutter Unit Assembly Collar Rubber Clutch Disc 8 If the cutter unit assembly is worn or damaged, it clockwise....new cutter unit assembly in container when blending. Replacing the cutter unit assembly The cutter unit assembly should be checked daily for the Blender Replacing the Cutter Unit Assembly wWARNING Cut Hazard Always place cover on the bottom of the container. 2. Do not put hands, ...
Operation Manual
Page 9
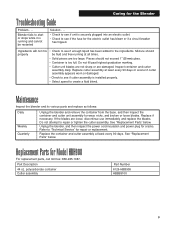
...assembly at least every 90 days. Refer to create a fluid blend. Part Description 44 oz. Maintenance Inspect the blender and its various parts and replace as follows: Daily Weekly Quarterly Unplug the blender and remove the container from the base, and then inspect the container and cutter unit...cutter assembly appears worn or damaged. • Check to see if unit is too full. polycarbonate container Cutter assembly Part Number 6126-HBB908 HBB99100 9 Do not fill past highest graduation marking. • Cutter unit blades are not sharp or are loose, discontinue use immediately...
...assembly at least every 90 days. Refer to create a fluid blend. Part Description 44 oz. Maintenance Inspect the blender and its various parts and replace as follows: Daily Weekly Quarterly Unplug the blender and remove the container from the base, and then inspect the container and cutter unit...cutter assembly appears worn or damaged. • Check to see if unit is too full. polycarbonate container Cutter assembly Part Number 6126-HBB908 HBB99100 9 Do not fill past highest graduation marking. • Cutter unit blades are not sharp or are loose, discontinue use immediately...


