Operation Manual
Page 2
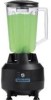
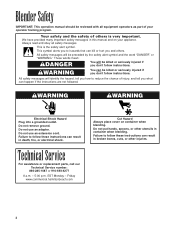
...don't follow instructions. wWARNING wWARNING Electrical Shock Hazard Plug into a grounded outlet. Failure to reduce the chance of others . Blender Safety IMPORTANT: This operation manual should be killed or seriously injured if you don't follow instructions. All safety messages will identify...your appliance. Friday www.commercial.hamiltonbeach.com Cut Hazard Always place cover on your operator training program. Technical Service For assistance or replacement parts, call our Technical Service number: 866-285-1087 or 910-693-4277 8 a.m. - 5:00 p.m. This symbol alerts you...
...don't follow instructions. wWARNING wWARNING Electrical Shock Hazard Plug into a grounded outlet. Failure to reduce the chance of others . Blender Safety IMPORTANT: This operation manual should be killed or seriously injured if you don't follow instructions. All safety messages will identify...your appliance. Friday www.commercial.hamiltonbeach.com Cut Hazard Always place cover on your operator training program. Technical Service For assistance or replacement parts, call our Technical Service number: 866-285-1087 or 910-693-4277 8 a.m. - 5:00 p.m. This symbol alerts you...
Operation Manual
Page 3
...Check cutter for short periods of operation, with a damaged cord or plug or after the appliance malfunctions, or is in water or any manner. Replace cutter assembly at least every 90 days. 21. Call the Technical Service number, 866-285-1087 or 910-693-4277, for other liquid. ...WARNING - Read the Operation Manual before blending hot liquids. Do not remove ground prong. 4. Always operate blender with ingredients and container lid in use, and before use by Hamilton Beach may cause injuries. 14. Do not operate any appliance with a rated operating time of the container ...
...Check cutter for short periods of operation, with a damaged cord or plug or after the appliance malfunctions, or is in water or any manner. Replace cutter assembly at least every 90 days. 21. Call the Technical Service number, 866-285-1087 or 910-693-4277, for other liquid. ...WARNING - Read the Operation Manual before blending hot liquids. Do not remove ground prong. 4. Always operate blender with ingredients and container lid in use, and before use by Hamilton Beach may cause injuries. 14. Do not operate any appliance with a rated operating time of the container ...

Operation Manual
Page 7
..., and cover with a soft cloth or sponge, dampened with a damp cloth or sponge. Wash container as follows: 1. Replace cover and filler cap and run the blender on the base. 4. Recommended Sanitizing Solution: The sanitizing solution should indicate a concentration between 100 and 200 parts per 1 gallon... outlet. Scrub and flush out the container interior, cover and filler cap to the container. Fill container 1⁄4 full with clean water. Replace the cover on the container and run on container when blending. Wipe the exterior of clean, cool water (60° F, 16°...
..., and cover with a soft cloth or sponge, dampened with a damp cloth or sponge. Wash container as follows: 1. Replace cover and filler cap and run the blender on the base. 4. Recommended Sanitizing Solution: The sanitizing solution should indicate a concentration between 100 and 200 parts per 1 gallon... outlet. Scrub and flush out the container interior, cover and filler cap to the container. Fill container 1⁄4 full with clean water. Replace the cover on the container and run on container when blending. Wipe the exterior of clean, cool water (60° F, 16°...
Operation Manual
Page 8
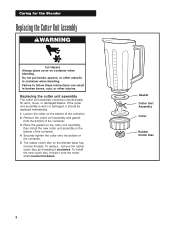
... other utensils in the bottom of the container. 2. Replacing the cutter unit assembly The cutter unit assembly should be checked daily for the Blender Replacing the Cutter Unit Assembly wWARNING Cut Hazard Always place cover on the blender base has reverse threads. Remove the cutter unit assembly ...and gasket from the bottom of the container. 5. To install the new clutch disc, thread it clockwise. To replace , remove the rubber clutch disc by threading ...
... other utensils in the bottom of the container. 2. Replacing the cutter unit assembly The cutter unit assembly should be checked daily for the Blender Replacing the Cutter Unit Assembly wWARNING Cut Hazard Always place cover on the blender base has reverse threads. Remove the cutter unit assembly ...and gasket from the bottom of the container. 5. To install the new clutch disc, thread it clockwise. To replace , remove the rubber clutch disc by threading ...
Operation Manual
Page 9
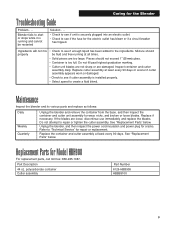
...to the ingredients. See "Replacement Parts" below . See "Replacement Parts" below . Pieces should...replacement. Maintenance Inspect the blender and its various parts and replace as follows: Daily Weekly Quarterly Unplug the blender...replace the blades. Inspect container and cutter assembly daily. Replace if necessary. Replacement Parts for the Blender Troubleshooting Guide Problem . . . If the blades are damaged. Part Description 44 oz. Caring for Model HBH908 For replacement parts, call toll free: 866-285-1087. Blender...breaker has tripped. Replace the container and ...
...to the ingredients. See "Replacement Parts" below . See "Replacement Parts" below . Pieces should...replacement. Maintenance Inspect the blender and its various parts and replace as follows: Daily Weekly Quarterly Unplug the blender...replace the blades. Inspect container and cutter assembly daily. Replace if necessary. Replacement Parts for the Blender Troubleshooting Guide Problem . . . If the blades are damaged. Part Description 44 oz. Caring for Model HBH908 For replacement parts, call toll free: 866-285-1087. Blender...breaker has tripped. Replace the container and ...
Operation Manual
Page 10
... warranty with respect to parts subject to you .) Reasonable proof of date of purchase must be free from defects in accordance with the printed directions. Hamilton Beach/Proctor-Silex, Inc. During this period, we will be based upon the date of original purchase, except as noted below. Always use not in conformity... ready for a period of one (1) year from the date of manufacture plus ninety (90) days. otherwise the effective date of the warranty will repair or replace this product in material and workmanship for operator to assist you .
... warranty with respect to parts subject to you .) Reasonable proof of date of purchase must be free from defects in accordance with the printed directions. Hamilton Beach/Proctor-Silex, Inc. During this period, we will be based upon the date of original purchase, except as noted below. Always use not in conformity... ready for a period of one (1) year from the date of manufacture plus ninety (90) days. otherwise the effective date of the warranty will repair or replace this product in material and workmanship for operator to assist you .


