

Use & Care
Page 3
..., it can result in damage to the cutting blades, jar, blender and possibly result in the freezer filled with your blender jar, the round rubber gasket must be provided with food or liquid. Do not use only. Care must be pulled on available cutting blades and jar combinations that it will...
..., it can result in damage to the cutting blades, jar, blender and possibly result in the freezer filled with your blender jar, the round rubber gasket must be provided with food or liquid. Do not use only. Care must be pulled on available cutting blades and jar combinations that it will...
Use & Care
Page 4
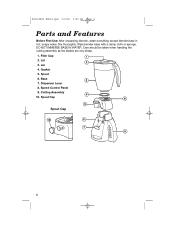
Gasket 5. Spout Cap Spout Cap 4 Dry thoroughly. DO NOT IMMERSE BASE IN WATER. Jar 4. Spout 6. Cutting Assembly 10. Speed Control Panel 9. Lid 3. Dispenser Lever 8. Wipe blender base with a damp cloth or sponge. Filler Cap 2. Base 7. 840143800 ENv03.qxd 1/6/06 9:05 AM Page 4 Parts and Features Before First Use: After unpacking blender, wash everything except blender base in hot, soapy water. Care should be taken when handling the cutting assembly as the blades are very sharp. 1.
Gasket 5. Spout Cap Spout Cap 4 Dry thoroughly. DO NOT IMMERSE BASE IN WATER. Jar 4. Spout 6. Cutting Assembly 10. Speed Control Panel 9. Lid 3. Dispenser Lever 8. Wipe blender base with a damp cloth or sponge. Filler Cap 2. Base 7. 840143800 ENv03.qxd 1/6/06 9:05 AM Page 4 Parts and Features Before First Use: After unpacking blender, wash everything except blender base in hot, soapy water. Care should be taken when handling the cutting assembly as the blades are very sharp. 1.
Use & Care
Page 5
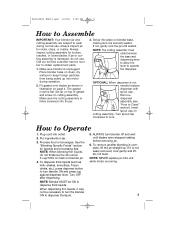
...To remove jar after dispensing. See the "Blending Specific Foods" section for speeds and processing tips. Place blender base on cutting assembly. The gasket must slide between the base and dispensing lever to allow the lever to operate the dispenser. Call our toll-free customer service number to Clean..." section). If not, gently rock the jar until blades have stopped rotating before removing jar. 6. Set jar on top of gasket and screw on clean, dry surface to keep foreign particles from being pulled up . NOTE: NEVER replace jar onto unit while motor is complete,...
...To remove jar after dispensing. See the "Blending Specific Foods" section for speeds and processing tips. Place blender base on cutting assembly. The gasket must slide between the base and dispensing lever to allow the lever to operate the dispenser. Call our toll-free customer service number to Clean..." section). If not, gently rock the jar until blades have stopped rotating before removing jar. 6. Set jar on top of gasket and screw on clean, dry surface to keep foreign particles from being pulled up . NOTE: NEVER replace jar onto unit while motor is complete,...
Use & Care
Page 8
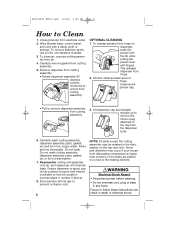
Wipe blender base, control panel, and cord with fingers. Carefully remove gasket from cutting assembly. Reassemble cutting unit assembly onto jar, and replace jar onto blender base. Store blender with lid ajar to prevent container odor. 8 ... actuator from cutting assembly. 3. Lift and rotate actuator around hinge. Carefully wash cutting assembly, dispenser assembly parts, gasket, jar, and lid in a dishwasher. 7. Do not soak. Do not wash cutting assembly, dispenser assembly parts, gasket, jar, or lid in hot, soapy water. To remove stubborn spots, use a mild, non-abrasive cleanser. ...
Wipe blender base, control panel, and cord with fingers. Carefully remove gasket from cutting assembly. Reassemble cutting unit assembly onto jar, and replace jar onto blender base. Store blender with lid ajar to prevent container odor. 8 ... actuator from cutting assembly. 3. Lift and rotate actuator around hinge. Carefully wash cutting assembly, dispenser assembly parts, gasket, jar, and lid in a dishwasher. 7. Do not soak. Do not wash cutting assembly, dispenser assembly parts, gasket, jar, or lid in hot, soapy water. To remove stubborn spots, use a mild, non-abrasive cleanser. ...
Use & Care
Page 9
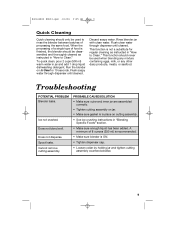
... not blend well. PROBABLE CAUSE/SOLUTION • Make sure outer and inner jar are assembled correctly. • Tighten cutting assembly on jar. • Make sure gasket is ON. • Tighten dispenser cap. • Loosen collar by holding jar and tighten cutting assembly counterclockwise. 9 Cannot remove cutting assembly. To quick clean, pour...
... not blend well. PROBABLE CAUSE/SOLUTION • Make sure outer and inner jar are assembled correctly. • Tighten cutting assembly on jar. • Make sure gasket is ON. • Tighten dispenser cap. • Loosen collar by holding jar and tighten cutting assembly counterclockwise. 9 Cannot remove cutting assembly. To quick clean, pour...
Use & Care
Page 12
... manufacturer's instructions, use for commercial purposes, or any use not in material and workmanship for a period of three (3) years for Hamilton Beach products or one hundred eighty (180) days for Proctor-Silex and Traditions products from the date of your blender. These numbers can ...supplied with the printed directions. or Canada. During this product, including without limitation: glass parts, glass containers, cutter/strainers, blades, seals, gaskets, clutches, motor brushes, and/or agitators, etc. This warranty gives you specific legal rights, and you may also have other legal rights...
... manufacturer's instructions, use for commercial purposes, or any use not in material and workmanship for a period of three (3) years for Hamilton Beach products or one hundred eighty (180) days for Proctor-Silex and Traditions products from the date of your blender. These numbers can ...supplied with the printed directions. or Canada. During this product, including without limitation: glass parts, glass containers, cutter/strainers, blades, seals, gaskets, clutches, motor brushes, and/or agitators, etc. This warranty gives you specific legal rights, and you may also have other legal rights...


