

Use & Care
Page 2
... carefully- Do not use a broken, chipped, or cracked blender jar. 13. Always begin processing at the lowest speed setting. Injury can result if moving parts. 6. Do not use , before putting on cutting assembly firmly. 840143800 ENv03.qxd 1/6/06 9:05 AM Page 2 WARNING Shock Hazard • Do not ...blender jar beyond the 3-cup (750 ml) level. Screw on or taking off parts, and before cleaning. 5. Avoid contact with lid in threaded cutting assembly. 19. If the jar should always be used by Hamilton Beach/Proctor-Silex, Inc. The plug fits only one wide blade) that reduces the ...
... carefully- Do not use a broken, chipped, or cracked blender jar. 13. Always begin processing at the lowest speed setting. Injury can result if moving parts. 6. Do not use , before putting on cutting assembly firmly. 840143800 ENv03.qxd 1/6/06 9:05 AM Page 2 WARNING Shock Hazard • Do not ...blender jar beyond the 3-cup (750 ml) level. Screw on or taking off parts, and before cleaning. 5. Avoid contact with lid in threaded cutting assembly. 19. If the jar should always be used by Hamilton Beach/Proctor-Silex, Inc. The plug fits only one wide blade) that reduces the ...

Use & Care
Page 3
Care must be taken to crush ice, frozen fruit, etc. The blender as replacement parts. This is when a blender requires the most . This is a better measure of what a blender motor can result in personal injury. If the cutting blades lock ...
Care must be taken to crush ice, frozen fruit, etc. The blender as replacement parts. This is when a blender requires the most . This is a better measure of what a blender motor can result in personal injury. If the cutting blades lock ...
Use & Care
Page 4
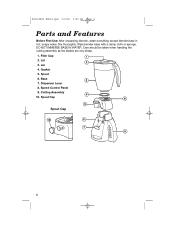
DO NOT IMMERSE BASE IN WATER. Base 7. Cutting Assembly 10. Spout Cap Spout Cap 4 840143800 ENv03.qxd 1/6/06 9:05 AM Page 4 Parts and Features Before First Use: After unpacking blender, wash everything except blender base in hot, soapy water. Spout 6. Speed Control Panel 9. Lid 3. Wipe blender base with a damp cloth or sponge. Filler Cap 2. Gasket 5. Dry thoroughly. Jar 4. Dispenser Lever 8. Care should be taken when handling the cutting assembly as the blades are very sharp. 1.
DO NOT IMMERSE BASE IN WATER. Base 7. Cutting Assembly 10. Spout Cap Spout Cap 4 840143800 ENv03.qxd 1/6/06 9:05 AM Page 4 Parts and Features Before First Use: After unpacking blender, wash everything except blender base in hot, soapy water. Spout 6. Speed Control Panel 9. Lid 3. Wipe blender base with a damp cloth or sponge. Filler Cap 2. Gasket 5. Dry thoroughly. Jar 4. Dispenser Lever 8. Care should be taken when handling the cutting assembly as the blades are very sharp. 1.
Use & Care
Page 5
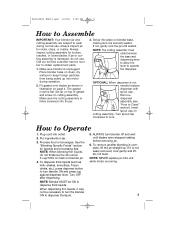
... dispenser lever. If it may not be ON to dispense thick liquids. Always inspect cutting assembly for speeds and processing tips. How to obtain replacement parts. 1. To dispense thick liquids (such as shown in jar. 3. 840143800 ENv03.qxd 1/6/06 9:05 AM Page 5 How to Assemble IMPORTANT: Your blender jar and cutting...
... dispenser lever. If it may not be ON to dispense thick liquids. Always inspect cutting assembly for speeds and processing tips. How to obtain replacement parts. 1. To dispense thick liquids (such as shown in jar. 3. 840143800 ENv03.qxd 1/6/06 9:05 AM Page 5 How to Assemble IMPORTANT: Your blender jar and cutting...
Use & Care
Page 8
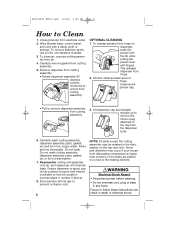
...Rotate dispenser assembly 90 degrees counterclockwise to unlock from cutting assembly. 3. Unscrew dispenser cap. • Pull to the heating element. Some part distortion may be washed in a dishwasher. 7. Carefully remove gasket from jar. 4. Rinse and dry thoroughly. Ensure dispenser or spout cap...blender from hinge on the top rack only. This releases dispenser from the dispenser body. 6. Carefully wash cutting assembly, dispenser assembly parts, gasket, jar, and lid in any liquid. Lift dispenser cap and actuator straight up to remove the interior plug attached to ...
...Rotate dispenser assembly 90 degrees counterclockwise to unlock from cutting assembly. 3. Unscrew dispenser cap. • Pull to the heating element. Some part distortion may be washed in a dishwasher. 7. Carefully remove gasket from jar. 4. Rinse and dry thoroughly. Ensure dispenser or spout cap...blender from hinge on the top rack only. This releases dispenser from the dispenser body. 6. Carefully wash cutting assembly, dispenser assembly parts, gasket, jar, and lid in any liquid. Lift dispenser cap and actuator straight up to remove the interior plug attached to ...
Use & Care
Page 12
...NUMBERS FOR FUTURE REFERENCE! 12 This warranty gives you specific legal rights, and you may be supplied with this product, including without limitation: glass parts, glass containers, cutter/strainers, blades, seals, gaskets, clutches, motor brushes, and/or agitators, etc. During this period, we will help...series, and type numbers ready for operator to be free from defects in material and workmanship for a period of three (3) years for Hamilton Beach products or one hundred eighty (180) days for commercial purposes, or any use not in conformity with respect to province. Before calling,...
...NUMBERS FOR FUTURE REFERENCE! 12 This warranty gives you specific legal rights, and you may be supplied with this product, including without limitation: glass parts, glass containers, cutter/strainers, blades, seals, gaskets, clutches, motor brushes, and/or agitators, etc. During this period, we will help...series, and type numbers ready for operator to be free from defects in material and workmanship for a period of three (3) years for Hamilton Beach products or one hundred eighty (180) days for commercial purposes, or any use not in conformity with respect to province. Before calling,...


