Use & Care
Page 2
... any appliance with this BrewStation®. Scalding may cause injuries. 10. Do not operate any manner. Call our toll-free customer service number for use of table or counter or touch hot surfaces, including stove. 12. The use with a damaged cord or plug, or after the appliance malfunctions or is used on or taking off parts and before cleaning. The coffee tank is lifted during...
... any appliance with this BrewStation®. Scalding may cause injuries. 10. Do not operate any manner. Call our toll-free customer service number for use of table or counter or touch hot surfaces, including stove. 12. The use with a damaged cord or plug, or after the appliance malfunctions or is used on or taking off parts and before cleaning. The coffee tank is lifted during...

Use & Care
Page 3
... Never use only. Clean monthly. • Do not clean coffee tank in dishwasher. • Read instructions before attempting any way or using . The plug fits only one wide blade) that affect coffeemaker performance. If the plug does not fit, reverse the plug. The length of the BrewStation®. Handle coffee tank when it still does not fit, have an electrician replace the outlet...
... Never use only. Clean monthly. • Do not clean coffee tank in dishwasher. • Read instructions before attempting any way or using . The plug fits only one wide blade) that affect coffeemaker performance. If the plug does not fit, reverse the plug. The length of the BrewStation®. Handle coffee tank when it still does not fit, have an electrician replace the outlet...
Use & Care
Page 5
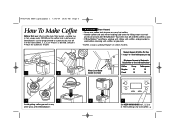
...; Never use : Wash coffee tank, filter basket, and drip tray in 0 (for iced coffee. 5 Default is cool. • If BrewStation® overflows, unplug unit. Normal Amount of Coffee Per Cup 1 scoop* or 1 level tablespoon per cup Maximum Amount of the BrewStation®. 5 6 Set KEEP WARM HOURS to 1, 2, 3, or 4. NEVER put the coffee tank in any other areas of Automatic Drip Coffee to Use in BrewStation® Coffee Scoop Tablespoons Regular 12 12 Water Level Guide 1 2 (inside reservoir) Decaf 12 12 3 4 Avoid getting coffee grounds...
...; Never use : Wash coffee tank, filter basket, and drip tray in 0 (for iced coffee. 5 Default is cool. • If BrewStation® overflows, unplug unit. Normal Amount of Coffee Per Cup 1 scoop* or 1 level tablespoon per cup Maximum Amount of the BrewStation®. 5 6 Set KEEP WARM HOURS to 1, 2, 3, or 4. NEVER put the coffee tank in any other areas of Automatic Drip Coffee to Use in BrewStation® Coffee Scoop Tablespoons Regular 12 12 Water Level Guide 1 2 (inside reservoir) Decaf 12 12 3 4 Avoid getting coffee grounds...
Use & Care
Page 6
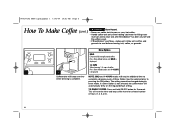
.../strong-flavored coffee Press Brew Mode button until BOLD is displayed 1-4 CUPS When brewing 1-4 cups of coffee Press Brew Mode button until 1-4 CUPS 7 8 is displayed Coffeemaker will reset the timer and keep coffee warm for selected number of hours (1, 2, 3, or 4). 6 The setting cannot be selected prior to cool before cleaning unit, coffee, or grounds. This will beep one time when brewing is cool. • If BrewStation® overflows, unplug unit. A Brew Option must be changed during/in brew mode. If a Brew Option...
.../strong-flavored coffee Press Brew Mode button until BOLD is displayed 1-4 CUPS When brewing 1-4 cups of coffee Press Brew Mode button until 1-4 CUPS 7 8 is displayed Coffeemaker will reset the timer and keep coffee warm for selected number of hours (1, 2, 3, or 4). 6 The setting cannot be selected prior to cool before cleaning unit, coffee, or grounds. This will beep one time when brewing is cool. • If BrewStation® overflows, unplug unit. A Brew Option must be changed during/in brew mode. If a Brew Option...
Use & Care
Page 7
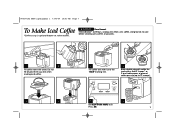
... not fill beyond the 6-cup line when making iced coffee. 5 6 3 Fill coffee tank with ice to cool before cleaning unit, coffee, or grounds. 1 2 Fill coffee tank with water. Add 2 scoops* or 2 level tablespoons of ground coffee per cup (up to 12 scoops). 7 8 Set KEEP WARM HOURS to 0. Press ON. 7 840177102 ENv01.qxd:Layout 1 7/24/09 10:53 AM Page 7 To Make Iced Coffee *Coffee scoop is optional feature on select models. If BrewStation® overflows, unplug unit.
... not fill beyond the 6-cup line when making iced coffee. 5 6 3 Fill coffee tank with ice to cool before cleaning unit, coffee, or grounds. 1 2 Fill coffee tank with water. Add 2 scoops* or 2 level tablespoons of ground coffee per cup (up to 12 scoops). 7 8 Set KEEP WARM HOURS to 0. Press ON. 7 840177102 ENv01.qxd:Layout 1 7/24/09 10:53 AM Page 7 To Make Iced Coffee *Coffee scoop is optional feature on select models. If BrewStation® overflows, unplug unit.
Use & Care
Page 8
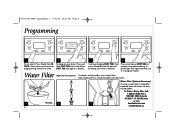
... START TIME to work. Filter replacement is in display. Continue holding START TIME; A green light will appear in program mode. (optional accessory) For better tasting coffee, use a water filter. To Order a Water Filter Call: 1.800.851.8900 (U.S.) 1.800.267.2826 (Canada) 01.800.71.16.100 (Mexico) or visit 3 hamiltonbeach.com hamiltonbeach.ca then press H and M until clock flashes. START TIME will signal that the unit is recommended every 60 cycles. 1 15 min. 2 8 Water Filter...
... START TIME to work. Filter replacement is in display. Continue holding START TIME; A green light will appear in program mode. (optional accessory) For better tasting coffee, use a water filter. To Order a Water Filter Call: 1.800.851.8900 (U.S.) 1.800.267.2826 (Canada) 01.800.71.16.100 (Mexico) or visit 3 hamiltonbeach.com hamiltonbeach.ca then press H and M until clock flashes. START TIME will signal that the unit is recommended every 60 cycles. 1 15 min. 2 8 Water Filter...
Use & Care
Page 9
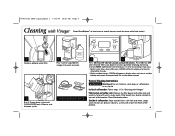
... of the product. 9 minated for 2 cycles. • Built-in residue sensor-CLEAN will flash in top rack of coffeemaker: Follow steps 1-5 in display when unit senses residue buildup and remain illuminated until the unit has been cleaned. DISHWASHER-SAFE 3 4 Press ON. Press ON. Filter basket and coffee tank: Remove the filter basket and coffee tank and wash by hand with CLEAN WATER only. Filter basket may also be cleaned in display and stay illu- Turn OFF after...
... of the product. 9 minated for 2 cycles. • Built-in residue sensor-CLEAN will flash in top rack of coffeemaker: Follow steps 1-5 in display when unit senses residue buildup and remain illuminated until the unit has been cleaned. DISHWASHER-SAFE 3 4 Press ON. Press ON. Filter basket and coffee tank: Remove the filter basket and coffee tank and wash by hand with CLEAN WATER only. Filter basket may also be cleaned in display and stay illu- Turn OFF after...
Use & Care
Page 10
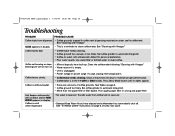
... water in display. then plug back in filter basket. See "To Reheat Coffee" instructions on . • Mineral deposits have elapsed and coffeemaker has automatically shut off. Set coffee grinder to automatic drip grind. • Coffee-to make coffee. Coffee not brewing or stops brewing/unit will not brew and/or POUR WATER appears in reservoir. See Table on page 5. • Coffee ground too finely. See "Cleaning with Vinegar." Adjust for personal preference. • Poor water quality. Unit beeps continuously/ will not turn...
... water in display. then plug back in filter basket. See "To Reheat Coffee" instructions on . • Mineral deposits have elapsed and coffeemaker has automatically shut off. Set coffee grinder to automatic drip grind. • Coffee-to make coffee. Coffee not brewing or stops brewing/unit will not brew and/or POUR WATER appears in reservoir. See Table on page 5. • Coffee ground too finely. See "Cleaning with Vinegar." Adjust for personal preference. • Poor water quality. Unit beeps continuously/ will not turn...
Use & Care
Page 11
.... 11 To make a warranty claim. For faster service, locate the model, type, and series numbers on where you . During this written warranty. Keep the original sales receipt, as proof of purchase is limited to the duration of any other warranty or condition. All liability is no longer available, we will replace with the printed directions, or damage to the product resulting from the...
.... 11 To make a warranty claim. For faster service, locate the model, type, and series numbers on where you . During this written warranty. Keep the original sales receipt, as proof of purchase is limited to the duration of any other warranty or condition. All liability is no longer available, we will replace with the printed directions, or damage to the product resulting from the...


