
Use & Care
Page 2
... or other liquids. 3. Care shall be tripped over. To avoid the risk of fire or electric shock due to overheating. Always turn a steam iron upside down- Never pull on the cord to arrange the cord so that the surface on which the stand is placed is required for less... 8. Only use . 6. Do not let the cord touch hot surfaces. Incorrect assembly might be used. To avoid a circuit overload, do not operate an iron on an ironing board. 10. If an extension cord is connected or on the same circuit with retractable cord, fully retract cord when storing. 5. SAVE THESE INSTRUCTIONS 2
... or other liquids. 3. Care shall be tripped over. To avoid the risk of fire or electric shock due to overheating. Always turn a steam iron upside down- Never pull on the cord to arrange the cord so that the surface on which the stand is placed is required for less... 8. Only use . 6. Do not let the cord touch hot surfaces. Incorrect assembly might be used. To avoid a circuit overload, do not operate an iron on an ironing board. 10. If an extension cord is connected or on the same circuit with retractable cord, fully retract cord when storing. 5. SAVE THESE INSTRUCTIONS 2
Use & Care
Page 3
... adapter. This will stop after a few uses with tap water. Do not defeat the safety purpose of the iron, it still does not fit, have an electrician replace the outlet. • Use the iron on page 11. 3 The plug fits only one wide blade) that are being worn. • Do not... conditioned. This will stop and does not indicate a defect or hazard. • Many irons spit or sputter during the first few uses. • To clean steam vents before first use, prepare iron for steam ironing and then iron over an old cloth for household use of the plug by modifying the plug in...
... adapter. This will stop after a few uses with tap water. Do not defeat the safety purpose of the iron, it still does not fit, have an electrician replace the outlet. • Use the iron on page 11. 3 The plug fits only one wide blade) that are being worn. • Do not... conditioned. This will stop and does not indicate a defect or hazard. • Many irons spit or sputter during the first few uses. • To clean steam vents before first use, prepare iron for steam ironing and then iron over an old cloth for household use of the plug by modifying the plug in...
Use & Care
Page 5
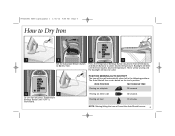
... press Temperature Settings Button until the iron reaches desired temperature. POSITION SENSING/AUTO SHUTOFF The iron will now be a beep and the backlight will turn iron off automatically when left in front of the Spray and Steam Buttons) to (Dry Iron). IRON POSITION MOTIONLESS TIME Resting on soleplate 30...The Auto Shutoff time varies based on heel 15 minutes NOTE: Moving/tilting the iron will blink until "OFF" is illuminated. 840203501 ENv01.qxd:Layout 1 1/16/12 9:06 AM Page 5 How to Dry Iron 1 2 3 4 Set the Adjustable Steam Switch to select desired temperature. ...
... press Temperature Settings Button until the iron reaches desired temperature. POSITION SENSING/AUTO SHUTOFF The iron will now be a beep and the backlight will turn iron off automatically when left in front of the Spray and Steam Buttons) to (Dry Iron). IRON POSITION MOTIONLESS TIME Resting on soleplate 30...The Auto Shutoff time varies based on heel 15 minutes NOTE: Moving/tilting the iron will blink until "OFF" is illuminated. 840203501 ENv01.qxd:Layout 1 1/16/12 9:06 AM Page 5 How to Dry Iron 1 2 3 4 Set the Adjustable Steam Switch to select desired temperature. ...
Use & Care
Page 6
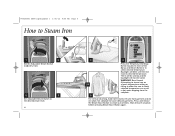
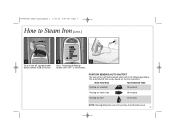
... desired steam level. 6 3 4 OR 6 Press the Temperature Settings Button (located in hot water dripping from garment and do not allow the iron to reach selected temperature can result in front of the Spray and Steam Buttons) to select desired temperature. Wait at least 5 seconds before pressing ...Steam Burst Button again. Backlight will now be a beep and the backlight will blink until the iron reaches desired temperature. There will be solid. Press and release the Steam Burst Button to touch delicate garments. For vertical steaming, hold...
... desired steam level. 6 3 4 OR 6 Press the Temperature Settings Button (located in hot water dripping from garment and do not allow the iron to reach selected temperature can result in front of the Spray and Steam Buttons) to select desired temperature. Wait at least 5 seconds before pressing ...Steam Burst Button again. Backlight will now be a beep and the backlight will blink until the iron reaches desired temperature. There will be solid. Press and release the Steam Burst Button to touch delicate garments. For vertical steaming, hold...
Use & Care
Page 7
The Auto Shutoff time varies based on heel 15 minutes NOTE: Moving/tilting the iron will turn off , set Adjustable Steam Switch to Steam Iron (cont.) 7 To turn iron off automatically when left in the following positions. IRON POSITION MOTIONLESS TIME Resting on soleplate 30 seconds Resting on either side 30 seconds Resting on the iron's position. 840203501 ENv01.qxd:Layout 1 1/16/12 9:06 AM Page 7 How to (Dry Iron). 8 9 Press Temperature Settings Button until "OFF" is illuminated. POSITION SENSING/AUTO SHUTOFF The iron will reset the Auto Shutoff sensor. 7
The Auto Shutoff time varies based on heel 15 minutes NOTE: Moving/tilting the iron will turn off , set Adjustable Steam Switch to Steam Iron (cont.) 7 To turn iron off automatically when left in the following positions. IRON POSITION MOTIONLESS TIME Resting on soleplate 30 seconds Resting on either side 30 seconds Resting on the iron's position. 840203501 ENv01.qxd:Layout 1 1/16/12 9:06 AM Page 7 How to (Dry Iron). 8 9 Press Temperature Settings Button until "OFF" is illuminated. POSITION SENSING/AUTO SHUTOFF The iron will reset the Auto Shutoff sensor. 7
Use & Care
Page 8
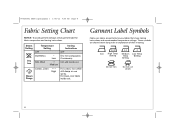
... garment damage, check garment label for fabric composition and ironing instructions. These symbols are shown below along with an explanation of their meaning. Iron High Temp Medium Low Temp Setting Temp Setting Setting Do not iron Do not use spray. Cotton, Linen ••&#...8226; High Steam Range For cotton, iron while still damp or use steam 8 Iron silk inside out. For linen, iron fabric inside out. Steam Setting Dry Iron Temperature Setting OFF Synthetics •...
... garment damage, check garment label for fabric composition and ironing instructions. These symbols are shown below along with an explanation of their meaning. Iron High Temp Medium Low Temp Setting Temp Setting Setting Do not iron Do not use spray. Cotton, Linen ••&#...8226; High Steam Range For cotton, iron while still damp or use steam 8 Iron silk inside out. For linen, iron fabric inside out. Steam Setting Dry Iron Temperature Setting OFF Synthetics •...
Use & Care
Page 9
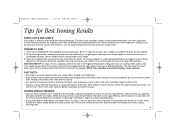
... is repeated until the areas that has two layers of a garment that need to the cloth. TEST KITCHEN TIP: To clean an iron's soleplate, preheat the iron to avoid stretching fabrics. • A pressing cloth can purchase a pressing cloth in the laundry care section, or a clean white ...dishtowel or 100% cotton pillowcase works equally well. Many irons have heard the terms "ironing" and "pressing" used while cleaning; You do not know what the content of the fabric is, use a low temperature setting. Set...
... is repeated until the areas that has two layers of a garment that need to the cloth. TEST KITCHEN TIP: To clean an iron's soleplate, preheat the iron to avoid stretching fabrics. • A pressing cloth can purchase a pressing cloth in the laundry care section, or a clean white ...dishtowel or 100% cotton pillowcase works equally well. Many irons have heard the terms "ironing" and "pressing" used while cleaning; You do not know what the content of the fabric is, use a low temperature setting. Set...
Use & Care
Page 10
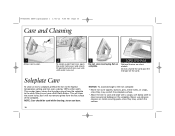
...This will clean the steam holes, but it will not remove grime from the soleplate to the cloth. Many irons have a Self-Clean Button. NOTICE: To avoid damage to the iron soleplate: • Never iron over zippers, buttons, pins, metal rivets, or snaps, since they may scratch the surface. 10 CORD STORAGE... while cleaning; steam can burn. Never use abrasive cleaners or metal scouring pads, since they may scratch the soleplate surface. • Allow the iron to cool and wipe with a soapy, soft damp cloth to clean occasional buildup on soleplate. Do not unwind the cord past the red tape ...
...This will clean the steam holes, but it will not remove grime from the soleplate to the cloth. Many irons have a Self-Clean Button. NOTICE: To avoid damage to the iron soleplate: • Never iron over zippers, buttons, pins, metal rivets, or snaps, since they may scratch the surface. 10 CORD STORAGE... while cleaning; steam can burn. Never use abrasive cleaners or metal scouring pads, since they may scratch the soleplate surface. • Allow the iron to cool and wipe with a soapy, soft damp cloth to clean occasional buildup on soleplate. Do not unwind the cord past the red tape ...
Use & Care
Page 11
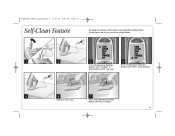
840203501 ENv01.qxd:Layout 1 1/16/12 9:06 AM Page 11 Self-Clean Feature To keep the steam vents clear of any buildup, follow these instructions each time you iron using steam. 1 2 3 4 Press Temperature Settings Button until tank is empty. 11 Press and hold the Self-Clean Button until "5 LINEN" is illuminated. 5 6 7 Hold iron over sink. Press Temperature Settings Button until "OFF" is illuminated and let iron heat.
840203501 ENv01.qxd:Layout 1 1/16/12 9:06 AM Page 11 Self-Clean Feature To keep the steam vents clear of any buildup, follow these instructions each time you iron using steam. 1 2 3 4 Press Temperature Settings Button until tank is empty. 11 Press and hold the Self-Clean Button until "5 LINEN" is illuminated. 5 6 7 Hold iron over sink. Press Temperature Settings Button until "OFF" is illuminated and let iron heat.
Use & Care
Page 12
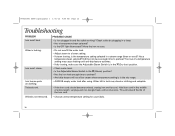
... in a lamp. • Has a temperature been selected? • Is the OFF light illuminated? Did the iron have enough time to a lower setting. • If steam ironing, is in the (Dry Iron) position. • Check water level. • Is the Adjustable Steam Switch in the dry range. •... ALWAYS empty water tank after using. Let plug and iron dangle freely until anti-drip feature activates. • If dry ironing, make sure the Adjustable Steam Switch is the temperature setting selected in the middle of a temperature setting may ...
... in a lamp. • Has a temperature been selected? • Is the OFF light illuminated? Did the iron have enough time to a lower setting. • If steam ironing, is in the (Dry Iron) position. • Check water level. • Is the Adjustable Steam Switch in the dry range. •... ALWAYS empty water tank after using. Let plug and iron dangle freely until anti-drip feature activates. • If dry ironing, make sure the Adjustable Steam Switch is the temperature setting selected in the middle of a temperature setting may ...
Use & Care
Page 13
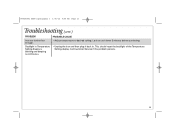
Backlight in . Call Customer Service if this problem persists. 13 PROBABLE CAUSE • Adjust temperature to desired setting. 840203501 ENv01.qxd:Layout 1 1/16/12 9:06 AM Page 13 Troubleshooting (cont.) PROBLEM Iron too hot/not hot enough. This should reset the backlight of the Temperature Setting display. Let iron cool down 5 minutes before continuing. • Unplug the iron and then plug it back in Temperature Setting display is blinking and beeping is continuous.
Backlight in . Call Customer Service if this problem persists. 13 PROBABLE CAUSE • Adjust temperature to desired setting. 840203501 ENv01.qxd:Layout 1 1/16/12 9:06 AM Page 13 Troubleshooting (cont.) PROBLEM Iron too hot/not hot enough. This should reset the backlight of the Temperature Setting display. Let iron cool down 5 minutes before continuing. • Unplug the iron and then plug it back in Temperature Setting display is blinking and beeping is continuous.


