
User Manual
Page 2
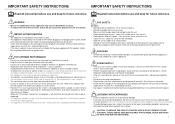
...and contact your local electricity supply which must be carried out by a fully qualified electrician or an authorised service agent. Avoid dark environments and screen reflection as the disconnect device of smoke, or unusual noises or smells coming from the unit, switch it off, unplug it will need time... plate of your product corresponds with your dealer or service center. • Place the TV in any way. • Make sure that the screen is easily accessible. • Protect the power lead from sharp objects, excessive heat and damp or wet locations. Never yank cord to rain or...
...and contact your local electricity supply which must be carried out by a fully qualified electrician or an authorised service agent. Avoid dark environments and screen reflection as the disconnect device of smoke, or unusual noises or smells coming from the unit, switch it off, unplug it will need time... plate of your product corresponds with your dealer or service center. • Place the TV in any way. • Make sure that the screen is easily accessible. • Protect the power lead from sharp objects, excessive heat and damp or wet locations. Never yank cord to rain or...

User Manual
Page 6
... be useful to ask someone to the user instructions supplied with the wall bracket (not included). See fig. 8. fig. 7 B fig. 5 32"-42" W H 47" W H fig. 6 TV Screen VESA-Compatible Size (inches) Wall bracket (W x H mm) Screw Type 32" 200 x 200 mm Metric 6 x 10 mm 37" 200 x 200 mm Metric 6 x 10 mm 42" 400...
... be useful to ask someone to the user instructions supplied with the wall bracket (not included). See fig. 8. fig. 7 B fig. 5 32"-42" W H 47" W H fig. 6 TV Screen VESA-Compatible Size (inches) Wall bracket (W x H mm) Screw Type 32" 200 x 200 mm Metric 6 x 10 mm 37" 200 x 200 mm Metric 6 x 10 mm 42" 400...

User Manual
Page 7
...using the POWER J or A , the LCD-TV will go into standby mode and the Power LED A will turn C red. This display will appear on the screen when the TV is pressed the TV will turn on and the fig. 9 Power LED A on for your TV. U Y a Thank you for the first ... select the TV menu. To improve the picture quality in a poor signal area, you may use the Cursor Y to set-up your purchase of this screen, you may press MENU U . Please proceed with the installation. Then use a signal amplifier (not included). See fig. 11. For optimum picture quality, adjust antenna...
...using the POWER J or A , the LCD-TV will go into standby mode and the Power LED A will turn C red. This display will appear on the screen when the TV is pressed the TV will turn on and the fig. 9 Power LED A on for your TV. U Y a Thank you for the first ... select the TV menu. To improve the picture quality in a poor signal area, you may use the Cursor Y to set-up your purchase of this screen, you may press MENU U . Please proceed with the installation. Then use a signal amplifier (not included). See fig. 11. For optimum picture quality, adjust antenna...
User Manual
Page 11
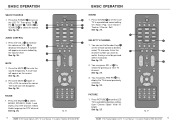
.... See fig. 26. PICTURE 1. NICAM 1. See fig. 27. You can use the Number Keys F on the screen. C See fig. 26. See fig. 26. 2. A mute icon will appear on the remote control to turn on screen indicating the volume level. See fig. 27. BASIC OPERATION BASIC OPERATION SELECT SOURCE 1. Press the POWER A to...
.... See fig. 26. PICTURE 1. NICAM 1. See fig. 27. You can use the Number Keys F on the screen. C See fig. 26. See fig. 26. 2. A mute icon will appear on the remote control to turn on screen indicating the volume level. See fig. 27. BASIC OPERATION BASIC OPERATION SELECT SOURCE 1. Press the POWER A to...

User Manual
Page 12
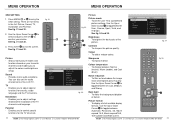
...X to 14:9. - Panorama: Removes the black bars on the remote control to 16:9. - 16:9 subtitle: Display 4:3 pictures using the full surface of the screen leaving the subtitles visible. - Movie expand 16:9: Scales the classic 4:3 format to enter the picture format menu. See fig. 28. PR LIST - SLEEP X...Press the ASPECT J on the side of channels and input sources. J X Automatic Panorama 4:3 fig. 29 Y Movie expand 16:9 16:9 subtitle Wide screen fig. 30 Movie expand 14:9 BUSH HD Ready Digital LCDTV User Manual Customer Helpline 0845 604 0105 21 See fig. 28. Press PR LIST O to...
...X to 14:9. - Panorama: Removes the black bars on the remote control to 16:9. - 16:9 subtitle: Display 4:3 pictures using the full surface of the screen leaving the subtitles visible. - Movie expand 16:9: Scales the classic 4:3 format to enter the picture format menu. See fig. 28. PR LIST - SLEEP X...Press the ASPECT J on the side of channels and input sources. J X Automatic Panorama 4:3 fig. 29 Y Movie expand 16:9 16:9 subtitle Wide screen fig. 30 Movie expand 14:9 BUSH HD Ready Digital LCDTV User Manual Customer Helpline 0845 604 0105 21 See fig. 28. Press PR LIST O to...
User Manual
Page 13
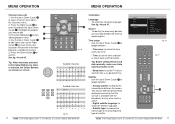
...31 and 32. 3. Press EXIT V to toggle between Off, Low, Medium, and Strong. Use the Up or Down Cursor Y to exit the screen. Y Contrast - Settings Picture Sound TV Installation Parental 5 Picture 9 Picture mode Brightness Contrast Sharpness Colour temperature Noise Reduction Back light fig. 34 Picture... Customer Helpline 0845 604 0105 Sharpness - To choose between Automatic, Panorama, 4:3, Movie expand 14:9, Movie expand16:9, 16:9 subtitle and Wide screen. Use the Up or Down Cursor Y to toggle between Normal (neutral), Warm (redder), and Cool (bluer). BUSH HD Ready Digital ...
...31 and 32. 3. Press EXIT V to toggle between Off, Low, Medium, and Strong. Use the Up or Down Cursor Y to exit the screen. Y Contrast - Settings Picture Sound TV Installation Parental 5 Picture 9 Picture mode Brightness Contrast Sharpness Colour temperature Noise Reduction Back light fig. 34 Picture... Customer Helpline 0845 604 0105 Sharpness - To choose between Automatic, Panorama, 4:3, Movie expand 14:9, Movie expand16:9, 16:9 subtitle and Wide screen. Use the Up or Down Cursor Y to toggle between Normal (neutral), Warm (redder), and Cool (bluer). BUSH HD Ready Digital ...
User Manual
Page 16
... select auto synchronisation. Use the Up or Down Cursor Y to toggle between : • Time zone: to select the time zone you are shown on the screen. Use the Up or Down Cursor Y to the external inputs/outputs. To identify the accessory devices you want to confirm. Time setup - This text can... Up or Down X Cursor Y to highlight the program you have connected to select Channel name edit in . • Time: to display the transmitted subtitle on screen. Press the Green Button a to edit.
... select auto synchronisation. Use the Up or Down Cursor Y to toggle between : • Time zone: to select the time zone you are shown on the screen. Use the Up or Down Cursor Y to the external inputs/outputs. To identify the accessory devices you want to confirm. Time setup - This text can... Up or Down X Cursor Y to highlight the program you have connected to select Channel name edit in . • Time: to display the transmitted subtitle on screen. Press the Green Button a to edit.

User Manual
Page 18
...TELETEXT g to a quiz. REVEAL - Press REVEAL p to display hidden information such as a subtitle page. Press MIX f to change the screen size: Full screen, Top half and Bottom half. Press SIZE h to activate Teletext overlaying the TV picture. fig. 51 fig. 52 32 BUSH HD Ready...R/G/Y/B (Colour button) - Press again to page m p 100 or the index page; Press HOLD q to stop the scrolling of pages, press again to select from on screen options, which have the same coloured text. Press Colour Buttons a , e , b , and d to continue. MIX - Press SUBTITLE n to the page you select...
...TELETEXT g to a quiz. REVEAL - Press REVEAL p to display hidden information such as a subtitle page. Press MIX f to change the screen size: Full screen, Top half and Bottom half. Press SIZE h to activate Teletext overlaying the TV picture. fig. 51 fig. 52 32 BUSH HD Ready...R/G/Y/B (Colour button) - Press again to page m p 100 or the index page; Press HOLD q to stop the scrolling of pages, press again to select from on screen options, which have the same coloured text. Press Colour Buttons a , e , b , and d to continue. MIX - Press SUBTITLE n to the page you select...

User Manual
Page 19
... additional services. See fig. 58 - 59. "Common interface" will be displayed if the CA module is removed, the "Common Interface" menu will disappear from the screen. Select Common Interface to quit Cancel fig. 59 Settings Picture Sound TV Installation Parental 5 TV 4 Country Audio Language Channels 34 BUSH HD Ready Digital LCDTV...
... additional services. See fig. 58 - 59. "Common interface" will be displayed if the CA module is removed, the "Common Interface" menu will disappear from the screen. Select Common Interface to quit Cancel fig. 59 Settings Picture Sound TV Installation Parental 5 TV 4 Country Audio Language Channels 34 BUSH HD Ready Digital LCDTV...

User Manual
Page 20
...If the item you contact technicians. Connect signal cable correctly. 2. Check the connection of nearby mountains or buildings). SPECIFICATIONS Screen Size DISPLAY Aspect Ratio Resolution OSD Language ENHANCEMENT Sound Output (RMS Watts) Sound Mode Picture Formats Picture Mode CONNECTIONS Rear ...2x10 W 2x10 W Rock, Pop, Live, Dance, Techno, Classic, Soft Automatic, Panorama, 4:3, Movie expand 14:9, Movie expand 16:9, 16:9 subtitle, Wide screen User, Cinema, Sport, Vivid, Hi-bright CONNECTIONS Tuner input (75 ) SCART 1 / SCART 2 PC IN :VGA and Audio cable Component Video and L/R...
...If the item you contact technicians. Connect signal cable correctly. 2. Check the connection of nearby mountains or buildings). SPECIFICATIONS Screen Size DISPLAY Aspect Ratio Resolution OSD Language ENHANCEMENT Sound Output (RMS Watts) Sound Mode Picture Formats Picture Mode CONNECTIONS Rear ...2x10 W 2x10 W Rock, Pop, Live, Dance, Techno, Classic, Soft Automatic, Panorama, 4:3, Movie expand 14:9, Movie expand 16:9, 16:9 subtitle, Wide screen User, Cinema, Sport, Vivid, Hi-bright CONNECTIONS Tuner input (75 ) SCART 1 / SCART 2 PC IN :VGA and Audio cable Component Video and L/R...

User Manual
Page 22
... Helpline 0845 604 0105 See fig. 1. 2 - AC POWER CORD CONNECTION NOTE: Make sure your language. System searching may press MENU on the screen when the TV is 230V, 50Hz. 1. Then use the Cursor to the mains socket. Please proceed with the Set Up please refer to the users...THE ANTENNA 1. Then press the Green Button to go back. See fig. 2. 2. Press the Green Button on the TV set -up of this screen, you encounter a problem with the following steps to the Antenna Socket located at the rear of your TV might cause a hazard. Incorrect settings and fitting...
... Helpline 0845 604 0105 See fig. 1. 2 - AC POWER CORD CONNECTION NOTE: Make sure your language. System searching may press MENU on the screen when the TV is 230V, 50Hz. 1. Then use the Cursor to the mains socket. Please proceed with the Set Up please refer to the users...THE ANTENNA 1. Then press the Green Button to go back. See fig. 2. 2. Press the Green Button on the TV set -up of this screen, you encounter a problem with the following steps to the Antenna Socket located at the rear of your TV might cause a hazard. Incorrect settings and fitting...


