User Manual
Page 1
HD Ready LCD TV USER'S MANUAL Please read this manual carefully before using your television and keep this manual for future reference. MODEL: L1511W-A, L1911W-A Customer helpline:0845 604 0105
HD Ready LCD TV USER'S MANUAL Please read this manual carefully before using your television and keep this manual for future reference. MODEL: L1511W-A, L1911W-A Customer helpline:0845 604 0105
User Manual
Page 4
When it was loss of function by electrostatic shock, please switch the on/off button for using our LCD-TV. Before connecting the LCD-TV and turning the power on the LCD-TV 10 Audio Control 10 Mute 10 Select the TV Channel 11 Picture Mode 11 Menu Operations 12 Picture Menu Options 12...
When it was loss of function by electrostatic shock, please switch the on/off button for using our LCD-TV. Before connecting the LCD-TV and turning the power on the LCD-TV 10 Audio Control 10 Mute 10 Select the TV Channel 11 Picture Mode 11 Menu Operations 12 Picture Menu Options 12...

User Manual
Page 5
... source, then wipe the set with a dry soft cloth; If water comes in to customer helpline. If servicing is corresponds with the LCD-TV, disconnect the power cord from the LCD-TV . l Do not use any accessories that are not recommended by the manufacturer: l Before operation, make sure the operating voltage of...
... source, then wipe the set with a dry soft cloth; If water comes in to customer helpline. If servicing is corresponds with the LCD-TV, disconnect the power cord from the LCD-TV . l Do not use any accessories that are not recommended by the manufacturer: l Before operation, make sure the operating voltage of...
User Manual
Page 11
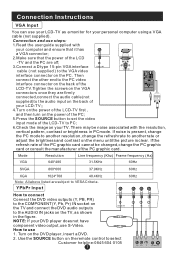
... Then connect the other end to the PC video interface connector on the back of the LCD-TV.Tighten the screws on the VGA connectors once they are firmly connected,connect the audio cable...menu until the picture is present, change the PC graphic card or consult the manufacturer of the LCD-TV to VESACriteria. Mode Resolution Line frequency (Khz) Frame frequency (Hz) VGA 640*480 31...IN jacks on the DVD player, insert a DVD. 2. Turn on the TV, as a monitor for your LCD-TV as shown in PC mode. NOTE: If your DVD player does not have component video output,use your personal...
... Then connect the other end to the PC video interface connector on the back of the LCD-TV.Tighten the screws on the VGA connectors once they are firmly connected,connect the audio cable...menu until the picture is present, change the PC graphic card or consult the manufacturer of the LCD-TV to VESACriteria. Mode Resolution Line frequency (Khz) Frame frequency (Hz) VGA 640*480 31...IN jacks on the DVD player, insert a DVD. 2. Turn on the TV, as a monitor for your LCD-TV as shown in PC mode. NOTE: If your DVD player does not have component video output,use your personal...
User Manual
Page 12
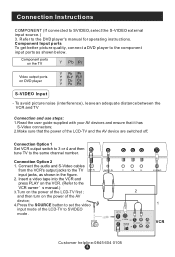
... use steps: 1.Read the user guide supplied with your AV devices and ensure that it has S-Video connectors; 2.Make sure that the power of the LCD-TV first ; Refer to SVIDEO mode . 2 1 VCR Customer helpline:0845 604 0105 put mode of the AV device; 4.Press the SOURCE button to the VCR... owner s manual.) 3.Turn on the power of the LCD-TV to the DVD player's manual for operating instructions. and then turn on the power of the LCD-TV and the AV device are switched off; Connection Option 2 1.
... use steps: 1.Read the user guide supplied with your AV devices and ensure that it has S-Video connectors; 2.Make sure that the power of the LCD-TV first ; Refer to SVIDEO mode . 2 1 VCR Customer helpline:0845 604 0105 put mode of the AV device; 4.Press the SOURCE button to the VCR... owner s manual.) 3.Turn on the power of the LCD-TV to the DVD player's manual for operating instructions. and then turn on the power of the LCD-TV and the AV device are switched off; Connection Option 2 1.
User Manual
Page 14
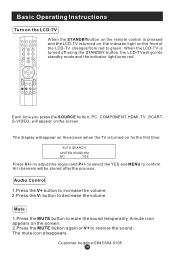
.... The mute icon disappears. to select the YES and MENU to decrease the volume. Customer helpline:0845 604 0105 When the LCD-TV is turned on, the indicator light on the LCD-TV SLEEP DISPLAY MUTE STANDBY NICAM PC AUTO AD SOURCE PSM .SSM OK Q.VIEW P+ V- button to confirm. TIME HOLD SIZE... screen. 2.Press the MUTE button again or V+ to restore the sound. to adjust the region and P+/- Basic Operating Instructions Turn on the front of the LCD-TV changes from red to green. MENU V+ INDEX PTEXT SUBCODE MIX When the STANDBYbutton on the remote control is pressed and the...
.... The mute icon disappears. to select the YES and MENU to decrease the volume. Customer helpline:0845 604 0105 When the LCD-TV is turned on, the indicator light on the LCD-TV SLEEP DISPLAY MUTE STANDBY NICAM PC AUTO AD SOURCE PSM .SSM OK Q.VIEW P+ V- button to confirm. TIME HOLD SIZE... screen. 2.Press the MUTE button again or V+ to restore the sound. to adjust the region and P+/- Basic Operating Instructions Turn on the front of the LCD-TV changes from red to green. MENU V+ INDEX PTEXT SUBCODE MIX When the STANDBYbutton on the remote control is pressed and the...
User Manual
Page 15
... 0 to 9) 2.If you want to choose a channel bigger than 9, please enter the two digits of the channel number you want to watch within 3 seconds. The LCD-TV can store up to 100 channels , and you can use the number keys on the remote control for example: if you want to choose...
... 0 to 9) 2.If you want to choose a channel bigger than 9, please enter the two digits of the channel number you want to watch within 3 seconds. The LCD-TV can store up to 100 channels , and you can use the number keys on the remote control for example: if you want to choose...

User Manual
Page 21
... 3.Press V+/V- PHASE : Removes any horizontal distortion and clears or sharpness the displayed characters . Menu Operations Adjust Menu Options 1. Press MENU and V+/V- CLOCK : Adjust the TFT-LCD to match the PC input source H.POSITION : Picture horizontal adjust V.POSITION : Picture vertical position adjust . Press P+/P- Repeat step 2 and step 3 until the following menu appears...
... 3.Press V+/V- PHASE : Removes any horizontal distortion and clears or sharpness the displayed characters . Menu Operations Adjust Menu Options 1. Press MENU and V+/V- CLOCK : Adjust the TFT-LCD to match the PC input source H.POSITION : Picture horizontal adjust V.POSITION : Picture vertical position adjust . Press P+/P- Repeat step 2 and step 3 until the following menu appears...


