

User Manual
Page 3
... 13 Basic Operation 18 Menu Operation 22 Teletext ...32 Common Interface Module 34 Troubleshooting 36 Specifications 37 Product Guarantee 39 2 BUSH HD Ready Digital LCDTV User Manual Customer Helpline 0845 604 0105 KNOW YOUR MACHINE A POWER B VIDEO C SCART D TV E PC F Numerical Buttons G EPG H PRE PR J ASPECT K SOURCE L NICAM M SLEEP N PICTURE O PR LIST...
... 13 Basic Operation 18 Menu Operation 22 Teletext ...32 Common Interface Module 34 Troubleshooting 36 Specifications 37 Product Guarantee 39 2 BUSH HD Ready Digital LCDTV User Manual Customer Helpline 0845 604 0105 KNOW YOUR MACHINE A POWER B VIDEO C SCART D TV E PC F Numerical Buttons G EPG H PRE PR J ASPECT K SOURCE L NICAM M SLEEP N PICTURE O PR LIST...
User Manual
Page 4
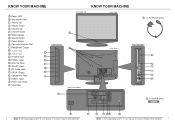
... Control Panel C D E F G H J Y 1 x LCD TV KNOW YOUR MACHINE Front View Z 1 x AC Power Cord A B Rear Connections Rear View Side Connections K L M N O P a 2 x AAA Battery X 4 BUSH HD Ready Digital LCDTV User Manual Customer Helpline 0845 604 0105 V U T SR Q BUSH HD Ready Digital LCDTV...
... Control Panel C D E F G H J Y 1 x LCD TV KNOW YOUR MACHINE Front View Z 1 x AC Power Cord A B Rear Connections Rear View Side Connections K L M N O P a 2 x AAA Battery X 4 BUSH HD Ready Digital LCDTV User Manual Customer Helpline 0845 604 0105 V U T SR Q BUSH HD Ready Digital LCDTV...
User Manual
Page 5
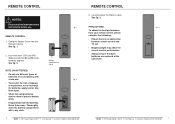
Insert two new 1.5V size AAA Batteries with a dry cloth. 6 BUSH HD Ready Digital LCDTV User Manual Customer Helpline 0845 604 0105 REMOTE CONTROL 3. Thoroughly clean the battery compartment with the and marks correctly aligned. Carefully close the Battery ...2 • To prevent the risk of batteries or an old battery with a new one. See fig. 1. 2. REMOTE CONTROL NOTES: - BUSH HD Ready Digital LCDTV User Manual Customer Helpline 0845 604 0105 7 Unclip the Battery Cover from your remote control, please consider the following: • Ensure there is no obstruction between remote...
Insert two new 1.5V size AAA Batteries with a dry cloth. 6 BUSH HD Ready Digital LCDTV User Manual Customer Helpline 0845 604 0105 REMOTE CONTROL 3. Thoroughly clean the battery compartment with the and marks correctly aligned. Carefully close the Battery ...2 • To prevent the risk of batteries or an old battery with a new one. See fig. 1. 2. REMOTE CONTROL NOTES: - BUSH HD Ready Digital LCDTV User Manual Customer Helpline 0845 604 0105 7 Unclip the Battery Cover from your remote control, please consider the following: • Ensure there is no obstruction between remote...
User Manual
Page 6
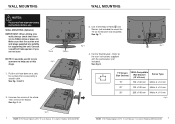
... covered by a smooth cloth. Consult a qualified tradesperson if you at this stage. 1. Use 4 Wall Mount Holes B and Screws (not included) to the user instructions supplied with the wall bracket (not included). fig. 7 B Stand W H TV Screen VESA-Compatible Size (inches) Wall bracket (W x H mm) ...10 mm 26" 200 x 100 mm Metric 4 x 10 mm fig. 8 fig. 6 8 BUSH HD Ready Digital LCDTV User Manual Customer Helpline 0845 604 0105 BUSH HD Ready Digital LCDTV User Manual Customer Helpline 0845 604 0105 9 See fig. 4 - 6. Please read the important safety instructions before use. Make sure that...
... covered by a smooth cloth. Consult a qualified tradesperson if you at this stage. 1. Use 4 Wall Mount Holes B and Screws (not included) to the user instructions supplied with the wall bracket (not included). fig. 7 B Stand W H TV Screen VESA-Compatible Size (inches) Wall bracket (W x H mm) ...10 mm 26" 200 x 100 mm Metric 4 x 10 mm fig. 8 fig. 6 8 BUSH HD Ready Digital LCDTV User Manual Customer Helpline 0845 604 0105 BUSH HD Ready Digital LCDTV User Manual Customer Helpline 0845 604 0105 9 See fig. 4 - 6. Please read the important safety instructions before use. Make sure that...

User Manual
Page 7
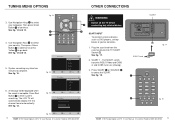
... of the TV. This display will turn A red. See fig. 11. Next fig. 12 10 BUSH HD Ready Digital LCDTV User Manual Customer Helpline 0845 604 0105 BUSH HD Ready Digital LCDTV User Manual Customer Helpline 0845 604 0105 11 Connect the Antenna Plug to the mains socket. TURN ON THE LCD-TV 1. To...
... of the TV. This display will turn A red. See fig. 11. Next fig. 12 10 BUSH HD Ready Digital LCDTV User Manual Customer Helpline 0845 604 0105 BUSH HD Ready Digital LCDTV User Manual Customer Helpline 0845 604 0105 11 Connect the Antenna Plug to the mains socket. TURN ON THE LCD-TV 1. To...
User Manual
Page 8
...). 3. Press SCART C or SOURCE K to select the SCART. SCART1 R fig. 17 SCART Lead C K fig. 18 fig. 16 Exit Next 12 BUSH HD Ready Digital LCDTV User Manual Customer Helpline 0845 604 0105 BUSH HD Ready Digital LCDTV...
...). 3. Press SCART C or SOURCE K to select the SCART. SCART1 R fig. 17 SCART Lead C K fig. 18 fig. 16 Exit Next 12 BUSH HD Ready Digital LCDTV User Manual Customer Helpline 0845 604 0105 BUSH HD Ready Digital LCDTV...
User Manual
Page 9
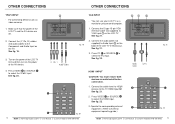
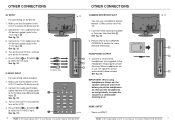
Make sure that the power of the AV device. 4. U fig. 19 Pr Pb Y Audio Cables B K fig. 20 14 BUSH HD Ready Digital LCDTV User Manual Customer Helpline 0845 604 0105 VGA INPUT - See fig. 21. 3. HDMI 1 INPUT CAUTION: You must ensure both devices are off before connection. 1. Connect the ... on the power of the LCD-TV (if necessary). Press VIDEO B or SOURCE K to PC B K fig. 21 E fig. 22 BUSH HD Ready Digital LCDTV User Manual Customer Helpline 0845 604 0105 15 See fig. 20. You can use your personal computer. 1. Connect the D type 15-pin VGA interface cable (not supplied...
Make sure that the power of the AV device. 4. U fig. 19 Pr Pb Y Audio Cables B K fig. 20 14 BUSH HD Ready Digital LCDTV User Manual Customer Helpline 0845 604 0105 VGA INPUT - See fig. 21. 3. HDMI 1 INPUT CAUTION: You must ensure both devices are off before connection. 1. Connect the ... on the power of the LCD-TV (if necessary). Press VIDEO B or SOURCE K to PC B K fig. 21 E fig. 22 BUSH HD Ready Digital LCDTV User Manual Customer Helpline 0845 604 0105 15 See fig. 20. You can use your personal computer. 1. Connect the D type 15-pin VGA interface cable (not supplied...
User Manual
Page 10
...control to a low level before you put the headphones on, then put the headphones on the LCD-TV first ; BUSH HD Ready Digital LCDTV User Manual Customer Helpline 0845 604 0105 17 Connect the Audio cables from the AV device's output jacks to the S-Video Input O and Audio Input N... . S-Video Cable B K fig. 23 M N O fig. 24 16 BUSH HD Ready Digital LCDTV User Manual Customer Helpline 0845 604 0105 COMMON INTERFACE SLOT - You can use , the speakers will be automatically disconnected. Connect the audio and S-Video cables from the...
...control to a low level before you put the headphones on, then put the headphones on the LCD-TV first ; BUSH HD Ready Digital LCDTV User Manual Customer Helpline 0845 604 0105 17 Connect the Audio cables from the AV device's output jacks to the S-Video Input O and Audio Input N... . S-Video Cable B K fig. 23 M N O fig. 24 16 BUSH HD Ready Digital LCDTV User Manual Customer Helpline 0845 604 0105 COMMON INTERFACE SLOT - You can use , the speakers will be automatically disconnected. Connect the audio and S-Video cables from the...
User Manual
Page 11
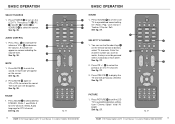
...A 1. See fig. 27. See fig. 27. See fig. 27. fig. 27 18 BUSH HD Ready Digital LCDTV User Manual Customer Helpline 0845 604 0105 BUSH HD Ready Digital LCDTV User Manual Customer Helpline 0845 604 0105 19 AUDIO CONTROL 1. See fig. 26. You can use the Number Keys F on the LCD...-TV. See fig. 27. 3. Press PRE PR H to increase the volume or VOL- User / Cinema / Sport / Vivid / Hibright. Press...
...A 1. See fig. 27. See fig. 27. See fig. 27. fig. 27 18 BUSH HD Ready Digital LCDTV User Manual Customer Helpline 0845 604 0105 BUSH HD Ready Digital LCDTV User Manual Customer Helpline 0845 604 0105 19 AUDIO CONTROL 1. See fig. 26. You can use the Number Keys F on the LCD...-TV. See fig. 27. 3. Press PRE PR H to increase the volume or VOL- User / Cinema / Sport / Vivid / Hibright. Press...

User Manual
Page 12
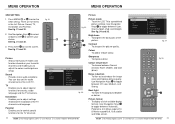
...:9. - 16:9 subtitle: Display 4:3 pictures using the full surface of channels and input sources. fig. 28 20 BUSH HD Ready Digital LCDTV User Manual Customer Helpline 0845 604 0105 BASIC OPERATION PICTURE FORMAT 1. See fig. 29. - Wide screen: Stretches the classic 4:3 format to turn the ...X Automatic Panorama 4:3 fig. 29 Y Movie expand 16:9 16:9 subtitle Wide screen fig. 30 Movie expand 14:9 BUSH HD Ready Digital LCDTV User Manual Customer Helpline 0845 604 0105 21 Press PR LIST O to enter the picture format menu. PR LIST - Automatic: DTV and HDMI input will automatically...
...:9. - 16:9 subtitle: Display 4:3 pictures using the full surface of channels and input sources. fig. 28 20 BUSH HD Ready Digital LCDTV User Manual Customer Helpline 0845 604 0105 BASIC OPERATION PICTURE FORMAT 1. See fig. 29. - Wide screen: Stretches the classic 4:3 format to turn the ...X Automatic Panorama 4:3 fig. 29 Y Movie expand 16:9 16:9 subtitle Wide screen fig. 30 Movie expand 14:9 BUSH HD Ready Digital LCDTV User Manual Customer Helpline 0845 604 0105 21 Press PR LIST O to enter the picture format menu. PR LIST - Automatic: DTV and HDMI input will automatically...
User Manual
Page 13
...Sharpness Colour temperature Noise Reduction Back light fig. 34 fig. 35 Y 22 BUSH HD Ready Digital LCDTV User Manual Customer Helpline 0845 604 0105 BUSH HD Ready Digital LCDTV User Manual Customer Helpline 0845 604 0105 23 Picture - You can also set the LCD TV to the installation ...picture quality. See fig. 31 and 32. 2. Enables you to adjust special functions for the TV channels. Use Navigation Keys Y to toggle between User, Cinema, Sport, Vivid, and Hi-bright. Shows more audio selections. Enables you to exit the screen. Brightness - Use Navigation Keys Y to ...
...Sharpness Colour temperature Noise Reduction Back light fig. 34 fig. 35 Y 22 BUSH HD Ready Digital LCDTV User Manual Customer Helpline 0845 604 0105 BUSH HD Ready Digital LCDTV User Manual Customer Helpline 0845 604 0105 23 Picture - You can also set the LCD TV to the installation ...picture quality. See fig. 31 and 32. 2. Enables you to adjust special functions for the TV channels. Use Navigation Keys Y to toggle between User, Cinema, Sport, Vivid, and Hi-bright. Shows more audio selections. Enables you to exit the screen. Brightness - Use Navigation Keys Y to ...
User Manual
Page 14
... Bass Treble Virtual surround Sound mode AVL Digital audio out fig. 38 fig. 39 Y 24 BUSH HD Ready Digital LCDTV User Manual Customer Helpline 0845 604 0105 BUSH HD Ready Digital LCDTV User Manual Customer Helpline 0845 604 0105 25 To adjust the amount of the sound. To adjust the amount of treble. AVL...
... Bass Treble Virtual surround Sound mode AVL Digital audio out fig. 38 fig. 39 Y 24 BUSH HD Ready Digital LCDTV User Manual Customer Helpline 0845 604 0105 BUSH HD Ready Digital LCDTV User Manual Customer Helpline 0845 604 0105 25 To adjust the amount of the sound. To adjust the amount of treble. AVL...
User Manual
Page 15
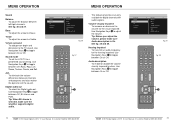
...TV Installation Parental 5 TV 3 Country Audio Language Channels fig. 40 fig. 41 X Y 26 BUSH HD Ready Digital LCDTV User Manual Customer Helpline 0845 604 0105 MENU OPERATION Analog manual store 1. Use Navigation Keys Y to switch. Press the Right Navigation Key Y to enter it and press OK X to toggle... Channel skip 1. Channel skip Channel sort Channel name edit Channel scan Start fig. 42 fig. 43 X Y BUSH HD Ready Digital LCDTV User Manual Customer Helpline 0845 604 0105 27 Press the Right Navigation Key Y to enter it and press OK X to fine tune the program.
...TV Installation Parental 5 TV 3 Country Audio Language Channels fig. 40 fig. 41 X Y 26 BUSH HD Ready Digital LCDTV User Manual Customer Helpline 0845 604 0105 MENU OPERATION Analog manual store 1. Use Navigation Keys Y to switch. Press the Right Navigation Key Y to enter it and press OK X to toggle... Channel skip 1. Channel skip Channel sort Channel name edit Channel scan Start fig. 42 fig. 43 X Y BUSH HD Ready Digital LCDTV User Manual Customer Helpline 0845 604 0105 27 Press the Right Navigation Key Y to enter it and press OK X to fine tune the program.
User Manual
Page 16
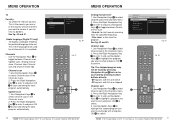
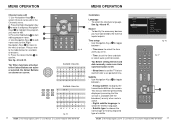
...Subtitle Teletext Current software info Reset AV settings fig. 46 fig. 47 Y BUSH HD Ready Digital LCDTV User Manual Customer Helpline 0845 604 0105 29 Press the Green Button a to choose the normal type or hearing impaired.... @0 1 _- 1 2 ABCab c 2 3 DE F d e f 3 4 GH I g H i 4 5JKL j k l 5 6 MN O mn o 6 7 PQRSp qr s 7 8 TUVt u v8 9 WX Y Z w x y z 9 fig. 45 28 BUSH HD Ready Digital LCDTV User Manual Customer Helpline 0845 604 0105 Installation Language - Time setup - Press the Red Button e to select Channel name edit in . • Time: to the table below...
...Subtitle Teletext Current software info Reset AV settings fig. 46 fig. 47 Y BUSH HD Ready Digital LCDTV User Manual Customer Helpline 0845 604 0105 29 Press the Green Button a to choose the normal type or hearing impaired.... @0 1 _- 1 2 ABCab c 2 3 DE F d e f 3 4 GH I g H i 4 5JKL j k l 5 6 MN O mn o 6 7 PQRSp qr s 7 8 TUVt u v8 9 WX Y Z w x y z 9 fig. 45 28 BUSH HD Ready Digital LCDTV User Manual Customer Helpline 0845 604 0105 Installation Language - Time setup - Press the Red Button e to select Channel name edit in . • Time: to the table below...
User Manual
Page 17
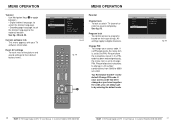
... Picture Sound TV Installation Parental 5 Parental 3 Channel lock Program lock Change PIN fig. 50 30 BUSH HD Ready Digital LCDTV User Manual Customer Helpline 0845 604 0105 BUSH HD Ready Digital LCDTV User Manual Customer Helpline 0845 604 0105 31 This menu appears with your access code has been changed or you have forgotten...
... Picture Sound TV Installation Parental 5 Parental 3 Channel lock Program lock Change PIN fig. 50 30 BUSH HD Ready Digital LCDTV User Manual Customer Helpline 0845 604 0105 BUSH HD Ready Digital LCDTV User Manual Customer Helpline 0845 604 0105 31 This menu appears with your access code has been changed or you have forgotten...
User Manual
Page 18
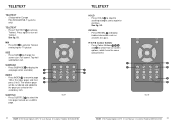
... to turn off Teletext. Press SUBTITLE n to the page you select or the secondary item. fig. 51 fig. 52 32 BUSH HD Ready Digital LCDTV User Manual Customer Helpline 0845 604 0105 BUSH HD Ready Digital LCDTV...
... to turn off Teletext. Press SUBTITLE n to the page you select or the secondary item. fig. 51 fig. 52 32 BUSH HD Ready Digital LCDTV User Manual Customer Helpline 0845 604 0105 BUSH HD Ready Digital LCDTV...
User Manual
Page 19
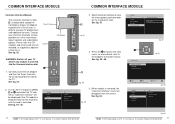
... Select Common Interface to view pay TV programmes and additional services. See fig. 57. Wait for more details refer to the module's instruction manual. COMMON INTERFACE MODULE COMMON INTERFACE MODULE Common Interface Module - See fig. 53. 3. Turn on the inserted CI card. fig. 56 Settings... Sound TV Installation Parental 5 TV 4 Country Audio Language Channels 34 BUSH HD Ready Digital LCDTV User Manual Customer Helpline 0845 604 0105 fig. 60 BUSH HD Ready Digital LCDTV User Manual Customer Helpline 0845 604 0105 35 "Common interface" will be displayed if the CA module is ...
... Select Common Interface to view pay TV programmes and additional services. See fig. 57. Wait for more details refer to the module's instruction manual. COMMON INTERFACE MODULE COMMON INTERFACE MODULE Common Interface Module - See fig. 53. 3. Turn on the inserted CI card. fig. 56 Settings... Sound TV Installation Parental 5 TV 4 Country Audio Language Channels 34 BUSH HD Ready Digital LCDTV User Manual Customer Helpline 0845 604 0105 fig. 60 BUSH HD Ready Digital LCDTV User Manual Customer Helpline 0845 604 0105 35 "Common interface" will be displayed if the CA module is ...

User Manual
Page 20
...W 3 W 5 W Rock, Pop, Live, Dance, Techno, Classic, Soft Automatic, Panorama, 4:3, Movie expand 14:9, Movie expand 16:9, 16:9 subtitle, Wide screen User, Cinema, Sport, Vivid, Hi-bright CONNECTIONS Tuner input (75 ) SCART 1 PC IN :VGA and Audio cable Component Video and L/R Audio input SPDIF Output (Digital ...-240V 1.5A 50-60Hz AC100-240V 1.5A 50-60Hz 36 BUSH HD Ready Digital LCDTV User Manual Customer Helpline 0845 604 0105 BUSH HD Ready Digital LCDTV User Manual Customer Helpline 0845 604 0105 37 TROUBLESHOOTING The following table contains common problems and the solutions...
...W 3 W 5 W Rock, Pop, Live, Dance, Techno, Classic, Soft Automatic, Panorama, 4:3, Movie expand 14:9, Movie expand 16:9, 16:9 subtitle, Wide screen User, Cinema, Sport, Vivid, Hi-bright CONNECTIONS Tuner input (75 ) SCART 1 PC IN :VGA and Audio cable Component Video and L/R Audio input SPDIF Output (Digital ...-240V 1.5A 50-60Hz AC100-240V 1.5A 50-60Hz 36 BUSH HD Ready Digital LCDTV User Manual Customer Helpline 0845 604 0105 BUSH HD Ready Digital LCDTV User Manual Customer Helpline 0845 604 0105 37 TROUBLESHOOTING The following table contains common problems and the solutions...

User Manual
Page 21
This product is unsuitable or needs to be connected to the terminal which is in doubt contact a qualified electrician. If this manual. - WARNING : Never connect live or neutral wires to the following : Plug Replacement If you purchased the unit. The product must ... or consumable items. - It must be ASTA approved. CHECK WITH YOUR LOCAL AUTHORITY FOR RECYCLING ADVICE. 38 BUSH HD Ready Digital LCDTV User Manual Customer Helpline 0845 604 0105 PRODUCT GUARANTEE This product is guaranteed against manufacturing defects for twelve months from whom you need to , and does...
This product is unsuitable or needs to be connected to the terminal which is in doubt contact a qualified electrician. If this manual. - WARNING : Never connect live or neutral wires to the following : Plug Replacement If you purchased the unit. The product must ... or consumable items. - It must be ASTA approved. CHECK WITH YOUR LOCAL AUTHORITY FOR RECYCLING ADVICE. 38 BUSH HD Ready Digital LCDTV User Manual Customer Helpline 0845 604 0105 PRODUCT GUARANTEE This product is guaranteed against manufacturing defects for twelve months from whom you need to , and does...
User Manual
Page 22
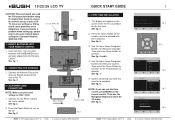
... located at the rear of your language. This display will appear on the TV. Connect the Antenna Plug to set up , please refer to the user manual before using the Quick Start Guide to select the TV menu. See fig. 5. 3. Use the Up or Down Navigation Buttons to turn on the screen...
... located at the rear of your language. This display will appear on the TV. Connect the Antenna Plug to set up , please refer to the user manual before using the Quick Start Guide to select the TV menu. See fig. 5. 3. Use the Up or Down Navigation Buttons to turn on the screen...


