
User Manual for
Page 1
LED LCD TV OWNER' S MANUAL MODEL: LE32K6000T LE40K6000TF LE43K6000TF Please READ this manual carefully before operating your TV, and retain it for future reference
LED LCD TV OWNER' S MANUAL MODEL: LE32K6000T LE40K6000TF LE43K6000TF Please READ this manual carefully before operating your TV, and retain it for future reference
User Manual for
Page 2
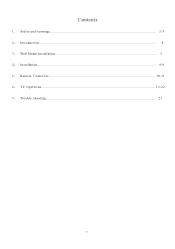
Contents 1、 Safety and warnings...2-3 2、 Introduction...4 3、 Wall Mount Installation...5 4、 Installation...6-9 5、 Remote Controller...10-11 6、 TV Operation...12-22 7、 Trouble shooting...23 -1-
Contents 1、 Safety and warnings...2-3 2、 Introduction...4 3、 Wall Mount Installation...5 4、 Installation...6-9 5、 Remote Controller...10-11 6、 TV Operation...12-22 7、 Trouble shooting...23 -1-
User Manual for
Page 6
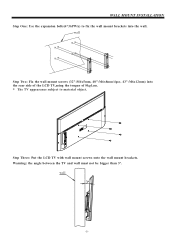
wall -5- Warning: the angle between the TV and wall must not be bigger than 3º. WALL MOUNT INSTALLATION Step One: Use the expansion bolts(4*36PWA) to fix the wall mount brackets into the rear side of the LCD TV,using the tongue of 8kgf.cm. * The TV appearance subject to material object. wall Step Two: Fix the wall mount screws (32":M4x5mm, 40":M6x8mm/4pcs, 43":M6x12mm) into the wall. Step Three: Put the LCD TV with wall mount screws onto the wall mount brackets.
wall -5- Warning: the angle between the TV and wall must not be bigger than 3º. WALL MOUNT INSTALLATION Step One: Use the expansion bolts(4*36PWA) to fix the wall mount brackets into the rear side of the LCD TV,using the tongue of 8kgf.cm. * The TV appearance subject to material object. wall Step Two: Fix the wall mount screws (32":M4x5mm, 40":M6x8mm/4pcs, 43":M6x12mm) into the wall. Step Three: Put the LCD TV with wall mount screws onto the wall mount brackets.
User Manual for
Page 9
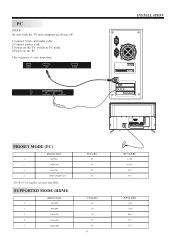
...) RESOLUTION 1 800*600 2 1024*768 3 1280*768 4 1920*1080(40"/43") NOTE: PC V.Freq.(Hz) not more than 60Hz. PC STEPS: Be sure both the TV and computer are Power off. 1.Connect VGA and audio cable 2.Connect power cord 3.Power on the...
...) RESOLUTION 1 800*600 2 1024*768 3 1280*768 4 1920*1080(40"/43") NOTE: PC V.Freq.(Hz) not more than 60Hz. PC STEPS: Be sure both the TV and computer are Power off. 1.Connect VGA and audio cable 2.Connect power cord 3.Power on the...

User Manual for
Page 10
You can use the input terminals on TV set rear as well. Please refer to the owner's manual of the equipment to be connected to VCR, DVD or other video equipment. USB HDMI1(... AUDIO OUTPUTS It can support these video fomats: 480i, 576i, 480p, 576p, 720p, 1080i, 1080p. YPbPr can be connected as follows. INSTALLATION AV EQUIPMENT This TV provides one group of AV, one audio channel. 2.When HDMI port get DVI signal, the "AV Audio" channel is changed to receive the audio for...
You can use the input terminals on TV set rear as well. Please refer to the owner's manual of the equipment to be connected to VCR, DVD or other video equipment. USB HDMI1(... AUDIO OUTPUTS It can support these video fomats: 480i, 576i, 480p, 576p, 720p, 1080i, 1080p. YPbPr can be connected as follows. INSTALLATION AV EQUIPMENT This TV provides one group of AV, one audio channel. 2.When HDMI port get DVI signal, the "AV Audio" channel is changed to receive the audio for...
User Manual for
Page 11
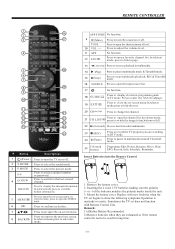
... guide in multimedia mode & Timeshift mode. GUIDE/ EXIT/ No function. Press to stop multimedia playback, REC& Timeshift mode. Press to pause in TV mode. Press to enter the teletext subpage. S.MODE Press to enter mix mode. Press to open the input source list. EPG: Record, Info,... list. In teletext mode, press to hold a page. (reverse) Press to reverse playback in multimedia mode & Timeshift mode. Press to turn the TV on -screen menu. Remove the battery cover. 2. Replace with Remote Control Unit. Press to close the on -screen menu. Press to display the ...
... guide in multimedia mode & Timeshift mode. GUIDE/ EXIT/ No function. Press to stop multimedia playback, REC& Timeshift mode. Press to pause in TV mode. Press to enter the teletext subpage. S.MODE Press to enter mix mode. Press to open the input source list. EPG: Record, Info,... list. In teletext mode, press to hold a page. (reverse) Press to reverse playback in multimedia mode & Timeshift mode. Press to turn the TV on -screen menu. Remove the battery cover. 2. Replace with Remote Control Unit. Press to close the on -screen menu. Press to display the ...
User Manual for
Page 13
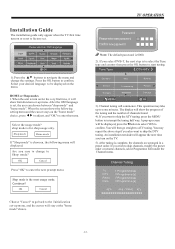
.... 2). OK Cancel Choose "Cancel" to go straight to the Initialization set , the user can choose between "shop mode" and "home mode". TV OPERATION Password Please enter new password Confirm new password Note: The default password is choosen, the following setting menu and the cursor stays on the...displayed. If you sure to factory set -up to interrupt the tuning half way. Installation Guide The installation guide only appear when the TV first time turn on the TV. 5). A pop-up menu, and the cursor will be displayed on the "home mode" choice, press ◀▶ to adjust...
.... 2). OK Cancel Choose "Cancel" to go straight to the Initialization set , the user can choose between "shop mode" and "home mode". TV OPERATION Password Please enter new password Confirm new password Note: The default password is choosen, the following setting menu and the cursor stays on the...displayed. If you sure to factory set -up to interrupt the tuning half way. Installation Guide The installation guide only appear when the TV first time turn on the TV. 5). A pop-up menu, and the cursor will be displayed on the "home mode" choice, press ◀▶ to adjust...
User Manual for
Page 14
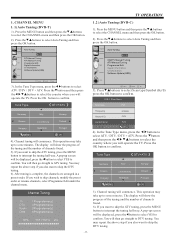
... Manual Tuning ATV Manual Tuning Programme Edit Signal Information CI Information Software Update(USB) LOCK MENU BACK MOVE OK OK 3). You will operate the TV. In the Tune Type menu, press the ◀▶buttons to interrupt the tuning half way. After tuning is complete, the channels are ...button to select the CHANNEL menu and then press the OK button. 2). Press the MENU button and then press the▼▲buttons to confirm TV OPERATION 1.2 )Auto Tuning (DVB-C) 1). In the Tune Type menu, press the◀▶buttons to select Auto Tuning and then press the OK...
... Manual Tuning ATV Manual Tuning Programme Edit Signal Information CI Information Software Update(USB) LOCK MENU BACK MOVE OK OK 3). You will operate the TV. In the Tune Type menu, press the ◀▶buttons to interrupt the tuning half way. After tuning is complete, the channels are ...button to select the CHANNEL menu and then press the OK button. 2). Press the MENU button and then press the▼▲buttons to confirm TV OPERATION 1.2 )Auto Tuning (DVB-C) 1). In the Tune Type menu, press the◀▶buttons to select Auto Tuning and then press the OK...

User Manual for
Page 15
TV OPERATION 4). Press the▼▲buttons to commence the search of that channel. Press the▼▲buttons to select(Frequency /Symbol (ks/s/QAM Type ...
TV OPERATION 4). Press the▼▲buttons to commence the search of that channel. Press the▼▲buttons to select(Frequency /Symbol (ks/s/QAM Type ...

User Manual for
Page 16
3) ATV Manual tuning : You can change the sound system to search the analog TV channels and fine tune the channels , then storage the channels you wish to move. Move the cursor to the program, press teletext green button to ... 58 Green 50 Blue 50 MENU MENU 1).Tint is the SOUND MENU. Once your favorite channel. 5). CI information: (optional) This menu can rename ATV programs . TV OPERATION 2. ATV Manual Tuning Storage To 1 System BG Current CH 1 Search Fine-Tune Frequency 424.25 MHz Save MENU Press teletext red button to storage...
3) ATV Manual tuning : You can change the sound system to search the analog TV channels and fine tune the channels , then storage the channels you wish to move. Move the cursor to the program, press teletext green button to ... 58 Green 50 Blue 50 MENU MENU 1).Tint is the SOUND MENU. Once your favorite channel. 5). CI information: (optional) This menu can rename ATV programs . TV OPERATION 2. ATV Manual Tuning Storage To 1 System BG Current CH 1 Search Fine-Tune Frequency 424.25 MHz Save MENU Press teletext red button to storage...
User Manual for
Page 17
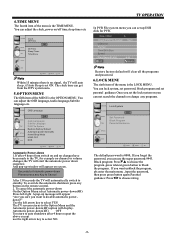
...MENU BACK MOVE OK OK Automatic Power-down 1.If after 4 hours repeat the above except use the super password:9443. Seconds to the TV, for PVR. TV OPERATION In PVR File system menu you can not search the channels or change any programs. CHANNEL Lock System PICTURE SOUND TIME OK Set...to standby. To cancel the automatic power-down On the Option Menu select Automatic power-down(4H) Press left arrow key to select YES The TV screen returns to the Option Menu and the Automatic power-down(4H) option will automatically switch to disable automatic powerdown?" Use the left /right A...
...MENU BACK MOVE OK OK Automatic Power-down 1.If after 4 hours repeat the above except use the super password:9443. Seconds to the TV, for PVR. TV OPERATION In PVR File system menu you can not search the channels or change any programs. CHANNEL Lock System PICTURE SOUND TIME OK Set...to standby. To cancel the automatic power-down On the Option Menu select Automatic power-down(4H) Press left arrow key to select YES The TV screen returns to the Option Menu and the Automatic power-down(4H) option will automatically switch to disable automatic powerdown?" Use the left /right A...
User Manual for
Page 18
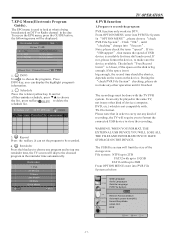
... "check PVR File System". file format. Reminder Press the blue key to choose one program and set the program to be played in the same TV, not in any other operation until "checking"change into "Success". Please note that means the speed of the storage size. 7.EPG Menu(Electronic Program ... 04:55 28th Apr Delete Time Date Programme Title Channel Name 3. Reminder 1 TV3 37 Minute 11 Hour Jan Month 26 Date Once Mode OK BACK TV OPERATION 8.PVR function 1.Prepare to store the recording. If it finished. The default "Free Record Limit" is "HD support", that in DTV. If the ...
... "check PVR File System". file format. Reminder Press the blue key to choose one program and set the program to be played in the same TV, not in any other operation until "checking"change into "Success". Please note that means the speed of the storage size. 7.EPG Menu(Electronic Program ... 04:55 28th Apr Delete Time Date Programme Title Channel Name 3. Reminder 1 TV3 37 Minute 11 Hour Jan Month 26 Date Once Mode OK BACK TV OPERATION 8.PVR function 1.Prepare to store the recording. If it finished. The default "Free Record Limit" is "HD support", that in DTV. If the ...
User Manual for
Page 19
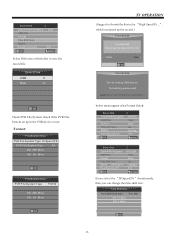
Select Disk USB 0 Disk C: TV OPERATION (Suggest to save the record file. Start OK Exit Format disk Do not unplug USB device. OK MENU Select Disk C: Check PVR File System ...
Select Disk USB 0 Disk C: TV OPERATION (Suggest to save the record file. Start OK Exit Format disk Do not unplug USB device. OK MENU Select Disk C: Check PVR File System ...
User Manual for
Page 20
... all USB devices are the same as Timeshift function,see the following pages for details. USB Drive Storage Format Select to record the program This TV allows you click "stop recording program. 22 23 24 25 Please do not turn off the power or remove the USB device during formatting. ...Models that are not listed may be erased after formatting. TV OPERATION 9.Timeshift function Prepare to format the USB device and allocate the amount of your original data before formatting. All the data stored in the...
... all USB devices are the same as Timeshift function,see the following pages for details. USB Drive Storage Format Select to record the program This TV allows you click "stop recording program. 22 23 24 25 Please do not turn off the power or remove the USB device during formatting. ...Models that are not listed may be erased after formatting. TV OPERATION 9.Timeshift function Prepare to format the USB device and allocate the amount of your original data before formatting. All the data stored in the...

User Manual for
Page 21
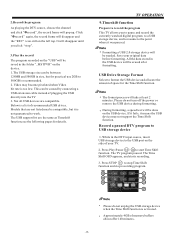
...disk drive electricty should be compatible, but it is too low. 7. Do Not remove the signal source during Time Shift operations. Not all digital TV,such as scrambled or audio only channels. -20- A75 Kingston Data Traveler 410 USB 2.0 Flash Drive-8 GB DT410/8 GB Kingston Data Traveler 410... power during Time Shift operations. 5. San Disk Extreme® Contour™ USB Flash Drive - 8GB SDCZ8 - 8192 - Below is lost. 4. TV OPERATION Video playback may become pixelated when Video bit rate is not guaranteed to work. It will abort once the signal is a list of recommended...
...disk drive electricty should be compatible, but it is too low. 7. Do Not remove the signal source during Time Shift operations. Not all digital TV,such as scrambled or audio only channels. -20- A75 Kingston Data Traveler 410 USB 2.0 Flash Drive-8 GB DT410/8 GB Kingston Data Traveler 410... power during Time Shift operations. 5. San Disk Extreme® Contour™ USB Flash Drive - 8GB SDCZ8 - 8192 - Below is lost. 4. TV OPERATION Video playback may become pixelated when Video bit rate is not guaranteed to work. It will abort once the signal is a list of recommended...

User Manual for
Page 22
...◀▶to select the function icon, press OK button to enter the USB menu. Haier Innovation Life PHOTO MUSIC TEXT MOVIE USB2.0 EXIT Back Move OK Select Please make sure that....USB Player Press source key, and select USB in source list, press OK button to confirm the function. Haier Innovation Life Return C EXIT Back Move OK Select Press the ◀▶to select the right disk and...files and folder list or choose Return to back to exit the control bar except for music. TV OPERATION play the media file in the Info menu while Playing the video file.Choose the Info...
...◀▶to select the function icon, press OK button to enter the USB menu. Haier Innovation Life PHOTO MUSIC TEXT MOVIE USB2.0 EXIT Back Move OK Select Please make sure that....USB Player Press source key, and select USB in source list, press OK button to confirm the function. Haier Innovation Life Return C EXIT Back Move OK Select Press the ◀▶to select the right disk and...files and folder list or choose Return to back to exit the control bar except for music. TV OPERATION play the media file in the Info menu while Playing the video file.Choose the Info...

User Manual for
Page 23
...; or ▶button to enter into Hotel Mode. Setup Menu Display : Main menu lock , main menu will not display when set to set to TV from USB disk. This option allows you can't change the source, when set the Max Volume Level. Hotel Mode Operation Hotel Mode Operation OFF Panel... Key Lock OFF Max Volume 100 Start Source Off Setup Menu Display Off Input Source Change Off Save To USB Load Volume Default 10 TV OPERATION Hotel Mode Operation : Set Hotel mode on default volume, press the ◀ or ▶ button to select the desired volume. -22- Input Source...
...; or ▶button to enter into Hotel Mode. Setup Menu Display : Main menu lock , main menu will not display when set to set to TV from USB disk. This option allows you can't change the source, when set the Max Volume Level. Hotel Mode Operation Hotel Mode Operation OFF Panel... Key Lock OFF Max Volume 100 Start Source Off Setup Menu Display Off Input Source Change Off Save To USB Load Volume Default 10 TV OPERATION Hotel Mode Operation : Set Hotel mode on default volume, press the ◀ or ▶ button to select the desired volume. -22- Input Source...


