User Manual
Page 2
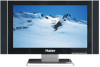
... of the best-built, best-backed products available today. The User Manual uses the following rules should be observedfor the installation,use and maintenanceof th product. Congratulations on your confidence in Haier. This symbol indicates that high voltage is dangerous to operatorsor properties: This symbol indicates that there are important operating and maintenance instructions in the industry. No user-serviceable parts inside . To...
... of the best-built, best-backed products available today. The User Manual uses the following rules should be observedfor the installation,use and maintenanceof th product. Congratulations on your confidence in Haier. This symbol indicates that high voltage is dangerous to operatorsor properties: This symbol indicates that there are important operating and maintenance instructions in the industry. No user-serviceable parts inside . To...
User Manual
Page 4
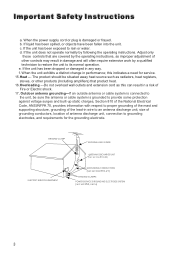
... cable system is damaged or frayed. When the power supply cord or plug is connected to the unit, be situated away heat source such as radiators, heat registers, stoves, or other controls may result in wire to an antenna discharge unit, size of grounding conductors, location of the lead-in damage and will often require extensive work by following the operating instructions...
... cable system is damaged or frayed. When the power supply cord or plug is connected to the unit, be situated away heat source such as radiators, heat registers, stoves, or other controls may result in wire to an antenna discharge unit, size of grounding conductors, location of the lead-in damage and will often require extensive work by following the operating instructions...
User Manual
Page 5
... menu 26 Rear control panel 6 Adjust menu 27 Remote controller 7 Lock setup 29 Keys of remote controller 8 Other functions 31 Function introduction 8 Teletext functions 32 Effective range 9 Maintenance 34 External Equipment Connections ........ 10 Specifications and functions 35 Operation Troubleshooting 36 Set up your TV 15 Switching ON/OFF the TV set........... 15 Choose the Menu Language 15 Choose the Input Source 15 Tuning menu 16 Auto search 16 Manual search 17 AFT(Auto Fine Tuning 17 Program...
... menu 26 Rear control panel 6 Adjust menu 27 Remote controller 7 Lock setup 29 Keys of remote controller 8 Other functions 31 Function introduction 8 Teletext functions 32 Effective range 9 Maintenance 34 External Equipment Connections ........ 10 Specifications and functions 35 Operation Troubleshooting 36 Set up your TV 15 Switching ON/OFF the TV set........... 15 Choose the Menu Language 15 Choose the Input Source 15 Tuning menu 16 Auto search 16 Manual search 17 AFT(Auto Fine Tuning 17 Program...
User Manual
Page 6
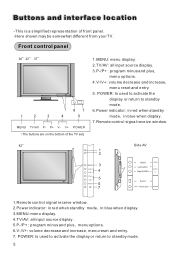
... set) 1.MENU: menu display. 2.TV/AV: all input source display. 5.P-/P+ : program minus and plus , menu options. 4.V-/V+: volume decrease and increase, menu reset and entry. 5. V+ POWER The buttons are on the bottom of front panel. -Here shown may be somewhat different from your TV. P+ V- POWER: Is used to activate the display or return to standby mode. TV/AV 6 7 Side AV VIDEO Left AUDIO Right AUDEO VIDEO L AUDIO R Switch Power jack POWER 1.Remote control signal receive window. 2.Power indicator: in red when standby mode...
... set) 1.MENU: menu display. 2.TV/AV: all input source display. 5.P-/P+ : program minus and plus , menu options. 4.V-/V+: volume decrease and increase, menu reset and entry. 5. V+ POWER The buttons are on the bottom of front panel. -Here shown may be somewhat different from your TV. P+ V- POWER: Is used to activate the display or return to standby mode. TV/AV 6 7 Side AV VIDEO Left AUDIO Right AUDEO VIDEO L AUDIO R Switch Power jack POWER 1.Remote control signal receive window. 2.Power indicator: in red when standby mode...
User Manual
Page 7
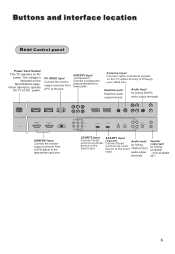
Antenna Input Connect cable or antenna signals to operate the TV on DC power. The voltage is indicated on AC power. Never attempt to the TV, either directly or through your cable box. audio output terminals. Buttons and interface location Rear Control panel Power Cord Socket This TV operates on the Specifications page. Earphone jack: Earphone audio output terminal. AC IN HDMI/DVI IN1 HDMI/DVI IN2 PC IN Y Pb/Cb Pr/Cr IN2 IN1 Y Pb/Cb Pr/Cr SCART2...
Antenna Input Connect cable or antenna signals to operate the TV on DC power. The voltage is indicated on AC power. Never attempt to the TV, either directly or through your cable box. audio output terminals. Buttons and interface location Rear Control panel Power Cord Socket This TV operates on the Specifications page. Earphone jack: Earphone audio output terminal. AC IN HDMI/DVI IN1 HDMI/DVI IN2 PC IN Y Pb/Cb Pr/Cr IN2 IN1 Y Pb/Cb Pr/Cr SCART2...
User Manual
Page 9
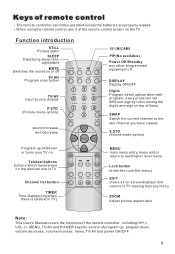
... by turns among the digits and sign on . S.STD (Sound mode option) MENU main menu entry, menu exit or return to TV viewing from any other programmed equipment off SCAN Program scan button MUTE STILL SCAN SLEEP PIP DISPLAY ABC@ DEF TV/AV Input source display P.STD (Picture mode option) GHI$ JKL% MNO POR& STUV WXYZ TV/AV *#() SWAP P.STD S.STD sound increase and decrease CH+ VOL- ZOOM Adjust picture aspect ratio Note: This User's Manual covers...
... by turns among the digits and sign on . S.STD (Sound mode option) MENU main menu entry, menu exit or return to TV viewing from any other programmed equipment off SCAN Program scan button MUTE STILL SCAN SLEEP PIP DISPLAY ABC@ DEF TV/AV Input source display P.STD (Picture mode option) GHI$ JKL% MNO POR& STUV WXYZ TV/AV *#() SWAP P.STD S.STD sound increase and decrease CH+ VOL- ZOOM Adjust picture aspect ratio Note: This User's Manual covers...
User Manual
Page 12
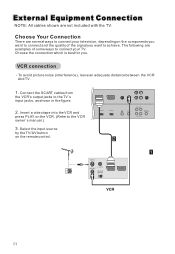
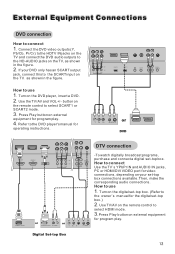
... cables from the VCR's output jacks to the VCR owner`s manual.) 3. The following are examples of some ways to connect your television, depending on the remote control. To avoid picture noise (interference), leave an adequate distance between the VCR And TV. 1. Select the input source by the TV/AV button on the components you want to connect and the quality of the signal you . SCART2 SCART1 ANT IN HD-AUDIO...
... cables from the VCR's output jacks to the VCR owner`s manual.) 3. The following are examples of some ways to connect your television, depending on the remote control. To avoid picture noise (interference), leave an adequate distance between the VCR And TV. 1. Select the input source by the TV/AV button on the components you want to connect and the quality of the signal you . SCART2 SCART1 ANT IN HD-AUDIO...
User Manual
Page 13
... and connect a digital set -top box.) 2. Then, make the corresponding audio connections. External Equipment Connections DVD connection How to select SCART1 or SCART2 mode. 3. Use theTV/AV and VOL+/- How to connect Use the TV`s YPbPr IN and AUDIO IN jacks, PC or HDMI/DVI VIDEO port for the digital set -top box. Refer tothe DVD player'smanual for program play . 4. Use TV/AV on the remote control to the HD-AUDIO jacks on your DVD only has an SCART output jack, connect this to the owner`s manual for video connections...
... and connect a digital set -top box.) 2. Then, make the corresponding audio connections. External Equipment Connections DVD connection How to select SCART1 or SCART2 mode. 3. Use theTV/AV and VOL+/- How to connect Use the TV`s YPbPr IN and AUDIO IN jacks, PC or HDMI/DVI VIDEO port for the digital set -top box. Refer tothe DVD player'smanual for program play . 4. Use TV/AV on the remote control to the HD-AUDIO jacks on your DVD only has an SCART output jack, connect this to the owner`s manual for video connections...

User Manual
Page 14
... source. 3. If using a sound card, adjust the PC sound as required. NOTES: 1 Use a PC cable. 2 Avoid keeping a fixed image on the TV's screen for video connections, depending on the screen. 3 The synchronization input form for Horizontal and Vertical frequencies is present, change the PC graphic card or consult the manufacturer of time. Then, make the corresponding audio connection. Check the image on the remote control to ( 1024x768),60Hz. 2. Use TV/AV...
... source. 3. If using a sound card, adjust the PC sound as required. NOTES: 1 Use a PC cable. 2 Avoid keeping a fixed image on the TV's screen for video connections, depending on the screen. 3 The synchronization input form for Horizontal and Vertical frequencies is present, change the PC graphic card or consult the manufacturer of time. Then, make the corresponding audio connection. Check the image on the remote control to ( 1024x768),60Hz. 2. Use TV/AV...

User Manual
Page 15
... an electrician replace the obsolete outlet. Plug a set of headphones into the 3.5mm mini-jack socket on AC. External Equipment Connections Connecting Headphones You can connect a set of headphones to your hearing. Note Prolonged use of the set. Power source Wider Hole and Blade AC Outlet TO USE AC POWER SOURCE Use the AC polarized line cord provided for operation on the rear panel of headphones at a high volume may damage your set if you...
... an electrician replace the obsolete outlet. Plug a set of headphones into the 3.5mm mini-jack socket on AC. External Equipment Connections Connecting Headphones You can connect a set of headphones to your hearing. Note Prolonged use of the set. Power source Wider Hole and Blade AC Outlet TO USE AC POWER SOURCE Use the AC polarized line cord provided for operation on the rear panel of headphones at a high volume may damage your set if you...
User Manual
Page 16
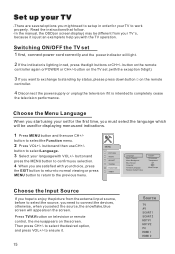
... start using your set 1 first, connect power cord correctly and the power indicator will be different from the external input source, before to select the source, you need to set .(with the exception 0 digit) 3 If you hope to enjoy the picture from your TV`s, because it . button and then use CH+/- Set up in red, press the digit buttons or CH+/- button to work properly. MENU PICTURE AUDIO ADJUST TUNING FUNCTION TIMER Language Menu Timeout Menu Backgroud Blue Screen...
... start using your set 1 first, connect power cord correctly and the power indicator will be different from the external input source, before to select the source, you need to set .(with the exception 0 digit) 3 If you hope to enjoy the picture from your TV`s, because it . button and then use CH+/- Set up in red, press the digit buttons or CH+/- button to work properly. MENU PICTURE AUDIO ADJUST TUNING FUNCTION TIMER Language Menu Timeout Menu Backgroud Blue Screen...
User Manual
Page 17
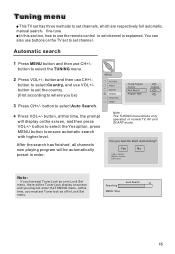
... only operated in normal TV, AV and SCART mode. MENU PICTURE AUDIO ADJUST TUNING FUNCTION TIMER Tuning Program Country Auto Search Program Table England 4 Press VOL+/- You can also use VOL+/button to set channel. After the search has finished, all channels now playing program will be ) 3 Press CH+/- there will display on the screen, and then press VOL+/- button to select the Yes option, press MENU button to select Auto Search. Yes VOL+/-:Select MENU: Confirm...
... only operated in normal TV, AV and SCART mode. MENU PICTURE AUDIO ADJUST TUNING FUNCTION TIMER Tuning Program Country Auto Search Program Table England 4 Press VOL+/- You can also use VOL+/button to set channel. After the search has finished, all channels now playing program will be ) 3 Press CH+/- there will display on the screen, and then press VOL+/- button to select the Yes option, press MENU button to select Auto Search. Yes VOL+/-:Select MENU: Confirm...
User Manual
Page 20
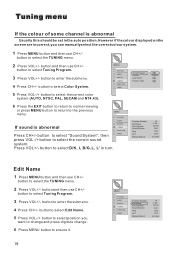
...+/- button to select Color System. button to enter the submenu. 4 Press CH+/- MENU PICTURE AUDIO ADJUST TUNING FUNCTION TIMER 5 Press VOL-/+ button to select the correct color system (AUTO, NTSC, PAL, SECAM and NT4.43). 6 Press the EXIT button to return to normal viewing or press MENU button to return to select D/K, I, B/G, L, L' in turn. button to the previous MENU menu. button to select Tuning Program. 3 Press VOL+/- MENU PICTURE AUDIO ADJUST TUNING FUNCTION TIMER Program Number Edit Name Color System Sound System Skip AFT Manual...
...+/- button to select Color System. button to enter the submenu. 4 Press CH+/- MENU PICTURE AUDIO ADJUST TUNING FUNCTION TIMER 5 Press VOL-/+ button to select the correct color system (AUTO, NTSC, PAL, SECAM and NT4.43). 6 Press the EXIT button to return to normal viewing or press MENU button to return to select D/K, I, B/G, L, L' in turn. button to the previous MENU menu. button to select Tuning Program. 3 Press VOL+/- MENU PICTURE AUDIO ADJUST TUNING FUNCTION TIMER Program Number Edit Name Color System Sound System Skip AFT Manual...

User Manual
Page 23
... the input signal, one or more menu items may not be entered automatically if Contrast, Brightness, Saturation, Hue, Sharpness parameters are satisfied with high ambient lighting such as daytime sport; button to adjusted. 3 Press VOL+/- button and then use CH+/- MENU PICTURE AUDIO ADJUST TUNING FUNCTION TIMER Video Mode Contrast Brightness Saturation Hue Sharpness Backlight Noise Reduction Personal 50 50 0 0 0 0 Auto Brightness This will adjust the light output of...
... the input signal, one or more menu items may not be entered automatically if Contrast, Brightness, Saturation, Hue, Sharpness parameters are satisfied with high ambient lighting such as daytime sport; button to adjusted. 3 Press VOL+/- button and then use CH+/- MENU PICTURE AUDIO ADJUST TUNING FUNCTION TIMER Video Mode Contrast Brightness Saturation Hue Sharpness Backlight Noise Reduction Personal 50 50 0 0 0 0 Auto Brightness This will adjust the light output of...

User Manual
Page 24
... your own sound status 1 Press MENU button and then use CH+/- MENU PICTURE AUDIO ADJUST TUNING FUNCTION TIMER Volume Balance Audio Mode Treble Bass Auto Volume Woofer 0 0 Music 0 0 OFF 0 Balance This will adjust the sound output level. Press CH+/- button to Select Audio Mode, press VOL+/- Sound Adjustment Sound modes The sound mode provides the pre-defined sound settings. Press CH+/- button to select the option.(Music/Standard/Personal/Hall) This select the modes for sound reproduction dependent on the broadcast signals or signals from external inputs received...
... your own sound status 1 Press MENU button and then use CH+/- MENU PICTURE AUDIO ADJUST TUNING FUNCTION TIMER Volume Balance Audio Mode Treble Bass Auto Volume Woofer 0 0 Music 0 0 OFF 0 Balance This will adjust the sound output level. Press CH+/- button to Select Audio Mode, press VOL+/- Sound Adjustment Sound modes The sound mode provides the pre-defined sound settings. Press CH+/- button to select the option.(Music/Standard/Personal/Hall) This select the modes for sound reproduction dependent on the broadcast signals or signals from external inputs received...
User Manual
Page 26
... MENU button to return to be reset when the power is reconnected. 1 Press MENU button and then use CH+/- button to set "Off Time". button to select "Remind Time", then press the digit buttons to set the desired channel. or the digit buttons to set the value of hour and minute. 3 Press CH+/- When the set is disconnect from the power supply or is turned off by the main power, the clock loses power and will need...
... MENU button to return to be reset when the power is reconnected. 1 Press MENU button and then use CH+/- button to set "Off Time". button to select "Remind Time", then press the digit buttons to set the desired channel. or the digit buttons to set the value of hour and minute. 3 Press CH+/- When the set is disconnect from the power supply or is turned off by the main power, the clock loses power and will need...
User Manual
Page 30
Lock setup The television has the function of the television is 0000. Lock setup Press H.LOCK button on remote control, Password will appear on the screen, and the time will be the same with the main menu if no operation. If password is correctly entered, the LOCK menu will display the follow. If the password is to set . The initial password of security default lock. Press digital button to be on the screen. When enter the TUNING menu, Tuner Lock will...
Lock setup The television has the function of the television is 0000. Lock setup Press H.LOCK button on remote control, Password will appear on the screen, and the time will be the same with the main menu if no operation. If password is correctly entered, the LOCK menu will display the follow. If the password is to set . The initial password of security default lock. Press digital button to be on the screen. When enter the TUNING menu, Tuner Lock will...
User Manual
Page 32
...: If the Off time on the remote controller will be selected. Display function If current program number, color system and sound system are to select a desirable program, you want to be set in memory. Press scan buttononce, there arenine pictures onthe screen. 2 If you may set , when press SLEEP button, the 0Min will switch automatically to be still; The / button on the TIMER menu is transmitting Bilingual sound service. You may scan all the related...
...: If the Off time on the remote controller will be selected. Display function If current program number, color system and sound system are to select a desirable program, you want to be set in memory. Press scan buttononce, there arenine pictures onthe screen. 2 If you may set , when press SLEEP button, the 0Min will switch automatically to be still; The / button on the TIMER menu is transmitting Bilingual sound service. You may scan all the related...

User Manual
Page 34
... the image making the characters easier to change from different screen display size. Press the button again to revert back to automatically search for the subtitle page. This feature is usually page 801. (CH.LIST) Press the button to show the teletext data superimposed on top of the teletext page to go directly to choose next. This feature is very useful...
... the image making the characters easier to change from different screen display size. Press the button again to revert back to automatically search for the subtitle page. This feature is usually page 801. (CH.LIST) Press the button to show the teletext data superimposed on top of the teletext page to go directly to choose next. This feature is very useful...
User Manual
Page 37
... residual image on your television screen. Refer to the instructions listed hereunder before contacting the after -sales service for adjust. Verify if the antenna is properly supplied power. If the problem still exists, contact authorized after -sales service for local interference such as it is below 750hpa, the picture on the screen may result in good condition. Note: Production of channel. NOTE: Design and specifications are input. Troubleshooting...
... residual image on your television screen. Refer to the instructions listed hereunder before contacting the after -sales service for adjust. Verify if the antenna is properly supplied power. If the problem still exists, contact authorized after -sales service for local interference such as it is below 750hpa, the picture on the screen may result in good condition. Note: Production of channel. NOTE: Design and specifications are input. Troubleshooting...


