
User Manual
Page 2
... selected one of contact with your purchase for many years to qualified service personnel. As a member of the Haier "family," you`re entitled to make any inside . The User Manual uses the following rules should be observedfor the installation,use and maintenanceof th product. Dear Haier product owner: Thank you happy with any kind of the most comprehensive warranties and outstanding service networks...
... selected one of contact with your purchase for many years to qualified service personnel. As a member of the Haier "family," you`re entitled to make any inside . The User Manual uses the following rules should be observedfor the installation,use and maintenanceof th product. Dear Haier product owner: Thank you happy with any kind of the most comprehensive warranties and outstanding service networks...
User Manual
Page 4
..., PART H) Adjust only those controls that product heat. 16.Overloading ---Do not overload wall outlets and extension cord as improper adjustment of other products (Including amplifiers) that are covered by following the operating instructions. Outdoor antenna grounding---If an outside antenna or cable system is connected to grounding electrodes, and requirements for service. 15.Heat --- When the unit exhibits a distinct change in a risk of antenna...
..., PART H) Adjust only those controls that product heat. 16.Overloading ---Do not overload wall outlets and extension cord as improper adjustment of other products (Including amplifiers) that are covered by following the operating instructions. Outdoor antenna grounding---If an outside antenna or cable system is connected to grounding electrodes, and requirements for service. 15.Heat --- When the unit exhibits a distinct change in a risk of antenna...
User Manual
Page 5
... menu 26 Rear control panel 6 Adjust menu 27 Remote controller 7 Lock setup 29 Keys of remote controller 8 Other functions 31 Function introduction 8 Teletext functions 32 Effective range 9 Maintenance 34 External Equipment Connections ........ 10 Specifications and functions 35 Operation Troubleshooting 36 Set up your TV 15 Switching ON/OFF the TV set........... 15 Choose the Menu Language 15 Choose the Input Source 15 Tuning menu 16 Auto search 16 Manual search 17 AFT(Auto Fine Tuning 17 Program...
... menu 26 Rear control panel 6 Adjust menu 27 Remote controller 7 Lock setup 29 Keys of remote controller 8 Other functions 31 Function introduction 8 Teletext functions 32 Effective range 9 Maintenance 34 External Equipment Connections ........ 10 Specifications and functions 35 Operation Troubleshooting 36 Set up your TV 15 Switching ON/OFF the TV set........... 15 Choose the Menu Language 15 Choose the Input Source 15 Tuning menu 16 Auto search 16 Manual search 17 AFT(Auto Fine Tuning 17 Program...
User Manual
Page 6
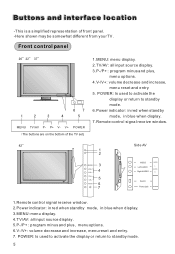
...to standby mode. 6.Power indicator: in red when standby mode, in blue when display. 3.MENU: menu display. 4.TV/AV: all input source display. 3.P-/P+ : program minus and plus , menu options. 6.V-/V+: volume decrease and increase, menu reset and entry. 7. CH+ 5 CH- TV/AV 6 7 Side AV VIDEO Left AUDIO Right AUDEO VIDEO L AUDIO R Switch Power jack POWER 1.Remote control signal receive window. 2.Power indicator: in red when standby mode, in blue when display. 7.Remote control signal receive window. 1 2 MENU 3 VOL+ 4 VOL- Front control panel MENU TV/AV P- V+ POWER The buttons are on...
...to standby mode. 6.Power indicator: in red when standby mode, in blue when display. 3.MENU: menu display. 4.TV/AV: all input source display. 3.P-/P+ : program minus and plus , menu options. 6.V-/V+: volume decrease and increase, menu reset and entry. 7. CH+ 5 CH- TV/AV 6 7 Side AV VIDEO Left AUDIO Right AUDEO VIDEO L AUDIO R Switch Power jack POWER 1.Remote control signal receive window. 2.Power indicator: in red when standby mode, in blue when display. 7.Remote control signal receive window. 1 2 MENU 3 VOL+ 4 VOL- Front control panel MENU TV/AV P- V+ POWER The buttons are on...
User Manual
Page 7
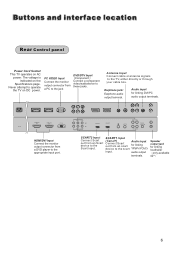
... The voltage is indicated on AC power. Never attempt to the TV, either directly or through your cable box. Speaker output jack for linking DVI/PC audio output terminals. SCART1 Input (Canal+) Audio input Connect Scart out from a PC to the jack DVD/DTV Input (Component ) Connect a component video/audiodevice to the scart YPbPr/YCbCr input. Buttons and interface location Rear Control panel Power Cord Socket This TV operates on the Specifications page. PC VIDEO Input Connect the monitor output connector from an scart for...
... The voltage is indicated on AC power. Never attempt to the TV, either directly or through your cable box. Speaker output jack for linking DVI/PC audio output terminals. SCART1 Input (Canal+) Audio input Connect Scart out from a PC to the jack DVD/DTV Input (Component ) Connect a component video/audiodevice to the scart YPbPr/YCbCr input. Buttons and interface location Rear Control panel Power Cord Socket This TV operates on the Specifications page. PC VIDEO Input Connect the monitor output connector from an scart for...
User Manual
Page 9
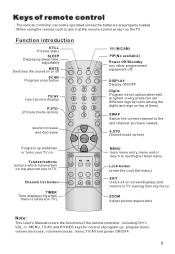
... Picture static SLEEP Displaying sleep time, adjustable MUTE Switches the sound on . Teletext buttons buttons which have viewed. Channel list button CH- The remote controller cannot be operated unless the batteries are properly loaded. - H.LOCK CH.LIST TIMER ZOOM EXIT TIMER Time display(only when there is teletext in TV. ZOOM Adjust picture aspect ratio Note: This User's Manual covers the functions of the remote controller, including CH+/-, VOL-/+, MENU, TV/AV and POWER keys for control of remote control - When using the remote control, aim it at the remote control...
... Picture static SLEEP Displaying sleep time, adjustable MUTE Switches the sound on . Teletext buttons buttons which have viewed. Channel list button CH- The remote controller cannot be operated unless the batteries are properly loaded. - H.LOCK CH.LIST TIMER ZOOM EXIT TIMER Time display(only when there is teletext in TV. ZOOM Adjust picture aspect ratio Note: This User's Manual covers the functions of the remote controller, including CH+/-, VOL-/+, MENU, TV/AV and POWER keys for control of remote control - When using the remote control, aim it at the remote control...
User Manual
Page 12
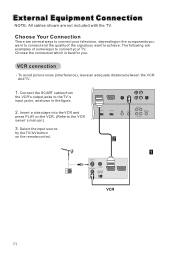
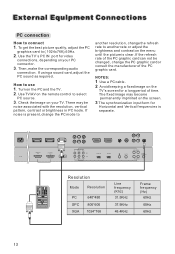
... VCR owner`s manual.) 3. To avoid picture noise (interference), leave an adequate distance between the VCR And TV. 1. Insert a video tape into the VCR and press PLAY on the remote control. VCR connection - The following are not included with the TV. Select the input source by the TV/AV button on the VCR. (Refer to achieve. SCART2 SCART1 ANT IN HD-AUDIO PC/DVI AUDIO IN HD-AUDIO S-VIDEO External Equipment Connection NOTE: All cables...
... VCR owner`s manual.) 3. To avoid picture noise (interference), leave an adequate distance between the VCR And TV. 1. Insert a video tape into the VCR and press PLAY on the remote control. VCR connection - The following are not included with the TV. Select the input source by the TV/AV button on the VCR. (Refer to achieve. SCART2 SCART1 ANT IN HD-AUDIO PC/DVI AUDIO IN HD-AUDIO S-VIDEO External Equipment Connection NOTE: All cables...
User Manual
Page 13
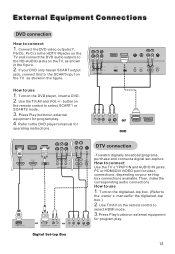
... owner`s manual for the digital set-top box.) 2. Use TV/AV on the remote control to select HDMI mode. 3.Press Play button on external equipment for video connections, depending on the digital set-top box. (Refer to use 1. as shown in the figure. Then, make the corresponding audio connections. Refer tothe DVD player'smanual for program play . If your set -top box. Use theTV/AV and VOL+/- Press Play buttonon external equipment for operating instructions. Connect the DVD video outputs (Y, Pb/Cb, Pr/Cr) to the HDTV IN jacks...
... owner`s manual for the digital set-top box.) 2. Use TV/AV on the remote control to select HDMI mode. 3.Press Play button on external equipment for video connections, depending on the digital set-top box. (Refer to use 1. as shown in the figure. Then, make the corresponding audio connections. Refer tothe DVD player'smanual for program play . If your set -top box. Use theTV/AV and VOL+/- Press Play buttonon external equipment for operating instructions. Connect the DVD video outputs (Y, Pb/Cb, Pr/Cr) to the HDTV IN jacks...
User Manual
Page 14
...: 1 Use a PC cable. 2 Avoid keeping a fixed image on the menu until the picture is separate. To get the best picture quality, adjust the PC graphics card to use 1. How to ( 1024x768),60Hz. 2. If noise is present, change the PC mode to another resolution, change the PC graphic card or consult the manufacturer of time. Then, make the corresponding audio connection. Use TV/AV on the screen. 3 The synchronization input form...
...: 1 Use a PC cable. 2 Avoid keeping a fixed image on the menu until the picture is separate. To get the best picture quality, adjust the PC graphics card to use 1. How to ( 1024x768),60Hz. 2. If noise is present, change the PC mode to another resolution, change the PC graphic card or consult the manufacturer of time. Then, make the corresponding audio connection. Use TV/AV on the screen. 3 The synchronization input form...

User Manual
Page 15
... your hearing. Insert the AC cord plug into the 3.5mm mini-jack socket on AC. Polarized AC Cord Plug NOTES: Never connect the AC line cord plug to file or cut the blade. Power source Wider Hole and Blade AC Outlet TO USE AC POWER SOURCE Use the AC polarized line cord provided for operation on the rear panel of the set of headphones into a standard polarized AC outlet...
... your hearing. Insert the AC cord plug into the 3.5mm mini-jack socket on AC. Polarized AC Cord Plug NOTES: Never connect the AC line cord plug to file or cut the blade. Power source Wider Hole and Blade AC Outlet TO USE AC POWER SOURCE Use the AC polarized line cord provided for operation on the rear panel of the set of headphones into a standard polarized AC outlet...
User Manual
Page 16
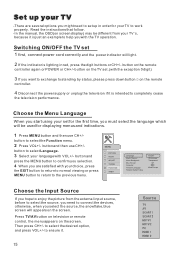
Set up in red, press the digit buttons or CH+/- button on the screen. MENU PICTURE AUDIO ADJUST TUNING FUNCTION TIMER Language Menu Timeout Menu Backgroud Blue Screen Calendar Teletext Language Restore Default Value English 15 seconds Transparent Off West Europe Choose the Input Source If you hope to enjoy the picture from your language with VOL+/- Press TV/AV button on television or remote control, the menu appears on the remote controller again or POWER or...
Set up in red, press the digit buttons or CH+/- button on the screen. MENU PICTURE AUDIO ADJUST TUNING FUNCTION TIMER Language Menu Timeout Menu Backgroud Blue Screen Calendar Teletext Language Restore Default Value English 15 seconds Transparent Off West Europe Choose the Input Source If you hope to enjoy the picture from your language with VOL+/- Press TV/AV button on television or remote control, the menu appears on the remote controller again or POWER or...
User Manual
Page 17
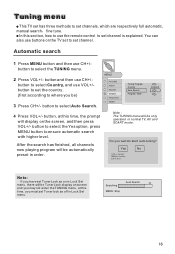
... MENU button and then use the remote control to set channel is explained. Do you be only operated in order. After the search has finished, all channels now playing program will be ) 3 Press CH+/- there will be automatically preset in normal TV, AV and SCART mode. MENU PICTURE AUDIO ADJUST TUNING FUNCTION TIMER Tuning Program Country Auto Search Program Table England 4 Press VOL+/- Note : The TUNING menu will be Tuner Lock display on screen and...
... MENU button and then use the remote control to set channel is explained. Do you be only operated in order. After the search has finished, all channels now playing program will be ) 3 Press CH+/- there will be automatically preset in normal TV, AV and SCART mode. MENU PICTURE AUDIO ADJUST TUNING FUNCTION TIMER Tuning Program Country Auto Search Program Table England 4 Press VOL+/- Note : The TUNING menu will be Tuner Lock display on screen and...

User Manual
Page 20
... select D/K, I, B/G, L, L' in turn. Tuning menu If the colour of some channel is abnormal TUNING FUNCTION TIMER Press CH+/- button and then use CH+/- button to enter the submenu. 4 Press CH+/- button to select Tuning Program. 3 Press VOL+/- MENU PICTURE AUDIO ADJUST TUNING FUNCTION TIMER Program Number Edit Name Color System Sound System Skip AFT Manual Search 18 C 28 AUTO D/K OFF OFF 62.25MHz button to select Tuning Program. 3 Press VOL+/- button to select the correct sound system. button to select "Sound...
... select D/K, I, B/G, L, L' in turn. Tuning menu If the colour of some channel is abnormal TUNING FUNCTION TIMER Press CH+/- button and then use CH+/- button to enter the submenu. 4 Press CH+/- button to select Tuning Program. 3 Press VOL+/- MENU PICTURE AUDIO ADJUST TUNING FUNCTION TIMER Program Number Edit Name Color System Sound System Skip AFT Manual Search 18 C 28 AUTO D/K OFF OFF 62.25MHz button to select Tuning Program. 3 Press VOL+/- button to select the correct sound system. button to select "Sound...
User Manual
Page 23
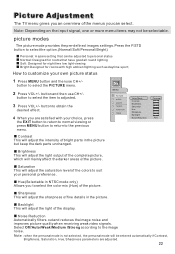
.... picture modes The picture mode provides the pre-defined images settings. button to select the item to select the PICTURE menu. 2 Press VOL+/- Contrast This will mainly affect the darker areas of the picture. MENU PICTURE AUDIO ADJUST TUNING FUNCTION TIMER Video Mode Contrast Brightness Saturation Hue Sharpness Backlight Noise Reduction Personal 50 50 0 0 0 0 Auto Brightness This will adjust the light output of the complete picture, which will adjust the intensity of bright parts in the picture...
.... picture modes The picture mode provides the pre-defined images settings. button to select the item to select the PICTURE menu. 2 Press VOL+/- Contrast This will mainly affect the darker areas of the picture. MENU PICTURE AUDIO ADJUST TUNING FUNCTION TIMER Video Mode Contrast Brightness Saturation Hue Sharpness Backlight Noise Reduction Personal 50 50 0 0 0 0 Auto Brightness This will adjust the light output of the complete picture, which will adjust the intensity of bright parts in the picture...

User Manual
Page 24
... sound. Auto Volume Each broadcasting station has its own signal conditions, making it sometimes difficult to adjust the volume every time the channel is a speaker that can be adjusted to set Auto Volume as Off or On Woofer Woofer is changed. button to Select Audio Mode, press VOL+/- button to personal tastes Standard: Normal sound with your own sound status 1 Press MENU button and then use CH+/- Press CH+/- Bass This will adjust the treble output...
... sound. Auto Volume Each broadcasting station has its own signal conditions, making it sometimes difficult to adjust the volume every time the channel is a speaker that can be adjusted to set Auto Volume as Off or On Woofer Woofer is changed. button to Select Audio Mode, press VOL+/- button to personal tastes Standard: Normal sound with your own sound status 1 Press MENU button and then use CH+/- Press CH+/- Bass This will adjust the treble output...

User Manual
Page 26
... you are all setting the time, if the TV is turned on to select the Clock option. MENU PICTURE AUDIO ADJUST TUNING FUNCTION TIMER Clock Off Time On Time On Prog. button to move the cursor to the previous menu. Time Setting Clock setting The clock will only work if the TV set is turned off by the main power, the clock loses power and will need to set the value of both...
... you are all setting the time, if the TV is turned on to select the Clock option. MENU PICTURE AUDIO ADJUST TUNING FUNCTION TIMER Clock Off Time On Time On Prog. button to move the cursor to the previous menu. Time Setting Clock setting The clock will only work if the TV set is turned off by the main power, the clock loses power and will need to set the value of both...

User Manual
Page 30
... Lock set Tuner Lock Off or operate Clear Lock. to exit the window. Confirm Pw. ---- Preset Prog. Press CH+/- Tuner Lock Press CH+/- To set . Lock setup Press H.LOCK button on the screen, and the time will be changed. button, sources can be the same with the main menu if no operation. Press digital button to set mode will display New Pw.----, then you will be on remote control, Password will display the follow . When enter the TUNING menu, Tuner Lock...
... Lock set Tuner Lock Off or operate Clear Lock. to exit the window. Confirm Pw. ---- Preset Prog. Press CH+/- Tuner Lock Press CH+/- To set . Lock setup Press H.LOCK button on the screen, and the time will be changed. button, sources can be the same with the main menu if no operation. Press digital button to set mode will display New Pw.----, then you will be on remote control, Password will display the follow . When enter the TUNING menu, Tuner Lock...

User Manual
Page 32
... set timer is set will switch automatically to do this. You can press the / button to be selected. Sleep The TV set , when press SLEEP button, the 0Min will display on . Other functions NICAM If the broadcaster is named, its name will also appear ). You can simplypress SCAN button to standby at the preset time with the SLEEP time on the screen. Display function If current program number, color system and sound...
... set timer is set will switch automatically to do this. You can press the / button to be selected. Sleep The TV set , when press SLEEP button, the 0Min will display on . Other functions NICAM If the broadcaster is named, its name will also appear ). You can simplypress SCAN button to standby at the preset time with the SLEEP time on the screen. Display function If current program number, color system and sound...

User Manual
Page 34
... useful as it magnifies the image making the characters easier to change from different screen display size. This feature is very useful where there are several teletext pages or data on the same page number. (ZOOM) Pressing the button to read. (REVEAL) Pressing the button will reveal hidden text. Teletext functions (MIX) While in Teletext mode press the button will show the list...
... useful as it magnifies the image making the characters easier to change from different screen display size. This feature is very useful where there are several teletext pages or data on the same page number. (ZOOM) Pressing the button to read. (REVEAL) Pressing the button will reveal hidden text. Teletext functions (MIX) While in Teletext mode press the button will show the list...
User Manual
Page 37
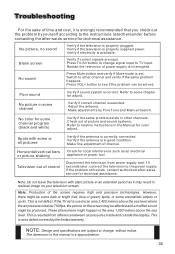
... button and verify if Mute mode is set is used in this manual is a approximation. Make adjustments by Fine Tune and Manual Search. Restart the television of power supply is not a defect covered by the limited warranty. No color for some channel program (black and white) Verify if the same problem exists in residual image on the screen may result in other channel and verify if the same problem happens. Troubleshooting...
... button and verify if Mute mode is set is used in this manual is a approximation. Make adjustments by Fine Tune and Manual Search. Restart the television of power supply is not a defect covered by the limited warranty. No color for some channel program (black and white) Verify if the same problem exists in residual image on the screen may result in other channel and verify if the same problem happens. Troubleshooting...


