User Manual
Page 1
LCD TV OWNER`S MANUAL MODELS:L26V6-A8K L32V6-A8K L37V6-A8K L42V6-A8K L26V6-A8 L32V6-A8 L37V6-A8 L42V6-A8 Please READ this manual carefully before operating your TV, and retain it for future reference.
LCD TV OWNER`S MANUAL MODELS:L26V6-A8K L32V6-A8K L37V6-A8K L42V6-A8K L26V6-A8 L32V6-A8 L37V6-A8 L42V6-A8 Please READ this manual carefully before operating your TV, and retain it for future reference.
User Manual
Page 5
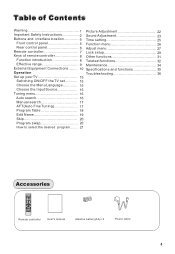
...32 Effective range 9 Maintenance 34 External Equipment Connections ........ 10 Specifications and functions 35 Operation Troubleshooting 36 Set up your TV 15 Switching ON/OFF the TV set........... 15 Choose the Menu Language 15 Choose the Input Source 15 Tuning menu 16 Auto search 16 Manual search 17... the desired program....... 21 Accessories MUTE STILL SCAN SLEEP PIP DISPLAY ABC@ DEF GHI$ JKL% MNO POR& STUV WXYZ TV/AV *#() SWAP P.STD CH+ S.STD VOL- H.LOCK CH.LIST TIMER ZOOM EXIT Remote controller User's manual Alkaline battery(AA) 2 Power ...
...32 Effective range 9 Maintenance 34 External Equipment Connections ........ 10 Specifications and functions 35 Operation Troubleshooting 36 Set up your TV 15 Switching ON/OFF the TV set........... 15 Choose the Menu Language 15 Choose the Input Source 15 Tuning menu 16 Auto search 16 Manual search 17... the desired program....... 21 Accessories MUTE STILL SCAN SLEEP PIP DISPLAY ABC@ DEF GHI$ JKL% MNO POR& STUV WXYZ TV/AV *#() SWAP P.STD CH+ S.STD VOL- H.LOCK CH.LIST TIMER ZOOM EXIT Remote controller User's manual Alkaline battery(AA) 2 Power ...
User Manual
Page 6
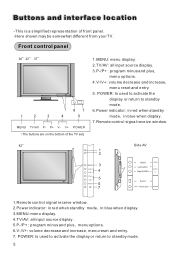
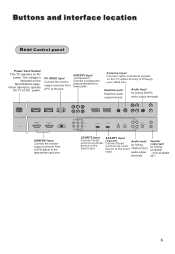
... the display or return to standby mode. 6.Power indicator: in red when standby mode, in blue when display. 3.MENU: menu display. 4.TV/AV: all input source display. 3.P-/P+ : program minus and plus , menu options. 6.V-/V+: volume decrease and increase, menu reset and entry. ...7. Buttons and interface location -This is a simplified representation of the TV set) 1.MENU: menu display. 2.TV/AV: all input source display. 5.P-/P+ : program minus and plus , menu options. 4.V-/V+: volume decrease and increase, menu reset and entry...
... the display or return to standby mode. 6.Power indicator: in red when standby mode, in blue when display. 3.MENU: menu display. 4.TV/AV: all input source display. 3.P-/P+ : program minus and plus , menu options. 6.V-/V+: volume decrease and increase, menu reset and entry. ...7. Buttons and interface location -This is a simplified representation of the TV set) 1.MENU: menu display. 2.TV/AV: all input source display. 5.P-/P+ : program minus and plus , menu options. 4.V-/V+: volume decrease and increase, menu reset and entry...
User Manual
Page 7
...IN L PC/DVI AUDIO IN R HD-AUDIO HDMI/DVI Input Connect the monitor output connector from an Scart device to operate the TV on the Specifications page. The voltage is indicated on DC power. Audio input for linking loudhailer only available 42 SCART2 Input Connect Scart...appropriate input port. audio output terminals. PC VIDEO Input Connect the monitor output connector from an scart for linking device to the TV, either directly or through your cable box. Earphone jack: Earphone audio output terminal. Buttons and interface location Rear Control panel Power ...
...IN L PC/DVI AUDIO IN R HD-AUDIO HDMI/DVI Input Connect the monitor output connector from an Scart device to operate the TV on the Specifications page. The voltage is indicated on DC power. Audio input for linking loudhailer only available 42 SCART2 Input Connect Scart...appropriate input port. audio output terminals. PC VIDEO Input Connect the monitor output connector from an scart for linking device to the TV, either directly or through your cable box. Earphone jack: Earphone audio output terminal. Buttons and interface location Rear Control panel Power ...
User Manual
Page 9
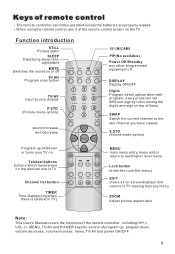
... buttons buttons which have viewed. DISPLAY Display ON/OFF Digits Program direct option(when edit program, every press can use in TV) I/II (NICAM) PIP(No available) Power Off/Standby any menu. Channel list button CH- Keys of them) SWAP Switch the current channel to the last ...channel you have letters on top also can set different sign by turns among the digits and sign on the TV. Lock button (enter the Lock Set menu) EXIT clears all on or off . The remote controller cannot be operated unless the batteries are properly loaded...
... buttons buttons which have viewed. DISPLAY Display ON/OFF Digits Program direct option(when edit program, every press can use in TV) I/II (NICAM) PIP(No available) Power Off/Standby any menu. Channel list button CH- Keys of them) SWAP Switch the current channel to the last ...channel you have letters on top also can set different sign by turns among the digits and sign on the TV. Lock button (enter the Lock Set menu) EXIT clears all on or off . The remote controller cannot be operated unless the batteries are properly loaded...

User Manual
Page 10
... and 20O above 20 20 below the control window. To ensure a normal operation, the remote controller should not be kept dry and away from your TV, is 8 meters to the front of remote control: 1. It should be placed between the remote control and the remote control window. Battery replacement is pointed...
... and 20O above 20 20 below the control window. To ensure a normal operation, the remote controller should not be kept dry and away from your TV, is 8 meters to the front of remote control: 1. It should be placed between the remote control and the remote control window. Battery replacement is pointed...

User Manual
Page 11
... ANT IN 300 twin-lead cable Antenna adapter 75 coaxial cable Plug (additional purchase) Note * It is not installed properly, contact your dealer for two Tv`s, install a 2-WaySignal Splitter in a poor signal area, purchase and install a signal amplifier. If the antenna needs to be split for assistance. If the antenna is...
... ANT IN 300 twin-lead cable Antenna adapter 75 coaxial cable Plug (additional purchase) Note * It is not installed properly, contact your dealer for two Tv`s, install a 2-WaySignal Splitter in a poor signal area, purchase and install a signal amplifier. If the antenna needs to be split for assistance. If the antenna is...
User Manual
Page 12
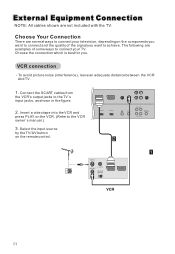
..., depending on the components you want to the VCR owner`s manual.) 3. The following are not included with the TV. Connect the SCART cables from the VCR's output jacks to connect your TV. Insert a video tape into the VCR and press PLAY on the remote control. SCART2 SCART1 ANT IN HD-AUDIO... HD-AUDIO S-VIDEO External Equipment Connection NOTE: All cables shown are examples of the signal you . VCR connection - Select the input source by the TV/AV button on the VCR. (Refer to achieve. To avoid picture noise (interference), leave an adequate distance between the VCR And...
..., depending on the components you want to the VCR owner`s manual.) 3. The following are not included with the TV. Connect the SCART cables from the VCR's output jacks to connect your TV. Insert a video tape into the VCR and press PLAY on the remote control. SCART2 SCART1 ANT IN HD-AUDIO... HD-AUDIO S-VIDEO External Equipment Connection NOTE: All cables shown are examples of the signal you . VCR connection - Select the input source by the TV/AV button on the VCR. (Refer to achieve. To avoid picture noise (interference), leave an adequate distance between the VCR And...
User Manual
Page 13
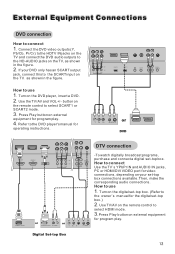
...Pr R AUDEO -To watch digitally broadcast programs, purchase and connect a digital set -top box connections available. Use TV/AV on the remote control to the SCART input on your DVD only has an SCART output jack, connect this ... HDMI mode. 3.Press Play button on external equipment for video connections, depending on the TV. If your set -top box. Use theTV/AV and VOL+/- Digital Set-top Box How to use... 1. How to connect Use the TV`s YPbPr IN and AUDIO IN jacks, PC or HDMI/DVI VIDEO port for program play . 4....
...Pr R AUDEO -To watch digitally broadcast programs, purchase and connect a digital set -top box connections available. Use TV/AV on the remote control to the SCART input on your DVD only has an SCART output jack, connect this ... HDMI mode. 3.Press Play button on external equipment for video connections, depending on the TV. If your set -top box. Use theTV/AV and VOL+/- Digital Set-top Box How to use... 1. How to connect Use the TV`s YPbPr IN and AUDIO IN jacks, PC or HDMI/DVI VIDEO port for program play . 4....

User Manual
Page 14
...may become permanently imprinted on the menu until the picture is separate. NOTES: 1 Use a PC cable. 2 Avoid keeping a fixed image on the TV's screen for video connections, depending on the remote control to connect 1. External Equipment Connections PC connection How to select PC source. 3. Then, make... the corresponding audio connection. If using a sound card, adjust the PC sound as required. Use TV/AV on your TV. The fixed image may be changed, change the refresh rate to another resolution, change the PC graphic card or consult the manufacturer...
...may become permanently imprinted on the menu until the picture is separate. NOTES: 1 Use a PC cable. 2 Avoid keeping a fixed image on the TV's screen for video connections, depending on the remote control to connect 1. External Equipment Connections PC connection How to select PC source. 3. Then, make... the corresponding audio connection. If using a sound card, adjust the PC sound as required. Use TV/AV on your TV. The fixed image may be changed, change the refresh rate to another resolution, change the PC graphic card or consult the manufacturer...

User Manual
Page 15
... to have an electrician replace the obsolete outlet. Note Prolonged use of headphones at a high volume may damage your set if you wish to watch a TV programme without disturbing the other than the specified voltage. It is the user`s responsibility to normal operation. External Equipment Connections Connecting Headphones You can connect...
... to have an electrician replace the obsolete outlet. Note Prolonged use of headphones at a high volume may damage your set if you wish to watch a TV programme without disturbing the other than the specified voltage. It is the user`s responsibility to normal operation. External Equipment Connections Connecting Headphones You can connect...
User Manual
Page 16
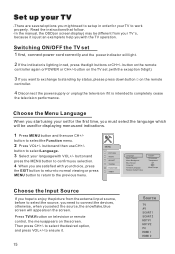
...on screen display) may be used for displaying menus and indications. 1 Press MENU button and then use CH+/- Switching ON/OFF the TV set up your TV -There are satisfied with your choice, press the EXIT button to return to normal viewing or press MENU button to return to select... Language. 3 Select your language with the TV operation. button to connect the devices, otherwise, when you with VOL+/- Source button and then use CH+/- MENU PICTURE AUDIO ADJUST TUNING FUNCTION TIMER...
...on screen display) may be used for displaying menus and indications. 1 Press MENU button and then use CH+/- Switching ON/OFF the TV set up your TV -There are satisfied with your choice, press the EXIT button to return to normal viewing or press MENU button to return to select... Language. 3 Select your language with the TV operation. button to connect the devices, otherwise, when you with VOL+/- Source button and then use CH+/- MENU PICTURE AUDIO ADJUST TUNING FUNCTION TIMER...
User Manual
Page 17
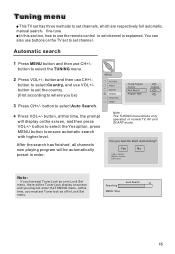
... has finished, all channels now playing program will be Tuner Lock display on screen and you must set Tuner lock as on the TV set to set channel. Tuning menu This TV set has three methods to select Auto Search. Automatic search 1 Press MENU button and then use buttons on in normal...
... has finished, all channels now playing program will be Tuner Lock display on screen and you must set Tuner lock as on the TV set to set channel. Tuning menu This TV set has three methods to select Auto Search. Automatic search 1 Press MENU button and then use buttons on in normal...

User Manual
Page 22
...channel number in a presetting channel. Volume button, the channel will not appear.) How to select the desired sound Press VOL-/+ button on the TV screen. Press CH+ button to select a channel number in number decreasing direction. (Note: If Skip is displayed automatically on the remote controller or... the front of the TV set to select the program. The range is 0~100. How to select the desired program 1 Using "Program number" buttons Press digit button...
...channel number in a presetting channel. Volume button, the channel will not appear.) How to select the desired sound Press VOL-/+ button on the TV screen. Press CH+ button to select a channel number in number decreasing direction. (Note: If Skip is displayed automatically on the remote controller or... the front of the TV set to select the program. The range is 0~100. How to select the desired program 1 Using "Program number" buttons Press digit button...

User Manual
Page 23
... details in the picture but keep the dark parts unchanged. Backlight This will adjust the sharpness of bright parts in the picture. Picture Adjustment The TV menu gives you an overview of the display. Press the P.STD button to select the option.(Normal/Soft/Personal/Bright) Personal: A spare setting that have...
... details in the picture but keep the dark parts unchanged. Backlight This will adjust the sharpness of bright parts in the picture. Picture Adjustment The TV menu gives you an overview of the display. Press the P.STD button to select the option.(Normal/Soft/Personal/Bright) Personal: A spare setting that have...

User Manual
Page 25
At this time, the sound of the screen. Sound Adjustment Eliminate sound When you , the sound elimination (mute) function is very convenient. 1 Press the MUTE button on the remote control and "Mute" type face will display on the lower part of the TV set is turned off. 2 If you want to surrounded sounds, or there is a telephone calling you or there are some guests visiting you need to pay attention to recover the sound, press the MUTE button again or directly press VOL+ button.
At this time, the sound of the screen. Sound Adjustment Eliminate sound When you , the sound elimination (mute) function is very convenient. 1 Press the MUTE button on the remote control and "Mute" type face will display on the lower part of the TV set is turned off. 2 If you want to surrounded sounds, or there is a telephone calling you or there are some guests visiting you need to pay attention to recover the sound, press the MUTE button again or directly press VOL+ button.
User Manual
Page 26
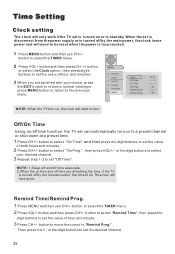
... buttons to set the value of hour and minutes; 3 When you are all setting the time, if the TV is turned off by the remote control, the time of hour and minute. 3 Press CH+/- button to select...buttons to set "Off Time". or the digit buttons to set can automatically turn on /off time function, the TV set the desired channel. button to select the TIMER menu. 2 Press VOL+ button and then press CH -/+... , the clock will start to time. Time Setting Clock setting The clock will only work if the TV set is turned off by the main power, the clock loses power and will need to be reset when...
... buttons to set the value of hour and minutes; 3 When you are all setting the time, if the TV is turned off by the remote control, the time of hour and minute. 3 Press CH+/- button to select...buttons to set "Off Time". or the digit buttons to set can automatically turn on /off time function, the TV set the desired channel. button to select the TIMER menu. 2 Press VOL+ button and then press CH -/+... , the clock will start to time. Time Setting Clock setting The clock will only work if the TV set is turned off by the main power, the clock loses power and will need to be reset when...

User Manual
Page 28
...to reset the defecult setting parameters Display Mode Adjust RGB Default Auto Sync Color Temperature Black Stretch 4:3 9300K OFF It does not work on the TV mode. button to adjust the option you have selected. 4 When you can select. Black Stretch Black Stretch-(Automatically Increases the Contrast Rage) Press .... Adjustment Setup When PC input mode is used for adjustment of picture location frequency and phase parameters in PC mode. Adjust menu The TV menu gives you an overview of the menus you are satisfied with your choice, press the EXIT button to return to normal viewing or...
...to reset the defecult setting parameters Display Mode Adjust RGB Default Auto Sync Color Temperature Black Stretch 4:3 9300K OFF It does not work on the TV mode. button to adjust the option you have selected. 4 When you can select. Black Stretch Black Stretch-(Automatically Increases the Contrast Rage) Press .... Adjustment Setup When PC input mode is used for adjustment of picture location frequency and phase parameters in PC mode. Adjust menu The TV menu gives you an overview of the menus you are satisfied with your choice, press the EXIT button to return to normal viewing or...

User Manual
Page 31
Lock setup Prog Num Prog Num is opted for adjustment between 0 100. Press VOL+/- button, to select channel number.(The item is not available except TV signal.) Source Lock Source Lock is opted to select the option, and press VOL+/- Press CH+/- button to hinder external input modes, such as AV, ...
Lock setup Prog Num Prog Num is opted for adjustment between 0 100. Press VOL+/- button, to select channel number.(The item is not available except TV signal.) Source Lock Source Lock is opted to select the option, and press VOL+/- Press CH+/- button to hinder external input modes, such as AV, ...
User Manual
Page 32
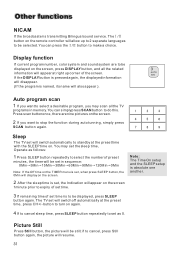
... repeatedly to be displayed on the screen, press DISPLAY button, and all the TV programs in sequence: 0Min 5Min 15Min 30Min 60Min 90Min 120Min 0Min Note: If the Off time on the... screen. Sleep The TV set will switch automatically to standby at right up to 2 separate languages to expiry of ...and the SLEEP setup is absolute one another. 2 After the sleep time is to make a choice. The TV set timer is set, the Indication will appear on the remote controller will allow up corner of set will...
... repeatedly to be displayed on the screen, press DISPLAY button, and all the TV programs in sequence: 0Min 5Min 15Min 30Min 60Min 90Min 120Min 0Min Note: If the Off time on the... screen. Sleep The TV set will switch automatically to standby at right up to 2 separate languages to expiry of ...and the SLEEP setup is absolute one another. 2 After the sleep time is to make a choice. The TV set timer is set, the Indication will appear on the remote controller will allow up corner of set will...


