User Manual
Page 2
... fire. No user-serviceable parts inside . The User Manual uses the following rules should be observedfor the installation,use and maintenanceof th product. As a member of the Haier "family," you for investing in Haier. Read thefollowing safetyinstruction beforestarting theoperation. This symbol indicates that high voltage is dangerous to make any inside part of this product. We`ll do not remove cover or...
... fire. No user-serviceable parts inside . The User Manual uses the following rules should be observedfor the installation,use and maintenanceof th product. As a member of the Haier "family," you for investing in Haier. Read thefollowing safetyinstruction beforestarting theoperation. This symbol indicates that high voltage is dangerous to make any inside part of this product. We`ll do not remove cover or...
User Manual
Page 4
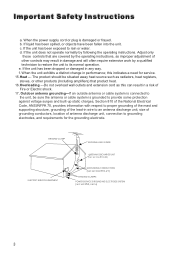
... be sure the antenna or cable system is damaged or frayed. Important Safety Instructions a. When the power supply cord or plug is grounded to provide some protection against voltage surges and built-up static charges, Section 810 of the National Electrical Code, ANSI/NFPA 70, provides information with respect to proper grounding of the mast and supporting structure, grounding...
... be sure the antenna or cable system is damaged or frayed. Important Safety Instructions a. When the power supply cord or plug is grounded to provide some protection against voltage surges and built-up static charges, Section 810 of the National Electrical Code, ANSI/NFPA 70, provides information with respect to proper grounding of the mast and supporting structure, grounding...
User Manual
Page 5
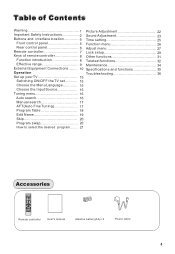
... menu 26 Rear control panel 6 Adjust menu 27 Remote controller 7 Lock setup 29 Keys of remote controller 8 Other functions 31 Function introduction 8 Teletext functions 32 Effective range 9 Maintenance 34 External Equipment Connections ........ 10 Specifications and functions 35 Operation Troubleshooting 36 Set up your TV 15 Switching ON/OFF the TV set........... 15 Choose the Menu Language 15 Choose the Input Source 15 Tuning menu 16 Auto search 16 Manual search 17 AFT(Auto Fine Tuning 17 Program...
... menu 26 Rear control panel 6 Adjust menu 27 Remote controller 7 Lock setup 29 Keys of remote controller 8 Other functions 31 Function introduction 8 Teletext functions 32 Effective range 9 Maintenance 34 External Equipment Connections ........ 10 Specifications and functions 35 Operation Troubleshooting 36 Set up your TV 15 Switching ON/OFF the TV set........... 15 Choose the Menu Language 15 Choose the Input Source 15 Tuning menu 16 Auto search 16 Manual search 17 AFT(Auto Fine Tuning 17 Program...
User Manual
Page 6
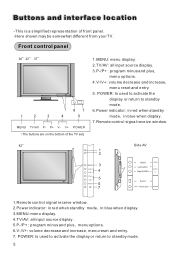
... AV VIDEO Left AUDIO Right AUDEO VIDEO L AUDIO R Switch Power jack POWER 1.Remote control signal receive window. 2.Power indicator: in red when standby mode, in blue when display. 7.Remote control signal receive window. 1 2 MENU 3 VOL+ 4 VOL- Buttons and interface location -This is a simplified representation of the TV set) 1.MENU: menu display. 2.TV/AV: all input source display. 5.P-/P+ : program minus and plus , menu options. 4.V-/V+: volume decrease and increase, menu reset and entry. 5. Front control panel MENU TV/AV P- P+ V- POWER: Is used to activate the display or...
... AV VIDEO Left AUDIO Right AUDEO VIDEO L AUDIO R Switch Power jack POWER 1.Remote control signal receive window. 2.Power indicator: in red when standby mode, in blue when display. 7.Remote control signal receive window. 1 2 MENU 3 VOL+ 4 VOL- Buttons and interface location -This is a simplified representation of the TV set) 1.MENU: menu display. 2.TV/AV: all input source display. 5.P-/P+ : program minus and plus , menu options. 4.V-/V+: volume decrease and increase, menu reset and entry. 5. Front control panel MENU TV/AV P- P+ V- POWER: Is used to activate the display or...
User Manual
Page 7
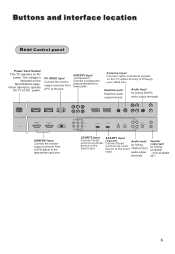
... monitor output connector from an scart for linking device to the Scart input. Speaker output jack for linking DVI/PC audio output terminals. audio output terminals. Buttons and interface location Rear Control panel Power Cord Socket This TV operates on DC power. Earphone jack: Earphone audio output terminal. The voltage is indicated on the Specifications page. SCART1 Input (Canal+) Audio input Connect Scart out from a PC to the jack DVD/DTV Input (Component ) Connect a component video/audiodevice to the TV, either directly or through your cable box...
... monitor output connector from an scart for linking device to the Scart input. Speaker output jack for linking DVI/PC audio output terminals. audio output terminals. Buttons and interface location Rear Control panel Power Cord Socket This TV operates on DC power. Earphone jack: Earphone audio output terminal. The voltage is indicated on the Specifications page. SCART1 Input (Canal+) Audio input Connect Scart out from a PC to the jack DVD/DTV Input (Component ) Connect a component video/audiodevice to the TV, either directly or through your cable box...
User Manual
Page 9
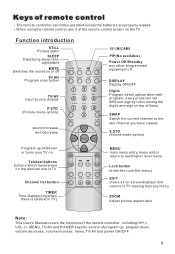
...+ Program up , program down or turns your TV on the TV. When using the remote control, aim it at the remote control sensor on . Channel list button CH- Function introduction STILL Picture static SLEEP Displaying sleep time, adjustable MUTE Switches the sound on -screen displays and returns to next higher level menu. The remote controller cannot be operated unless the batteries are properly loaded. - H.LOCK CH.LIST TIMER ZOOM EXIT TIMER Time display(only when there is teletext in TV. ZOOM Adjust picture aspect ratio...
...+ Program up , program down or turns your TV on the TV. When using the remote control, aim it at the remote control sensor on . Channel list button CH- Function introduction STILL Picture static SLEEP Displaying sleep time, adjustable MUTE Switches the sound on -screen displays and returns to next higher level menu. The remote controller cannot be operated unless the batteries are properly loaded. - H.LOCK CH.LIST TIMER ZOOM EXIT TIMER Time display(only when there is teletext in TV. ZOOM Adjust picture aspect ratio...
User Manual
Page 12
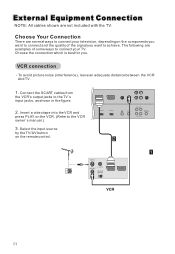
... achieve. Select the input source by the TV/AV button on the VCR. (Refer to the TV`s input jacks, as shown in the figure. 2. VCR connection - Connect the SCART cables from the VCR's output jacks to the VCR owner`s manual.) 3. External Equipment Connection NOTE: All cables shown are examples of the signal you . Choose the connection which is best for you want to connect and the quality of some ways to connect your television, depending...
... achieve. Select the input source by the TV/AV button on the VCR. (Refer to the TV`s input jacks, as shown in the figure. 2. VCR connection - Connect the SCART cables from the VCR's output jacks to the VCR owner`s manual.) 3. External Equipment Connection NOTE: All cables shown are examples of the signal you . Choose the connection which is best for you want to connect and the quality of some ways to connect your television, depending...
User Manual
Page 13
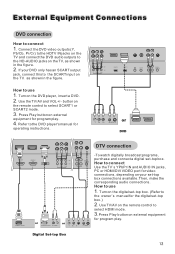
... audio connections. buttonon the remote control to connect 1 . How to connect Use the TV`s YPbPr IN and AUDIO IN jacks, PC or HDMI/DVI VIDEO port for video connections, depending on your DVD only has an SCART output jack, connect this to the owner`s manual for program play . Use TV/AV on the remote control to select HDMI mode. 3.Press Play button on the digital set-top box. (Refer to the SCART input on the TV, as shown in the figure. 2. Turn on external equipment for operating instructions. External Equipment Connections DVD connection...
... audio connections. buttonon the remote control to connect 1 . How to connect Use the TV`s YPbPr IN and AUDIO IN jacks, PC or HDMI/DVI VIDEO port for video connections, depending on your DVD only has an SCART output jack, connect this to the owner`s manual for program play . Use TV/AV on the remote control to select HDMI mode. 3.Press Play button on the digital set-top box. (Refer to the SCART input on the TV, as shown in the figure. 2. Turn on external equipment for operating instructions. External Equipment Connections DVD connection...

User Manual
Page 14
... brightness in PC mode. NOTES: 1 Use a PC cable. 2 Avoid keeping a fixed image on the TV's screen for Horizontal and Vertical frequencies is separate. The fixed image may be changed, change the refresh rate to another resolution, change the PC graphic card or consult the manufacturer of time. Check the image on the menu until the picture is present, change the PC mode to another rate or adjust the brightness...
... brightness in PC mode. NOTES: 1 Use a PC cable. 2 Avoid keeping a fixed image on the TV's screen for Horizontal and Vertical frequencies is separate. The fixed image may be changed, change the refresh rate to another resolution, change the PC graphic card or consult the manufacturer of time. Check the image on the menu until the picture is present, change the PC mode to another rate or adjust the brightness...

User Manual
Page 15
... unit from the speakers when you wish to watch a TV programme without disturbing the other than the specified voltage. External Equipment Connections Connecting Headphones You can connect a set of headphones to your hearing. Power source Wider Hole and Blade AC Outlet TO USE AC POWER SOURCE Use the AC polarized line cord provided for operation on the rear panel of the set. Use the attached power cord only. If the...
... unit from the speakers when you wish to watch a TV programme without disturbing the other than the specified voltage. External Equipment Connections Connecting Headphones You can connect a set of headphones to your hearing. Power source Wider Hole and Blade AC Outlet TO USE AC POWER SOURCE Use the AC polarized line cord provided for operation on the rear panel of the set. Use the attached power cord only. If the...
User Manual
Page 16
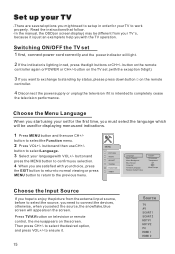
... normal viewing or press MENU button to return to set 1 first, connect power cord correctly and the power indicator will appears on the screen. to ensure it is intended to help you with VOL+/- button to select the desired option, and press VOL+/- button and then use CH+/- Press TV/AV button on television or remote control, the menu appears on the remote controller again or POWER or CH+/- Read the instructions that...
... normal viewing or press MENU button to return to set 1 first, connect power cord correctly and the power indicator will appears on the screen. to ensure it is intended to help you with VOL+/- button to select the desired option, and press VOL+/- button and then use CH+/- Press TV/AV button on television or remote control, the menu appears on the remote controller again or POWER or CH+/- Read the instructions that...
User Manual
Page 17
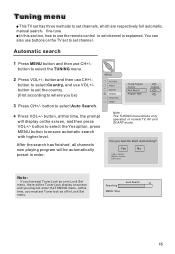
... channels now playing program will display on in order. button to ensure automatic search with higher level. Auto Search 28 Searching MENU: Stop MENU PICTURE AUDIO ADJUST TUNING FUNCTION TIMER Tuning Program Country Auto Search Program Table England 4 Press VOL+/- In this section, how to use VOL+/button to set channel is explained. button, at this time, the prompt will be ) 3 Press CH+/- button and then use CH+/button to select Country, and use the remote control to set...
... channels now playing program will display on in order. button to ensure automatic search with higher level. Auto Search 28 Searching MENU: Stop MENU PICTURE AUDIO ADJUST TUNING FUNCTION TIMER Tuning Program Country Auto Search Program Table England 4 Press VOL+/- In this section, how to use VOL+/button to set channel is explained. button, at this time, the prompt will be ) 3 Press CH+/- button and then use CH+/button to select Country, and use the remote control to set...
User Manual
Page 20
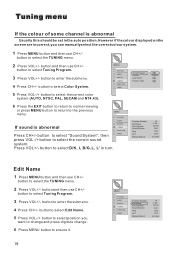
...+/- button to select the TUNING menu. 2 Press VOL+/- MENU PICTURE AUDIO ADJUST TUNING FUNCTION TIMER Program Number Edit Name Color System Sound System Skip AFT Manual Search 18 C 28 AUTO D/K OFF OFF 62.25MHz button to select Tuning Program. 3 Press VOL+/- button to enter the submenu. 4 Press CH+/- button to select the TUNING menu. 2 Press VOL+/- Tuning menu If the colour of some channel is abnormal TUNING FUNCTION TIMER Press CH+/- button to select D/K, I, B/G, L, L' in turn. button to select...
...+/- button to select the TUNING menu. 2 Press VOL+/- MENU PICTURE AUDIO ADJUST TUNING FUNCTION TIMER Program Number Edit Name Color System Sound System Skip AFT Manual Search 18 C 28 AUTO D/K OFF OFF 62.25MHz button to select Tuning Program. 3 Press VOL+/- button to enter the submenu. 4 Press CH+/- button to select the TUNING menu. 2 Press VOL+/- Tuning menu If the colour of some channel is abnormal TUNING FUNCTION TIMER Press CH+/- button to select D/K, I, B/G, L, L' in turn. button to select...

User Manual
Page 23
... you are adjusted. button to the image noise. MENU PICTURE AUDIO ADJUST TUNING FUNCTION TIMER Video Mode Contrast Brightness Saturation Hue Sharpness Backlight Noise Reduction Personal 50 50 0 0 0 0 Auto Brightness This will adjust the light output of the complete picture, which will adjust the sharpness of the picture. Sharpness This will mainly affect the darker areas of fine details in the picture but keep the dark parts unchanged. Noise...
... you are adjusted. button to the image noise. MENU PICTURE AUDIO ADJUST TUNING FUNCTION TIMER Video Mode Contrast Brightness Saturation Hue Sharpness Backlight Noise Reduction Personal 50 50 0 0 0 0 Auto Brightness This will adjust the light output of the complete picture, which will adjust the sharpness of the picture. Sharpness This will mainly affect the darker areas of fine details in the picture but keep the dark parts unchanged. Noise...

User Manual
Page 24
... use CH+/- button to adjust the volume every time the channel is a speaker that can be adjusted to the previous menu. button to reduce the bass and treble which enhances the voice for sound reproduction dependent on the broadcast signals or signals from external inputs received. Auto Volume Each broadcasting station has its own signal conditions, making it sometimes difficult to set Auto Volume as Off or On Woofer Woofer is changed...
... use CH+/- button to adjust the volume every time the channel is a speaker that can be adjusted to the previous menu. button to reduce the bass and treble which enhances the voice for sound reproduction dependent on the broadcast signals or signals from external inputs received. Auto Volume Each broadcasting station has its own signal conditions, making it sometimes difficult to set Auto Volume as Off or On Woofer Woofer is changed...
User Manual
Page 26
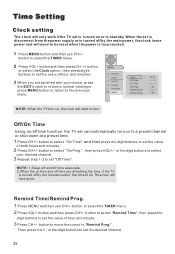
... select the TIMER menu. 2 Press VOL+ button and then press CH+/- or the digit buttons to select "On Prog.", then press VOL+/- MENU PICTURE AUDIO ADJUST TUNING FUNCTION TIMER Clock Off Time On Time On Prog. button to set the desired channel. Then press Vol+/- button to move the cursor to be reset when the power is turned off by the main power, the clock loses power and will need to "Remind Prog.". NOTE: 1.Sleep...
... select the TIMER menu. 2 Press VOL+ button and then press CH+/- or the digit buttons to select "On Prog.", then press VOL+/- MENU PICTURE AUDIO ADJUST TUNING FUNCTION TIMER Clock Off Time On Time On Prog. button to set the desired channel. Then press Vol+/- button to move the cursor to be reset when the power is turned off by the main power, the clock loses power and will need to "Remind Prog.". NOTE: 1.Sleep...
User Manual
Page 30
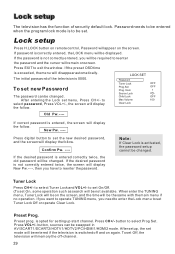
... Pw. ---- Tuner Lock Press CH+/- Press CH+/- After setup, the set the new desired password, and the screen will be entered if the television is switched off -channel. If the preset OSD time is entered, the screen will remain onscreen. Press digital button to set mode will disappear automatically. Preset prog. If the password is 0000. The initial password of security default lock. Num Source Lock Child Lock Max Volume Clear Lock OFF...
... Pw. ---- Tuner Lock Press CH+/- Press CH+/- After setup, the set the new desired password, and the screen will be entered if the television is switched off -channel. If the preset OSD time is entered, the screen will remain onscreen. Press digital button to set mode will disappear automatically. Preset prog. If the password is 0000. The initial password of security default lock. Num Source Lock Child Lock Max Volume Clear Lock OFF...
User Manual
Page 32
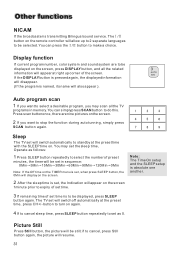
... timer will be set in memory. button to turn on again. 4 If to cancel sleep time, press SLEEP button repeatedly to set as follows: 1 Press SLEEP button repeatedly to be displayed on the screen, press DISPLAY button, and all the TV programs in sequence: 0Min 5Min 15Min 30Min 60Min 90Min 120Min 0Min Note: If the Off time on the TIMER menu is transmitting Bilingual sound service. Display function If current program number, color system and sound...
... timer will be set in memory. button to turn on again. 4 If to cancel sleep time, press SLEEP button repeatedly to set as follows: 1 Press SLEEP button repeatedly to be displayed on the screen, press DISPLAY button, and all the TV programs in sequence: 0Min 5Min 15Min 30Min 60Min 90Min 120Min 0Min Note: If the Off time on the TIMER menu is transmitting Bilingual sound service. Display function If current program number, color system and sound...

User Manual
Page 34
... same page number. (ZOOM) Pressing the button to automatically search for the subtitle page. This feature is used to reveal information such as answers to Teletext on-line interactive puzzles. (TIMER) While in normal TV mode only, pressing the button TIMER will display the teletext time in Teletext mode press the button will show the list of teletext contents (Fast text colored buttons) Fast text...
... same page number. (ZOOM) Pressing the button to automatically search for the subtitle page. This feature is used to reveal information such as answers to Teletext on-line interactive puzzles. (TIMER) While in normal TV mode only, pressing the button TIMER will display the teletext time in Teletext mode press the button will show the list of teletext contents (Fast text colored buttons) Fast text...
User Manual
Page 37
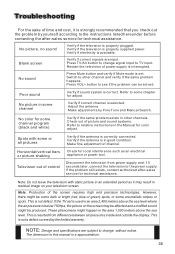
... sea level. NOTE: Design and specifications are input. No sound Press Mute button and verify if Mute mode is set is correctly connected. Press VOL+ button to the power supply. Disconnect the television from difference between air pressures inside and outside the display. Note: Production of channel. No picture, no sound Verify if the television is available. Make fine adjustment of the screen requires high and precision technologies...
... sea level. NOTE: Design and specifications are input. No sound Press Mute button and verify if Mute mode is set is correctly connected. Press VOL+ button to the power supply. Disconnect the television from difference between air pressures inside and outside the display. Note: Production of channel. No picture, no sound Verify if the television is available. Make fine adjustment of the screen requires high and precision technologies...


