
Product Manual
Page 2
Contents Safety and warnings 2-3 Introduction 4 Installation 5-11 Remote Control 12 Operation...13-17 Trouble Shooting 18 Warranty...19 -1-
Contents Safety and warnings 2-3 Introduction 4 Installation 5-11 Remote Control 12 Operation...13-17 Trouble Shooting 18 Warranty...19 -1-
Product Manual
Page 3
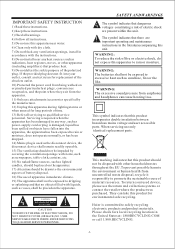
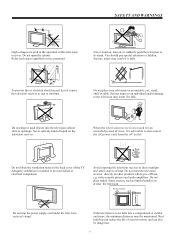
... dry cloth. 7) Do not block any ventilation openings, install in accordance with the instructions. 8) Do not install near any way, such as power-supply cord or plug is damaged, liquid has been spilled or objects have fallen into your used as the disconnect device, the disconnect device shall remain readily operable. 15) The ventilation should not be impeded by...
... dry cloth. 7) Do not block any ventilation openings, install in accordance with the instructions. 8) Do not install near any way, such as power-supply cord or plug is damaged, liquid has been spilled or objects have fallen into your used as the disconnect device, the disconnect device shall remain readily operable. 15) The ventilation should not be impeded by...
Product Manual
Page 4
.... Refer servicing to direct sunlight and other products which give off heat, e.g. Serious injury may result if it falls. Do not block the ventilation holes on or near the television. Adequate ventilation is to disconnect the AC power cord from the AC outlet. video cassette players and audio amplifiers. When the television receiver is not used in the operation of this television receiver...
.... Refer servicing to direct sunlight and other products which give off heat, e.g. Serious injury may result if it falls. Do not block the ventilation holes on or near the television. Adequate ventilation is to disconnect the AC power cord from the AC outlet. video cassette players and audio amplifiers. When the television receiver is not used in the operation of this television receiver...
Product Manual
Page 5
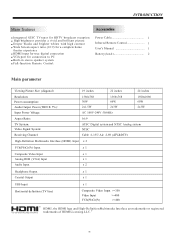
... theater experience HDMI input for true digital connection VGA port for connection to PC Built-in stereo speaker system Full-function Remote Control Power Cable 1 Infrared Remote Control 1 User s Manual 1 Battery(AAA 2 Main parameter Viewing Picture Size (diagonal) 19 inches 22 inches 24 inches Resolution: Power consumption: Audio Output Power (THD 7%): Input Power Voltage: 1366x768 30W 1366x768 60W 2x1.5W 2x3W AC 100V-240V 50/60Hz 1920x1080 60W 2x3W Aspect Ratio: 16:9 TV System: Video Signal System: Receiving Channel: ATSC Digital system and...
... theater experience HDMI input for true digital connection VGA port for connection to PC Built-in stereo speaker system Full-function Remote Control Power Cable 1 Infrared Remote Control 1 User s Manual 1 Battery(AAA 2 Main parameter Viewing Picture Size (diagonal) 19 inches 22 inches 24 inches Resolution: Power consumption: Audio Output Power (THD 7%): Input Power Voltage: 1366x768 30W 1366x768 60W 2x1.5W 2x3W AC 100V-240V 50/60Hz 1920x1080 60W 2x3W Aspect Ratio: 16:9 TV System: Video Signal System: Receiving Channel: ATSC Digital system and...
Product Manual
Page 6
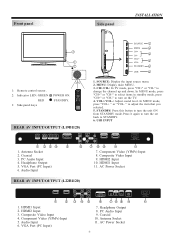
...- 2 STANDBY 5 USB 6 30 30 1: Remote control sensor. 1 2 3 4 5 6 7 8 9 0 2: Indicator LED: GREEN POWER ON. MENU: Display main MENU. 3. " to STANDBY. 6. USB INPUT REAR AV INPUT/OUTPUT (L19B1120) RF INPUT COAXIAL PC AUDIO INPUT HEADPHONE VGA INPUT 1 234 5 1. Component Video (YPbPr) Input 8. HDMI1 Input 2. Antenna Socket 11. RED STANDBY. + + VOL CH _ _ 3: Side panel keys 1. STANDBY: Press this button to turn the unit ON from STANDBY mode. AC Power Socket -5- HDMI2 Input 10. VGA Port (PC Input) Pr Pb L COMPONENT INPUT AUDIO INPUT AV...
...- 2 STANDBY 5 USB 6 30 30 1: Remote control sensor. 1 2 3 4 5 6 7 8 9 0 2: Indicator LED: GREEN POWER ON. MENU: Display main MENU. 3. " to STANDBY. 6. USB INPUT REAR AV INPUT/OUTPUT (L19B1120) RF INPUT COAXIAL PC AUDIO INPUT HEADPHONE VGA INPUT 1 234 5 1. Component Video (YPbPr) Input 8. HDMI1 Input 2. Antenna Socket 11. RED STANDBY. + + VOL CH _ _ 3: Side panel keys 1. STANDBY: Press this button to turn the unit ON from STANDBY mode. AC Power Socket -5- HDMI2 Input 10. VGA Port (PC Input) Pr Pb L COMPONENT INPUT AUDIO INPUT AV...
Product Manual
Page 7
... DVI connection is used on the HDMI 1 Input, use "YPbPr Audio" for the audio signal input. 3. Turn on the TV and switch to VGAmode. 4. Audio Input 6. When a DVI connection is used on the HDMI 2 Input, use "PC Audio" for the audio signal input. PC Audio Input 9. Connect the power cord. 3. HDMI2 Input 3. PC STEPS: Be sure both the TV and computer are powered off. 1. VGA Port (PC Input) Pr Pb COMPONENT INPUT AUDIO L INPUT AV Y R 345 VGA INPUT PC AUDIO HEADPHONE COAXIAL INPUT RF INPUT 6 7 8 9 10 7. INSTALLATION REAR AV INPUT/OUTPUT (L24B1180) AC...
... DVI connection is used on the HDMI 1 Input, use "YPbPr Audio" for the audio signal input. 3. Turn on the TV and switch to VGAmode. 4. Audio Input 6. When a DVI connection is used on the HDMI 2 Input, use "PC Audio" for the audio signal input. PC Audio Input 9. Connect the power cord. 3. HDMI2 Input 3. PC STEPS: Be sure both the TV and computer are powered off. 1. VGA Port (PC Input) Pr Pb COMPONENT INPUT AUDIO L INPUT AV Y R 345 VGA INPUT PC AUDIO HEADPHONE COAXIAL INPUT RF INPUT 6 7 8 9 10 7. INSTALLATION REAR AV INPUT/OUTPUT (L24B1180) AC...

Product Manual
Page 9
Input impendance:75 unbalanced. -8- ANTENNA INSTALLATION Note: Aerial connections:IEC(female).
Input impendance:75 unbalanced. -8- ANTENNA INSTALLATION Note: Aerial connections:IEC(female).
Product Manual
Page 10
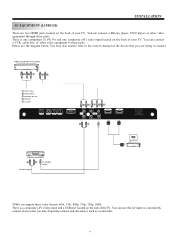
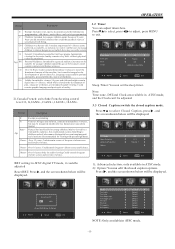
... GBR WR Y Yellow (video) W White(audio L) R Red(audio R or Pr) B Blue(Pb) G Green(Y) RF INPUT COAXIAL PC AUDIO INPUT HEADPHONE VGA INPUT WR GB R R Y AV COMPONENT INPUT HDMI 2 L Pb Pr W R HDMI 1 HDMI VIDEO EQUIPMENT W R TO VIDEO output To audio outputs There is one component (Y, Pb, Pr) and one composite (AV) video input located on the back of your TV. Please see the diagram below. You may frequently connect and disconnect, such as a camcorder. -9- INSTALLATION AV EQUIPMENT (L19B1120...
... GBR WR Y Yellow (video) W White(audio L) R Red(audio R or Pr) B Blue(Pb) G Green(Y) RF INPUT COAXIAL PC AUDIO INPUT HEADPHONE VGA INPUT WR GB R R Y AV COMPONENT INPUT HDMI 2 L Pb Pr W R HDMI 1 HDMI VIDEO EQUIPMENT W R TO VIDEO output To audio outputs There is one component (Y, Pb, Pr) and one composite (AV) video input located on the back of your TV. Please see the diagram below. You may frequently connect and disconnect, such as a camcorder. -9- INSTALLATION AV EQUIPMENT (L19B1120...

Product Manual
Page 11
... (video) W White(audio L) R Red(audio R or Pr) B Blue(Pb) G Green(Y) HDMI 1 HDMI 2 GB R WR Pr Pb L COMPONENT INPUT AUDIO INPUT AV Y R W R VGA INPUT HEADPHONE PC AUDIO INPUT COAXIAL RF INPUT AC INPUT 100-240V~50/60Hz HDMI VIDEO EQUIPMENT W R TO VIDEO output To audio outputs There is one component (Y, Pb, Pr) and one composite (AV) video input located on the side of your TV. You can connect a Blu-ray player, DVD player, or other video equipment to these ports. You can connect a VCR, cable box, or...
... (video) W White(audio L) R Red(audio R or Pr) B Blue(Pb) G Green(Y) HDMI 1 HDMI 2 GB R WR Pr Pb L COMPONENT INPUT AUDIO INPUT AV Y R W R VGA INPUT HEADPHONE PC AUDIO INPUT COAXIAL RF INPUT AC INPUT 100-240V~50/60Hz HDMI VIDEO EQUIPMENT W R TO VIDEO output To audio outputs There is one component (Y, Pb, Pr) and one composite (AV) video input located on the side of your TV. You can connect a Blu-ray player, DVD player, or other video equipment to these ports. You can connect a VCR, cable box, or...
Product Manual
Page 12
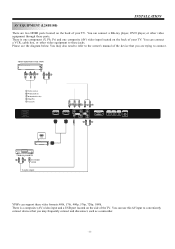
... GBR WR Y Yellow (video) W White(audio L) R Red(audio R or Pr) B Blue(Pb) G Green(Y) AC INPUT 100-240V~50/60Hz HDMI 1 GB R WR HDMI 2 Pr Pb COMPONENT INPUT AUDIO L INPUT AV Y R VGA INPUT W R PC AUDIO HEADPHONE COAXIAL INPUT RF INPUT HDMI VIDEO EQUIPMENT W R TO VIDEO output To audio outputs There is one component (Y, Pb, Pr) and one composite (AV) video input located on the back of your TV. Please see the diagram below. INSTALLATION AV EQUIPMENT (L24B1180) There are trying to connect.
... GBR WR Y Yellow (video) W White(audio L) R Red(audio R or Pr) B Blue(Pb) G Green(Y) AC INPUT 100-240V~50/60Hz HDMI 1 GB R WR HDMI 2 Pr Pb COMPONENT INPUT AUDIO L INPUT AV Y R VGA INPUT W R PC AUDIO HEADPHONE COAXIAL INPUT RF INPUT HDMI VIDEO EQUIPMENT W R TO VIDEO output To audio outputs There is one component (Y, Pb, Pr) and one composite (AV) video input located on the back of your TV. Please see the diagram below. INSTALLATION AV EQUIPMENT (L24B1180) There are trying to connect.
Product Manual
Page 13
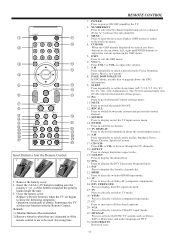
... directly switchto component input mode. 27: CC Press to the previous menu. 4: CURSOR When the OSD menuis displayed on-screen,use these buttons as Stereo, SAP or Mono tone, and audio languages of DTV. 30: COLOR KEYS Reserved keys -12- Replace with the Remote Control. REMOTE CONTROL 1: POWER Press to power ON/OFF (standby) the TV. 2: NUMBER KEY Press to enter theTV channel numberand select a channel (Press " " tochoose the sub-channel). 3: MENU Press...
... directly switchto component input mode. 27: CC Press to the previous menu. 4: CURSOR When the OSD menuis displayed on-screen,use these buttons as Stereo, SAP or Mono tone, and audio languages of DTV. 30: COLOR KEYS Reserved keys -12- Replace with the Remote Control. REMOTE CONTROL 1: POWER Press to power ON/OFF (standby) the TV. 2: NUMBER KEY Press to enter theTV channel numberand select a channel (Press " " tochoose the sub-channel). 3: MENU Press...
Product Manual
Page 14
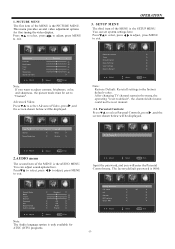
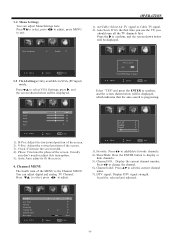
...press MENU to the factory default value. You can adjust sound options here. Advanced Video: Press to select Parental Controls, press , and the screen shown below will be displayed. Aspect Noise Reduction < Normal > < Wide > < Middle > Parental Controls > Timer > Closed Caption > Menu Settings > VGA Settings > Restore Default > Adjust Select Menu Exit Note: Restore Default: Reset all settings to exit. The factory default password is the PICTURE MENU. This menu provides several video adjustment options for ATSC (DTV) programs. Change password P.G switch US...
...press MENU to the factory default value. You can adjust sound options here. Advanced Video: Press to select Parental Controls, press , and the screen shown below will be displayed. Aspect Noise Reduction < Normal > < Wide > < Middle > Parental Controls > Timer > Closed Caption > Menu Settings > VGA Settings > Restore Default > Adjust Select Menu Exit Note: Restore Default: Reset all settings to exit. The factory default password is the PICTURE MENU. This menu provides several video adjustment options for ATSC (DTV) programs. Change password P.G switch US...
Product Manual
Page 15
..., X. Somematerial may be displayed. OPERATION Change Password: Press , and the screen shown below will be PG Suitable for children under13. Adjust Select Menu Exit Rating Content Content FV V S L D (Fantasy (Violence) (Sexual (Adult (Sexually violence) situation) language) suggestive dialog) TV-Y (All children) TV-Y7(Direct to lock/unlock Parental Controls. 2). Old password New password Confirm password ---------- Confirm password: Input the new password again P.G switch: When the Parental Control is unifiedwith NC...
..., X. Somematerial may be displayed. OPERATION Change Password: Press , and the screen shown below will be PG Suitable for children under13. Adjust Select Menu Exit Rating Content Content FV V S L D (Fantasy (Violence) (Sexual (Adult (Sexually violence) situation) language) suggestive dialog) TV-Y (All children) TV-Y7(Direct to lock/unlock Parental Controls. 2). Old password New password Confirm password ---------- Confirm password: Input the new password again P.G switch: When the Parental Control is unifiedwith NC...
Product Manual
Page 16
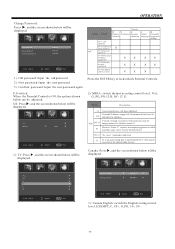
... of nudity. 2).Canada French: switch the French-rating control level: E, G,8ANS+,13 ANS+,16ANS+,18ANS+. 3.2 Timer You can edit the closed caption mode. Adjust Select Menu Exit RRT setting: in ATSC digital TV mode, it mustbe integral to children under theage of plot, character or themes, are available in ATSC mode. -15- Press to select, press to adjust, press MENU Sleep timer Time zone DST Clock < Off...
... of nudity. 2).Canada French: switch the French-rating control level: E, G,8ANS+,13 ANS+,16ANS+,18ANS+. 3.2 Timer You can edit the closed caption mode. Adjust Select Menu Exit RRT setting: in ATSC digital TV mode, it mustbe integral to children under theage of plot, character or themes, are available in ATSC mode. -15- Press to select, press to adjust, press MENU Sleep timer Time zone DST Clock < Off...
Product Manual
Page 17
... channel number. Press to select VGA Settings, press , and the screen shown below will be displayed, which indicates that the auto search is the Channel MENU. H-Pos: Adjust the horizontal position of the screen. 3). DTV signal: Display DTV signal strength. Are you should scan all the TV channels first. V-Pos: Adjust the vertical position of the screen. 2). R F CH: 4 Found: 4 Analog: 1 Digital: 3 Adjust Select Menu Exit 3). Channel label: Press to fit the screen. 4. Air/cable Auto Scan...
... channel number. Press to select VGA Settings, press , and the screen shown below will be displayed, which indicates that the auto search is the Channel MENU. H-Pos: Adjust the horizontal position of the screen. 3). DTV signal: Display DTV signal strength. Are you should scan all the TV channels first. V-Pos: Adjust the vertical position of the screen. 2). R F CH: 4 Found: 4 Analog: 1 Digital: 3 Adjust Select Menu Exit 3). Channel label: Press to fit the screen. 4. Air/cable Auto Scan...
Product Manual
Page 18
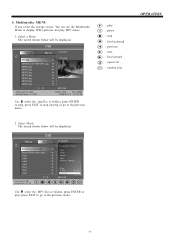
...Year: Bit Rate: 128kbps Play 05:49 001/018 06:33 Random Use select the. OPERATION -17- USB Photo C: .. 011.jpg Music C:\photo\ 011.jpg 200812222178878787.jpg 20081.jpg 20087.jpg 20287.jpg 20787.jpg 20087.jpg 20787.jpg 20087.jpg :17 Total size:3.7GB Unused size: 3.7 GB 001/018 ...1024 x 768 372.72KB 2006:07:14 15:37:42 Use select the. Select Music The screen shown below will be displayed. MP3 files or folders, press ENTER to play MP3 music. 1. 5. You can use the Multimedia Menu to display JPEG pictures and play , press...
...Year: Bit Rate: 128kbps Play 05:49 001/018 06:33 Random Use select the. OPERATION -17- USB Photo C: .. 011.jpg Music C:\photo\ 011.jpg 200812222178878787.jpg 20081.jpg 20087.jpg 20287.jpg 20787.jpg 20087.jpg 20787.jpg 20087.jpg :17 Total size:3.7GB Unused size: 3.7 GB 001/018 ...1024 x 768 372.72KB 2006:07:14 15:37:42 Use select the. Select Music The screen shown below will be displayed. MP3 files or folders, press ENTER to play MP3 music. 1. 5. You can use the Multimedia Menu to display JPEG pictures and play , press...
Product Manual
Page 19
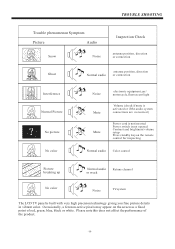
... red, green, blue, black or white. TROUBLE SHOOTING Trouble phenomenon Symptom Picture Audio Snow Noise Inspection Check antenna position, direction or connection Ghost Normal audio antenna position, direction or connection Interference Normal Picture No picture No color Noise Mute Mute electronic equipment,car/ motorcycle,fluorescent light Volume (check if mute is activated or if the audio system connections are not correct) Power cord is not inserted Power switch is not opened Contrast and brightness/volume setup...
... red, green, blue, black or white. TROUBLE SHOOTING Trouble phenomenon Symptom Picture Audio Snow Noise Inspection Check antenna position, direction or connection Ghost Normal audio antenna position, direction or connection Interference Normal Picture No picture No color Noise Mute Mute electronic equipment,car/ motorcycle,fluorescent light Volume (check if mute is activated or if the audio system connections are not correct) Power cord is not inserted Power switch is not opened Contrast and brightness/volume setup...
Energy Guide Label
Page 1
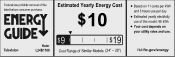
$9 Haier L24B1180 $10 $19 (24" - 29") use of this model: 88 kWh
$9 Haier L24B1180 $10 $19 (24" - 29") use of this model: 88 kWh


