User Manual
Page 11
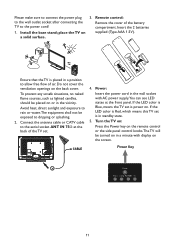
..., no naked flame sources, such as lighted candles, should be placed on the back cover. If the LED color is Red, which means this TV set is power on. Power Key Power Video Comp PC/HDMI TV 11 Do not cover the ventilation openings on or in standby state. 5. Turn the... power supply.You can see LED states at the back of the TV set is in the vicinity. If the LED color is Blue, means the TV set . 4. Min 1 m Ensure that the TV is placed in the wall socket with display on a solid surface. 3. Please make sure to connect the power plug to...
..., no naked flame sources, such as lighted candles, should be placed on the back cover. If the LED color is Red, which means this TV set is power on. Power Key Power Video Comp PC/HDMI TV 11 Do not cover the ventilation openings on or in standby state. 5. Turn the... power supply.You can see LED states at the back of the TV set is in the vicinity. If the LED color is Blue, means the TV set . 4. Min 1 m Ensure that the TV is placed in the wall socket with display on a solid surface. 3. Please make sure to connect the power plug to...
User Manual
Page 14
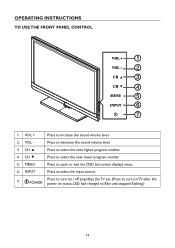
Press to select the next higher program number. 4. CH ▲ Press to decrease the sound volume level. 3. INPUT Press to select the next lower program number. 5. i POWER Press to turn on / off (standby) the TV set. (Press to turn on TV after the power on -screen display) menu. 6. VOL - MENU Press to open or exit the OSD (on status, LED had changed to increase the sound volume level. 2. CH ▼ Press to select the input source. 7. OPERATING INSTRUCTIONS TO USE THE FRONT PANEL CONTROL 1 2 3 4 5 6 7 1 VOL + Press to Blue and stopped flashing.) 14
Press to select the next higher program number. 4. CH ▲ Press to decrease the sound volume level. 3. INPUT Press to select the next lower program number. 5. i POWER Press to turn on / off (standby) the TV set. (Press to turn on TV after the power on -screen display) menu. 6. VOL - MENU Press to open or exit the OSD (on status, LED had changed to increase the sound volume level. 2. CH ▼ Press to select the input source. 7. OPERATING INSTRUCTIONS TO USE THE FRONT PANEL CONTROL 1 2 3 4 5 6 7 1 VOL + Press to Blue and stopped flashing.) 14

User Manual
Page 15
PREV CH Press to choose the various input sources. Source Press repeatedly to display the previous channel. V-Chip Press to lock Parental Control temporarily. (After setting the restricted table of DTV. C. TV Press to choose VGA or HDMI source mode. CH+ / CH Press + or - PC/...HDMI Press repeatedly to choose ATSC/NTSC TV source mode. 0 ~ 9 / - Wide Press to choose the display aspect as CC On/CC Off...
PREV CH Press to choose the various input sources. Source Press repeatedly to display the previous channel. V-Chip Press to lock Parental Control temporarily. (After setting the restricted table of DTV. C. TV Press to choose VGA or HDMI source mode. CH+ / CH Press + or - PC/...HDMI Press repeatedly to choose ATSC/NTSC TV source mode. 0 ~ 9 / - Wide Press to choose the display aspect as CC On/CC Off...
User Manual
Page 16
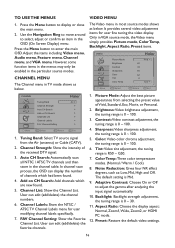
... 0 ~ 100. 5. Only in the particular source modes. Noise Reduction: Gives four NR effect degrees, such as below . Aspect Ratio: Choose the display aspect: Normal, Zoom1,Wide, Zoom2, or HDMI PC mode. 12. However, some function items in the menus may only be enabled in VGA source mode...all NTSC / ATSC TV channels and then store in most source modes shows as below . User can edit (add/delete) the favorite channels. 1. The default setting is 0 ~ 100. 6. Adaptive Contrast: Choose On or Off to enter the main OSD. Tint: Video tint adjustment, the tuning range is 0 ~ 100...
... 0 ~ 100. 5. Only in the particular source modes. Noise Reduction: Gives four NR effect degrees, such as below . Aspect Ratio: Choose the display aspect: Normal, Zoom1,Wide, Zoom2, or HDMI PC mode. 12. However, some function items in the menus may only be enabled in VGA source mode...all NTSC / ATSC TV channels and then store in most source modes shows as below . User can edit (add/delete) the favorite channels. 1. The default setting is 0 ~ 100. 6. Adaptive Contrast: Choose On or Off to enter the main OSD. Tint: Video tint adjustment, the tuning range is 0 ~ 100...
User Manual
Page 17
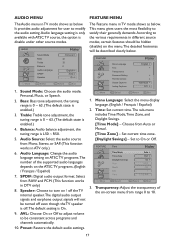
... Feature menu in TV mode shows as below. Menu Language: Select the menu display language. (English / Français / Español) 2. It provides audio adjustment for user to On or Off. Preset: Restore the default audio settings. AUDIO Move Sound Mode Bass Treble Balance Audio Language SPDIF Speaker Personal 32 32...
... Feature menu in TV mode shows as below. Menu Language: Select the menu display language. (English / Français / Español) 2. It provides audio adjustment for user to On or Off. Preset: Restore the default audio settings. AUDIO Move Sound Mode Bass Treble Balance Audio Language SPDIF Speaker Personal 32 32...

User Manual
Page 19
...the USB hub. JPEG Viewer 2. MP3 MusicBox Exit • Select MultiMedia Menu in a USB storage device. It will display. [Size] - Restore the default component setting values. 12. JPEG sizes are limited as Automatic, Small, Normal, or Large. [Font] - Music On Slide Show ...Yellow / Magenta / Cyan / Black. [Text Opacity] - Multimedia List 1. Press Menu to enlarge the selected photo (orange frame) in browser. • Image Delay: Set display time for each picture in component mode, which can edit the input labels. 11. Automatic / Black / White/ Red / Green / Blue / Yellow / Magenta /...
...the USB hub. JPEG Viewer 2. MP3 MusicBox Exit • Select MultiMedia Menu in a USB storage device. It will display. [Size] - Restore the default component setting values. 12. JPEG sizes are limited as Automatic, Small, Normal, or Large. [Font] - Music On Slide Show ...Yellow / Magenta / Cyan / Black. [Text Opacity] - Multimedia List 1. Press Menu to enlarge the selected photo (orange frame) in browser. • Image Delay: Set display time for each picture in component mode, which can edit the input labels. 11. Automatic / Black / White/ Red / Green / Blue / Yellow / Magenta /...

User Manual
Page 20
Mute Screen: This provides an option for the VGA display fine tuning. 1. Preset: Resetting MP3 relative audio parameters to reduce Horizontal-Line noise. (0-31) 5. VGA MENU This option only shows and is valid in VGA ... after 10 seconds, it will be turned-off automatically after 10 seconds no any key to turn -off backlight feature while playing MP3 media.The setting status is available in MP3 media player interface only. V-Position: Adjust the vertical position of the picture. (0-40) 2. Clock: Adjust picture clock to original source...
Mute Screen: This provides an option for the VGA display fine tuning. 1. Preset: Resetting MP3 relative audio parameters to reduce Horizontal-Line noise. (0-31) 5. VGA MENU This option only shows and is valid in VGA ... after 10 seconds, it will be turned-off automatically after 10 seconds no any key to turn -off backlight feature while playing MP3 media.The setting status is available in MP3 media player interface only. V-Position: Adjust the vertical position of the picture. (0-40) 2. Clock: Adjust picture clock to original source...

User Manual
Page 25
...second language translation for in order to provide maximum consumer viewing satisfaction. 25 S-Video Input You can set to a high-resolution video source (such as being capable of displaying a minimum of America Multichannel Television Sound (MTS) The broadcasting standard, which the TV will be ... with the TV picture. Second Audio Program (SAP) Another or additional audio channel provided for the displayed program). Sleep Timer You can connect your TV set a time period for which allows stereo sounds to receive higher picture resolution and offer sound connection options...
...second language translation for in order to provide maximum consumer viewing satisfaction. 25 S-Video Input You can set to a high-resolution video source (such as being capable of displaying a minimum of America Multichannel Television Sound (MTS) The broadcasting standard, which the TV will be ... with the TV picture. Second Audio Program (SAP) Another or additional audio channel provided for the displayed program). Sleep Timer You can connect your TV set a time period for which allows stereo sounds to receive higher picture resolution and offer sound connection options...


