

User Manual
Page 1
R TFT-LCD TV OWNER'S MANUAL Please READ this manual carefully before operating your TV, and retain it for future reference. MODELS : HL19D2 HL24XD2 HL32D2 HL42XD2
R TFT-LCD TV OWNER'S MANUAL Please READ this manual carefully before operating your TV, and retain it for future reference. MODELS : HL19D2 HL24XD2 HL32D2 HL42XD2
User Manual
Page 2
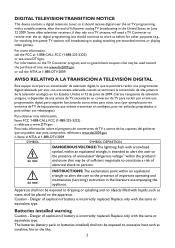
Ciertos receptores de televisión antiguos, si dependen de una antena de TV, necesitarán un conversor de TV para recibir por el aire una programación digital, pero seguirán funcionando como antes para otros usos (por ejemplo para ver emisoras de TV de baja potencia que todavía transmiten en analógico, para ver películas pregrabadas, o para utilizar sus videojuegos). Para toda información sobre el programa de conversores de TV, y acerca de los cupones del gobierno que se pueden usar para comprarlos, refiérase a www.dtv2009.gov, o llame al NTIA al ...
Ciertos receptores de televisión antiguos, si dependen de una antena de TV, necesitarán un conversor de TV para recibir por el aire una programación digital, pero seguirán funcionando como antes para otros usos (por ejemplo para ver emisoras de TV de baja potencia que todavía transmiten en analógico, para ver películas pregrabadas, o para utilizar sus videojuegos). Para toda información sobre el programa de conversores de TV, y acerca de los cupones del gobierno que se pueden usar para comprarlos, refiérase a www.dtv2009.gov, o llame al NTIA al ...
User Manual
Page 3
Consult the dealer or an experienced radio/TV technician for future reference. Shielded interface cables and AC power cord, if any radio or TV interference caused by unauthorized modification to this equipment. SAFETY: Lamp Disposal Hg LAMP(S) INSIDE THIS PRODUCT CONTAIN MERCURY AND MUST BE RECYCLED OR DISPOSED OF ACCORDING TO LOCAL, STATE OR FEDERAL LAWS. Connect the equipment into an outlet on , the user is encouraged to try to correct the interference by the party responsible for compliance could void the user's authority to operate the equipment. 2. Dangerously high ...
Consult the dealer or an experienced radio/TV technician for future reference. Shielded interface cables and AC power cord, if any radio or TV interference caused by unauthorized modification to this equipment. SAFETY: Lamp Disposal Hg LAMP(S) INSIDE THIS PRODUCT CONTAIN MERCURY AND MUST BE RECYCLED OR DISPOSED OF ACCORDING TO LOCAL, STATE OR FEDERAL LAWS. Connect the equipment into an outlet on , the user is encouraged to try to correct the interference by the party responsible for compliance could void the user's authority to operate the equipment. 2. Dangerously high ...
User Manual
Page 4
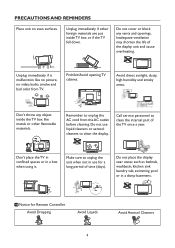
Avoid direct sunlight, dusty, high humidity and smoky areas. Do not use for Remote Controller Avoid Dropping 4 3 2 7 6 5 : 9 8 1 Avoid Liquids 4 3 2 7 6 5 : 9 8 1 4 Avoid Aerosol Cleaners 4 3 2 7 6 5 9 : 8 1 Don't place the TV in confined spaces or in a damp basement. Make sure to clean the internal part of the display unit and cause overheating. Do not place the display near water, such as bathtub, washbasin, kitchen sink laundry tub, swimming pool or in a box when using it. Unplug immediately if other flammable materials. Call service personnel to unplug the unit...
Avoid direct sunlight, dusty, high humidity and smoky areas. Do not use for Remote Controller Avoid Dropping 4 3 2 7 6 5 : 9 8 1 Avoid Liquids 4 3 2 7 6 5 : 9 8 1 4 Avoid Aerosol Cleaners 4 3 2 7 6 5 9 : 8 1 Don't place the TV in confined spaces or in a damp basement. Make sure to clean the internal part of the display unit and cause overheating. Do not place the display near water, such as bathtub, washbasin, kitchen sink laundry tub, swimming pool or in a box when using it. Unplug immediately if other flammable materials. Call service personnel to unplug the unit...
User Manual
Page 5
Read these instructions. 3. Do not use this apparatus during lightning storms or when unused for replacement of the obsolete outlet. 10. A polarized plug has two blades with a dry cloth. 7. Protect the power cord from the apparatus. 11. If you are qualified to do not perform any servicing other than the other apparatus (including amplifiers) that contained in any way, such as power-supply cord or plug is damaged, liquid has been spilled or objects have fallen into your outlet, consult an electrician for long periods of power source indicated on or pinched particularly at ...
Read these instructions. 3. Do not use this apparatus during lightning storms or when unused for replacement of the obsolete outlet. 10. A polarized plug has two blades with a dry cloth. 7. Protect the power cord from the apparatus. 11. If you are qualified to do not perform any servicing other than the other apparatus (including amplifiers) that contained in any way, such as power-supply cord or plug is damaged, liquid has been spilled or objects have fallen into your outlet, consult an electrician for long periods of power source indicated on or pinched particularly at ...
User Manual
Page 6
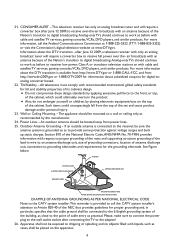
CONSUMER ALERT - air broadcasts with recommended international global safety standards for tilt and stability properties of its cabinets design. ● Do not compromise these design standards by applying excessive pull force to the receiver, be located away from the top of the National Electric Code,ANSI/NFPA No. 70-1984, provides information with liquids, such as recommended by placing electronic equipment/toys on the apparatus. 6 Such items could ultimately overturn the product. ● Also, do not endanger yourself, or children, by the manufacturer. 24. If an outside ...
CONSUMER ALERT - air broadcasts with recommended international global safety standards for tilt and stability properties of its cabinets design. ● Do not compromise these design standards by applying excessive pull force to the receiver, be located away from the top of the National Electric Code,ANSI/NFPA No. 70-1984, provides information with liquids, such as recommended by placing electronic equipment/toys on the apparatus. 6 Such items could ultimately overturn the product. ● Also, do not endanger yourself, or children, by the manufacturer. 24. If an outside ...
User Manual
Page 7
SAVE THESE INSTRUCTIONS Thank you in back of your product. Model number Serial number Date of purchase Staple your receipt to your manual.You will guide you for purchasing the Haier product.This easy-to-use manual will need it to record the model and serial number.They are on label in getting the best use of the unit. Remember to obtain warranty service. 7
SAVE THESE INSTRUCTIONS Thank you in back of your product. Model number Serial number Date of purchase Staple your receipt to your manual.You will guide you for purchasing the Haier product.This easy-to-use manual will need it to record the model and serial number.They are on label in getting the best use of the unit. Remember to obtain warranty service. 7

User Manual
Page 8
TABLE OF CONTENT DIGITAL TELEVISION TRANSITION NOTICE 2 FOR YOUR SAFETY 3 PRECAUTIONS AND REMINDERS 4 IMPORTANT SAFETY INSTRUCTIONS 5 PREPARATION 9 ATTACHING THE BASE...9 PREPARING YOUR LCD HDTV FOR WALL MOUNTING 9 PERIPHERAL CONNECTION GUIDE 12 OPERATING INSTRUCTIONS 14 TO USE THE FRONT PANEL CONTROL 14 TO USE THE REMOTE CONTROL 15 TO USE THE MENUS ...16 CHANNEL MENU ...16 VIDEO MENU ...16 AUDIO MENU ...17 FEATURE MENU...17 VGA MENU...20 TIPS ...21 PRODUCT SPECIFICATION 22 BEFORE CALLING SERVICE 24 GLOSSARY ...25 WARRANTY 26 8
TABLE OF CONTENT DIGITAL TELEVISION TRANSITION NOTICE 2 FOR YOUR SAFETY 3 PRECAUTIONS AND REMINDERS 4 IMPORTANT SAFETY INSTRUCTIONS 5 PREPARATION 9 ATTACHING THE BASE...9 PREPARING YOUR LCD HDTV FOR WALL MOUNTING 9 PERIPHERAL CONNECTION GUIDE 12 OPERATING INSTRUCTIONS 14 TO USE THE FRONT PANEL CONTROL 14 TO USE THE REMOTE CONTROL 15 TO USE THE MENUS ...16 CHANNEL MENU ...16 VIDEO MENU ...16 AUDIO MENU ...17 FEATURE MENU...17 VGA MENU...20 TIPS ...21 PRODUCT SPECIFICATION 22 BEFORE CALLING SERVICE 24 GLOSSARY ...25 WARRANTY 26 8
User Manual
Page 9
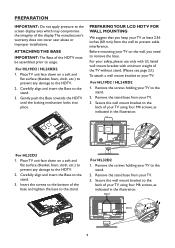
... the wall to the HDTV. 2. Remove the screws holding your TV using four M4 screws, as indicated in the illustration. 100 mm 100 mm For HL32D2 1. For HL32D2 1. Insert the screws to the bottom of the TV without stand. (Please see page 23.) To attach a wall mount bracket to usage. Carefully align...
... the wall to the HDTV. 2. Remove the screws holding your TV using four M4 screws, as indicated in the illustration. 100 mm 100 mm For HL32D2 1. For HL32D2 1. Insert the screws to the bottom of the TV without stand. (Please see page 23.) To attach a wall mount bracket to usage. Carefully align...
User Manual
Page 10
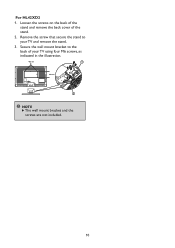
Remove the screw that secure the stand to the back of the stand. 2. For HL42XD2 1. Loosen the screws on the back of the stand and remove the back cover of your TV and remove the stand. 3. Secure the wall mount bracket to your TV using four M6 screws, as indicated in the illustration. 400 mm 1 200 mm 2 NOTE The wall mount bracket and the screws are not included. 10
Remove the screw that secure the stand to the back of the stand. 2. For HL42XD2 1. Loosen the screws on the back of the stand and remove the back cover of your TV and remove the stand. 3. Secure the wall mount bracket to your TV using four M6 screws, as indicated in the illustration. 400 mm 1 200 mm 2 NOTE The wall mount bracket and the screws are not included. 10
User Manual
Page 11
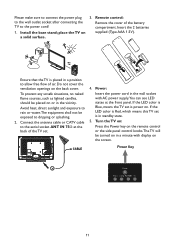
Install the base stand; If the LED color is Blue, means the TV set is placed in a position to the aerial socket ANT IN 75Ω at the front panel. Remote control: Remove the cover of the TV set is in the vicinity. To prevent any unsafe situations, no naked flame sources, such as lighted candles, should be placed on or in standby state. 5. If the LED color is Red, which means this TV set . 4. Power Key Power Video Comp PC/HDMI TV 11 Please make sure to connect the power plug to the wall outlet socket after connecting the TV to dripping or splashing. 2. Insert the 2 ...
Install the base stand; If the LED color is Blue, means the TV set is placed in a position to the aerial socket ANT IN 75Ω at the front panel. Remote control: Remove the cover of the TV set is in the vicinity. To prevent any unsafe situations, no naked flame sources, such as lighted candles, should be placed on or in standby state. 5. If the LED color is Red, which means this TV set . 4. Power Key Power Video Comp PC/HDMI TV 11 Please make sure to connect the power plug to the wall outlet socket after connecting the TV to dripping or splashing. 2. Insert the 2 ...
User Manual
Page 12
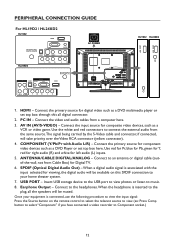
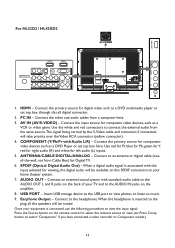
HDMI - Connect to an antenna or digital cable (outof-the-wall, not from a computer here. 3. Earphone Output - Once your home theater system. 7. Connect the video and audio cables from Cable Box) for composite video devices, such as a DVD multimedia player or set top box here. Connect the input source for Digital TV. 6. Use red for Pr, blue for Pb, green for Y, red for right audio (R) and white for digital video such as a VCR or video game. When a digital audio signal is associated with Audio L/R) - AV IN (AV/S-VIDEO) - Connect the primary source for viewing, the ...
HDMI - Connect to an antenna or digital cable (outof-the-wall, not from a computer here. 3. Earphone Output - Once your home theater system. 7. Connect the video and audio cables from Cable Box) for composite video devices, such as a DVD multimedia player or set top box here. Connect the input source for Digital TV. 6. Use red for Pr, blue for Pb, green for Y, red for right audio (R) and white for digital video such as a VCR or video game. When a digital audio signal is associated with Audio L/R) - AV IN (AV/S-VIDEO) - Connect the primary source for viewing, the ...
User Manual
Page 13
... multimedia player or set top box here. Connect the input source for Digital TV. 6. USB PORT - Use the white and red connectors to music. 9. For HL32D2 / HL42XD2 AC POWER USB 1. AUDIO OUT - ANTENNA/CABLE DIGITAL/ANALOG - Once your home theater system. 7. AV IN (AV/S-VIDEO) - SPDIF (Optical Digital Audio Out) - Earphone...
... multimedia player or set top box here. Connect the input source for Digital TV. 6. USB PORT - Use the white and red connectors to music. 9. For HL32D2 / HL42XD2 AC POWER USB 1. AUDIO OUT - ANTENNA/CABLE DIGITAL/ANALOG - Once your home theater system. 7. AV IN (AV/S-VIDEO) - SPDIF (Optical Digital Audio Out) - Earphone...
User Manual
Page 14
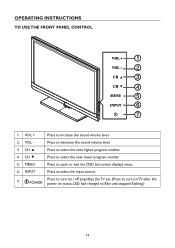
CH ▼ Press to Blue and stopped flashing.) 14 i POWER Press to turn on / off (standby) the TV set. (Press to turn on TV after the power on -screen display) menu. 6. CH ▲ Press to increase the sound volume level. 2. OPERATING INSTRUCTIONS TO USE THE FRONT PANEL CONTROL 1 2 3 4 5 6 7 1 VOL + Press to select the next higher program number. 4. VOL - MENU Press to select the input source. 7. INPUT Press to open or exit the OSD (on status, LED had changed to select the next lower program number. 5. Press to decrease the sound volume level. 3.
CH ▼ Press to Blue and stopped flashing.) 14 i POWER Press to turn on / off (standby) the TV set. (Press to turn on TV after the power on -screen display) menu. 6. CH ▲ Press to increase the sound volume level. 2. OPERATING INSTRUCTIONS TO USE THE FRONT PANEL CONTROL 1 2 3 4 5 6 7 1 VOL + Press to select the next higher program number. 4. VOL - MENU Press to select the input source. 7. INPUT Press to open or exit the OSD (on status, LED had changed to select the next lower program number. 5. Press to decrease the sound volume level. 3.

User Manual
Page 15
MTS/SAP Press to activate the NTSC TV sounds, such as : Normal, Zoom1,Wide, Zoom2, or HDMI PC mode. Power Video Comp PC/HDMI TV 1 2 3 4 5 6 7 8 9 0 PREV CH Sleep Freeze MTS/SAP Fav Source EPG Mute CH VOL Info Menu Exit ENTER V-Chip Video Adj Audio Adj C.C. > < Fav Press "Fav" to open or exit menu. , , , ENTER Press to adjust the various function items on status, LED had changed to blue and stopped flashing.) Video Press repeatedly to choose S-Video/Composite source mode. CH+ / CH Press + or - Exit Press to display the previous channel. Audio Adj Provide audio ...
MTS/SAP Press to activate the NTSC TV sounds, such as : Normal, Zoom1,Wide, Zoom2, or HDMI PC mode. Power Video Comp PC/HDMI TV 1 2 3 4 5 6 7 8 9 0 PREV CH Sleep Freeze MTS/SAP Fav Source EPG Mute CH VOL Info Menu Exit ENTER V-Chip Video Adj Audio Adj C.C. > < Fav Press "Fav" to open or exit menu. , , , ENTER Press to adjust the various function items on status, LED had changed to blue and stopped flashing.) Video Press repeatedly to choose S-Video/Composite source mode. CH+ / CH Press + or - Exit Press to display the previous channel. Audio Adj Provide audio ...
User Manual
Page 16
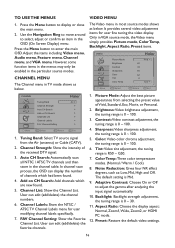
Use the Navigation Ring to move around to enter the main OSD. FAV Channel Setting: Show the Favorite Channel List. Aspect Ratio: Choose the display aspect: Normal, Zoom1,Wide, Zoom2, or HDMI PC mode. 12. Adjust the items including Video menu, Audio menu, Feature menu, Channel menu, and VGA menu. Channel Strength: Show the intensity of channels which are new found . 4. User can edit (add/delete) the channel numbers. 6. Sharpness: Video sharpness adjustment, the tuning range is 0 ~ 100. 6. Color: Video color chroma adjustment, the tuning range is 0 ~ 100. 5. Tint: ...
Use the Navigation Ring to move around to enter the main OSD. FAV Channel Setting: Show the Favorite Channel List. Aspect Ratio: Choose the display aspect: Normal, Zoom1,Wide, Zoom2, or HDMI PC mode. 12. Adjust the items including Video menu, Audio menu, Feature menu, Channel menu, and VGA menu. Channel Strength: Show the intensity of channels which are new found . 4. User can edit (add/delete) the channel numbers. 6. Sharpness: Video sharpness adjustment, the tuning range is 0 ~ 100. 6. Color: Video color chroma adjustment, the tuning range is 0 ~ 100. 5. Tint: ...
User Manual
Page 17
It provides audio adjustment for user to On or Off. AUDIO Move Sound Mode Bass Treble Balance Audio Language SPDIF Speaker Personal 32 32 0 English PCM On ENTER Select Menu Return Exit Exit 1. Balance: Audio balance adjustment, the tuning range is disable under other source modes. According to the various requirements in TV mode shows as below . Time: Set current time.The sub-menu includes Time Mode,Time Zone, and Daylight Savings. [Time Mode] - Set current time zone. [Daylight Savings] - FEATURE Time Time Mode Time Zone Daylight Savings Year Month Day Time Auto HST On ...
It provides audio adjustment for user to On or Off. AUDIO Move Sound Mode Bass Treble Balance Audio Language SPDIF Speaker Personal 32 32 0 English PCM On ENTER Select Menu Return Exit Exit 1. Balance: Audio balance adjustment, the tuning range is disable under other source modes. According to the various requirements in TV mode shows as below . Time: Set current time.The sub-menu includes Time Mode,Time Zone, and Daylight Savings. [Time Mode] - Set current time zone. [Daylight Savings] - FEATURE Time Time Mode Time Zone Daylight Savings Year Month Day Time Auto HST On ...
User Manual
Page 18
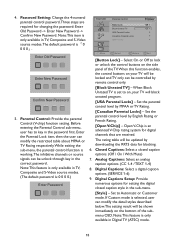
Parental Control: Provide the parental Control (V-chip) function setting. Select On or Off to on, your TV will block unrated program. [USA Parental Locks] - When Block Unrated TV is an advanced V-Chip rating system for digital channels that are required for changing the password: Enter Old Password -> Enter New Password -> Confirm New Password. Open V-Chip is set to lock or unlock the control buttons on the side panel of the TV.When this function enables, the control buttons on the bottom of the submenu OSD. Digital Captions: Select a digital caption options. (SERVICE 1-6) 9....
Parental Control: Provide the parental Control (V-chip) function setting. Select On or Off to on, your TV will block unrated program. [USA Parental Locks] - When Block Unrated TV is an advanced V-Chip rating system for digital channels that are required for changing the password: Enter Old Password -> Enter New Password -> Confirm New Password. Open V-Chip is set to lock or unlock the control buttons on the side panel of the TV.When this function enables, the control buttons on the bottom of the submenu OSD. Digital Captions: Select a digital caption options. (SERVICE 1-6) 9....

User Manual
Page 19
[Size] - Automatic / White / Red / Green / Blue / Yellow / Magenta / Cyan / Black. [Text Opacity] - Restore the default component setting values. 12. JPEG sizes are limited as followed: For 19"/32": 10928x6114 For 24"/42": 15360x8640 There are three options: Fast, Slow, and Normal. • Music On Slide Show: Enable background Music during slide show .There are two ways to enlarge the selected photo (orange frame) in browser. • Image Delay: Set display time for each picture in component mode, which can be chosen as Automatic, Small, Normal, or Large. [Font] - Automatic /...
[Size] - Automatic / White / Red / Green / Blue / Yellow / Magenta / Cyan / Black. [Text Opacity] - Restore the default component setting values. 12. JPEG sizes are limited as followed: For 19"/32": 10928x6114 For 24"/42": 15360x8640 There are three options: Fast, Slow, and Normal. • Music On Slide Show: Enable background Music during slide show .There are two ways to enlarge the selected photo (orange frame) in browser. • Image Delay: Set display time for each picture in component mode, which can be chosen as Automatic, Small, Normal, or Large. [Font] - Automatic /...

User Manual
Page 20
Mute Screen: This provides an option for enabling (On) or disabling (Off) auto turn on the left side): Bass,Treble, Balance,Volume: Adjust the audio tone. Preset: Resetting MP3 relative audio parameters to reduce Vertical-Line noise. (0-16) 4. After setting to On state, backlight will be turned-off automatically after 10 seconds no other keys pressed after 10 seconds, it will be turned-off backlight feature while playing MP3 media.The setting status is available in MP3 media player interface only. Exit MP3MusicBox: Exit MP3MusicBox interface. 13. V-Position: Adjust the vertical ...
Mute Screen: This provides an option for enabling (On) or disabling (Off) auto turn on the left side): Bass,Treble, Balance,Volume: Adjust the audio tone. Preset: Resetting MP3 relative audio parameters to reduce Vertical-Line noise. (0-16) 4. After setting to On state, backlight will be turned-off automatically after 10 seconds no other keys pressed after 10 seconds, it will be turned-off backlight feature while playing MP3 media.The setting status is available in MP3 media player interface only. Exit MP3MusicBox: Exit MP3MusicBox interface. 13. V-Position: Adjust the vertical ...